
Hello everyone, I’m the adorable Rib 😉
Introduction
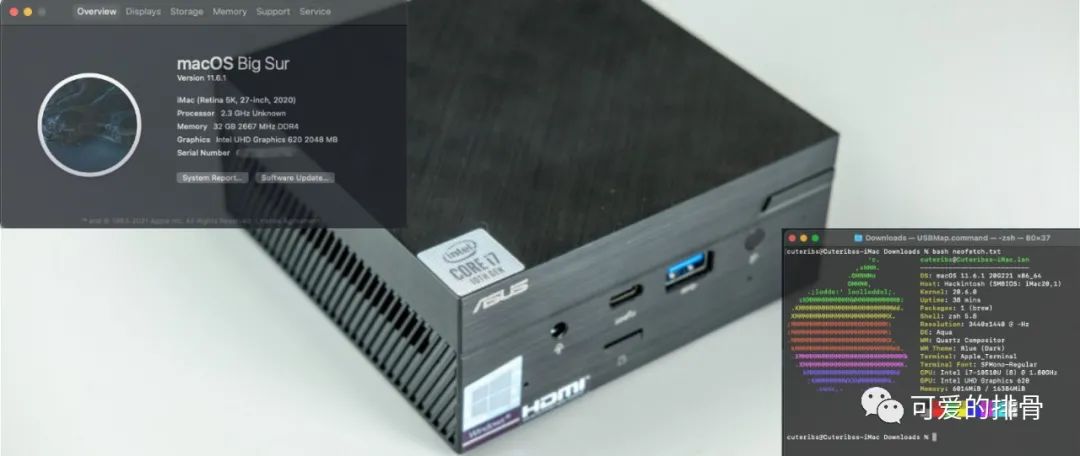
More than a year has passed since my last Hackintosh setup with the i7-10700K + Shengqi Z490, and now I face a new challenge: setting up the ASUS PN62 mini PC. As Hackintosh cannot support the integrated graphics of the 11th generation Core processors, and all new Apple computers have switched to Apple’s own ARM platform M1 processors, the PN62, represented by the 10th generation Core, may become the last recommended integrated graphics Hackintosh host.
What is Hackintosh setup? Generally, Hackintosh installation posts show a bunch of computer parts and installation screenshots, with the most important EFI configuration downloaded from others without mentioning the original author, purely a record of the process. In contrast, a Hackintosh setup post is on a completely different level; it refers to creating an EFI configuration from scratch without using someone else’s pre-made EFI and successfully installing and perfecting the Hackintosh system. Simply put, it’s the difference between copying and original work. 😆

Hardware Introduction
The PN series is the smallest model among ASUS hosts, with a size of only 115x115x49 mm (about 0.6 liters), comparable to Intel’s smallest NUC. This time, I will tackle the ASUS commercial mini PC series PN62, with the following specific configuration:
-
CPU: Intel Core i7-10510U ✅
-
Motherboard: PN62 Intel400 series ✅
-
Memory: Hynix DDR4 2666MHz 16GB (upgraded to Asgard DDR4 3200MHz 16GB x 2) ✅
-
Storage: Intel 660p 512GB (upgraded to Lexar NM620 2TB) ✅
-
Graphics: Intel UHD Graphics 620 ✅
-
Audio: Realtek ALC255 ✅
-
Wired Network Card: Intel I219-V 1GbE ✅
-
Wireless Card: Intel AX201NGW ✅
Generally, there is no need to elaborate on the interfaces of computer hosts, but for Hackintosh, the various interfaces of the host are also key points to tackle:

-
Front Headphone Jack: 3.5mm Audio Input/Output (may be canceled in later batches) ✅
-
Front Microphone Jack: Dual-pin Microphone Input ✅
-
Front USB-C Port: USB3 gen2 10Gbps + QC Fast Charge ✅
-
Front TF Card Slot: USB2 Standard Card Reader ✅
-
Front USB-A Port: USB3 ✅
-
Front Infrared Receiver: N/A

-
Rear HDMI Port: HDMI2.0 Output ✅
-
Rear Optional Port: DP1.2 Output ✅
-
Rear USB-C Port: USB3 + DP1.2 Output + PD Input ✅
-
Rear USB-A Ports: USB3 x 2 ✅
-
Rear Ethernet Port: RJ45 ✅
-
Rear DC Power Port: 19V DC5.5 ✅


To open the PN62, remove the long screws at the four corners of the bottom plate and gently pull to the left. The design is quite user-friendly. There are 4 hooks under the bottom plate to secure a 2.5-inch SATA hard drive, each with corresponding screw holes. When installing, pay attention to the orientation of the hard drive corresponding to the SATA socket of the host.

After removing the bottom plate, you can clearly see the installation positions of the memory and M.2 hard drive. The memory slot above is vacant, and the M.2 hard drive is hidden under the wireless card of the 2230 specification. The silver frame inside the case is fixed by 4 screws, and when replacing the wireless card, you may need to remove the frame. Be careful to avoid the SATA cable and card reader data cable when disassembling the frame.
Clearly, a single 16GB memory and 512GB hard drive are not enough for an i7 Hackintosh, especially since there will be a need to install Windows 11 later. Pairing a dual-channel 16GB memory with a 2TB NVMe hard drive would be more appropriate.

Asgard 16GB currently has a good price-performance ratio on JD, ranking in the top 10. Although the PN62 does not support the high frequency of 3200MHz, it is only 10 yuan more expensive than the 2666MHz version, so there is no reason not to choose 3200.


The Lexar NM620 SSD has a good price-performance ratio, with read and write speeds at the level of 3000MB/s, and its price is more affordable than other products in the same range. As an established flash memory brand, I also trust the quality of Lexar.

To perfectly adapt to Hackintosh, I also used a few additional components:
-
A USB-A/USB-C dual-head card reader: used to test the status of USB-A/C interfaces. A dual-head USB drive can also be used instead.
-
A 32GB USB drive: used as a multi-system installation disk for Hackintosh/Windows. 16GB is no longer sufficient, as the Big Sur image is already over 12GB.
-
A wired headset: used to test whether the front audio interface matches the AppleALC layout-id.
-
A set of 2.4G RF wireless keyboard and mouse: I dug out this Logitech K400 Plus, which has a terrible feel.

-
Of course, a monitor is also needed. My desk is too small, only enough for one monitor. Fortunately, this 34-inch ultrawide screen supports PBP (Picture-by-Picture) dual display functionality.
Hackintosh Configuration
The Hackintosh setup process is essentially the same as my previous post Hackintosh Setup: Detailed OpenCore Pure macOS Installation Process, and I won’t repeat the detailed steps and configuration explanations here to avoid unnecessary word count.
Previously, Hackintosh configurations were very unfriendly under Windows, as many useful tools could only run under macOS, such as OpenCore Configurator for configuring OpenCore, MaciASL for modifying and compiling ACPI/SSDT/AML, and PlistEdit Pro for editing plist files. Since the end of last year, a big shot named ic005k has successively released three cross-platform tools (OCAT/QtiASL/PlistEDPlus) on GitHub that not only come with a Windows GUI but also have very powerful features, even solving the issue of slow access to GitHub in China that requires acceleration mirrors! I give 31 thumbs up to the author! 😂
1. Modify ACPI/SSDT Power Patches
To ensure that Hackintosh can boot correctly and run stably, we first need to fix the differences between the BIOS of the computer manufacturer and that of Apple computers. Customizing and adding power patches is the main method for OpenCore to achieve this goal.
I modified and added SSDT-AWAC, SSDT-PLUG, SSDT-EC-USBX, SSDT-SBUS-MCHC, SSDT-RHUB five patches according to Dortania’s OC tutorial, which allowed for macOS installation; however, it would inevitably crash halfway through the installation. I spent several nights stuck here! 😣 I searched online, changed images, versions, hard drives, USB drives, and modified BIOS… Later, I found that in someone else’s 10th generation ultra-low voltage U platform EFI configuration, there was an SSDT-PMCR. This patch is typically mentioned as necessary only for 300 series motherboards. After trying to add it, I was indeed able to successfully complete the macOS installation! 😫 After several nights of struggling, I finally managed to climb out~
Later, I found a few virtual device patches from Hackintosh Xiaobing on GitHub, which, although unnecessary, did indeed speed up the Hackintosh boot process, probably saving time spent on error handling caused by not finding certain devices during the boot process. The final patch configuration is shown in the image below.

2. Bootloader Patch Selection
For the Bootloader quirks, just check all according to Dortania’s recommendations.

3. Hardware Configuration
The only devices that must be added under DeviceProperties (DP) are the two: graphics card and sound card.
The sound card chip on the ASUS PN62 is ALC255, and the corresponding layout-id of 30 works perfectly, driving the built-in microphone and wired headset of the host. This layout-id=30 was not guessed by me; it was the result of continuously modifying the configuration and rebooting over 10 times while using a Samsung phone’s headset… 🤐

The onboard integrated graphics of the 10th generation Core processor on the PN62 is the UHD 620, which needs to be disguised as other integrated graphics supported by macOS. The UHD 630 (00009B3E) suggested by Dortania is not correct; after several tests, I finally adopted the Iris Plus 655 (0400A53E), which allows for 2GB of video memory allocation. The HDMI2.0 and HDMI wake-up screen issue has also been fixed. I haven’t had time to resolve the issue of simultaneous output to three screens yet.


4. Kernel/Driver Settings
Configuring kext drivers is not very complicated.
-
Lilu/VirtualSMC/WhateverGreen are the three basic must-have options.
-
AppleALC driver for ALC255 sound card.
-
IntelMausi driver for I219-V network card.
-
Airportitlwm driver for AX201 network card.
-
IntelBluetoothFirmware/IntelBluetoothInjector drivers for the AX201 network card’s Bluetooth.
-
NVMeFix improves compatibility between Lexar NM620 SSD and Hackintosh, mainly regarding power consumption.
-
USBInjectAll/USBPorts is a custom USB driver; due to macOS limitations of a maximum of 15 USB ports, it does not adapt automatically, requiring manual customization.
-
XHCI-unsupported is uncertain whether it will be needed.

I also accepted most of Dortania’s recommendations for the selection of quirks, among which AppleXcpmCfgLock can solve the CFG-Lock issue, which is not provided with a disable option in the PN62’s BIOS. By checking DisableIoMapper, there is no need to disable VT-D in the BIOS, which may be used for hardware passthrough in Windows virtual machines.

5. NVRAM
It should be noted that under the configuration item 7C436110-AB2A-4BBB-A880-FE41995C9F82, when adding the boot-args parameter igfxonln=1, the HDMI-connected display will light up when waking from sleep mode, otherwise, it can only be lit by unplugging and plugging the HDMI cable.

6. Platform Information
For example, the Apple computer model suitable for the 10th generation Core is iMac20,1. Last year, when I set up the 10700K+Z490, I used iMac19,1, which had worse compatibility. After using the OCAT tool, I can basically get rid of the scripts written in Python for Hackintosh configuration under Windows.

All other OC configurations can be set according to the recommendations in Dortania’s tutorial. The configurations before and after the Hackintosh installation have basically been completed, and I can confidently enjoy macOS now! 🤩

7. USB Customization
The ASUS PN62 has a total of 13 USB ports (relative to macOS).
-
The card reader is a USB2 port, numbered HS03.
-
The Bluetooth interface is built-in, connected by the wireless card, edited as HS10.
-
The three front and rear USB-A interfaces occupy HS02/HS05/HS06 for 3 USB2 ports and SS02/SS05/SS06 for 3 USB3 ports, respectively.
-
The front USB-C interface supports 10Gbps bandwidth, requiring SS01/SS03 for two USB3 ports and also occupies HS01 for USB2 compatibility.
-
The rear USB-C occupies HS04/SS04, so it is equivalent to a USB3 interface, not supporting 10Gbps.

The complete USB customization is shown in the image below, and I have added notes. Be sure to remember that the USBInjectAll.kext downloaded from the internet only supports the USB controller 8086_02ed used in PN62 in some recent unofficial versions, and SS03 and SS06 are not included, which need to be manually added to the config.plist of the USBInjectAll.kext folder. This point can trap many Hackintosh beginners for a long time. 😂

Conclusion
Setup successful! The ASUS Mini PC PN62 Hackintosh debugging is complete! I spent about a week overall, and I was really desperate during the days when I was stuck at the installation program crash… It’s great that there were no mishaps, and I believe others who have tackled Hackintosh can deeply empathize with that feeling 😨😨😨.
The ASUS mini PC PN62 is super compact, has a high configuration, and great expandability, with many application potentials yet to be explored. I have other plans for tinkering in preparation~ such as a portable development/application server~ 😎 Stay tuned, interested friends! 🤞
Currently, Win11 to Go and Hackintosh to Go have been easily implemented on the PN62, and I will share with you all another day. I have uploaded the PN62’s EFI to GitHub, and those interested can leave their email to request it, as posting the link directly may be blocked by certain platforms. 😣
Finally, thanks to @Hackintosh Xiaobing for providing the image download and parameter information, @ic005k for writing the configuration tool, and @Dortania for the detailed and concise OpenCore tutorial.