1. NanoPi NEO Development Board
The NanoPi-NEO (http://www.friendlyelec.com.cn/nanopi-neo.asp) is a compact core board based on the Allwinner H3. I am using version 1.4, as shown below.
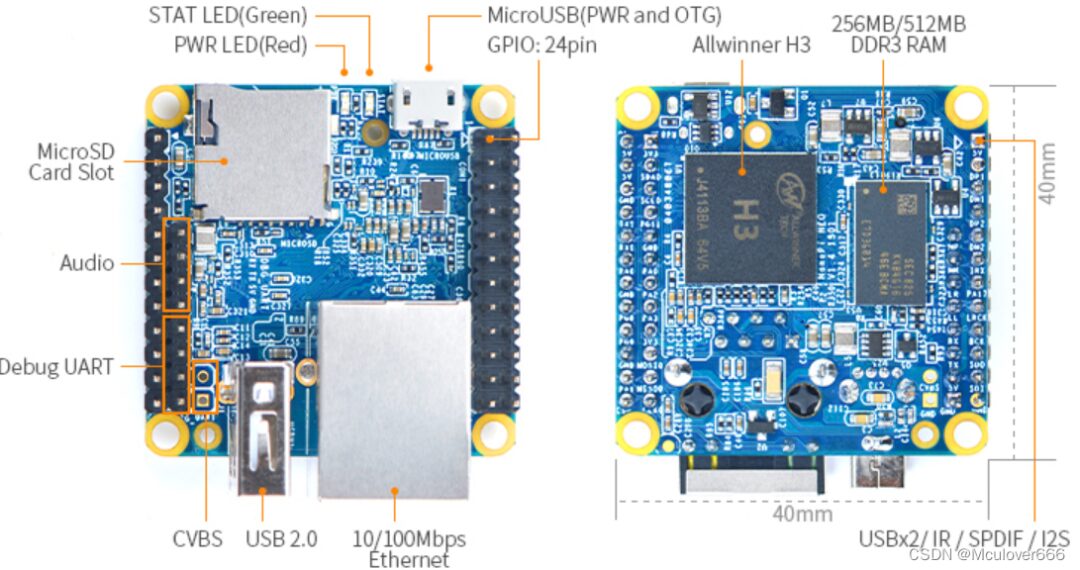
-
Main Control: Allwinner H3 processor, quad-core Cortex-A7, up to 1GHz -
Memory: 512MB DDR3 -
Storage: No eMMC, uses SD card -
Network: One 10/100M Ethernet -
Debug Serial Port: 2.54 pin header -
Power Supply: USB
The expansion pin description of the board is as follows:  Development board wiki: https://wiki.friendlyelec.com/wiki/index.php/NanoPi_NEO/en.
2. Allwinner H3 Processor
The features of the Allwinner H3 processor are as follows.
-
CPU Architecture: Quad-core ARM Cortex A7 processor, 32KB L1 instruction cache, 32KB L1 data cache, 512KB L2 cache -
GPU Architecture: ARM Mali400MP2 GPU, supports OpenGL ES 2.0 -
Storage Subsystem -
96KB on-chip Boot ROM, supports secure/non-secure boot, supports booting from Nand Flash, SD, eMMC, Nor Flash -
SDRAM: Supports JEDEC standard DDR2/DDR3/DDR3L/LPDDR2/LPDDR3 SDRAM, maximum 2GB address space, supports 2 chip select signals, maximum 667MHz -
Nand Flash: Supports up to 2 flash chip selects, 8-bit data bus width -
SD/MMC: Supports up to 3 SD/MMC controller interfaces
3. NanoPi NEO Development Board User Experience
1. Flashing the Image
This article uses the image provided by FriendlyElec (download link): h3_sd_friendlycore-focal_4.14_armhf_20210618.img.
First, use SD Card Formatter software to format the SD card:  Then use Win32 Disk Imager to flash the image to the SD card:
2. System Usage
-
uboot: 2017.11 -
kernel: 4.14.111 -
rootfs: Ubuntu 20.04 LTS
Check kernel information:  Check distribution information:
  Check software sources:
Check memory and SD card usage:  Check network usage:
  Check CPU information:
  Check current CPU frequency:
  Check current GPIO device usage:
Check audio devices:  Check I2C devices:
  Check SPI devices:
  Test USB-A port with a USB drive:
  Test USB-SATA hard drive:
3. SD Card Partitioning
 The first partition is in FAT format, storing the kernel image and device tree file:
  The second and third partitions are in ext4 format, both storing rootfs, but the third partition stores some contents that need to be loaded before mounting rootfs:
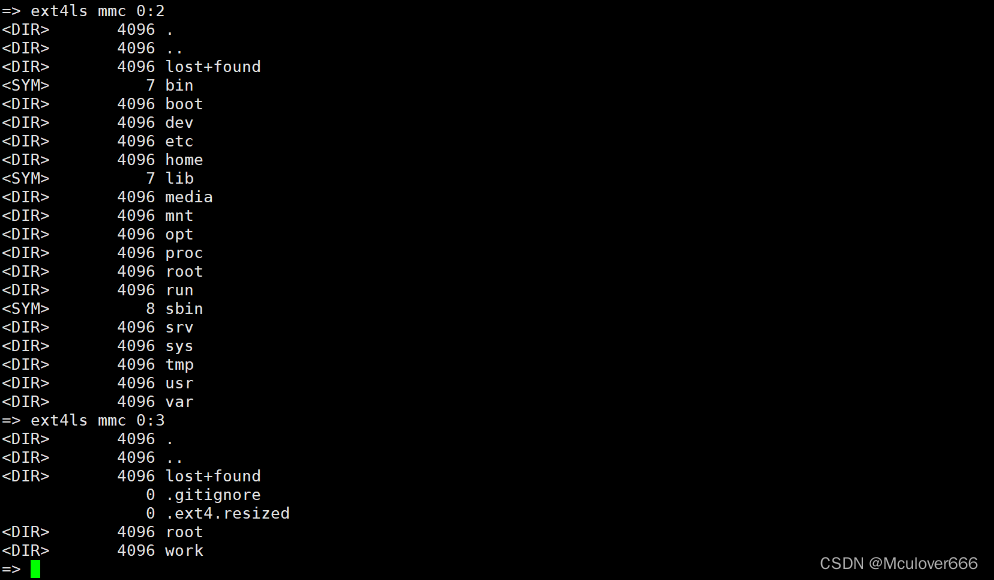
4. Kernel Boot Method
bootcmd=fatload mmc 0:1 ${scriptaddr} boot.scr; source ${scriptaddr}The boot process is as follows:
-
uboot loads the kernel from the first partition of mmc by executing the boot.scr script -
kernel mounts the rootfs from the second partition of mmc after booting
4. Compiling the NanoPi NEO Source Code (Mainline Version)
1. Toolchain Setup
This section compiles the mainline version source code provided by FriendlyElec, with the goal of successfully compiling the source code. The compiler version should be synchronized with FriendlyElec, using version 4.9.3, and avoid using other versions if possible.
Download link: https://download.friendlyelec.com/nanopineo.

2. u-boot Compilation
Pull the source code:
https://gitee.com/mculover666/u-boot.gitConfigure the compilation environment:
sudo apt-get install swig python-dev python3-dev
export CROSS_COMPILE=arm-linux-
Compile configuration:
make nanopi_h3_defconfigCompile:
make -j8If you encounter compilation issues due to the system libfdt library, uninstall the system library:
sudo apt-get remove libfdt-devRecompile, and the compilation passes, generating the bin file:  Flash it to the SD card:
sudo dd if=u-boot-sunxi-with-spl.bin of=/dev/sdb bs=1024 seek=8Boot test: 
3. Kernel Compilation
Pull the source code:
git clone https://github.com/friendlyarm/linux.git -b sunxi-4.14.y --depth 1Configure the compilation environment:
sudo apt-get install u-boot-tools
export CROSS_COMPILE=arm-linux-
export ARCH=arm
Compile configuration:
make sunxi_defconfigCompile:
make zImage dtbs -j16Mount the first partition of the SD card, replace the image and device tree:
sudo mount /dev/sdb1 /mnt
sudo cp arch/arm/boot/zImage /mnt/
sudo cp arch/arm/boot/dts/sun8i-h3-nanopi-neo.dtb /mnt/
Boot test: 
