(This series of tutorials are all based on the “Upload Execution” mode of Mind+, software version V1.1)
Introductory Video Tutorial:
Introduction to Mind+ Platform
Mind+ is a programming software for teenagers developed based on Scratch 3.0, supporting various open-source hardware such as Arduino and micro:bit. You can complete programming by simply dragging graphical program blocks, and also use advanced programming languages like python/c/c++ to easily experience the joy of creation.
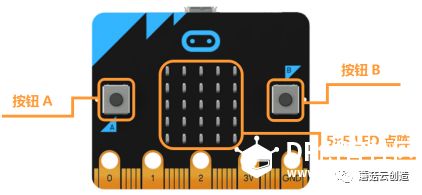
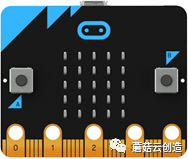
Introduction to micro:bit
micro:bit is a microcontroller designed by the BBC in the UK, featuring ARM architecture, onboard Bluetooth, an accelerometer, an electronic compass, three buttons, and a 5×5 LED matrix, primarily used for programming education for teenagers.
With micro:bit, you can create any cool little inventions, whether they are robots or musical instruments. micro:bit has a series of innovative features, such as 25 red LEDs that can display messages; two programmable buttons that can be used to control game operations or pause/play a piece of music. micro:bit can detect motion and inform the user of the direction of the motion, and it can also connect to other devices or the internet via a low-power Bluetooth module.
micro:bit also comes with common sensing devices like a light sensor and temperature sensor, meaning it can create many common intelligent products in daily life.

First Time Using micro:bit
If you are using micro:bit for the first time, you can also learn how to use the Mind+ programming platform and how to write programs for micro:bit through the following beginner tutorials.
Before starting, please ensure you have the following items:
Micro:bit Mainboard

microUSB Cable
In addition, you will also need a computer running Windows operating system.
STEP1: Open Mind+ Programming Software
The following steps are based on the Windows operating system. First, you need to open the webpage to download and install the software: http://mindplus.cc

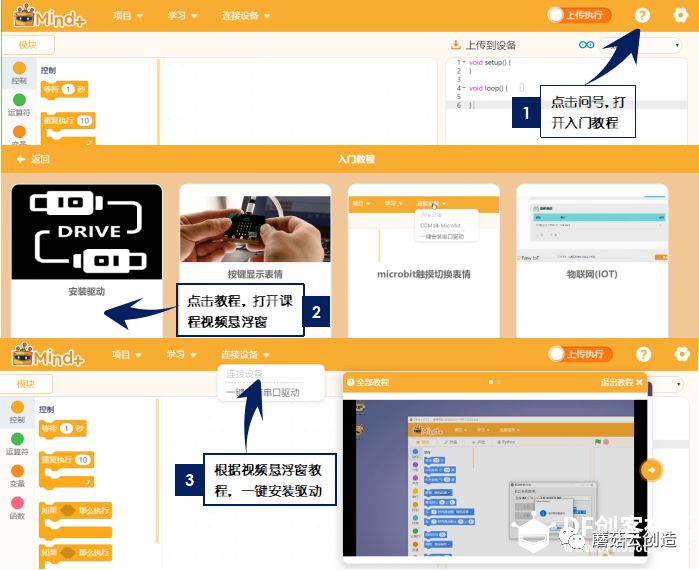
STEP2: Install Drivers
Click the tutorial in the upper right corner and follow the prompts to install the drivers (install only once).
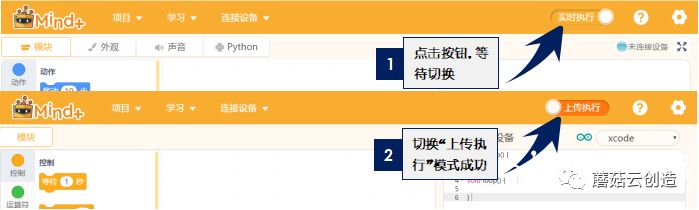
STEP3: Switch to “Upload Execution” Mode
(1) Click the button and wait for the switch
(2) Successfully switch to “Upload Execution” mode
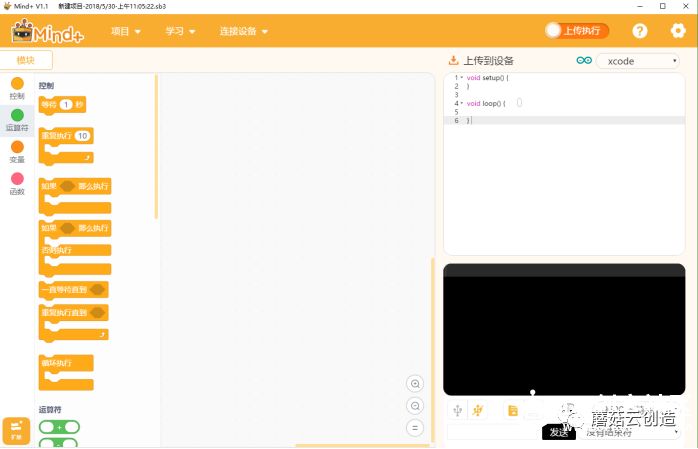
STEP4: Interface Introduction
Now let’s take a closer look at the Mind+ programming interface.
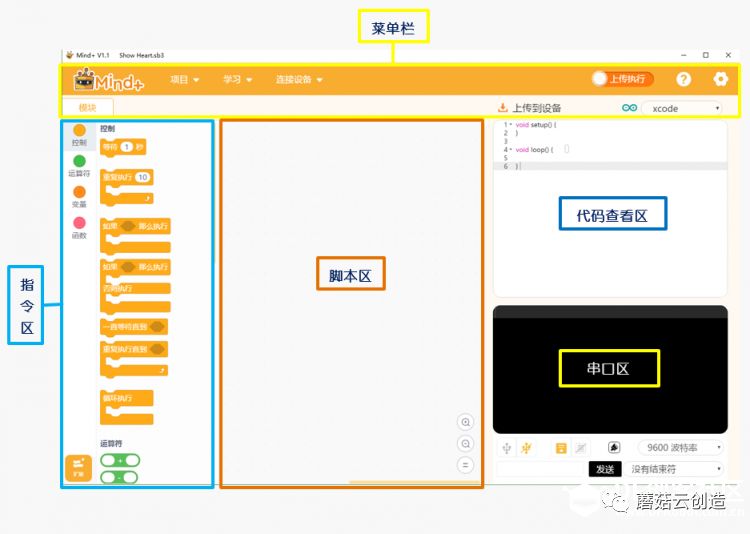
Menu Bar:
The “Project” menu allows you to create new projects, open projects, and save projects.
The “Learning” menu helps you find desired tutorials and example programs during initial use.
The “Connect Device” menu can detect connected devices and allows you to choose to connect or disconnect devices.
The “Upload Execution/Real-Time Execution” button can switch the execution mode of the program. “Upload Execution” uploads the program to the hardware device for execution, while “Real-Time Execution” executes the executable program in the script area in real-time on the hardware and Mind+ stage.
“  (Question Mark)” button is used to learn the basic usage in this mode.
“  (Settings)” button is used to set the software theme, language, learn basic cases, and seek help online or in groups.
Code Viewing Area: View the code in the script area.
Instruction Area: Dragging instructions from the instruction area can control various hardware for programming. Select various supported hardware from the extension to program.
Script Area: The area for writing the program, where you drag and drop instructions from the instruction area to write the program.
Serial Port Area: Displays the burning status and program running status, and also shows serial communication data. It includes: serial switch, scrolling switch, clear output, baud rate port, serial input box, and output format control.
STEP5: Select micro:bit Module
First (1) select “Extensions” in the lower left corner of the software. (2) Click on the main control board (3) select the micro:bit module

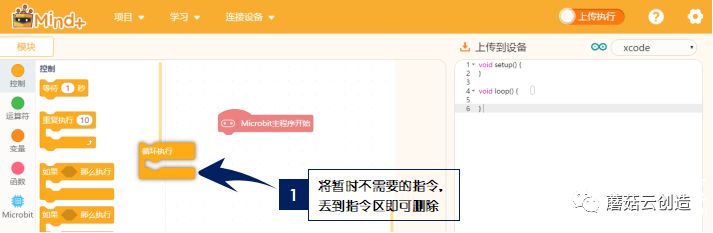
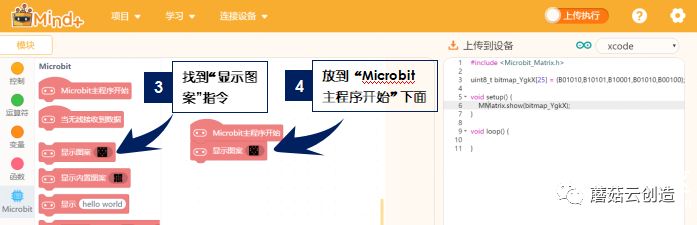
STEP6: Edit a Simple Program
Edit a program that displays a pattern on the micro:bit board’s LED matrix
(1) Drag the temporarily unnecessary instructions to the instruction area to delete them
(2) Click the “micro:bit” module
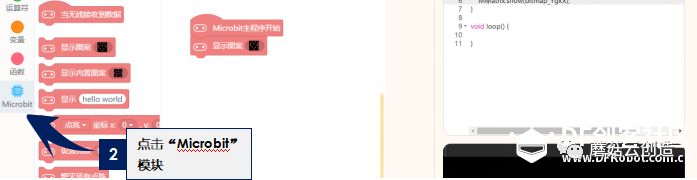
(3) Find the “Display Pattern” instruction
(4) Place the “Display Pattern” under the “micro:bit Main Program Start” section
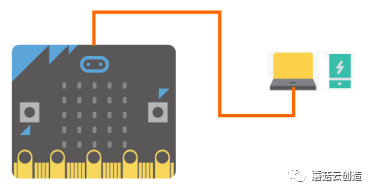
STEP7: Upload Program to Device
Connect the micro:bit board to the computer via USB; at this time, the yellow indicator light next to the USB port on the micro:bit board will light up.
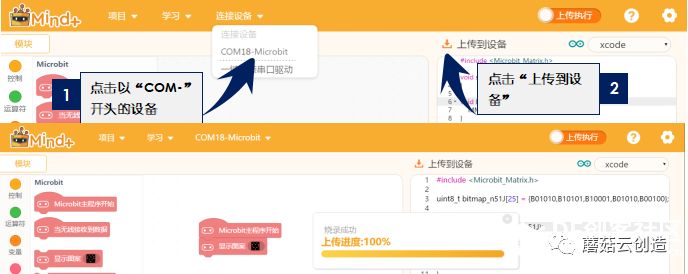
(1) Click on the “Connect Device” in the menu bar, find and click on the serial port number “COM**-microbit”, and the software will connect to the device.
(2) Once the device is successfully connected, click “Upload to Device” (if the device is not connected at this time, it will prompt “Not connected to device”), after successful upload, it will prompt “Burning successful, upload progress 100%”
Only when uploading the program, the power signal light on the back of the micro:bit mainboard will flash; after the upload is complete, the power signal light will stop flashing and remain on.
After uploading, did a small “heart” appear on your micro:bit board?

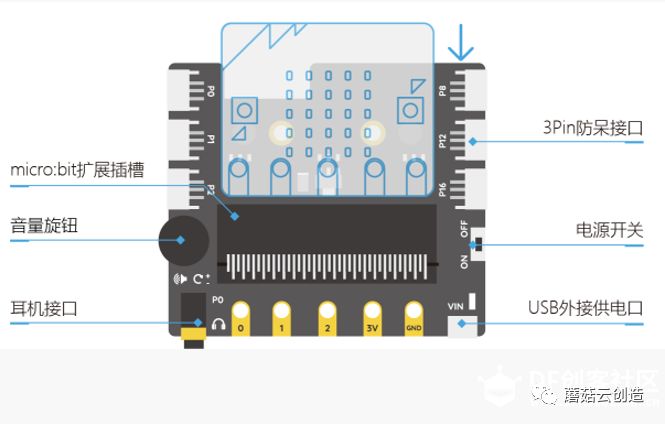
Combining micro:bit Expansion Board with micro:bit
Limitations of micro:bit
Micro:bit needs to connect more external devices through the gold finger slot. Due to its poor driving capability, it cannot directly drive motors, servos, and other high-current devices.
Additionally, the power supply and signal voltage of micro:bit are 3.3V, which cannot be directly used with commonly used 5V electronic components.
Benefits of micro:bit Expansion Board
1. The micro:bit Boson expansion board can easily bring out additional pins of micro:bit, plug and play, simple and quick;
2. Expansion interfaces provide stronger connection stability;
3. The external USB power supply port VIN can provide additional power for external components, better supporting high-current devices like LED strips and servos; (when downloading programs, it still needs to be connected to micro:bit)
4. The expansion board also comes with a 3.5mm headphone interface and volume knob for easy headphone plugging.
The maximum rated current of the expansion board is 500mA, please confirm the maximum power of the components before use. Do not use the expansion board with large servos, as it may cause damage to onboard components!
Above are the basic methods for using micro:bit. If you have any questions or suggestions during use, please feel free to click at the end of the article Read Original to visit our forum [Mind+ Section] to contact us.
—— End of Text ——
Recommended Reading:
Breaking News! The offline version of the official micro:bit programming software is officially launched!
Suzhou Science and Technology City Foreign Language School discusses STEM education, from nurturing curiosity to stimulating thirst for knowledge
Three keywords to analyze the development focus of maker education in primary and secondary schools in Sichuan Province in 2018
How blockchain technology solves the pain points of maker education
Two Sessions Hotspot丨What did these internet giants say about maker education at the Two Sessions?
Opportunities and challenges for the development of maker education under policy support
Interpretation of the new high school curriculum standard: the Internet of Things officially enters classroom teaching, and Mushroom Cloud teaches you how to open the door to the Internet of Things in 10 minutes!
Breaking News! The new high school curriculum standard is released, and maker education content has become the main force of technical courses!
Mu
Goo
Cloud
The Mushroom Cloud Maker Space, initiated by DFRobot in 2013, is recognized by the Ministry of Science and Technology as a National Maker Space.
As a sub-brand of DFRobot, it undertakes various service roles in the maker education ecosystem built by the company, including maker space solutions, teacher training, curriculum development, cultural dissemination, and project guidance.
Reply in the background【mb】 to download micro:bit Chinese learning materials
Reply【mc】 to get the download link for the official version of makecode software
Reply【2018】 to download the complete content of the new curriculum standard
Reply【IoT】 to view the OBLOQ tutorial for the Internet of Things learning module
Reply【Books】 to view recommended textbooks for maker education

Long press the QR code to follow,
More exciting content is continuously updated!