This article introduces simple operations of the <span>LCD</span> on the <span>STM32H573I-DK</span> development board under <span>FreeRTOS</span>.
Hardware Introduction
<span>ST</span> provides a development board that uses a <span>1.54"</span> <span>TFT LCD</span> and is designed with <span>CTP</span>. This article only introduces the <span>LCD</span> part.
From the schematic, it can be seen that a backlight circuit designed with <span>STLD40DPUR</span> is used. From the typical application circuit in the <span>STLD40DPUR</span> datasheet below, it can be seen that the backlight circuit is actually used to provide constant current to illuminate a series of LED lights.
<span>Typical application circuit of STLD40DPUR</span>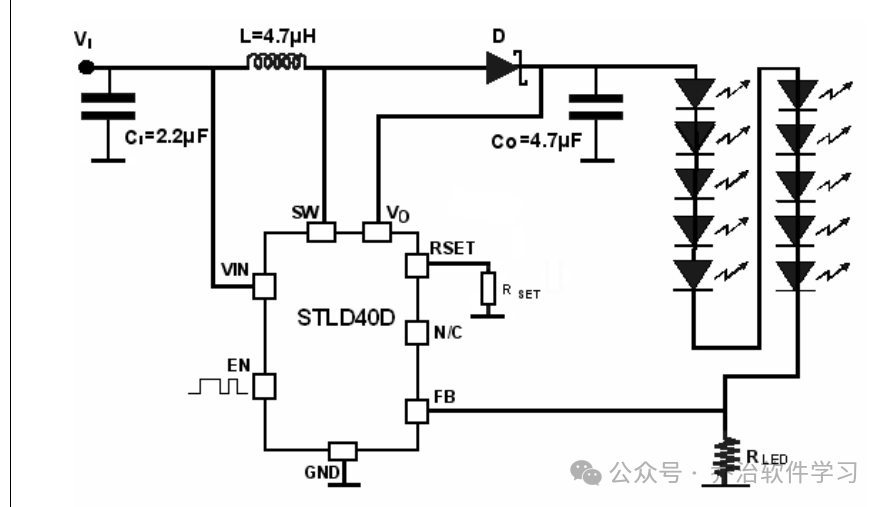
The development board’s <span>LCD</span> backlight circuit 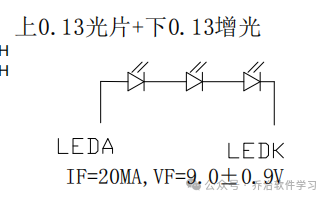
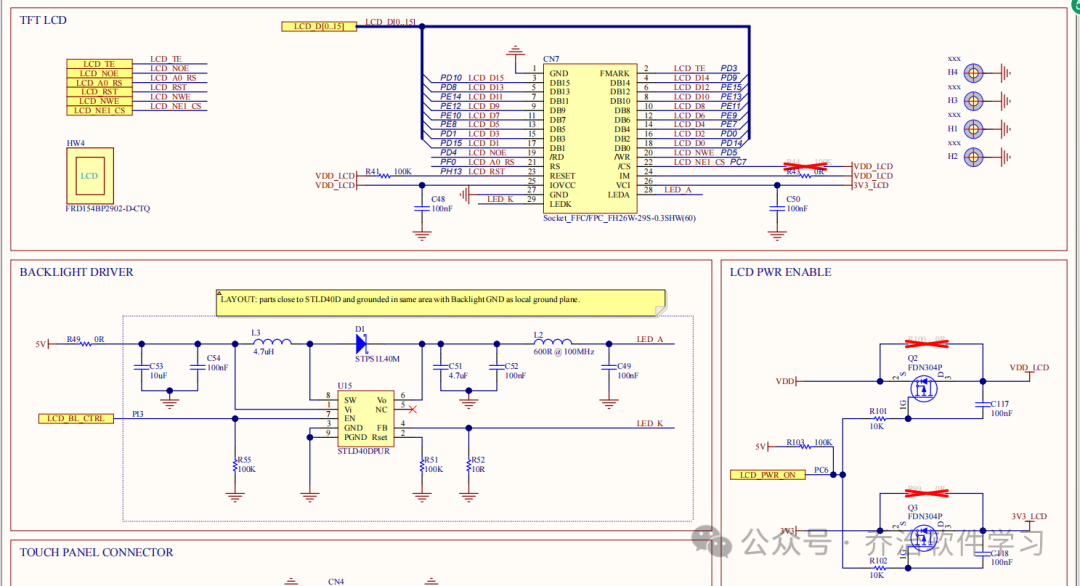
<span>LCD</span> screen integrates a display driver chip <span>ST7789H2-G4</span>, with a resolution of <span>240×RGB×240</span>. The interface used is <span>8080 16</span> bits (<span>5R+6G+5B</span>). The higher bit count in the green channel is used to enhance visual effects.
Program Objectives
Create tasks and then display information on the LCD screen.
STM32CubeMX Configuration
Create tasks 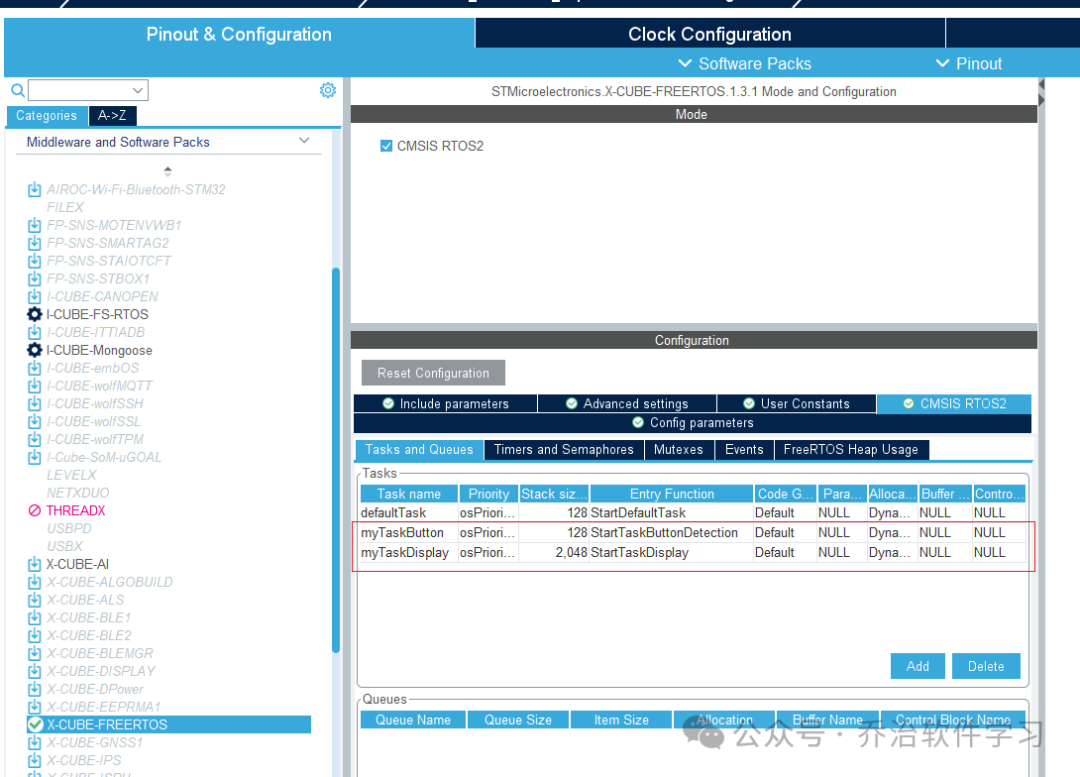
Enable the <span>BSP</span> package for the <span>LCD</span> driver.
Directly reference the existing low-level drivers, but friends who are learning should actually read this part of the code. The format and quality of the code are very good. It adopts a driver style similar to Linux’s <span>function pointer table</span>, achieving separation of interface unification and specific implementation, which is also a classic application of object-oriented programming in C language. 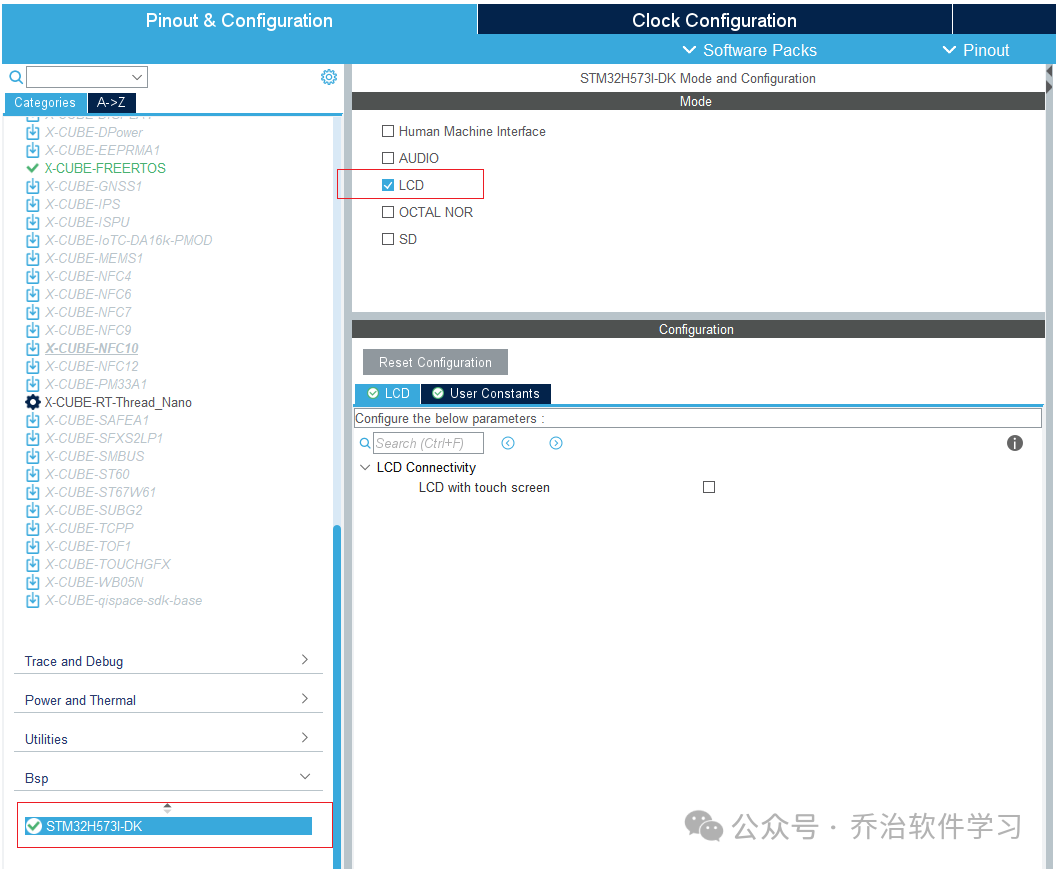
Program Source Code
The following is automatically generated by <span>STM32CubeMX</span>. Originally, it was planned to create multiple Button tasks for actual key triggers to dynamically update information on the LCD. However, this part was not implemented. Only simple information display was achieved, hoping to serve as a starting point for further exploration.
/* Definitions for myTaskButton */
osThreadId_t myTaskButtonHandle;
const osThreadAttr_t myTaskButton_attributes = {
  .name = "myTaskButton",
  .priority = (osPriority_t) osPriorityLow,
  .stack_size = 128 * 4
};
/* Definitions for myTaskDisplay */
osThreadId_t myTaskDisplayHandle;
const osThreadAttr_t myTaskDisplay_attributes = {
  .name = "myTaskDisplay",
  .priority = (osPriority_t) osPriorityLow,
  .stack_size = 2048 * 4
};
<span>LCD</span> operations (initialization, driver association, font settings, display)
/* USER CODE BEGIN Header_StartTaskDisplay */
/**
* @brief Function implementing the myTaskDisplay thread.
* @param argument: Not used
* @retval None
*/
/* USER CODE END Header_StartTaskDisplay */
void StartTaskDisplay(void *argument)
{
  /* USER CODE BEGIN myTaskDisplay */

  uint32_t pXSize;
  /* Initialize the LCD */
  if (BSP_LCD_Init(0, LCD_ORIENTATION_LANDSCAPE) != BSP_ERROR_NONE)
  {
    /* Initialization Error */
    Error_Handler();
  }

  UTIL_LCD_SetFuncDriver(&LCD_Driver); /* SetFunc before setting device */
  UTIL_LCD_SetDevice(0);            /* SetDevice after funcDriver is set */
  UTIL_LCD_SetFont(&UTIL_LCD_DEFAULT_FONT);
  UTIL_LCD_Clear(UTIL_LCD_COLOR_WHITE);

  /* Set the display on */
  if (BSP_LCD_DisplayOn(0) != BSP_ERROR_NONE)
  {
    /* Initialization Error */
    Error_Handler();
  }
  /* Display the demonstration window */
  UTIL_LCD_Clear(UTIL_LCD_COLOR_ST_YELLOW);
  UTIL_LCD_SetBackColor(UTIL_LCD_COLOR_ST_BLUE_DARK);
  UTIL_LCD_SetTextColor(UTIL_LCD_COLOR_ST_BLUE_DARK);
  BSP_LCD_GetXSize(0, &pXSize);
  UTIL_LCD_FillRect(0, 0, pXSize, UTIL_LCD_DEFAULT_FONT.Height*2, UTIL_LCD_COLOR_ST_BLUE_DARK);
  UTIL_LCD_SetTextColor(UTIL_LCD_COLOR_WHITE);

  UTIL_LCD_DisplayStringAt( 0,  UTIL_LCD_DEFAULT_FONT.Height  , (uint8_t *)"Hello,George!", CENTER_MODE);

  /* Let time user to see information */
  HAL_Delay(2000);
  /* Infinite loop */
  for(;;)
  {
    osDelay(100);
  }
  /* USER CODE END myTaskDisplay */
}
Several key functions and structures
/**
  * @brief  Initializes the LCD with a given orientation.
  * @param  Instance    LCD Instance
  * @param  Orientation LCD_ORIENTATION_PORTRAIT, LCD_ORIENTATION_PORTRAIT_ROT180
  *         LCD_ORIENTATION_LANDSCAPE or LCD_ORIENTATION_LANDSCAPE_ROT180
  * @retval BSP status
  */
int32_t BSP_LCD_Init(uint32_t Instance, uint32_t Orientation)
{
  int32_t ret;

  if ((Orientation > LCD_ORIENTATION_PORTRAIT) || (Instance >= LCD_INSTANCES_NBR))
  {
    ret = BSP_ERROR_WRONG_PARAM;
  }
  else
  {
    Lcd_Ctx[Instance].PixelFormat = LCD_PIXEL_FORMAT_RGB565;
    Lcd_Ctx[Instance].XSize       = LCD_DEFAULT_WIDTH;
    Lcd_Ctx[Instance].YSize       = LCD_DEFAULT_HEIGHT;

    /* Initialize LCD special pins GPIOs */
    ST7789H2_PowerUp();

    if (ST7789H2_Probe(Orientation) != BSP_ERROR_NONE)
    {
      ret = BSP_ERROR_UNKNOWN_COMPONENT;
    }
    else
    {
      ret = BSP_LCD_DisplayOn(Instance);
    }
  }

  return ret;
}
/**
  * @brief  Link board LCD drivers to STM32 LCD Utility drivers
  * @param  pDrv Structure of LCD functions
  */
void UTIL_LCD_SetFuncDriver(const LCD_UTILS_Drv_t *pDrv)
{
  FuncDriver.DrawBitmap     = pDrv->DrawBitmap;
  FuncDriver.FillRGBRect    = pDrv->FillRGBRect;
  FuncDriver.DrawHLine      = pDrv->DrawHLine;
  FuncDriver.DrawVLine      = pDrv->DrawVLine;
  FuncDriver.FillRect       = pDrv->FillRect;
  FuncDriver.GetPixel       = pDrv->GetPixel;
  FuncDriver.SetPixel       = pDrv->SetPixel;
  FuncDriver.GetXSize       = pDrv->GetXSize;
  FuncDriver.GetYSize       = pDrv->GetYSize;
  FuncDriver.SetLayer       = pDrv->SetLayer;
  FuncDriver.GetFormat      = pDrv->GetFormat;

  DrawProp->LcdLayer = 0;
  DrawProp->LcdDevice = 0;
  FuncDriver.GetXSize(0, &DrawProp->LcdXsize);
  FuncDriver.GetYSize(0, &DrawProp->LcdYsize);
  FuncDriver.GetFormat(0, &DrawProp->LcdPixelFormat);
}
/** @defgroup LCD_Driver_structure  LCD Driver structure
  * @{
  */
typedef struct
{
  int32_t (*DrawBitmap)(uint32_t, uint32_t, uint32_t, uint8_t *);
  int32_t (*FillRGBRect)(uint32_t, uint32_t, uint32_t, uint8_t *, uint32_t, uint32_t);
  int32_t (*DrawHLine)(uint32_t, uint32_t, uint32_t, uint32_t, uint32_t);
  int32_t (*DrawVLine)(uint32_t, uint32_t, uint32_t, uint32_t, uint32_t);
  int32_t (*FillRect)(uint32_t, uint32_t, uint32_t, uint32_t, uint32_t, uint32_t);
  int32_t (*GetPixel)(uint32_t, uint32_t, uint32_t, uint32_t *);
  int32_t (*SetPixel)(uint32_t, uint32_t, uint32_t, uint32_t);
  int32_t (*GetXSize)(uint32_t, uint32_t *);
  int32_t (*GetYSize)(uint32_t, uint32_t *);
  int32_t (*SetLayer)(uint32_t, uint32_t);
  int32_t (*GetFormat)(uint32_t, uint32_t *);
} LCD_UTILS_Drv_t;
Program Execution Results
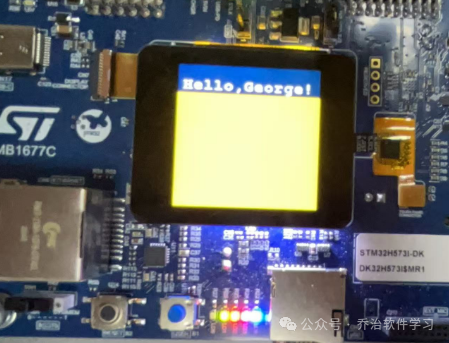
Thus, the introduction to the operations of the <span>LCD</span> development board under the <span>FreeRTOS</span> operating system is complete.
Since we mainly introduce the
<span>FreeRTOS</span>operating system, and given that the development board has an LCD design, we simply introduced and implemented basic operations. Detailed implementations of the<span>LCD</span>drivers and interfaces are not covered (this part is not much different from bare-metal programming). The code in this part is actually well written, and those interested can read and learn from it in detail.