

Author: Luo Kui, Technical Expert, Alibaba


Case Overview
With the development of machine learning, TinyML has been working in your home, car, and even pocket. What is TinyML? It is a subfield of machine learning that includes algorithms, hardware, and software capable of analyzing sensor data and running on ultra-low power devices. For example, voice assistants like Tmall Genie, Apple’s Siri, and Amazon’s Alexa are all applications of TinyML. They provide a voice user interface (AUI), allowing users to interact without needing to operate a screen, mouse, or keyboard, offering a new way of interaction that is almost ubiquitous, from standalone smart speakers to nearly all smartphones that have some form of voice assistant built-in.
In most cases, resource-intensive tasks such as voice recognition, natural language processing, and speech synthesis are performed in the cloud, where powerful servers run large machine learning models. When a user asks a question, the audio is sent to the cloud in a format like wav or other audio streams. The cloud identifies the meaning of the audio stream and responds accordingly. What voice assistants really need is the audio data after the device is awakened. If the wake word can be detected without sending data, and the audio stream transmission only starts after hearing the wake word, it can protect user privacy, save battery power and bandwidth, and even wake up without a network.
This is where TinyML comes into play. Running on low-power chips means training a tiny model that listens for the wake word, which is embedded into microcontroller devices. It can continuously listen for the wake word, notifying the operating system to start capturing audio and sending it to the cloud once the wake word is detected.
This article will teach you how to deploy a pre-trained detection model on the HaaS EDU K1 for wake word detection and use the TensorFlow Lite Micro inference engine for inference. We will also teach you how to train your own wake word using TensorFlow training scripts and deploy it on the device. This case consists of three main parts:
1. Voice Collection: Connect the analog microphone (Mic1 input);
2. Voice Recognition: Say “Turn on” and “Turn off” to recognize, and the OLED will display “Turn on…” and “Turn off”;
3. Voice Broadcast: Execute commands while broadcasting local TTS (mp3).
Before we start learning, let’s take a look at the effect of the case:
HaaS Voice Assistant Voice Control
Knowledge Points Involved
●
Wake word data collection, model training, model deployment
●
Device-side analog MIC audio sampling
●
Device-side audio feature extraction
●
Application of TFLite-Micro inference engine
●
Device-side command recognition and response
●
Device-side speaker playing mp3 files
●
File system applications
●
OLED character display


Solution Introduction
The entire solution framework is as follows:
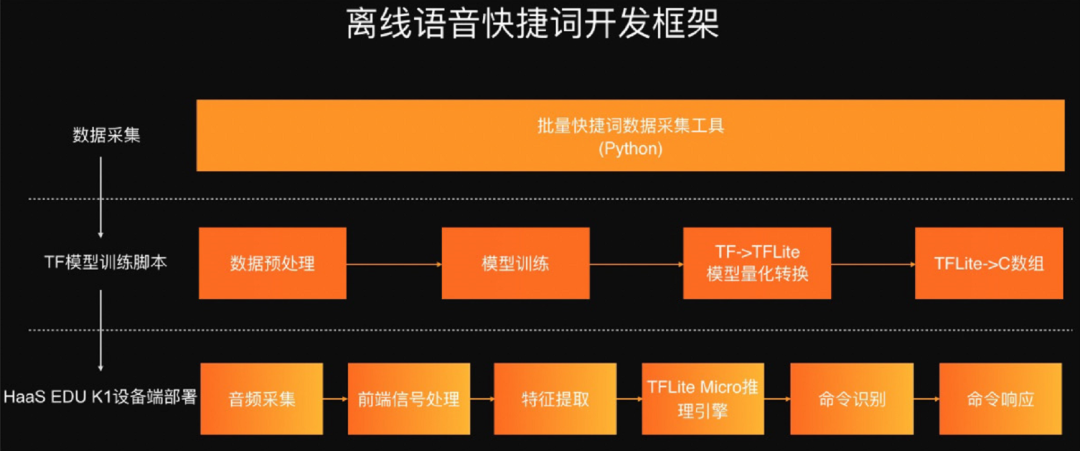
●
Provide batch audio recording tools for data collection;
●
Provide TF model training scripts for wake word training;
●
Provide a complete device-side model deployment solution;
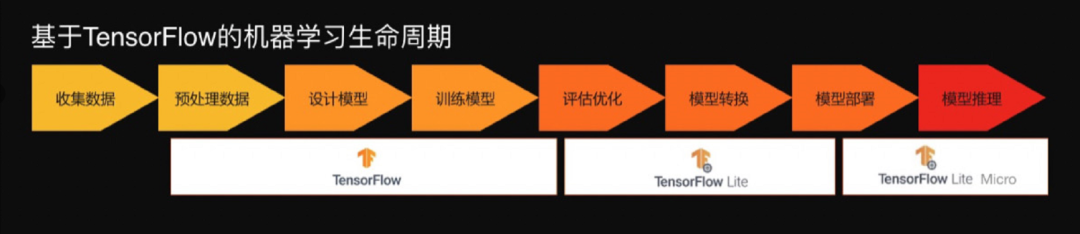
Based on this solution, you will learn the entire lifecycle of TinyML:


Development Environment Setup
1. Hardware Preparation
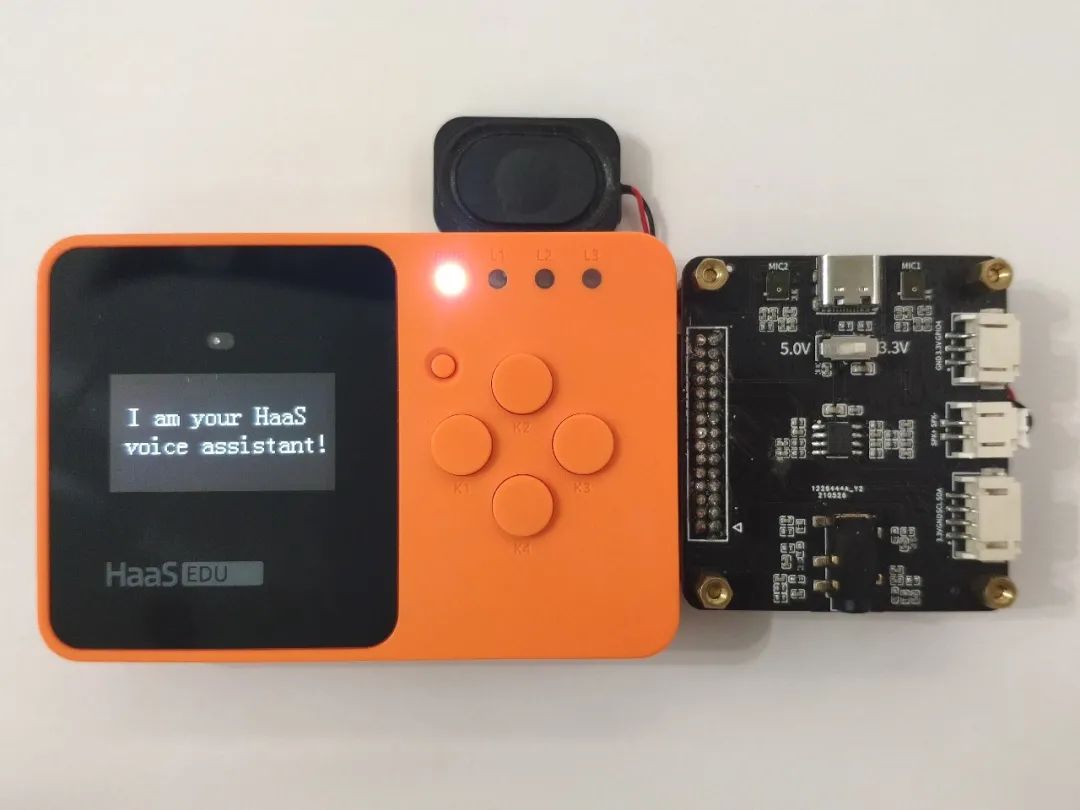
If you have the HaaS voice expansion board, just plug it in:
If you do not have the HaaS voice expansion board, please follow the steps below to connect the microphone and speaker:
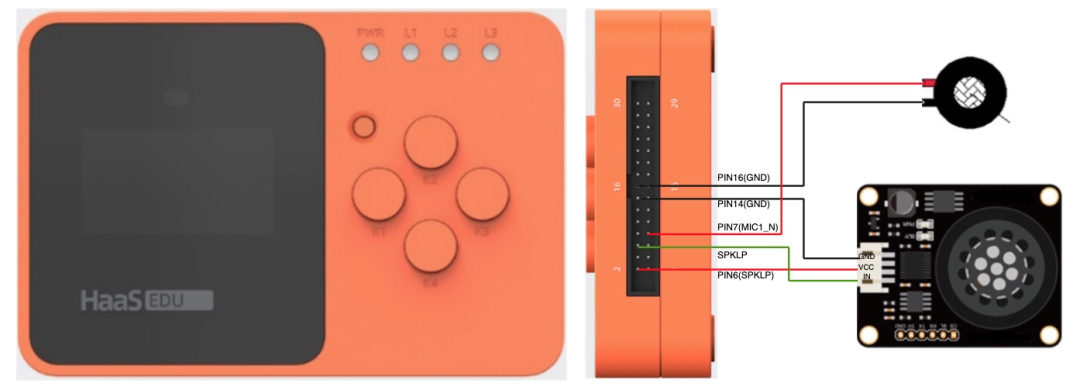
Refer to the HaaS EDU K1 hardware wiring diagram
HaaS EDU K1 Manual – IoT Operating System – Alibaba Cloud
-
HaaS EDU K1 Manual – IoT Operating System – Alibaba Cloud
https://help.aliyun.com/document_detail/205267.html
The purchasing links are for reference only and do not guarantee the quality of the merchant’s delivery.
|
Name |
Quantity |
Reference Link |
|
HaaS EDU K1 Development Board |
1 |
HaaS EDU K1 Purchase Link |
|
Type-C USB Data Cable |
1 |
Any ordinary Type-C USB cable will do |
|
Analog MIC |
1 |
Analog MIC Reference Link |
|
Speaker |
1 |
Speaker Reference Link |
|
Dupont Wires |
Several |
NA |
-
HaaS EDU K1 Purchase Link
https://detail.tmall.com/item.htm?spm=a230r.1.14.16.71c3cf45V4cFdQ&id=639294516891&ns=1&abbucket=10
-
Analog MIC Reference Link
https://item.taobao.com/item.htm?spm=a1z09.2.0.0.795a2e8drZ42nl&id=583316469629&_u=531h6c618fe
-
Speaker Reference Link
https://item.taobao.com/item.htm?spm=a1z09.2.0.0.6c4e2e8de1Ubch&id=564311744050&_u=ob3iuit4288
2. Environment Setup
Refer to the “HaaS EDU K1 Quick Start” in the HaaS Studio section to complete the AliOS Things development environment setup.
-
“HaaS EDU K1 Quick Start”
https://blog.csdn.net/HaaSTech/article/details/119674142
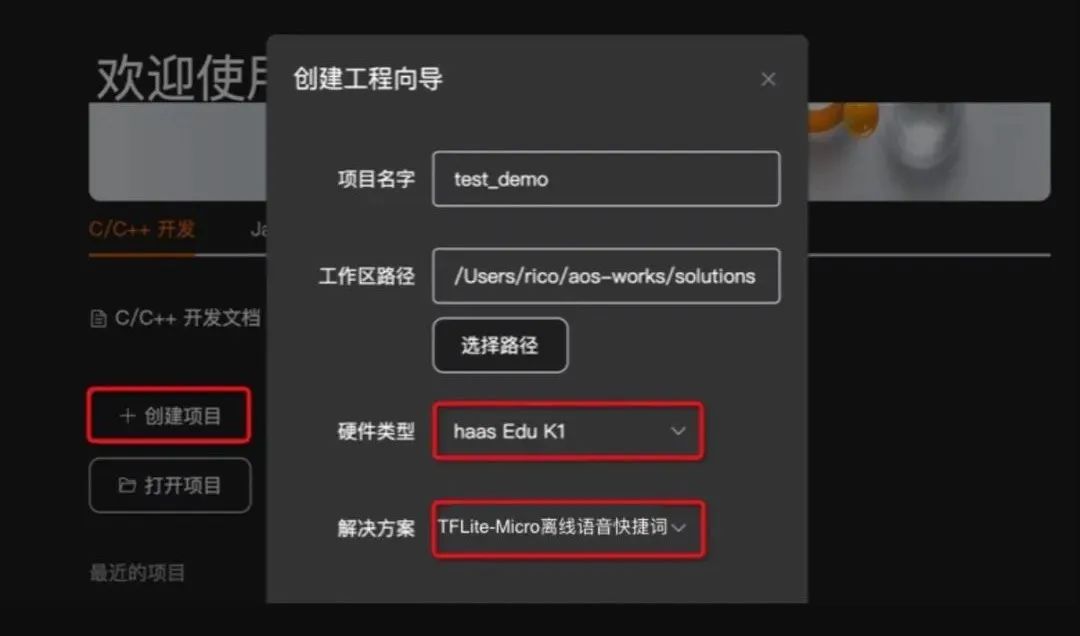
2.1 Case Code Download
The source code related to this case can be downloaded from “Creating a Project”, this case is a C/C++ case.
-
“Creating a Project”
https://g.alicdn.com/alios-things-3.3/doc/haas-studio.html?spm=a2cti.24227744.0.0.696b40faTNQpKM#autotoc_md1867
Among them:
●
Select the solution: “TFLite-Micro Offline Voice Wake Word Example” or “tflite_micro_speech_demo”
●
Select the development board: HaaS EDU K1
2.2 Code Compilation and Flashing
Refer to the “HaaS EDU K1 Quick Start” to complete the code compilation and flashing. Before flashing, please complete step 2.1, then proceed with compilation and flashing.
-
“HaaS EDU K1 Quick Start”
https://blog.csdn.net/HaaSTech/article/details/119674142
File System Flashing
The local corpus used in this component example is stored in the hardware/chip/haas1000/prebuild/data/ directory under the mp3 directory. In addition to flashing the tflite_micro_speech_demo image, the littlefs file system must also be flashed. Please uncomment the following code segment in the hardware/chip/haas1000/package.yaml file and recompile:
program_data_files:
    - filename: release/write_flash_tool/ota_bin/littlefs.bin
      address: 0xB32000
2.3 Open Serial Port
Refer to the “HaaS EDU K1 Quick Start” to open the serial port for LOG viewing.
-
“HaaS EDU K1 Quick Start”
https://blog.csdn.net/HaaSTech/article/details/119674142


Software Architecture
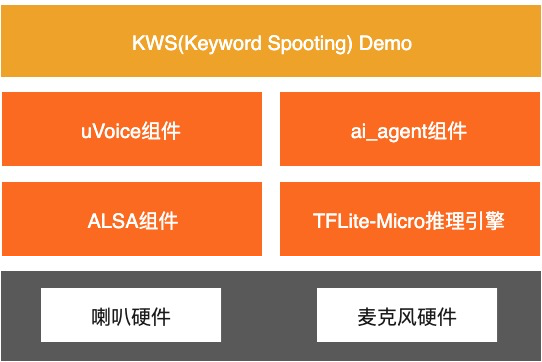
●
KWS Demo Application: Primarily facilitates the initialization of the AI voice engine, greeting broadcast.
●
ai_agent component: The core module of the AI engine on AliOS Things, connecting to different inference engines. In this case, the TFLite-Micro inference engine is used.
●
uVoice component: The core component of the intelligent voice solution on AliOS Things, providing basic functions such as local audio, URL audio, TTS synthesis, etc. It supports mainstream audio formats such as mp3, m4a, wav, opus, etc. In this case, it is used for responding with local mp3 corpus.
●
A2SA component: The audio service framework on AliOS Things, compatible with ALSA application interface access, supporting audio hardware driver abstraction, multi-audio driver loading/unloading, VFS interface support, and more.
1. Code Structure
├── cp_resources.py     # Copy local corpus to /prebuild/data directory, compile into file system
├── main.c
├── maintask.c
├── Makefile
├── micro_speech        # Voice recognition program
├── oled                # OLED display program
│   ├── oled.c
│   └── oled.h
├── package.yaml        # Compilation system configuration file
├── player              # Player program
│   ├── player.c
│   └── player.h
├── README.md
├── recorder            # Recording program
│   ├── recorder.c
│   └── recorder.h
├── resources
│   └── mp3             # Local mp3 corpus
├── SConstruct2. Device-side Workflow
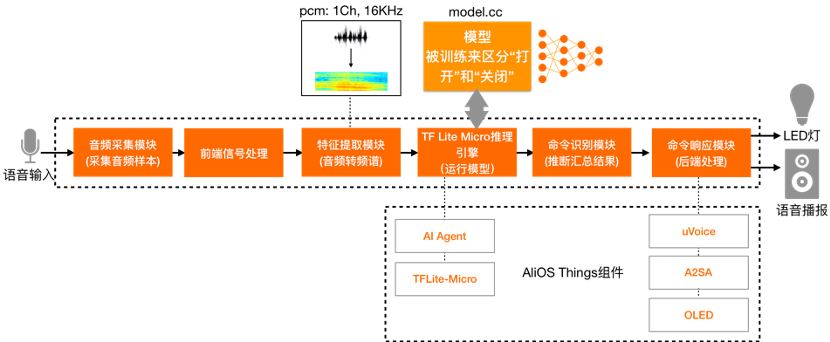
The entire workflow on the HaaS EDU K1 is shown in the following diagram:
3. Main Program
The following code is the main execution of the wake word recognition. The setup initializes the TFLite-Micro model inference engine, and the loop executes the entire process from audio collection to command response, with detailed logic referenced in the code.
// The name of this function is important for Arduino compatibility.
void setup()
{
    //   tflite::InitializeTarget();
    //RegisterDebugLogCallback(callback);
    // Set up logging. Google style is to avoid globals or statics because of
    // lifetime uncertainty, but since this has a trivial destructor it's okay.
    // NOLINTNEXTLINE(runtime-global-variables)
    static tflite::MicroErrorReporter micro_error_reporter;
    error_reporter = &micro_error_reporter;
    // Map the model into a usable data structure. This doesn't involve any
    // copying or parsing, it's a very lightweight operation.
    model = tflite::GetModel(g_model);
    if (model->version() != TFLITE_SCHEMA_VERSION)
    {
        TF_LITE_REPORT_ERROR(error_reporter,
                             "Model provided is schema version %d not equal "
                             "to supported version %d.",
                             model->version(), TFLITE_SCHEMA_VERSION);
        return;
    }
    // Pull in only the operation implementations we need.
    // This relies on a complete list of all the ops needed by this graph.
    // An easier approach is to just use the AllOpsResolver, but this will
    // incur some penalty in code space for op implementations that are not
    // needed by this graph.
    //
    // tflite::AllOpsResolver resolver;
    // NOLINTNEXTLINE(runtime-global-variables)
    static tflite::MicroMutableOpResolver<4> micro_op_resolver(error_reporter);
    if (micro_op_resolver.AddDepthwiseConv2D() != kTfLiteOk)
    {
        return;
    }
    if (micro_op_resolver.AddFullyConnected() != kTfLiteOk)
    {
        return;
    }
    if (micro_op_resolver.AddSoftmax() != kTfLiteOk)
    {
        return;
    }
    if (micro_op_resolver.AddReshape() != kTfLiteOk)
    {
        return;
    }
    // Build an interpreter to run the model with.
    static tflite::MicroInterpreter static_interpreter(
        model, micro_op_resolver, tensor_arena, kTensorArenaSize, error_reporter);
    interpreter = &static_interpreter;
    // Allocate memory from the tensor_arena for the model's tensors.
    TfLiteStatus allocate_status = interpreter->AllocateTensors();
    if (allocate_status != kTfLiteOk)
    {
        TF_LITE_REPORT_ERROR(error_reporter, "AllocateTensors() failed");
        return;
    }
    // Get information about the memory area to use for the model's input.
    model_input = interpreter->input(0);
    if ((model_input->dims->size != 2) || (model_input->dims->data[0] != 1) ||
        (model_input->dims->data[1] !=
         (kFeatureSliceCount * kFeatureSliceSize)) ||
        (model_input->type != kTfLiteInt8))
    {
        TF_LITE_REPORT_ERROR(error_reporter,
                             "Bad input tensor parameters in model");
        return;
    }
    model_input_buffer = model_input->data.int8;
    // Prepare to access the audio spectrograms from a microphone or other source
    // that will provide the inputs to the neural network.
    // NOLINTNEXTLINE(runtime-global-variables)
    static FeatureProvider static_feature_provider(kFeatureElementCount,
                                                   feature_buffer);
    feature_provider = &static_feature_provider;
    static RecognizeCommands static_recognizer(error_reporter);
    recognizer = &static_recognizer;
    previous_time = 0;
    RespondCommandThreadInit();
}
// The name of this function is important for Arduino compatibility.
void loop()
{
    // Fetch the spectrogram for the current time.
    const int32_t current_time = LatestAudioTimestamp();
    int how_many_new_slices = 0;
    TfLiteStatus feature_status = feature_provider->PopulateFeatureData(
        error_reporter, previous_time, current_time, &how_many_new_slices);
    // LOG("current_time: %d, previous_time: %d, how_many_new_slices: %d\n", current_time, previous_time, how_many_new_slices);
    if (feature_status != kTfLiteOk)
    {
        TF_LITE_REPORT_ERROR(error_reporter, "Feature generation failed");
        return;
    }
    previous_time = current_time;
    // If no new audio samples have been received since last time, don't bother
    // running the network model.
    if (how_many_new_slices == 0)
    {
        //LOG("[lk added]how_many_new_slices is 0\n");
        return;
    }
    // Copy feature buffer to input tensor
    for (int i = 0; i < kFeatureElementCount; i++)
    {
        model_input_buffer[i] = feature_buffer[i];
    }
    // Run the model on the spectrogram input and make sure it succeeds.
    TfLiteStatus invoke_status = interpreter->Invoke();
    if (invoke_status != kTfLiteOk)
    {
        TF_LITE_REPORT_ERROR(error_reporter, "Invoke failed");
        return;
    }
    // Obtain a pointer to the output tensor
    TfLiteTensor *output = interpreter->output(0);
    // Determine whether a command was recognized based on the output of inference
    const char *found_command = nullptr;
    uint8_t score = 0;
    bool is_new_command = false;
    TfLiteStatus process_status = recognizer->ProcessLatestResults(
        output, current_time, &found_command, &score, &is_new_command);
    if (process_status != kTfLiteOk)
    {
        TF_LITE_REPORT_ERROR(error_reporter,
                             "RecognizeCommands::ProcessLatestResults() failed");
        return;
    }
    // Do something based on the recognized command. The default implementation
    // just prints to the error console, but you should replace this with your
    // own function for a real application.
    RespondToCommand(error_reporter, current_time, found_command, score,
                     is_new_command);
}

Case Experience
Once the program is flashed, simply say “Turn on”/”Turn off” to see the effect shown in the video. Currently, it only supports near-field wake-up, with a wake-up distance of about 1 meter. Due to the limited corpus for this “Turn on”/”Turn off” wake word, the wake-up effect varies from person to person. It is recommended to train your own wake word according to section 6 or try using the English corpus “on/off” from the dataset.


Self-trained Wake Words
This case is about self-training a “Turn on”/”Turn off” quick wake word. This section will guide you through training a new quick wake word.
The detailed process from recording to deployment on HaaS EDU K1 is as follows:
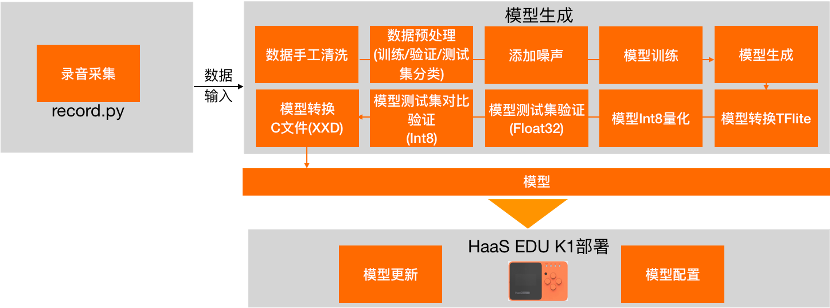
1. Corpus Collection
Corpus collection is a labor-intensive task. In commercial projects, data collection is usually handled by dedicated personnel or specialized data companies. Here, we provide a recording tool written in Python to help you quickly record audio.
Dependency Installation
#pip install pyaudio
or
#conda install pyaudio
Recording Configuration
●
Audio file length of one second
●
Mono, 16KHz, wav format
●
Record at three different speeds: fast, medium, slow
●
Record more than 100 times, the more times the better
●
Quiet environment
1.1 Wake Word Recording
When recording, you will see “Start recording, please speak…” and you can immediately say the wake word, such as “Turn on” or “Turn off”. Since we are detecting a one-second wake word, be sure to say the entire wake word within one second. After recording once, it will automatically play back to confirm whether the recording is complete. If the recording is complete, press Enter to continue to the next recording. If the recording is incomplete or has other noise, press any other key to delete the previous recording and continue to the next recording.
Execution Command:
#python micro_speech/train/record.py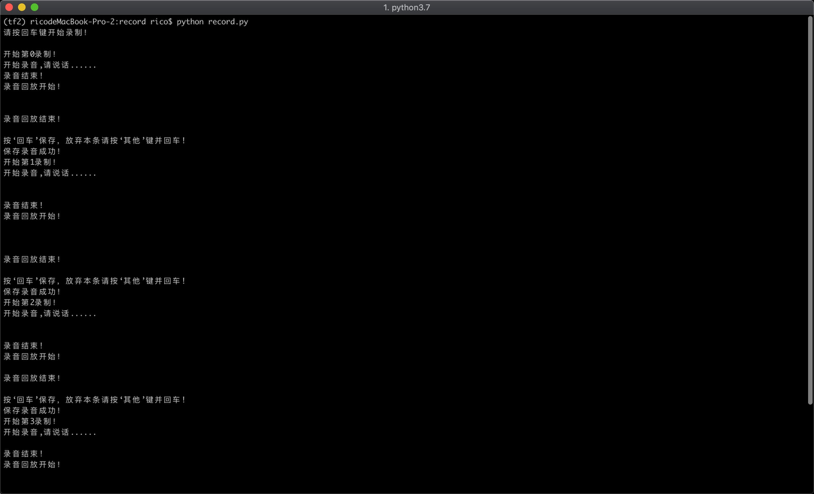
Undoubtedly, this teaching case is teaching you how to record a person’s voice. To achieve commercial recognition rates, recordings from at least 500 people are needed. If you only record your own wake word, it may work for your voice, but the success rate for others will be much lower. This case focuses on helping you understand the principles of wake word training and deployment.
1.2 Background Noise Recording
For better recognition, it is necessary to record some background noise, as the model will learn the difference between the wake word and background noise during training. Background noise can be recorded for 1-2 minutes. The model will randomly select segments from this during training to add as background noise to the wake word.
Execution Command:
#python micro_speech/train/record_noise.py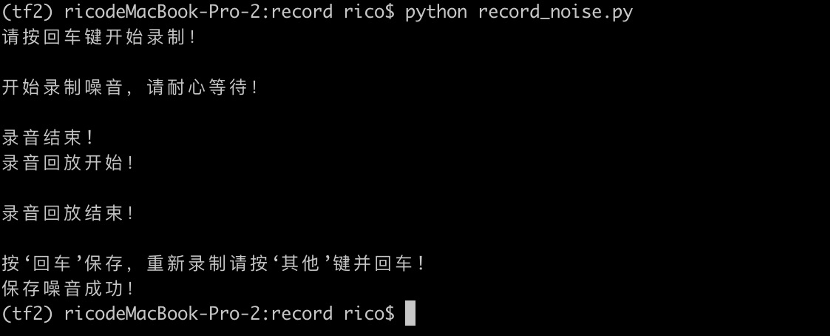
Record background noise and place it in the dataset/_background_noise_ directory.
1.3 Create Your Own Dataset
The default pre-trained dataset sampled in the training script is the Speech Commands dataset released by Google, which is an English dataset. Here we take recording the Chinese “Turn on”/”Turn off” as an example, recording each word 100 times. Once recorded, name the folders “dakai” and “guanbi” and place them in a custom “my_dataset” directory. Then select several words from the Speech Commands dataset such as “house”, “marvin”, “wow”, etc., to serve as the “unknown” category placed in the “my_only_dataset” directory. Its purpose is for the model to learn to distinguish the desired “dakai” and “guanbi” commands from these wake words. “Dakai” and “guanbi” can be understood as positive examples, while the “unknown” category serves as negative examples. Try to limit the total number of command words to below ten so that the training time won’t be too long. If you have other wake words of the same length and format as specified in the recording configuration, you can also include them. Additionally, if you record the wake word 100 times, try to keep the number of recordings for the other wake words in the “unknown” category around 100 as well. The recorded background noise should be placed in the “_background_noise_” directory, and during training, the script will randomly select one-second segments from it to add to the “silent” category.
2. Model Training
2.1 PC-side Training
On PC, open the jupyter notebook plugin in VSCode to open “tflite_micro_speech_demo/micro_speech/train/train_micro_speech_model.ipynb” for training other wake words.
Prerequisite:
After completing the development environment setup as per “Setting Up Python Virtual Environment in VSCode”, install TensorFlow version 1.15:
-
“Setting Up Python Virtual Environment in VSCode”
https://f.cp46.cn/q5zd
#conda create --name tf python=3.6
#conda activate tf
#conda install tensorflow=1.15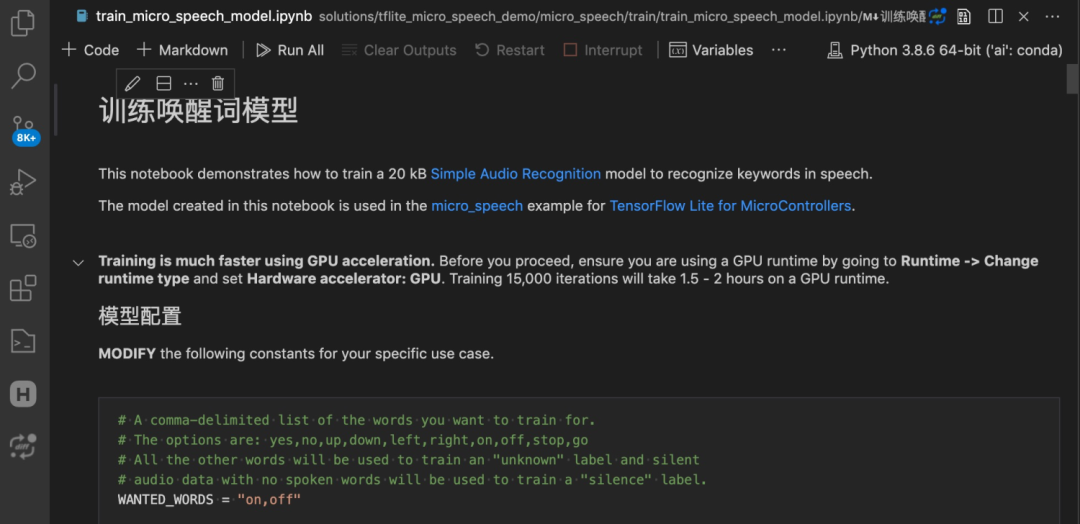
2.2 Training on Alibaba Cloud PAI Platform
If your PC’s performance is limited, using the Alibaba Cloud PAI platform for training is also a good choice. PAI-DSW is a cloud-based machine learning development IDE that provides an interactive programming environment suitable for developers of different levels. You can choose between the personal version, GPU special version, or Explorer version (free). The relevant user manual is DSW Beginner’s User Manual.
-
Explorer version (free)
https://dsw-dev.data.aliyun.com/#/
-
DSW Beginner’s User Manual
https://tianchi.aliyun.com/forum/postDetail?spm=TODO.TODO.header.2.21864825A5pdfB&postId=121050
Taking the personal version of DSW as an example:
1. Log in to the PAI console.
-
Log in to the PAI console
https://pai.data.aliyun.com/console
2. In the left navigation bar, select Model Development and Training > Interactive Modeling (DSW).
3. In the upper left corner of the page, select the target region.
4. On the Notebook Modeling Service page, click Create Instance.
5. On the instance configuration wizard page, configure parameters and select the TensorFlow 1.15-gpu-py36-cu101-ubuntu18.04 version for the image.

2.3 Model Configuration
No matter which platform you use for training, certain parameters in the script need to be configured:
Wake Word Configuration
WANTED_WORDS is your trained wake word. For example:
WANTED_WORDS=”yes, on”, where “yes/on” corresponds to the wake word corpus folders in the dataset directory. Modify according to the wake word you want to train.
Training Steps Configuration
If your wake words are only a few hundred or even ten, the training steps do not need to be too long, modify:
TRANINGS_STEPS=”1200, 300″
If you have over a thousand, you can increase the training steps.
TRANINGS_STEPS=”15000, 3000″
To prevent underfitting or overfitting during training, the duration of training needs to be validated repeatedly to find the optimal result.
Dataset Configuration
If using your own dataset, please modify:
DATASET_DIR = ‘./dataset/’
3. Model Deployment
The model is deployed on HaaS EDU K1, mainly consisting of three steps:
1. Model Replacement: Replace the generated model file model.cc with the micro_speech/micro_features/model.cc file
2. Label Update: In micro_speech/micro_features/micro_model_settings.cc, modify the kCategoryLabels label content, changing the label names to your trained wake words, such as “Turn on”, “Turn off”. Since the labels are matched to the model’s output tensor elements in order, these labels need to be listed in the order provided to the training script.
3. Business Logic Update: In micro_speech/command_responder.cc, update the corresponding business logic based on the labels. Currently, upon hearing “Turn on”, it will turn on the R/G/B LED lights on the HaaS EDU K1. You can also modify the logic to, for example, turn on a remote fan or light via WiFi. Here, you can fully leverage your imagination to create interesting application scenarios.


Summary
This case demonstrates the deployment of voice wake words based on the TFLite-Micro inference engine on HaaS EDU K1. It also provides a full chain development process from wake word collection to model training and deployment, helping you deeply understand how to develop and deploy offline voice recognition on low-power MCUs. We look forward to you creating more offline wake word applications belonging to you.

Click “Read the Original” to fill in the relevant information,
Share your experiences and cases
Don’t forget to “one-click triple connect”~

Share

Like

Looking