Author
Shifan Yu: Director of Frontend Development at EMQX, responsible for frontend development of EMQX, and also a developer and maintainer of MQTTX.
Introduction
With the rapid development of IoT technology, interaction between people and devices, as well as between devices, has become easier. However, achieving more natural, efficient, and intelligent interactions has become a new challenge in the IoT field.
Recently, advanced large language models (LLMs) such as ChatGPT, GPT-3.5, and GPT-4 released by OpenAI have quickly gained popularity worldwide, bringing more possibilities for the integration of general artificial intelligence (AGI) and the IoT field.
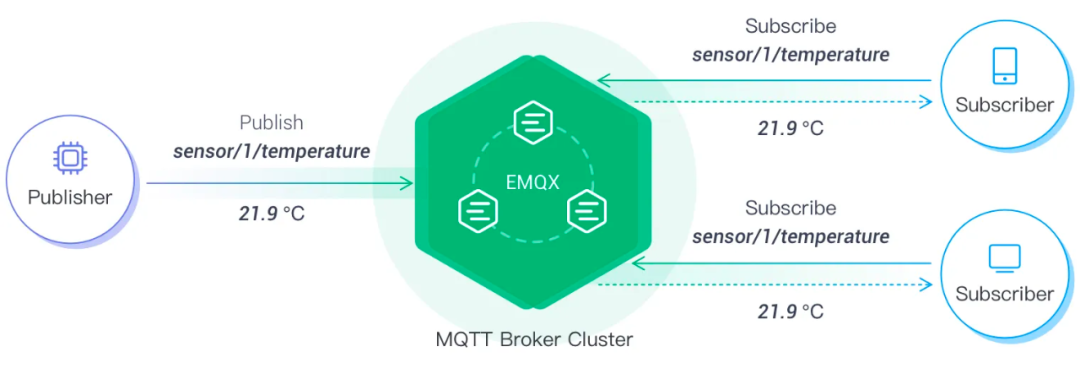
As an advanced natural language processing application, ChatGPT can easily achieve natural dialogue between humans and machines due to its excellent natural language processing capabilities. Meanwhile, the mainstream protocol in the IoT field, MQTT (Message Queuing Telemetry Transport), ensures real-time data transmission and efficient processing through its lightweight communication method and publish/subscribe model.
Therefore, we can boldly imagine that combining the MQTT protocol with ChatGPT can facilitate intelligent human-machine interaction in the IoT field:
-
In the smart home field, users can control smart devices at home through natural conversations with ChatGPT, improving their quality of life.
-
In the industrial automation field, ChatGPT can help engineers analyze device data more quickly, increasing production efficiency.
-
…
Based on this, this article will explore how to combine the MQTT protocol with natural language processing applications like ChatGPT, and will demonstrate an application scenario through a simple setup example, providing some ideas for readers to explore intelligent IoT applications.
Basic Concepts
Before we begin, we need to briefly understand some basic concepts about MQTT and ChatGPT.
MQTT Protocol
As mentioned above, the MQTT protocol is a lightweight messaging transport protocol based on a publish/subscribe model, which is now widely used in various fields, including IoT, mobile internet, smart hardware, vehicle networking, smart cities, remote medical care, power, oil, and energy.
Connecting massive IoT devices using the MQTT protocol requires a key component: the MQTT server. In the solution design below, we will use the large-scale distributed IoT MQTT message server EMQX to achieve efficient and reliable connections of massive IoT devices and real-time processing and distribution of message and event stream data.
After that, we can use an MQTT client to connect to the MQTT server to communicate with IoT devices. In this article, we will use the open-source cross-platform MQTT client MQTTX, which includes desktop, command-line, and web applications, allowing for easy connection testing with the MQTT server, helping developers quickly develop and debug MQTT services and applications.
ChatGPT
ChatGPT (https://openai.com/blog/chatgpt) is a natural language processing application built on advanced large language models such as OpenAI’s GPT-3.5 and GPT-4. GPT (Generative Pre-trained Transformer) is a deep learning model known for its powerful text generation and understanding capabilities. ChatGPT can understand and generate natural language, engaging in smooth and natural conversations with users. To achieve ChatGPT’s natural language processing capabilities, we need to use the API provided by OpenAI (https://platform.openai.com/docs/api-reference) to interact with the GPT model.
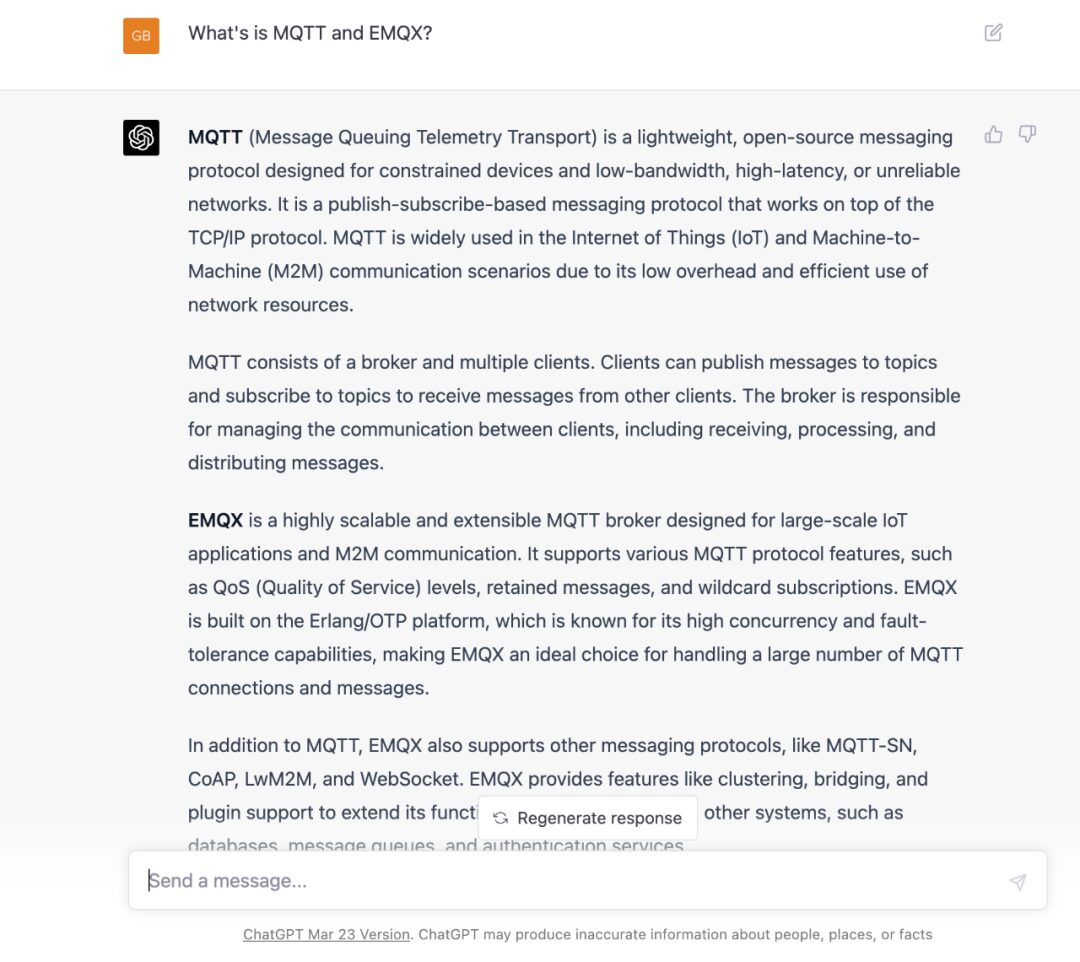
ChatGPT Interface
Solution Design and Preparation Work
Based on the capabilities of the MQTT protocol and ChatGPT, we will design a solution to achieve the integration and interaction of the two.
To implement natural language processing functionality similar to ChatGPT, we will write a client script that uses the API provided by OpenAI to interact with the GPT model. When the MQTT client in this script receives a message and forwards it to the API, a corresponding natural language response will be generated. This response message will then be published to a specific MQTT topic to achieve an interaction loop between ChatGPT and the MQTT client.
Through this design, we will demonstrate the interoperability process of message reception, processing, and forwarding between ChatGPT and the MQTT protocol.
First, please prepare the necessary tools and resources according to the following steps.
-
Install EMQX:
EMQX 5.0 can be quickly installed and started using Docker:
docker run -d --name emqx -p 1883:1883 -p 8083:8083 -p 8883:8883 -p 8084:8084 -p 18083:18083 emqx/emqx:latestIn addition to Docker installation, EMQX also supports installation using RPM or DEB packages. For specific installation methods, please refer to the EMQX 5.0 installation guide (https://www.emqx.io/docs/zh/v5.0/deploy/install.html).
-
Install the MQTTX desktop application:
Go to the official MQTTX website (https://mqttx.app/zh), select the version corresponding to your operating system and CPU architecture, click download, and install.
-
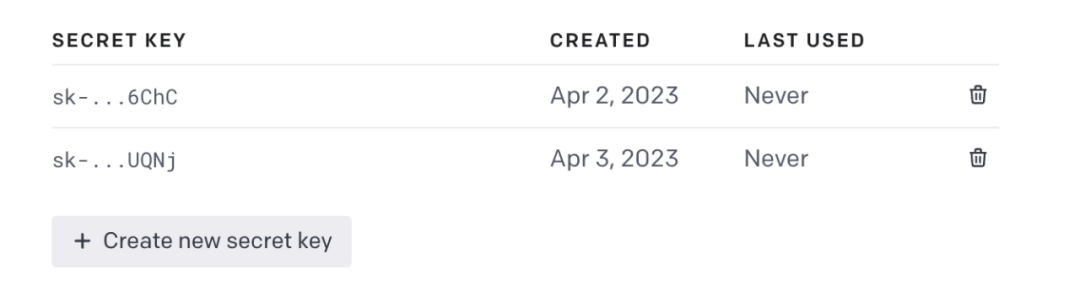
Register an OpenAI account and obtain an API key:
Visit OpenAI (https://platform.openai.com/overview), create or log into your account. Once done, click the top right corner, select <span>View</span><span> API Keys</span> , and under the API keys section, click <span>Create new secret key</span> to generate a new API key. Please keep this key safe, as it will be used for API authentication in subsequent programs.
After completing the above steps, we now have the tools and resources needed to combine the MQTT protocol with ChatGPT applications. For details on how to interact with the GPT language model using OpenAI’s API, you can refer to the OpenAI documentation (https://platform.openai.com/docs/introduction) for detailed guidance and learning materials.
Code Implementation
Once the resources and environment are prepared, we will build an MQTT client using the Node.js environment. This client will receive messages via MQTT topics, send data to the OpenAI API, and generate natural language through the GPT model. The generated natural language will then be published to a specified MQTT topic to achieve integrated interaction. Of course, you can also choose other programming languages such as Python or Golang based on your needs and familiarity. For intuitive demonstration, we will directly use the API, but you can also choose to use the official libraries, which provide a more concise usage for Node.js and Python.
For more information, please refer to: OpenAI Libraries (https://platform.openai.com/docs/libraries/libraries)
-
Prepare the Node.js environment: Ensure that Node.js is installed (recommended version v14.0 or higher). Create a new project folder and initialize the project using the npm init command. Then, install the necessary dependencies using the following command:
npm init -y
npm install axios mqtt dotenv
axios is used for sending HTTP requests, mqtt is for connecting to the MQTT server, and dotenv is for loading environment variables.
-
Use environment variables: Create a file named
<span>.</span><span>env</span>and add your OpenAI API key:OPENAI_API_KEY=your_openai_api_key -
Write the code: Create a new file named
<span><span>index.js</span></span>and implement the connection to the MQTT server, subscribe to the specified MQTT topic, and listen for messages. When a message is received, use axios to send an HTTP request to the OpenAI API, generate a natural language reply, and publish the reply to the specified MQTT topic. Below are thekey codes for each step for your reference:
-
Use the mqtt library to connect to the MQTT server, and upon successful connection, subscribe by default to the
<span><span>chatgpt/request/+</span></span>topic to receive sent MQTT messages:
const host = "127.0.0.1";
const port = "1883";
const clientId = `mqtt_${Math.random().toString(16).slice(3)}`;
const OPTIONS = {
  clientId,
  clean: true,
  connectTimeout: 4000,
  username: "emqx",
  password: "public",
  reconnectPeriod: 1000,
};
const connectUrl = `mqtt://${host}:${port}`;
const chatGPTReqTopic = "chatgpt/request/+";
const client = mqtt.connect(connectUrl, OPTIONS);
-
Write an
<span><span>genText</span></span>async function that receives a userId parameter, creates an HTTP client instance using axios, authenticates with the OpenAI API key in the HTTP headers, and then sends a POST request to the OpenAI API to generate a natural language reply. The generated reply content is then published to the specific topic subscribed by the user to receive replies. The historical messages are stored in the Messages array:
// Add your OpenAI API key to your environment variables in .env
const OPENAI_API_KEY = process.env.OPENAI_API_KEY;
let messages = []; // Store conversation history
const maxMessageCount = 10;
const http = axios.create({
    baseURL: "https://api.openai.com/v1/chat",
    headers: {
        "Content-Type": "application/json",
        Authorization: `Bearer ${OPENAI_API_KEY}`,
    },
});
const genText = async (userId) => {
    try {
        const { data } = await http.post("/completions", {
            model: "gpt-3.5-turbo",
            messages: messages[userId],
            temperature: 0.7,
        });
        if (data.choices && data.choices.length > 0) {
            const { content } = data.choices[0].message;
            messages[userId].push({ role: "assistant", content: content });
            if (messages[userId].length > maxMessageCount) {
               messages[userId].shift(); // Remove the oldest message
            }
            const replyTopic = `chatgpt/response/${userId}`;
            client.publish(replyTopic, content, { qos: 0, retain: false }, (error) => {
                if (error) {
                    console.error(error);
                }
            });
        }
    } catch (e) {
        console.log(e);
    }
};
-
Finally, by listening for messages on the topic
<span><span><span>chatgpt/request/+</span></span></span>, store the received messages in the Messages array, and call the<span><span><span>genText</span></span></span>function to generate a natural language reply and send it directly to the specific topic subscribed by the user. The maximum number of historical messages is 10:
client.on("message", (topic, payload) => {
    // Check if the topic is not the one you're publishing to
    if (topic.startsWith(chatGPTReqTopicPrefix)) {
        const userId = topic.replace(chatGPTReqTopicPrefix, "");
        messages[userId] = messages[userId] || [];
        messages[userId].push({ role: "user", content: payload.toString() });
        if (messages[userId].length > maxMessageCount) {
          messages[userId].shift(); // Remove the oldest message
        }
        genText(userId);
    }});
Run the script service:
node index.jsAt this point, we have completed the basic functionality of this demonstration project. In addition to basic functions, this code also implements user access isolation by simply adding different suffixes in specific topics. By storing previous message history, the GPT model can also understand the context in conversations and generate more coherent and context-appropriate replies based on previous dialogues.
The complete code can be found on GitHub at openai-mqtt-nodejs (https://github.com/emqx/openai-mqtt-nodejs).
Another Solution
In addition to the above example, we can also directly use the Webhook feature in EMQX’s rule engine and data bridging functionality for rapid development.
EMQX supports setting rules that trigger Webhook callbacks when messages are published to specific topics. We only need to write a simple web service that interacts with the OpenAI API and the GPT model, returning the generated reply via HTTP response. This can be published to a specified topic using a new MQTT client or directly using EMQX’s Publish API to achieve integrated interaction.
This method can maximize development cost savings for users with existing web services, quickly achieving PoC or Demo. Its advantage is that it does not require writing a standalone MQTT client and can utilize EMQX’s rule engine to simplify integration processes and flexibly handle data. However, it still requires writing and maintaining a web service, and for complex application scenarios, Webhook may not be convenient enough.
Therefore, the solutions mentioned above each have their advantages. We can choose the more suitable solution based on actual business needs and the technical level of developers. Regardless of the method, EMQX serves as the MQTT infrastructure, providing important support for system integration, allowing developers to quickly build project prototypes and promote digital transformation.
Demo Display
After completing the instance development of the MQTT client and GPT model interaction, we can use the MQTTX desktop client to test this demonstration project. The user interface of MQTTX is similar to that of chat software, making page operations simpler, thus better suited for demonstrating interactions with conversational bots.
First, we need to create a new connection in MQTTX, connecting to the same MQTT server as in the above code, for example: 127.0.0.1, then subscribe to the <span><span><span>chatgpt/response/demo</span></span></span> topic to receive replies and send messages to the <span><span><span>chatgpt/<span>request</span>/demo</span></span></span> topic. Here, the demo suffix can be replaced with other strings to achieve user access isolation, and we can test by sending a Hello message:

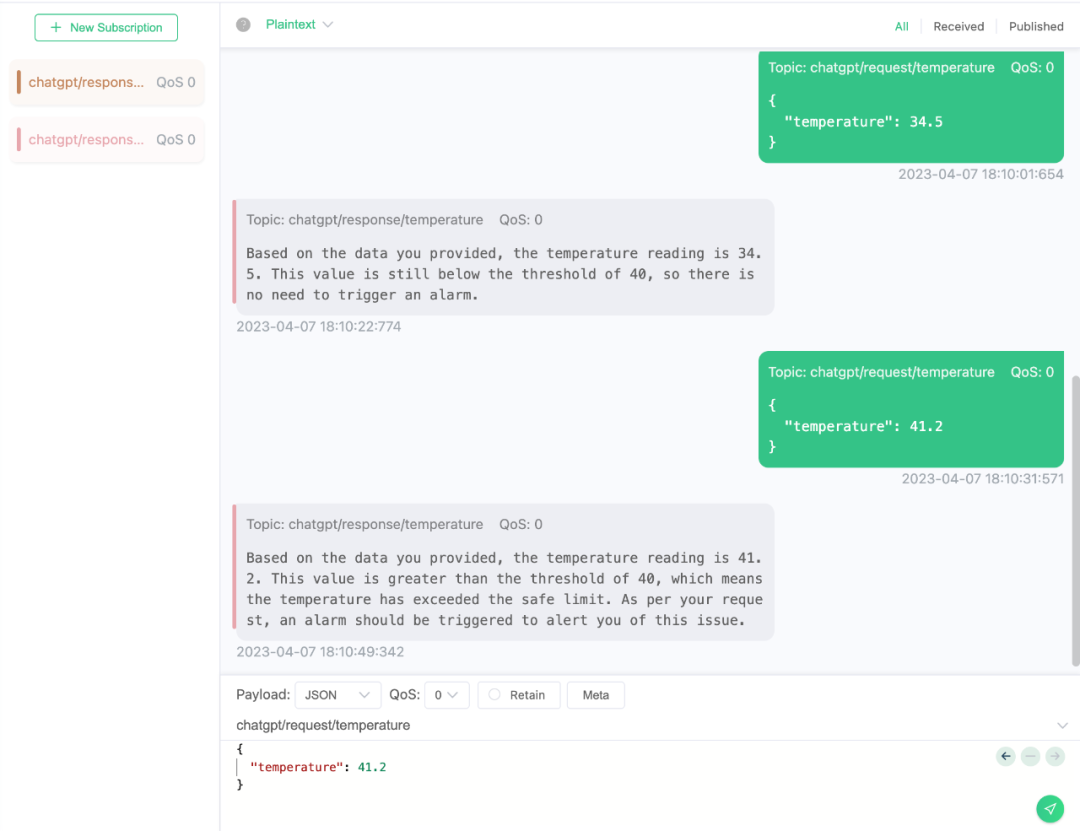
Next, we simulate a more complex demonstration environment. If the temperature of a certain sensor exceeds a preset threshold, the ChatGPT bot will send an alarm message to another MQTT topic connected to a monitoring device, such as a smartwatch or smart speaker. The monitoring device can convert the alarm message into speech using natural language technology, allowing users to receive and understand the information more conveniently.
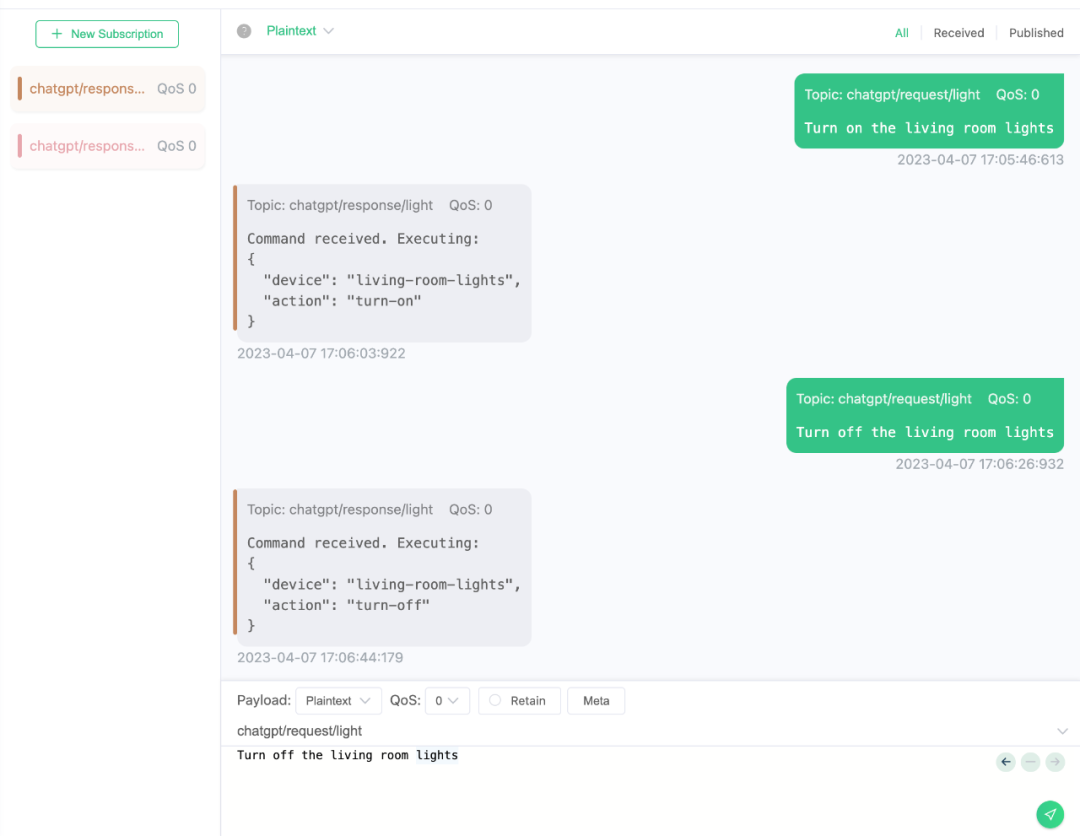
For example, we can also create a smart home environment that includes multiple MQTT topics corresponding to different types of devices (e.g., lights, air conditioning, audio systems). We will use ChatGPT to generate natural language commands for real-time interaction with these devices via the MQTT client.
Future Prospects
Combining ChatGPT and the MQTT protocol can realize intelligent IoT systems, with wide application potential in smart homes and industrial automation. Through natural language interaction, users can control the on/off, brightness, color, and other parameters of home devices, achieving a more intelligent and comfortable living environment. In industrial automation, utilizing ChatGPT and MQTT for intelligent device maintenance and control can lead to a more efficient and intelligent manufacturing process.
In the future, we can envision ChatGPT or even more intelligent AGI tools playing more roles in improving efficiency and productivity in the IoT field, such as:
-
Message parsing: Parsing messages transmitted via MQTT to extract necessary data for subsequent processing and analysis.
-
Semantic understanding: Understanding and processing messages received from MQTT to extract more precise information.
-
Intelligent processing: Using AI technology to intelligently process received MQTT messages, helping users obtain suitable solutions more quickly.
-
User feedback: Acting as a representative of intelligent interaction, receiving user feedback via MQTT and providing corresponding responses.
-
Virtual assistant: Serving as a virtual assistant, using voice recognition technology to control smart home devices, providing users with smarter and more efficient services, enhancing convenience and comfort in their lives.
Conclusion
In this blog, we briefly discussed the combination of MQTT and ChatGPT and its potential applications. Through EMQX and MQTTX, combined with the API provided by OpenAI, we realized an AI application similar to ChatGPT, demonstrating the integration of MQTT and ChatGPT by receiving and forwarding processed data through MQTT connections.
Although these technologies have not yet been deployed in production environments, as more products integrating AI technology are launched (such as New Bing integrating the GPT model into its search engine and GitHub’s Copilot), we believe that the future development direction of artificial intelligence (AI) and Internet of Things (IoT) technologies will also include optimization of natural language interaction, enhancement of device control intelligence, and more innovative application scenarios.
In summary, the combination of MQTT and ChatGPT reveals a field worth paying attention to and exploring deeply. We look forward to these continuously evolving innovative technologies bringing us a better world.