Example Camera Adaptation for Ai_forward_view

Example Camera Adaptation for Ai_forward_view

01 Environment Preparation
1.1 Hardware Environment
Development Board: J5 EVM
OE Version: V1.1.68
System Software: LNX_PL3.0_20231018-2 release

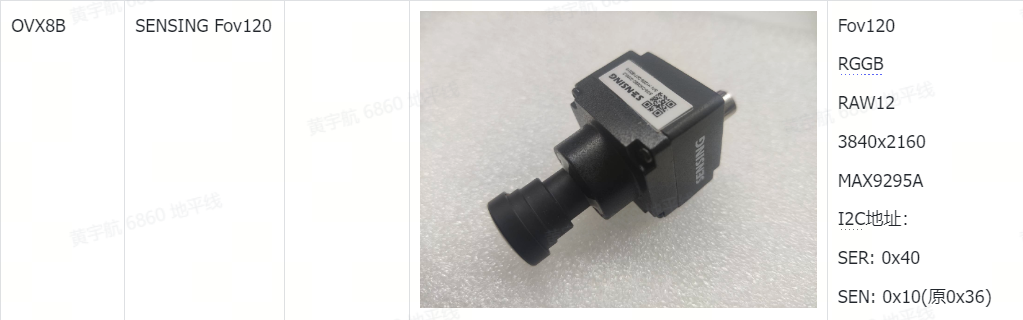
Deserializer Subboard: MAX9296, MAX96712

Example Camera Adaptation for Ai_forward_view

Example Camera Adaptation for Ai_forward_view

1.2 Hardware Connections

Example Camera Adaptation for Ai_forward_view

Example Camera Adaptation for Ai_forward_view

1.3 Power Check

Use i2cdetect to check if MIPI RX1 detects the Camera and MAX9296 subboard. If only address 0x28 is detected, it indicates no normal power supply.

i2cdetect -y -r 7    // Scan devices on the specified I2C bus
If normal power is not detected, it is necessary to pull up the PWDNB pin level.
hrut_gpio 454 1 1    // Pull up the specified 454 pin levelhrut_gpio 455 1 1    // Pull up the specified 455 pin level

Example Camera Adaptation for Ai_forward_view

Example Camera Adaptation for Ai_forward_view

  0x18        // Sensor, required
  0x28        // POC power, optional
  0x40        // Serializer, required
  0x48        // Deserializer, required
  0x50        // Sensor's EEPROM, optional
  0x58        // Custom address of the module, also EEPROM, optional
02 Example Run
2.1 Compilation
Refer to user manual for compilation, and copy the generated deploy directory to J5 EVM board.
2.2 Configuration File Modification

Example Camera Adaptation for Ai_forward_view

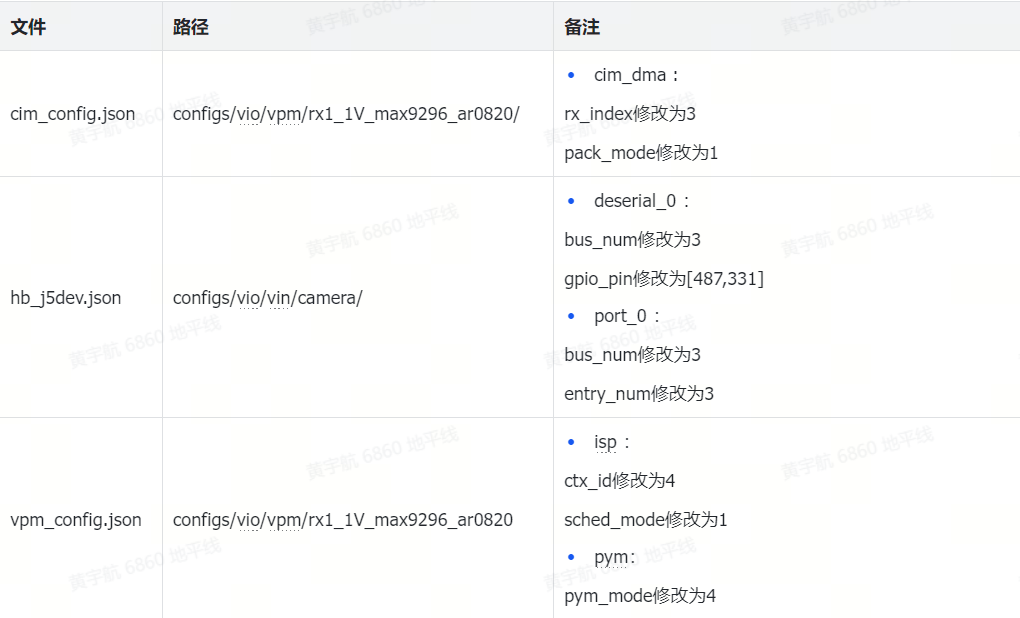
2.2.1 Configuration File:

https://pan.horizon.ai/index.php/s/jsgQ4sc529Yo3i9 (If the file is invalid, reply in the comments)

2.2.2 Configuration Information

Example Camera Adaptation for Ai_forward_view

Example Camera Adaptation for Ai_forward_view

2.2.3 Change List

Example Camera Adaptation for Ai_forward_view

2.3 Run Example
Run the following command in the deploy directory, and enter the corresponding board address in the browser to get the correct result.
sh run_sample.sh l

Example Camera Adaptation for Ai_forward_view

03 Adapt Customer Model
The customer’s model input size is different from the example of 512*512, and the vio/vpm/rx1_1V_max9296_ar0820/vpm_config.json configuration needs to be modified.
3.1 Important Parameter Description
The parameters of the Gaussian layer, linear layer, and downsampling layer are similar. Take the Gaussian layer and downsampling special parameters as examples:
gs_max_layer_en     // Enable Gaussian hardware base layer count
gs_en              // Enable Gaussian layer software output
gs_start_top       // Starting row coordinate of gs layer roi
gs_start_left      // Starting column coordinate of gs layer roi
gs_region_width    // Output width of gs layer, must be even
gs_region_height   // Output height of gs layer, must be even
gs_stride_y        // Output y component stride of gs layer, must be 16 aligned
gs_stride_uv       // Output uv component stride of gs layer, must be 16 aligned
ds_roi_layer       // Choose the source data source of the downscale layer
ds_roi_sel        // Source image type selection, original layer: 0, bl layer: 1, gs layer: 2
3.2 Modify Configuration

Example Camera Adaptation for Ai_forward_view

Assuming the input required by the customer model is 480*270, there are two ways to modify the output parameters of the downsampling layer shown in the figure. Remember to only modify the parameters in the red box; other parameters do not need to be modified, otherwise, there will be other issues.
  • Linear Layer: Enable the first two layers of the linear layer, the first layer of downsampling, and select the second layer of the linear layer as the source image input.

Example Camera Adaptation for Ai_forward_view

  • Gaussian Layer: Enable the first two layers of the Gaussian layer, the first layer of downsampling, and select the second layer of the Gaussian layer as the source image input.

Example Camera Adaptation for Ai_forward_view

04 Change Interface
The MIPI RX index, I2C bus index, and power GPIO pins of the J5EVM board are shown below:

Example Camera Adaptation for Ai_forward_view

Example Camera Adaptation for Ai_forward_view

4.1 Replace MIPI Interface

4.1.1 CIM Mode Interface Replacement

Replace the MAX9296 subboard from the MIPI RX1 interface to the RX0 interface, and need to modify the configuration file accordingly:

Example Camera Adaptation for Ai_forward_view

4.1.2 CIM Mode Change to CIMDMA Mode

Replace the MAX9296 subboard from the MIPI RX1 interface to the RX3 interface, and need to modify the configuration file accordingly:

Example Camera Adaptation for Ai_forward_view

4.2 Same Subboard Interface Replacement
The port definitions of the MAX9296 and MAX96712 subboards are shown in the figure below:

Example Camera Adaptation for Ai_forward_view

LinkA corresponds to

Leave a Comment

×