★
Embedded AI Series – Deploying YOLOv5 Model on RK Platform RV1126
”
1. Introduction
The official RK example code includes a deployment example for YOLOv5, so we do not need to start from scratch as we did in previous articles for deploying YOLOv3. We can first run the official YOLOv5 example code from RK and then make modifications or port it according to our actual project needs.
This article continues to use the development environment set up in the article “Embedded AI Series – Installing RKNN Toolkit (Streamlined Version)” and the RKNP project downloaded in the article “Embedded AI Series – Deploying YOLOv3 Model on RV1126”. The GitHub address is: https://github.com/rockchip-linux/rknpu.git. The directory rknpu/rknn/rknn_api/examples/rknn_yolov5_demo/ contains the YOLOv5 example code.
2. Read the Documentation
The first step, which is also very important, is to read the documentation. In the directory rknn_yolov5_demo, there is a text file README.md that briefly describes the usage process of the YOLOv5 example code:
// README.md# Yolo-v5 demo
## Model source
The original model used in this demo is yolov5s_relu.pt, which is included in the convert_rknn_demo/yolov5/models directory. Compared to the original version, some post-processing has been removed from the model and moved to the outside for better inference performance. The silu activation function has been replaced with relu. For more information on creating a YOLOv5 model without post-processing, please refer to [https://github.com/airockchip/yolov5/blob/master/README_rkopt_manual.md. ↗](https://github.com/airockchip/yolov5/blob/master/README_rkopt_manual.md)
For more information about other YOLO models, please refer to [https://github.com/airockchip/rknn_model_zoo/tree/main/models/CV/object_detection/yolo. ↗](https://github.com/airockchip/rknn_model_zoo/tree/main/models/CV/object_detection/yolo)


## Convert model to RKNN
You can use the convert_rknn_demo/yolov5/models/pytorch2rknn.py script to get the RKNN model. The following special parameters can be specified during conversion:
- Set output_optimize to 1 to reduce the time it takes for the capi normal inference interface rknn_outputs_get. (conflicts with zero-copy, cannot be used together)- When force_builtin_perm is set to True, the generated model input changed to nhwc instead of nchw, which is more suitable for image input. (Most images are in hwc format)

## Notice
1. Use rknn-toolkit version 1.7.0 or higher.2. This demo only supports inference of rknn models with 8-bit asymmetric quantization.3. When switching to your own trained model, please pay attention to aligning post-processing parameters such as anchor, otherwise it may cause post-processing parsing errors.4. The official yolov5 website and rk pre-trained models detect 80 classes of targets. If you are using your own trained model, modify the OBJ_CLASS_NUM and NMS_THRESH post-processing parameters in include/postprocess.h before compiling.5. Due to hardware limitations, the post-processing part of the yolov5 model is moved to the CPU for this demo's model by default. The models included in this demo use relu as the activation function. Compared with the silu activation function, the accuracy is slightly reduced, but the inference speed is faster.6. Regarding loading time: the models in the model directory are pre-compiled rknn models, which load faster than non-pre-compiled rknn models. The conversion script in the convert_rknn_demo directory generates non-pre-compiled rknn models. If you need to re-generate pre-compiled rknn models, please refer to [example of export rknn pre-compile model](https://github.com/rockchip-linux/rknn-toolkit/tree/master/examples/common_function_demos/export_rknn_precompile_model).

## Build and Install
### Compilation
Modify the path of the cross-compiler in `build.sh` according to the specified platform
- for rk1808, modify it to:``shGCC_COMPILER=~/opt/gcc-linaro-6.3.1-2017.05-x86_64_aarch64-linux-gnu/bin/aarch64-linux-gnu``- for rv1109/rv1126, modify it to:``shGCC_COMPILER=~/opt/gcc-arm-8.3-2019.03-x86_64-arm-linux-gnueabihf/bin/arm-linux-gnueabihf``- for rk1806, modify it to:``shGCC_COMPILER=~/opts/gcc-linaro-6.3.1-2017.05-x86_64_arm-linux-gnueabihf/bin/arm-linux-gnueabihf``
Then execute:
``sh./build.sh``
### Push executable file to the board
- Copy install/rknn_yolov5_demo to the /userdata/ directory of the board.  - If using a rockchip EVB board, you can use adb to push the file to the board:
``shadb push install/rknn_yolov5_demo /userdata/``
If using another board, you can use scp or other methods to copy install/rknn_yolov5_demo to the /userdata/ directory of the board.
## Run
``shadb shellcd /userdata/rknn_yolov5_demo/``
- rk180x
``sh./run_rk180x.sh``
- rv1109/rv1126
``sh./run_rv1109_rv1126.sh``
## Expected results
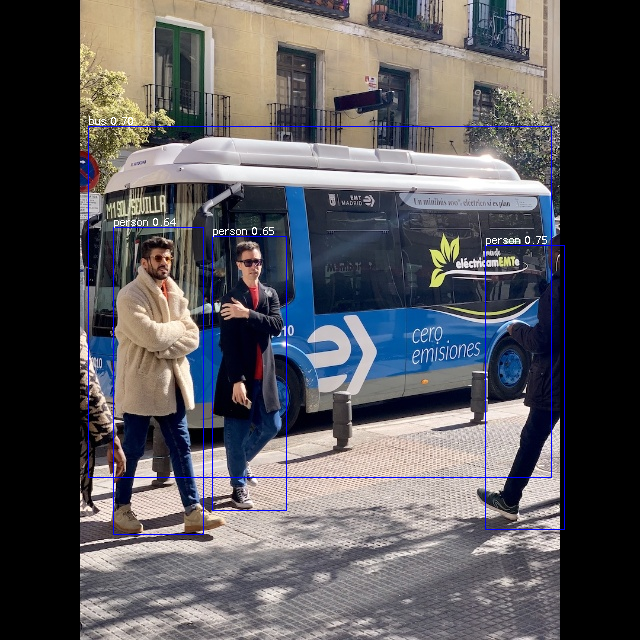
The test result should be similar to picture `ref_detect_result.bmp`.  Reference labels, coordinates, and scores:``person @ (208 238 287 511) 0.876641person @ (480 240 559 525) 0.867932person @ (108 233 230 535) 0.856740bus @ (91 127 554 466) 0.610052``
- Different platforms, different versions of tools and drivers may have slightly different results.
Summarizing the key points described in the documentation:
- Model source: To achieve better performance, the model used in this example removes some post-processing and replaces the activation function with relu.
- Convert model to RKNN: You can use the script pytorch2rknn.py to convert the model. Setting the parameter output_optimize to 1 can reduce the time taken by the interface rknn_outputs_get, and setting the parameter force_builtin_perm to true can change the model input to the more general nhwc format.
- Notice: The version of rknn-toolkit should not be lower than 1.7.0; using the relu activation function leads to a decrease in accuracy but improves performance; the demo provides pre-compiled models, which load faster than models converted by the script;
- Compilation: Before compiling, be sure to set the cross-compilation toolchain;
- Run: The compiled executable file, libraries, and model dependencies must be copied to the target board for execution;
3. Compilation
From reading the documentation, we know that we do not need to convert the model first; we can directly use the pre-converted rknn format model provided by RK. Next, we will compile the source code.
Enter the Docker container of the development environment set up in the article “Embedded AI Series – Installing RKNN Toolkit (Streamlined Version)”
3.1 Set Up Cross Toolchain
Enter the directory:
/work/rk/rknpu/rknn/rknn_api/examples/rknn_yolov5_demo, modify build.sh to specify the path of the cross-tool in the development environment:
# cd /work/rk/rknpu/rknn/rknn_api/examples/rknn_yolov5_demo# vi build.sh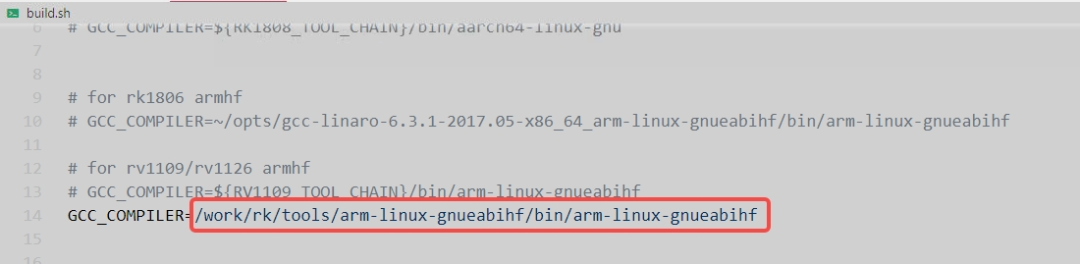
3.2 Compile
Execute the build.sh script to compile:
# ./build.shThe build.sh script will install the executable file and dependent resources into the install directory after compilation:
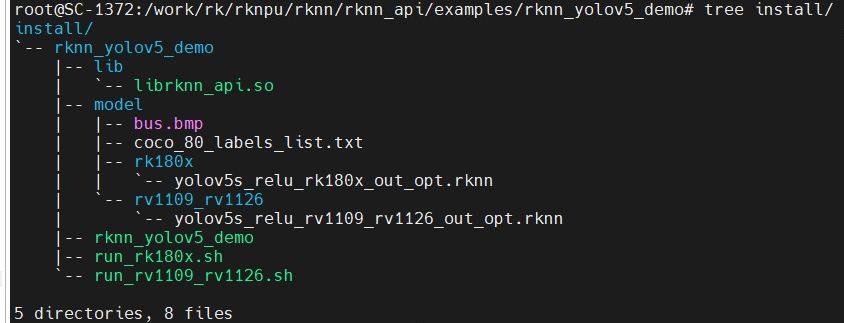
4. Run
4.1 Copy to Target Board
Package the entire install directory and copy it to the target board
# tar cvf install.tar install/# scp install.tar [email protected]:/userdata/tmp4.2 Run on Target Board
Enter the target board, extract the tar package,
Enter the directory install/rknn_yolov5_demo and execute the script run_rv1109_rv1126.sh
# tar xvf install.tar# cd install/rknn_yolov5_demo# chmod +x run_rv1109_rv1126.sh# ./run_rv1109_rv1126.shYou should see normal output in the console:
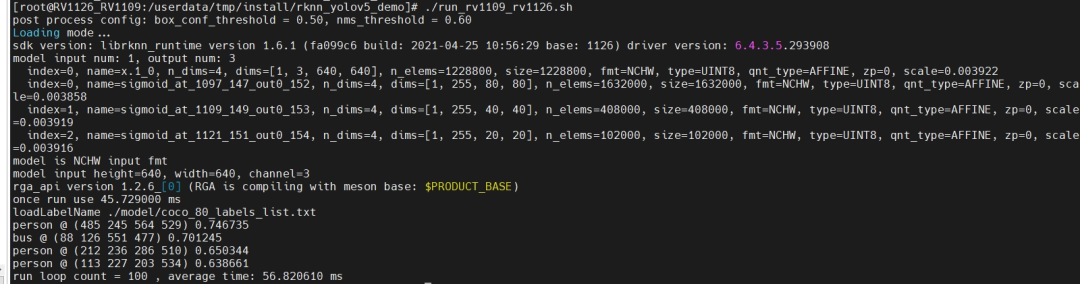
And generate result images: