


#include <Wire.h>#include <Adafruit_GFX.h>#include <Adafruit_SSD1306.h>
#define SCREEN_WIDTH 128 // OLED display width, in pixels
#define SCREEN_HEIGHT 64 // OLED display height, in pixels

// Declaration for an SSD1306 display connected to I2C (SDA, SCL pins)
Adafruit_SSD1306 display(SCREEN_WIDTH, SCREEN_HEIGHT, &Wire, -1);

void setup() {  Serial.begin(115200);
  if(!display.begin(SSD1306_SWITCHCAPVCC, 0x3C)) { // Address 0x3D for 128x64    Serial.println(F("SSD1306 allocation failed"));    for(;;);  }  delay(2000);  display.clearDisplay();
  display.setTextSize(1);  display.setTextColor(WHITE);  display.setCursor(0, 10);  // Display static text  display.println("Hello, world!");  display.display(); }
void loop() {}#include <Wire.h>#include <Adafruit_GFX.h>#include <Adafruit_SSD1306.h>#define SCREEN_WIDTH 128 // OLED display width, in pixels
#define SCREEN_HEIGHT 64 // OLED display height, in pixelsAdafruit_SSD1306 display(SCREEN_WIDTH, SCREEN_HEIGHT, &Wire, -1);Serial.begin(115200);if(!display.begin(SSD1306_SWITCHCAPVCC, 0x3C)) { // Address 0x3D for 128x64 Serial.println(F("SSD1306 allocation failed")); for(;;); }display.clearDisplay();display.setTextSize(1); display.setTextColor(WHITE); display.setCursor(0, 10);
display.println("Hello, world!");display.display(); 
display.drawPixel(64, 32, WHITE);
display.drawLine(0, 0, 127, 20, WHITE);
display.drawRect(10, 10, 50, 30, WHITE);
display.drawRect(10, 10, 50, 30, WHITE);display.fillRect(10, 10, 50, 30, WHITE);
display.drawRoundRect(10, 10, 30, 50, 2, WHITE);display.fillRoundRect(10, 10, 30, 50, 2, WHITE);
display.drawCircle(64, 32, 10, WHITE);

#include <Fonts/FreeSerif12pt7b.h>display.setFont(&FreeSerif12pt7b);#include <Wire.h>#include <Adafruit_GFX.h>#include <Adafruit_SSD1306.h>#include <Fonts/FreeSerif9pt7b.h>
#define SCREEN_WIDTH 128 // OLED display width, in pixels
#define SCREEN_HEIGHT 64 // OLED display height, in pixels
// Declaration for an SSD1306 display connected to I2C (SDA, SCL pins)
Adafruit_SSD1306 display(SCREEN_WIDTH, SCREEN_HEIGHT, &Wire, -1);
void setup() { Serial.begin(115200);
if(!display.begin(SSD1306_SWITCHCAPVCC, 0x3C)) { Serial.println("SSD1306 allocation failed"); for(;;); } delay(2000);
display.setFont(&FreeSerif9pt7b); display.clearDisplay(); display.setTextSize(1); display.setTextColor(WHITE); display.setCursor(0,20); display.println("Hello, world!"); display.display(); delay(2000); }
void loop() { }
http://javl.github.io/image2cpp/

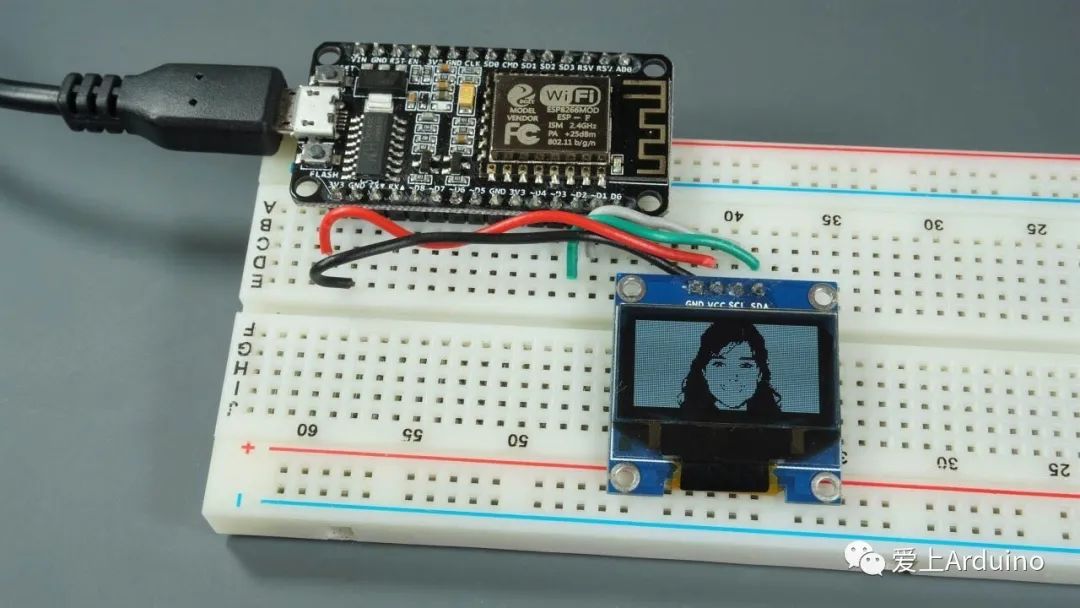
#include <Wire.h>#include <Adafruit_GFX.h>#include <Adafruit_SSD1306.h>
#define SCREEN_WIDTH 128
#define SCREEN_HEIGHT 64

Adafruit_SSD1306 display(SCREEN_WIDTH, SCREEN_HEIGHT, &Wire, -1);

static const uint8_t image_data_Saraarray[1024] = {    0xff, 0xff, 0xff, 0xff, 0xff, 0xff, 0xfe, 0x00, 0x00, 0x00, 0x1f, 0xff, 0xff, 0xff, 0xff, 0xff,     0xff, 0xff, 0xff, 0xff, 0xff, 0xff, 0xf8, 0x00, 0x00, 0x00, 0x0f, 0xff, 0xff, 0xff, 0xff, 0xff,     0xff, 0xff, 0xff, 0xff, 0xff, 0xff, 0xf8, 0x00, 0x00, 0x00, 0x07, 0xff, 0xff, 0xff, 0xff, 0xff,     0xff, 0xff, 0xff, 0xff, 0xff, 0xff, 0xf0, 0x00, 0x00, 0x00, 0x07, 0xff, 0xff, 0xff, 0xff, 0xff,     0xff, 0xff, 0xff, 0xff, 0xff, 0xff, 0xe0, 0x00, 0x00, 0x00, 0x03, 0xff, 0xff, 0xff, 0xff, 0xff,     0xff, 0xff, 0xff, 0xff, 0xff, 0xff, 0xc0, 0x00, 0x00, 0x00, 0x01, 0xff, 0xff, 0xff, 0xff, 0xff,     0xff, 0xff, 0xff, 0xff, 0xff, 0xff, 0x80, 0x00, 0x00, 0x00, 0x01, 0xff, 0xff, 0xff, 0xff, 0xff,     0xff, 0xff, 0xff, 0xff, 0xff, 0xff, 0x80, 0x00, 0x00, 0x00, 0x00, 0xff, 0xff, 0xff, 0xff, 0xff,     0xff, 0xff, 0xff, 0xff, 0xff, 0xff, 0x00, 0x00, 0x00, 0x00, 0x00, 0x7f, 0xff, 0xff, 0xff, 0xff,     0xff, 0xff, 0xff, 0xff, 0xff, 0xfe, 0x00, 0x00, 0x00, 0x00, 0x00, 0x3f, 0xff, 0xff, 0xff, 0xff,     0xff, 0xff, 0xff, 0xff, 0xff, 0xfc, 0x00, 0x00, 0x00, 0x00, 0x00, 0x3f, 0xff, 0xff, 0xff, 0xff,     0xff, 0xff, 0xff, 0xff, 0xff, 0xfc, 0x00, 0x00, 0x00, 0x00, 0x00, 0x1f, 0xff, 0xff, 0xff, 0xff,     0xff, 0xff, 0xff, 0xff, 0xff, 0xfc, 0x00, 0x00, 0x00, 0x00, 0x00, 0x1f, 0xff, 0xff, 0xff, 0xff,     0xff, 0xff, 0xff, 0xff, 0xff, 0xfc, 0x00, 0x00, 0x00, 0x0a, 0x00, 0x1f, 0xff, 0xff, 0xff, 0xff,     0xff, 0xff, 0xff, 0xff, 0xff, 0xfc, 0x00, 0x00, 0x14, 0x9e, 0x00, 0x1f, 0xff, 0xff, 0xff, 0xff,     0xff, 0xff, 0xff, 0xff, 0xff, 0xfc, 0x00, 0x00, 0x36, 0x3f, 0x00, 0x1f, 0xff, 0xff, 0xff, 0xff,     0xff, 0xff, 0xff, 0xff, 0xff, 0xfc, 0x00, 0x00, 0x6d, 0xff, 0x00, 0x1f, 0xff, 0xff, 0xff, 0xff,     0xff, 0xff, 0xff, 0xff, 0xff, 0xfc, 0x00, 0x00, 0xfb, 0xff, 0x80, 0x1f, 0xff, 0xff, 0xff, 0xff,     0xff, 0xff, 0xff, 0xff, 0xff, 0xfc, 0x00, 0x03, 0xd7, 0xff, 0x80, 0x0f, 0xff, 0xff, 0xff, 0xff,     0xff, 0xff, 0xff, 0xff, 0xff, 0xf8, 0x00, 0x07, 0xef, 0xff, 0x80, 0x07, 0xff, 0xff, 0xff, 0xff,     0xff, 0xff, 0xff, 0xff, 0xff, 0xf8, 0x00, 0x0f, 0xdf, 0xff, 0x90, 0x07, 0xff, 0xff, 0xff, 0xff,     0xff, 0xff, 0xff, 0xff, 0xff, 0xf8, 0x00, 0x0f, 0xbf, 0xff, 0xd0, 0x07, 0xff, 0xff, 0xff, 0xff,     0xff, 0xff, 0xff, 0xff, 0xff, 0xf0, 0x00, 0x1d, 0x7f, 0xff, 0xd0, 0x07, 0xff, 0xff, 0xff, 0xff,     0xff, 0xff, 0xff, 0xff, 0xff, 0xf0, 0x01, 0x1b, 0xff, 0xff, 0xc0, 0x07, 0xff, 0xff, 0xff, 0xff,     0xff, 0xff, 0xff, 0xff, 0xff, 0xf0, 0x02, 0xa7, 0xff, 0xff, 0xc0, 0x07, 0xff, 0xff, 0xff, 0xff,     0xff, 0xff, 0xff, 0xff, 0xff, 0xe0, 0x00, 0x03, 0xff, 0xc0, 0x00, 0x07, 0xff, 0xff, 0xff, 0xff,     0xff, 0xff, 0xff, 0xff, 0xff, 0xe0, 0x00, 0x00, 0xff, 0x80, 0x00, 0x0b, 0xff, 0xff, 0xff, 0xff,     0xff, 0xff, 0xff, 0xff, 0xff, 0xc0, 0x03, 0xff, 0xff, 0xff, 0xf0, 0x0f, 0xff, 0xff, 0xff, 0xff,     0xff, 0xff, 0xff, 0xff, 0xff, 0x80, 0x07, 0xff, 0xff, 0xff, 0xf0, 0x0f, 0xff, 0xff, 0xff, 0xff,     0xff, 0xff, 0xff, 0xff, 0xff, 0x00, 0x0f, 0x07, 0xff, 0xf8, 0xf8, 0x03, 0xff, 0xff, 0xff, 0xff,     0xff, 0xff, 0xff, 0xff, 0xff, 0x00, 0x0e, 0x01, 0xff, 0xc0, 0x38, 0x07, 0xff, 0xff, 0xff, 0xff,     0xff, 0xff, 0xff, 0xff, 0xff, 0x00, 0x1c, 0x46, 0xff, 0xb1, 0x18, 0x07, 0xff, 0xff, 0xff, 0xff,     0xff, 0xff, 0xff, 0xff, 0xfe, 0x00, 0x3f, 0x97, 0xff, 0xc0, 0x7a, 0x07, 0xff, 0xff, 0xff, 0xff,     0xff, 0xff, 0xff, 0xff, 0xfe, 0x00, 0x3f, 0xff, 0xff, 0xff, 0xfe, 0x03, 0xff, 0xff, 0xff, 0xff,     0xff, 0xff, 0xff, 0xff, 0xfe, 0x00, 0x3f, 0xff, 0xff, 0xff, 0xfe, 0x03, 0xff, 0xff, 0xff, 0xff,     0xff, 0xff, 0xff, 0xff, 0xfe, 0x01, 0x3f, 0xff, 0xff, 0xff, 0xfe, 0x01, 0xff, 0xff, 0xff, 0xff,     0xff, 0xff, 0xff, 0xff, 0xfe, 0x01, 0xbf, 0xff, 0xff, 0xff, 0xfe, 0x81, 0xff, 0xff, 0xff, 0xff,     0xff, 0xff, 0xff, 0xff, 0xfc, 0x00, 0xbf, 0xff, 0xff, 0xff, 0xfc, 0x81, 0xff, 0xff, 0xff, 0xff,     0xff, 0xff, 0xff, 0xff, 0xfc, 0x00, 0xff, 0xff, 0xfe, 0xff, 0xfd, 0x83, 0xff, 0xff, 0xff, 0xff,     0xff, 0xff, 0xff, 0xff, 0xf8, 0x00, 0xbf, 0xff, 0xfe, 0xff, 0xfd, 0x01, 0xff, 0xff, 0xff, 0xff,     0xff, 0xff, 0xff, 0xff, 0xf8, 0x00, 0x7f, 0xff, 0xff, 0xff, 0xff, 0x01, 0xff, 0xff, 0xff, 0xff,     0xff, 0xff, 0xff, 0xff, 0xf0, 0x00, 0x7f, 0xff, 0xff, 0xff, 0xfb, 0x03, 0xff, 0xff, 0xff, 0xff,     0xff, 0xff, 0xff, 0xff, 0xe0, 0x00, 0x3f, 0xff, 0xdc, 0xff, 0xfa, 0x03, 0xff, 0xff, 0xff, 0xff,     0xff, 0xff, 0xff, 0xff, 0xd8, 0x00, 0x1f, 0xff, 0xff, 0xff, 0xf8, 0x03, 0xff, 0xff, 0xff, 0xff,     0xff, 0xff, 0xff, 0xff, 0xd0, 0x00, 0x1f, 0xff, 0xff, 0xff, 0xf8, 0x01, 0xff, 0xff, 0xff, 0xff,     0xff, 0xff, 0xff, 0xff, 0x90, 0x00, 0x1f, 0xff, 0xff, 0xff, 0xf8, 0x02, 0xff, 0xff, 0xff, 0xff,     0xff, 0xff, 0xff, 0xff, 0xb0, 0x00, 0x0f, 0xf5, 0xff, 0xd7, 0xf8, 0x01, 0xff, 0xff, 0xff, 0xff,     0xff, 0xff, 0xff, 0xff, 0xb0, 0x00, 0x0f, 0xff, 0xff, 0xff, 0xf8, 0x00, 0x5f, 0xff, 0xff, 0xff,     0xff, 0xff, 0xff, 0xff, 0xa0, 0x00, 0x0f, 0xfb, 0xff, 0xff, 0xf0, 0x00, 0x3f, 0xff, 0xff, 0xff,     0xff, 0xff, 0xff, 0xff, 0x80, 0x00, 0x0f, 0xfd, 0xff, 0xdf, 0xf0, 0x00, 0x3f, 0xff, 0xff, 0xff,     0xff, 0xff, 0xff, 0xff, 0x80, 0x00, 0x07, 0xff, 0xff, 0xbf, 0xf0, 0x00, 0x0f, 0xff, 0xff, 0xff,     0xff, 0xff, 0xff, 0xff, 0x80, 0x00, 0x07, 0xff, 0xff, 0xff, 0xe0, 0x00, 0x87, 0xff, 0xff, 0xff,     0xff, 0xff, 0xff, 0xff, 0x80, 0x00, 0x03, 0xff, 0xff, 0xff, 0xc0, 0x00, 0x43, 0xff, 0xff, 0xff,     0xff, 0xff, 0xff, 0xff, 0x60, 0x00, 0x01, 0xff, 0xff, 0xff, 0xc0, 0x00, 0x73, 0xff, 0xff, 0xff,     0xff, 0xff, 0xff, 0xfe, 0xe0, 0x00, 0x00, 0xff, 0xff, 0xff, 0x80, 0x00, 0x7b, 0xff, 0xff, 0xff,     0xff, 0xff, 0xff, 0xfd, 0xe0, 0x00, 0x00, 0x7f, 0xff, 0xfe, 0x00, 0x00, 0x33, 0xff, 0xff, 0xff,     0xff, 0xff, 0xff, 0xfd, 0xe0, 0x00, 0x00, 0x3f, 0xff, 0xf8, 0x00, 0x00, 0x27, 0xff, 0xff, 0xff,     0xff, 0xff, 0xff, 0xff, 0xe0, 0x00, 0x00, 0x0f, 0xff, 0xf0, 0x00, 0x00, 0x0f, 0xff, 0xff, 0xff,     0xff, 0xff, 0xff, 0xff, 0x60, 0x00, 0x00, 0x67, 0xff, 0xe0, 0x00, 0x00, 0x1b, 0xff, 0xff, 0xff,     0xff, 0xff, 0xff, 0xfd, 0x40, 0x00, 0x00, 0xf3, 0xff, 0xc4, 0x00, 0x00, 0x0b, 0xff, 0xff, 0xff,     0xff, 0xff, 0xff, 0xfe, 0x80, 0x00, 0x00, 0xfc, 0xff, 0x8c, 0x00, 0x00, 0x03, 0xff, 0xff, 0xff,     0xff, 0xff, 0xff, 0xfe, 0x00, 0x00, 0x00, 0x7f, 0x3c, 0x3c, 0x00, 0x00, 0x07, 0xff, 0xff, 0xff,     0xff, 0xff, 0xff, 0xff, 0x00, 0x00, 0x00, 0x3f, 0xc0, 0x7c, 0x00, 0x00, 0x03, 0xff, 0xff, 0xff,     0xff, 0xff, 0xff, 0xff, 0x00, 0x00, 0x00, 0x1f, 0xff, 0xfc, 0x00, 0x00, 0x03, 0xff, 0xff, 0xff};
void setup() {  Serial.begin(115200);   if(!display.begin(SSD1306_SWITCHCAPVCC, 0x3C)) {    Serial.println(F("SSD1306 allocation failed"));    for(;;);  }  delay(2000); // Pause for 2 seconds   // Clear the buffer.  display.clearDisplay();    // Draw bitmap on the screen  display.drawBitmap(0, 0, image_data_Saraarray, 128, 64, 1);  display.display();}
void loop() {}
-
ESP8266 and IoT Magic NodeMCU
-
Lighting Up LEDs: How to Program NodeMCU with Arduino IDE
-
Three Network Modes of NodeMCU: How to Quickly Turn into a WiFi Hotspot
-
How to Control LED Remotely via WiFi with NodeMCU
-
How to Dominate the Screen with ESP8266 Hotspot

Arduino Electronics Books and Video Tutorials Acquisition Methods
Do you also want a copy of the Arduino Electronics Book and various video tutorials?
Scan the QR code below to add and reply “Benefits“

Click to read the original article, buy the Arduino introductory learning kit