Table of Contents
Knowledge Point 1: Layering of Images
Example: View Jenkins’s Dockerfile on Docker Hub
Knowledge Point 2: Base Image
Knowledge Point 3: Scratch Image
What is a Scratch Image?
Example: View BusyBox’s Dockerfile on Docker Hub
Knowledge Point 4: Bootfs and Rootfs
Knowledge Point 5: Why Does Docker Use This Layered Structure for Images?
If multiple containers share a base image, when one container modifies the contents of the base image, such as files in /etc, will the /etc of other containers also be modified?
Concept of Writable Layer:
Copy-on-Write
Knowledge Point 6: Creating a BusyBox Image
1. Write Dockerfile
Difference between ENTRYPOINT and CMD
2. Write while.sh
3. Build the Image
4. Start the Container Using the Image
Grant executable permission to while.sh
Knowledge Point 1: Layering of Images
Image: An image is a unit of software
Images are composed of various different layers, which is the concept of image layering
The bottom layer is the base image — base images
The system in the image uses the host’s kernel, and the base image contains the operating system.
[root@sc-docker-server mydocker]# vim Dockerfile
FROM python:2.7-slim
WORKDIR /app # Directory entered after entering the container
ADD . /app # Copy contents from the current directory of the Linux system to the /app directory of the container, similar to docker cp
RUN pip install --trusted-host pypi.python.org -r requirements.txt  # Command executed inside the container
EXPOSE 80   # Expose port 80
ENV NAME World   # Define environment variable NAME with value World
ENV AUTHOR cali  # Define environment variable AUTHOR with value cali
CMD ["python","app.py"]  # Command executed when the container starts: python app.py
Each time a RUN command is executed during the image creation process, the image will gain more content and become larger.
Images are loaded into containers for execution, with one container corresponding to one process, which consumes CPU and memory.
Example: View Jenkins’s Dockerfile on Docker Hub
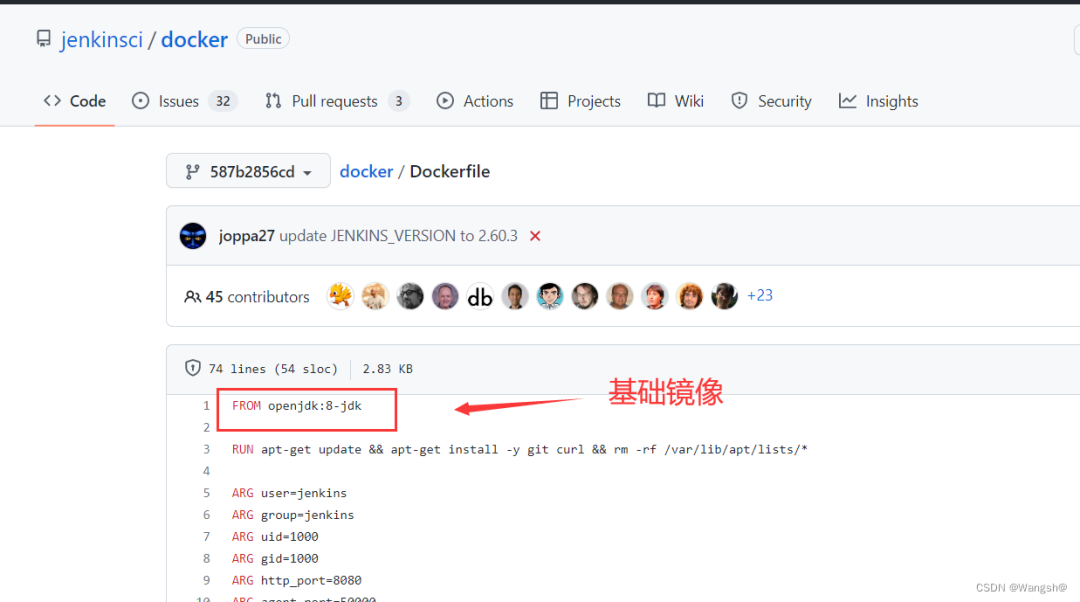
FROM openjdk:8-jdk: Specifies the base image used for the image — the foundation
Since Jenkins is software developed in Java, a Java environment (JDK) is required.
Knowledge Point 2: Base Image
The base image has two meanings
1. Does not depend on other images, built from scratch.
2. Other images can use it as a foundation for expansion.
Base images are usually Docker images of various Linux distributions, such as Ubuntu, Debian, CentOS, etc.
Knowledge Point 3: Scratch Image
What is a Scratch Image?
Scratch is the most basic empty image, which can be used to build ultra-small images like BusyBox. It can be said to truly start from zero to build your own image.
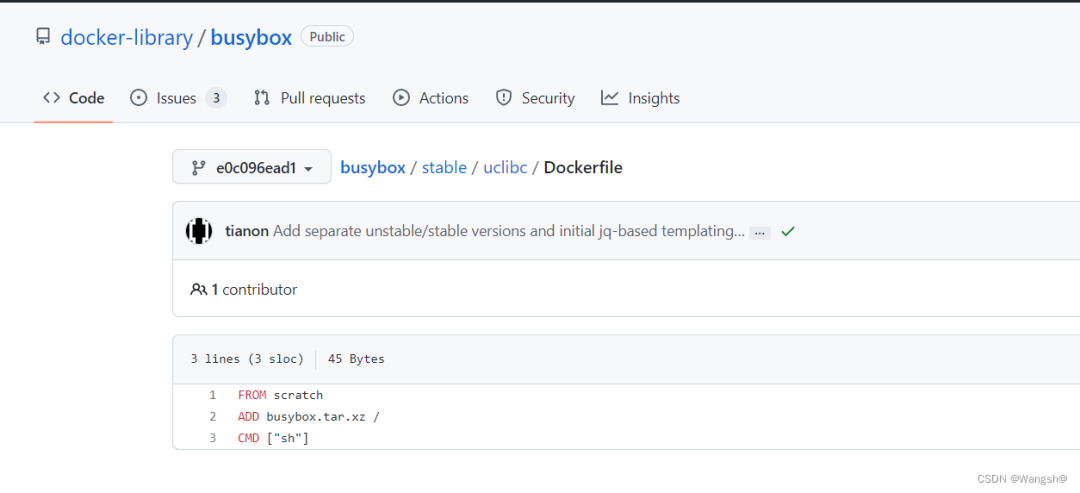
Example: View BusyBox’s Dockerfile on Docker Hub
The BusyBox image uses scratch as its base image. If used by a container, it only has a shell interpreter.
Knowledge Point 4: Bootfs and Rootfs
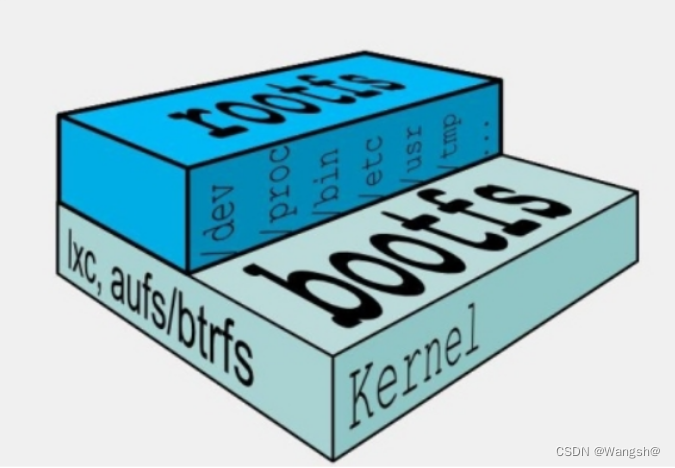
Bootfs — The content needed when the container starts, provided by the Linux kernel. Bootfs is the boot file system, which will be unmounted after the container starts.
For base images, the underlying system directly uses the host’s kernel, which provides bootfs, while the image only needs to provide rootfs.
Rootfs — The operating system inside the container, provided by the image, is the root file system.
Once rootfs is loaded, a closed environment is formed inside the container, similar to an operating system environment.
It contains /dev, /proc, /bin, /etc/, /usr, /tmp, etc.
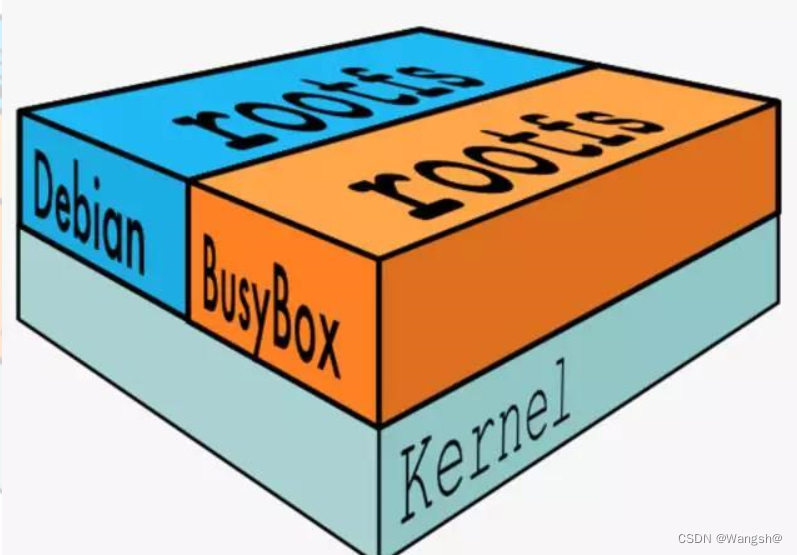
The main difference between different Linux distributions is the difference in rootfs.
Knowledge Point 5: Why Does Docker Use This Layered Structure for Images?
The biggest benefit is: resource sharing
For example: If multiple images are built from the same base image, only one copy of the base image needs to be saved on the Docker host, and only one copy of the base image needs to be loaded into memory.
This can serve all containers, and each layer of the image can be shared, saving disk and memory resources.
If multiple containers share a base image, when one container modifies the contents of the base image, such as files in /etc, will the /etc of other containers also be modified?
Concept of Writable Layer:
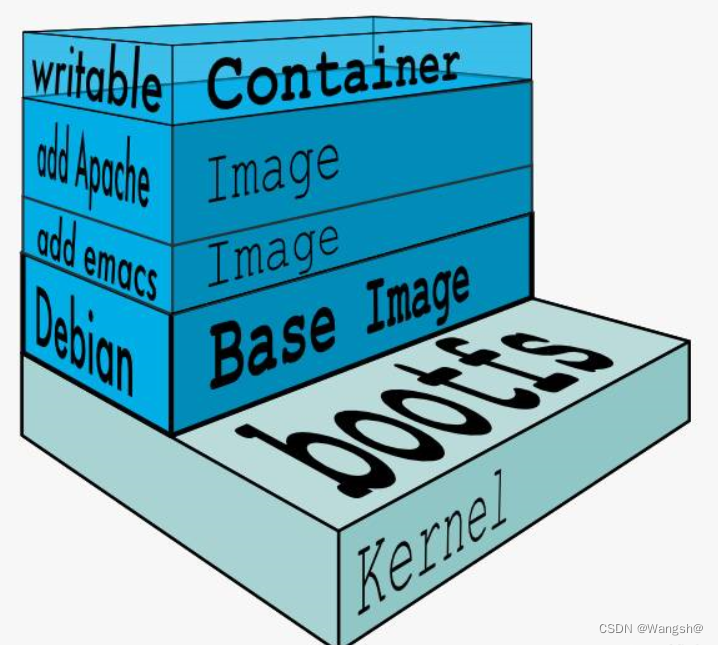
When a container starts, a new writable layer is loaded on top of the image. This layer is usually referred to as the container layer, while the layers below are called image layers.
The number of image layers can be many, and all image layers are combined to form a unified file system.
Copy-on-Write
The container layer saves the parts of the image that have changed and does not modify the image itself.
All changes to the container, whether adding, deleting, or modifying, will only occur in the container layer.
When the container starts, it reads from the bottom up, while reading data is done from the top down.
1. Adding Files
When creating a file in the container, the new file is added to the container layer.
2. Reading Files
When reading a file in the container, Docker will search for the file in each layer from top to bottom. Once found, it will open and read it into memory.
3. Modifying Files
When modifying an existing file in the container, Docker will search for the file in each image layer from top to bottom. Once found, it will copy it to the container layer and then modify it.
4. Deleting Files
When deleting a file in the container, Docker will also search for the file in the image layers from top to bottom. Once found, it will record the delete operation in the container layer.
Example: Create an image and observe changes in the container layer
[root@docker1 scdocker]# cat Dockerfile
FROM centos:7
RUN yum install vim -y
RUN yum install net-tools tree -y
RUN mkdir /sanchuang
RUN touch /sanchuang/fengdeyong{1..10}.txt
RUN rm -rf /sanchuang/fengdeyong1.txt
CMD ["/bin/bash"]
[root@docker1 scdocker]# docker build -t sccentos:7.9 .
Sending build context to Docker daemon  2.048kB
Step 1/7 : FROM centos:7
 ---> eeb6ee3f44bd
Step 2/7 : RUN yum install vim -y
 ---> Running in 93af96c0310c
Loaded plugins: fastestmirror, ovl
...........
..........
Complete!
Removing intermediate container 4a96fbf70500
 ---> 6fa74b2106fa
Step 4/7 : RUN mkdir /sanchuang
 ---> Running in 3a1cf78d4ca0
Removing intermediate container 3a1cf78d4ca0
 ---> 01a4d2f21282
Step 5/7 : RUN touch /sanchuang/fengdeyong{1..10}.txt
 ---> Running in c25513038189
Removing intermediate container c25513038189
 ---> f39a961d3899
Step 6/7 : RUN rm -rf /sanchuang/fengdeyong1.txt
 ---> Running in f6dc4e06812b
Removing intermediate container f6dc4e06812b
 ---> 56c7f9f45d6f
Step 7/7 : CMD ["/bin/bash"]
 ---> Running in 3f959c0752c6
Removing intermediate container 3f959c0752c6
 ---> c66b1be73d66
Successfully built c66b1be73d66
Removing intermediate container 4a96fbf70500
Each operation executed will create a temporary container to perform the operation, which will be deleted after execution.
CMD [“/bin/bash”]
The command in CMD must run in the container and in the foreground.
As long as the command running in the container ends, the container will exit.
Knowledge Point 6: Creating a BusyBox Image
1. Write Dockerfile
[root@docker1 busybox]# cat Dockerfile
FROM busybox
COPY . /
RUN cat /hello.txt
ENTRYPOINT ["/bin/sh","/while.sh"]
ENTRYPOINT: Specifies the command to run when starting the container.
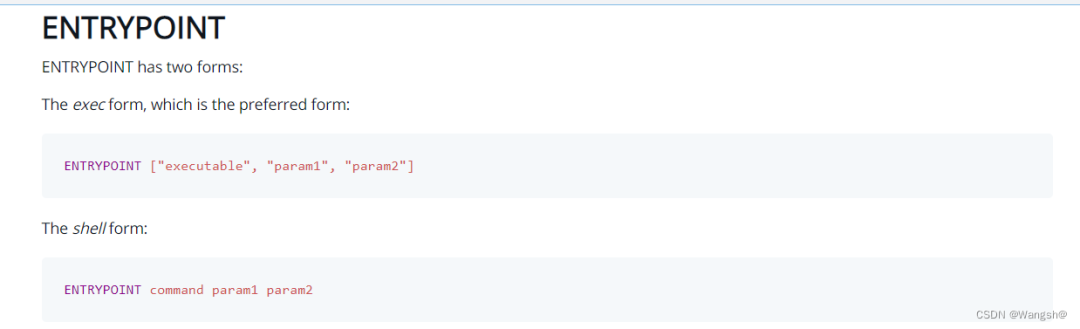
executable: Executable program
param1: Parameter 1
param2: Parameter 2
Difference between ENTRYPOINT and CMD
1. When starting the container with docker run, parameters can be passed to the command in ENTRYPOINT.
2. When both exist, the content in CMD will become parameters (positional parameters) for ENTRYPOINT.
2. Write while.sh
[root@docker1 busybox]# cat while.sh
#! /bin/bash
i=1
while:
do
echo "hello world, sanchuang $i"
let i++
sleep 1

done
[root@docker1 busybox]# ls
Dockerfile  hello.txt  while.sh
Dockerfile is the configuration file for building the image.
hello.txt is intentionally placed in the container to verify copying files from the host to the container.
while.sh is the program that actually runs inside the container.
3. Build the Image
[root@docker1 busybox]# docker build -t scbusybox:1.0 .
Sending build context to Docker daemon  4.096kB
Step 1/4 : FROM busybox
latest: Pulling from library/busybox
2c39bef88607: Pull complete
Digest: sha256:20142e89dab967c01765b0aea3be4cec3a5957cc330f061e5503ef6168ae6613
Status: Downloaded newer image for busybox:latest
 ---> c98db043bed9
Step 2/4 : COPY . /
 ---> 2cffc30469ea
Step 3/4 : RUN cat /hello.txt
 ---> Running in 776107d1c216
welcome to sanchuang!
Removing intermediate container 776107d1c216
 ---> 20a16576f67a
Step 4/4 : ENTRYPOINT ["/while.sh"]
 ---> Running in 9b742e805ee6
Removing intermediate container 9b742e805ee6
 ---> 7fb76760295e
Successfully built 7fb76760295e
Successfully tagged scbusybox:1.0
[root@docker1 busybox]# docker images
REPOSITORY   TAG            IMAGE ID       CREATED             SIZE
scbusybox    1.0            7fb76760295e   40 seconds ago      1.24MB
4. Start the Container Using the Image
An error will occur because while.sh does not have executable permissions.
[root@docker1 busybox]# docker run -d --name scbusybox-1 scbusybox:1.0
e19ac4541e0908bcc60c5b685a7968a35f9f600a3d307095c3c5ab64920613ee
docker: Error response from daemon: failed to create shim task: OCI runtime create failed: runc create failed: unable to start container process: exec: "/while.sh": permission denied: unknown.
[root@docker1 busybox]# ls
Dockerfile  hello.txt  while.sh
[root@docker1 busybox]# ll
总用量 12
-rw-r--r--. 1 root root 66 9月   3 16:48 Dockerfile
-rw-r--r--. 1 root root 22 9月   3 17:34 hello.txt
-rw-r--r--. 1 root root 84 9月   3 17:38 while.sh
Grant executable permission to while.sh
[root@docker1 busybox]# chmod +x while.sh
[root@docker1 busybox]# ll
总用量 12
-rw-r--r--. 1 root root 66 9月   3 16:48 Dockerfile
-rw-r--r--. 1 root root 22 9月   3 17:34 hello.txt
-rwxr-xr-x. 1 root root 84 9月   3 17:38 while.sh
It will still report an error because we only modified it on the host, but the image inside has not been modified, so we need to rebuild the image.
[root@docker1 busybox]# docker run -d --name scbusybox-2 scbusybox:1.0
40b729eeede30cfb75119001c6ad489ead452322ced8188b5f2306534c37e135
docker: Error response from daemon: failed to create shim task: OCI runtime create failed: runc create failed: unable to start container process: exec: "/while.sh": permission denied: unknown.
[root@docker1 busybox]#
[root@docker1 busybox]# docker build -t scbusybox:1.1 .
Sending build context to Docker daemon  4.096kB
Step 1/4 : FROM busybox
 ---> c98db043bed9
Step 2/4 : COPY . /
 ---> ec25c9060e17
Step 3/4 : RUN cat /hello.txt
 ---> Running in ec27802a5ca9
welcome to sanchuang!
Removing intermediate container ec27802a5ca9
 ---> d10143844fcb
Step 4/4 : ENTRYPOINT ["/while.sh"]
 ---> Running in f698d042c7fd
Removing intermediate container f698d042c7fd
 ---> 4883eded6503
Successfully built 4883eded6503
Successfully tagged scbusybox:1.1
Then start the container
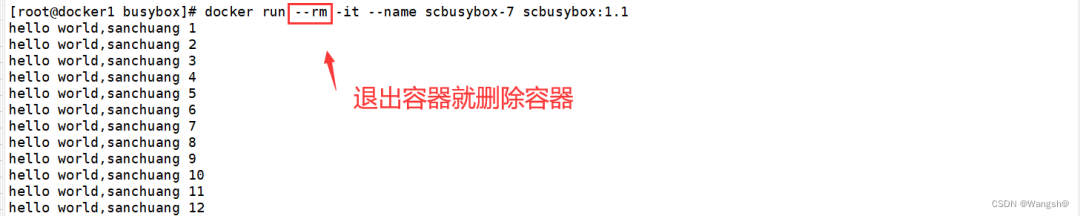
[root@docker1 busybox]# docker run -itd --name scbusybox-6 scbusybox:1.1
2e55c707993466b6f13ee004ad022790219dacbdbceb21b3a63503aa3100727b
[root@docker1 busybox]# docker ps
CONTAINER ID   IMAGE           COMMAND               CREATED         STATUS        PORTS     NAMES
2e55c7079934   scbusybox:1.1   "/bin/sh /while.sh"   2 seconds ago   Up 1 second             scbusybox-6
Link: https://www.cnblogs.com/jacklovey/p/18003849
(Copyright belongs to the original author, please delete if infringed)
WeChat group
WeChat group

To facilitate better communication on operation and maintenance and related technical issues, a WeChat group has been created. Friends who want to join the group can scan the QR code below to add me as a friend (note: join the group).

Blog
Guest
Blog

CSDN Blog: https://blog.csdn.net/qq_25599925

Juejin Blog: https://juejin.cn/user/4262187909781751
Knowledge Planet: https://wx.zsxq.com/group/15555885545422

Long press to recognize the QR code to visit the blog website and see more high-quality original content.