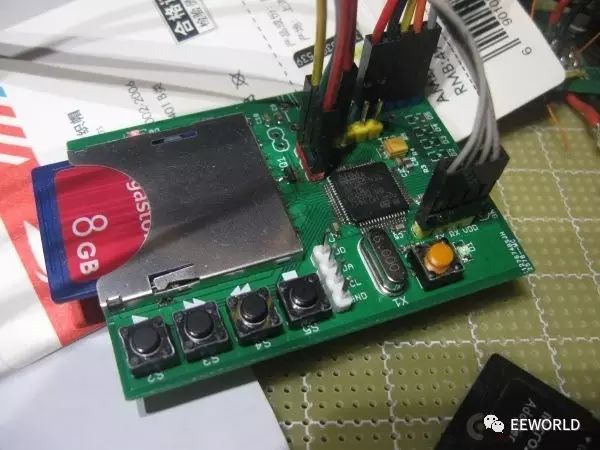
 After successfully reading the SD card with the SDIO module on STM32F4 at the end of last month (see: STM32 SDIO Troubleshooting), I finally implemented a simple FAT32 file system, and then read the WAV files on the card to output signals to my CS4398 DAC to play music.
Despite being quite rudimentary, I have finally created my first hardware music player (free from the computer). With limited energy, I simplified as much as possible, so its current limitations are:
(1) Only supports playback of 44.1kHz/16-bit CD format WAV audio files (uncompressed format)
(2) Only supports SD and SDHC cards formatted with FAT32 file system (3) Cannot fast forward or rewind within a file, can only play continuously from the start of each file. The controls are limited to play/pause, next, previous, and stop buttons. (4) No screen display; debugging information is output only via UART, and file name characters cannot include Chinese. (5) Only retrieves .wav files from the root directory, with a limit of 255; does not search subdirectories. Here is the circuit diagram: This is my STM32F411 development board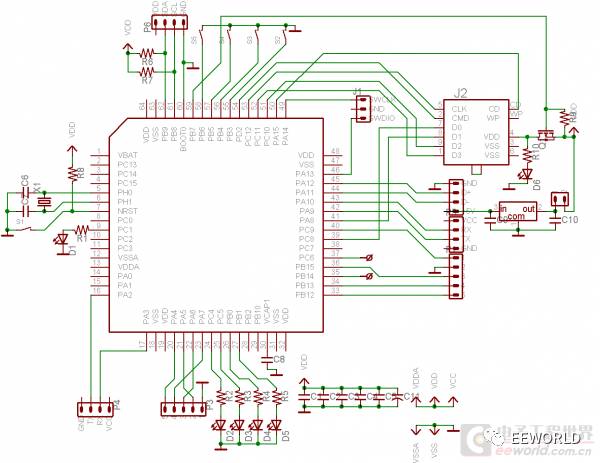
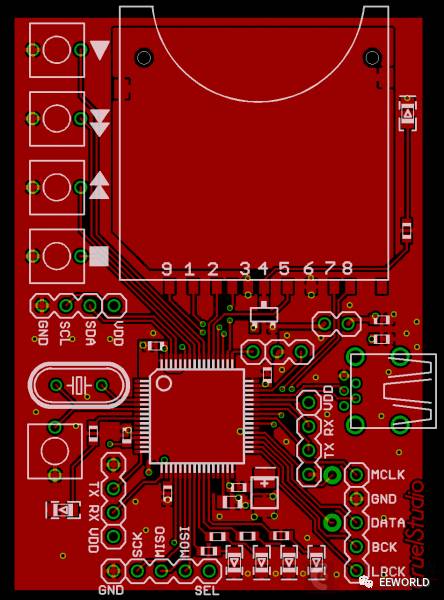
This development board is designed specifically for making a music player. Of course, DIY is not about making a product, so I didn’t consider the appearance or user interface. The reason for choosing the STM32F411RET6 MCU is: (1) M4F core with 128kB SRAM, sufficient for soft decoding MP3 and FLAC. (2) Cheap; the F407 has similar pricing but greater computational power with a larger package size. (3) Both SDIO and USB OTG FS are available. (4) I2S supports external clock input, meaning I2S acts as a master but is absolutely synchronized with the DAC’s MCLK.
The current main program framework is straightforward; after necessary initialization, it accesses the SD card to read the root directory for WAV files. Information about playable files found is established into a playlist, then it switches between idle_process() and play_file() functions, corresponding to stop and play states.
-
int main(void)
-
{
-
int i;
-
config_pins();
-
config_clock();
-
uart_setup();
-
uart_wstr(“\r\n– UART enabled –“);
-
config_i2s();
-
NVIC_EnableIRQ(DMA1_Stream4_IRQn);
Complete code can be viewed by clicking the original article
-
__WFI();
-
}
-
}
uart_wstr() and similar functions like uart_whex() are used for debugging and serve as part of the UI when there is no LCD display.
For the FAT32 file system, I considered using fatfs but found it a bit complex, so I wrote a simplified FAT32 support function library that is read-only and does not support file seeking, haha, reading files can only be done in 512-byte chunks.
-
#include <string.h>
-
#include “stm32f4xx.h”
-
/* simplified FAT32 read-only access library */
Complete code can be viewed by clicking the original article
Reading FAT32 is relatively simple because files are stored in a linked list, allowing for straightforward navigation. Each node in the linked list is a cluster, corresponding to several sectors (the disk concept, which is a storage block of 512 bytes). After obtaining the starting cluster number from the directory index, one can calculate the sector number to access data, and refer to the FAT (File Allocation Table) to find the next cluster number. Opening a file is done using the starting cluster number as a parameter rather than the file name, with the process of matching file names handled by the main program.
Focusing only on playing WAV files simplifies the process significantly, skipping the initial 44-byte WAV file header (I was lazy and didn’t even check if it was 44.1k/16-bit stereo format), with the PCM data following directly sent to the I2S module for output. The STM32’s I2S hardware is multiplexed with SPI, and in I2S mode, each data register write can only be 16-bit, corresponding to one PCM data for either the left or right channel (since CD format is also 16-bit). The MCU can trigger an interrupt after successfully sending I2S data, then write another 16-bit data, which means it needs to write 88200 times per second. This method is inefficient, and if the interrupt handling is not timely, it can lead to audio glitches.
Thus, DMA must be used for data transfer, moving the PCM data to the I2S module from SRAM without CPU involvement. The CPU can perform file access, decoding, etc., or enter SLEEP mode without doing anything. Since I2S data is continuous, even when no music is played, it must continually send “0”; hence DMA is configured in circular mode, automatically resetting the pointer when reading data from RAM. DMA can request an interrupt to the CPU when it finishes reading the memory buffer or reaches halfway, allowing for data updates.
I allocated 2kB of space in RAM as a PCM data DMA buffer#define HALF_COUNT 256uint32_t i2s_play_buf[2*HALF_COUNT];volatile char low_half_fill;low_half_fill is a variable set by the interrupt service routine, indicating which half of the buffer to write. The function responsible for filling the buffer is play_file():
-
int8_t play_file(myfile *fp)
-
{
-
uint32_t tbuf[128];
-
uint32_t *pcm_buf;
Complete code can be viewed by clicking the original article
File reading is also performed in this function. Reading from the SD card incurs I/O delays, but with buffering, as long as the average read speed exceeds playback speed, interruptions will not occur. Synchronization between file reading and DMA is achieved through interrupts: after the main program prepares a buffer of data, it uses the WFI instruction to sleep, waking the CPU when DMA reaches a threshold—indicating it’s time to work again—then the main program reads data from the SD card. Additionally, if there is a button action or the end of the file is reached, the buffer is cleared and it returns.

Feel free to click the original article to communicate with the author.
Follow EEWORLD (Electronic Engineering World) WeChat public account: reply “submission” for your original work to have a chance to appear in our WeChat posts.
To communicate with more industry peers, please click the original article to log in to the EEWORLD forum.

WeChat ID: EEWORLD Exciting hot posts E at your fingertips

Follow EEWORLD service account EE benefits at your fingertips


WeChat ID: EEXINRUI Chip Information Sharp Interpretation