DIY Electronic Calendar with Color E-Ink Display

Introduction
While daydreaming in my chair, I suddenly noticed that the desk calendar was still stuck on the previous month. In this digital age, physical calendars seem to be unable to keep up with our fast-paced lives, as we rely more on our phones and computers to remind us of meetings, travels, and appointments.
DIY Electronic Calendar with Color E-Ink Display
The only calendar I cherish is the one I got from the owner of a café on a rainy night when my partner and I ran in to avoid the rain. That day, we officially got together, and it hadn’t even been 24 hours.
DIY Electronic Calendar with Color E-Ink Display
Now, we have long entered the hall of marriage, and what gift should I give on the eve of our anniversary? She happens to love physical items, such as paper books, notebooks, and instant photos, so why not give her a calendar, but it has to be a little different.
I hope this “calendar” can last more than 365 days, automatically flip pages, display to-dos, and remind us of our anniversaries, and it should look good enough… So I made it, the E-Ink Calendar.
DIY Electronic Calendar with Color E-Ink Display
Calendar Functions
Function Areas. The calendar is divided into three display areas: image area, calendar area, and to-do area. Every day at midnight, the calendar refreshes to update the calendar information. Whenever there are changes in the to-do items (additions, completions, deletions, modifications), the calendar refreshes to display the latest to-do information and new images.
DIY Electronic Calendar with Color E-Ink Display
The images in the image area can be sourced from The Metropolitan Museum of Art’s online random retrieval, preset galleries, and user-uploaded images. The bottom left corner of the image area displays the title and author of the image. The calendar area shows the month, date, and day of the week. The to-do area displays Microsoft ToDo tasks, sorted by “completion status” and “creation date” in descending order, with completed items marked with a strikethrough.
Based on the width-to-height ratio of the images, the calendar automatically sets its orientation, with the basic rule being that if the ratio is less than or equal to 1, the calendar displays horizontally, and if the ratio is greater than 1, it displays vertically.
Interaction. I mentioned the multidimensional table Apitable in my previous article “Home Server Practice”, and it is also used in this calendar. All interactions are implemented within the WebAPP of Apitable, and the possible interactions include:
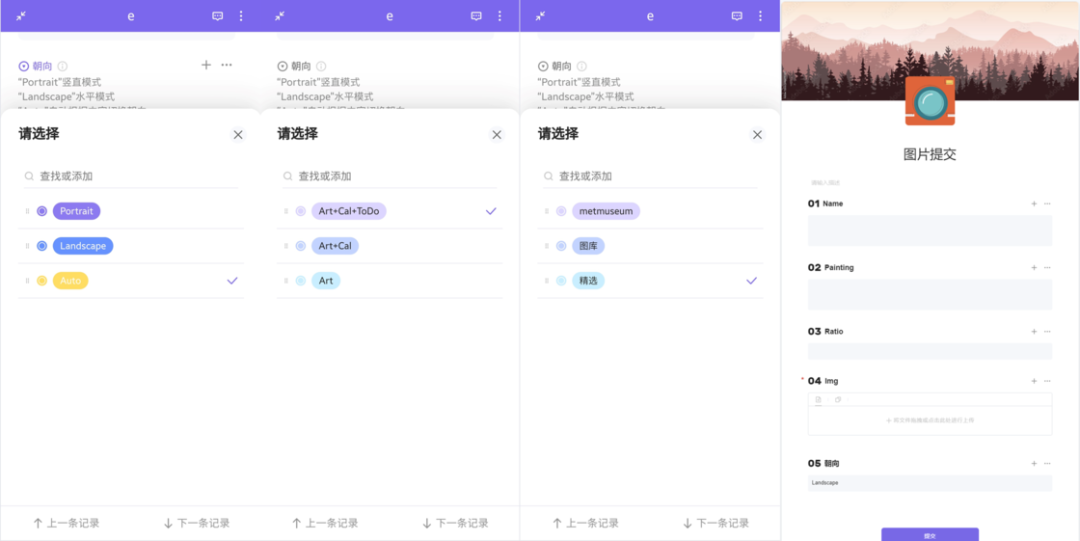
  • Display orientation settings: “Portrait”, “Landscape”, “Automatic”;
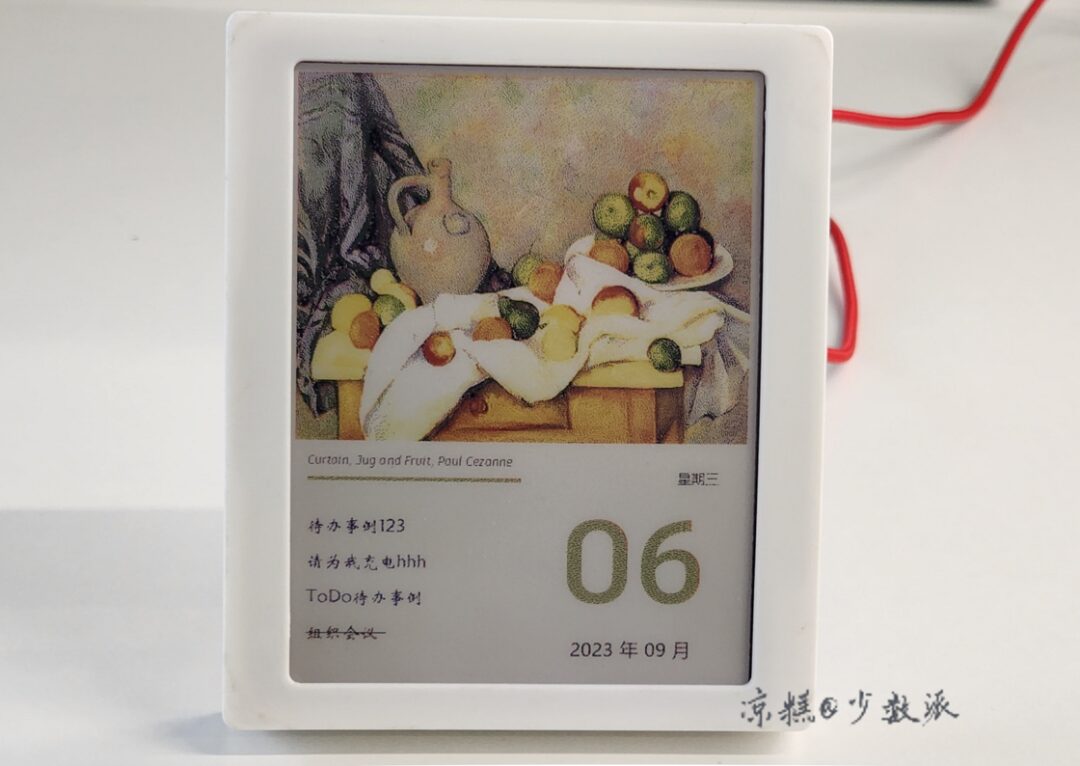
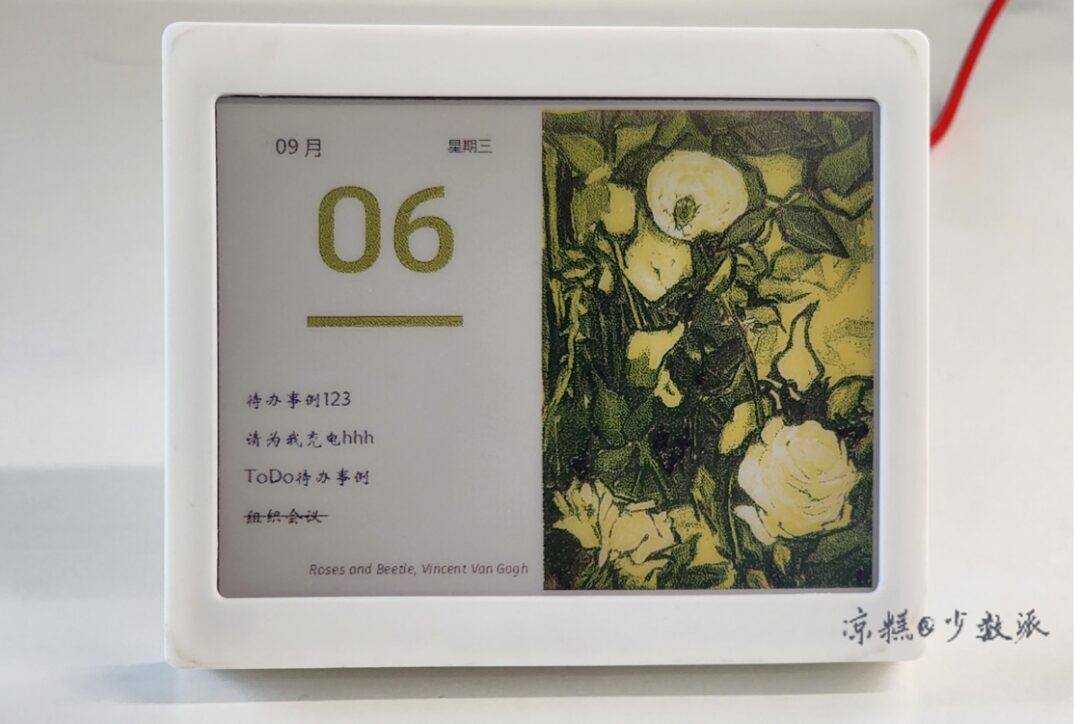
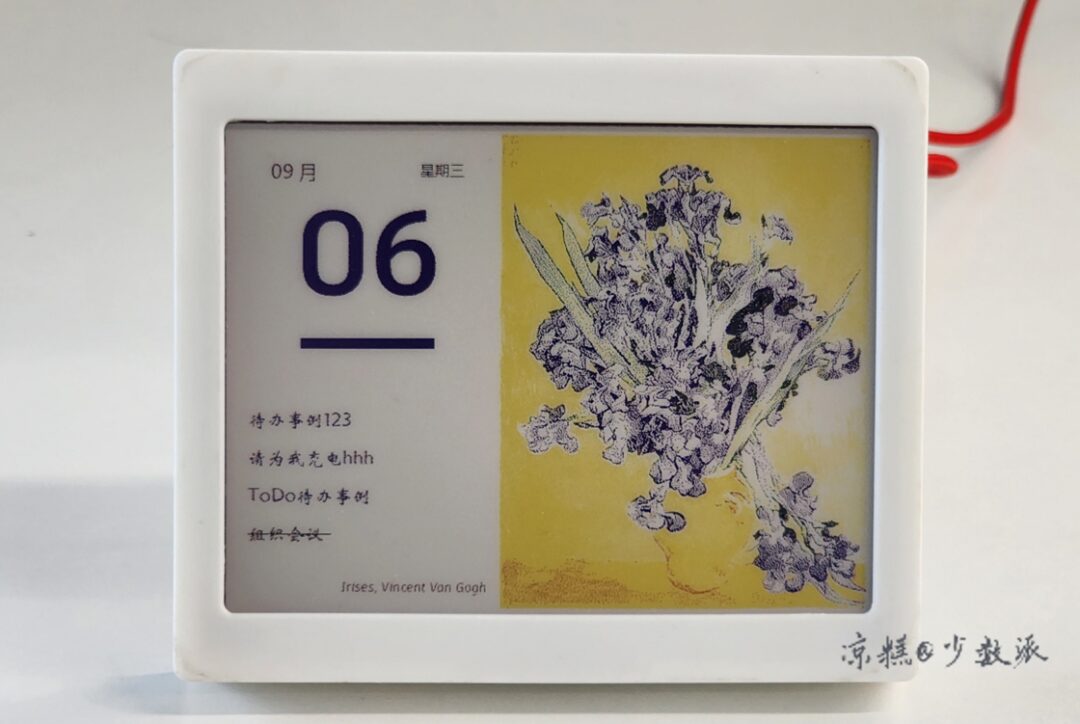
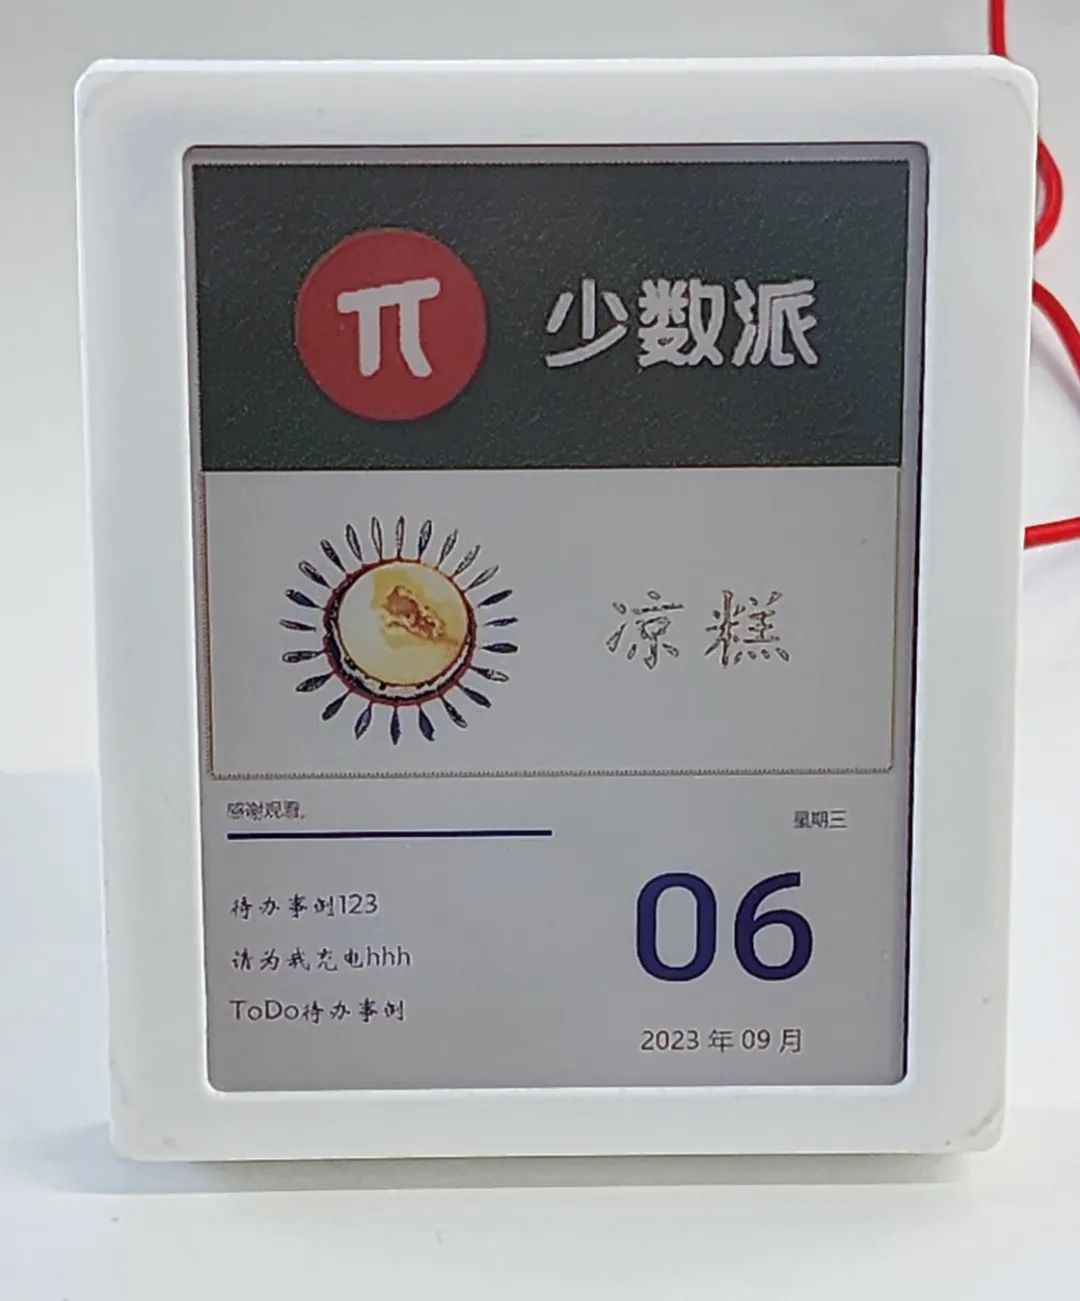
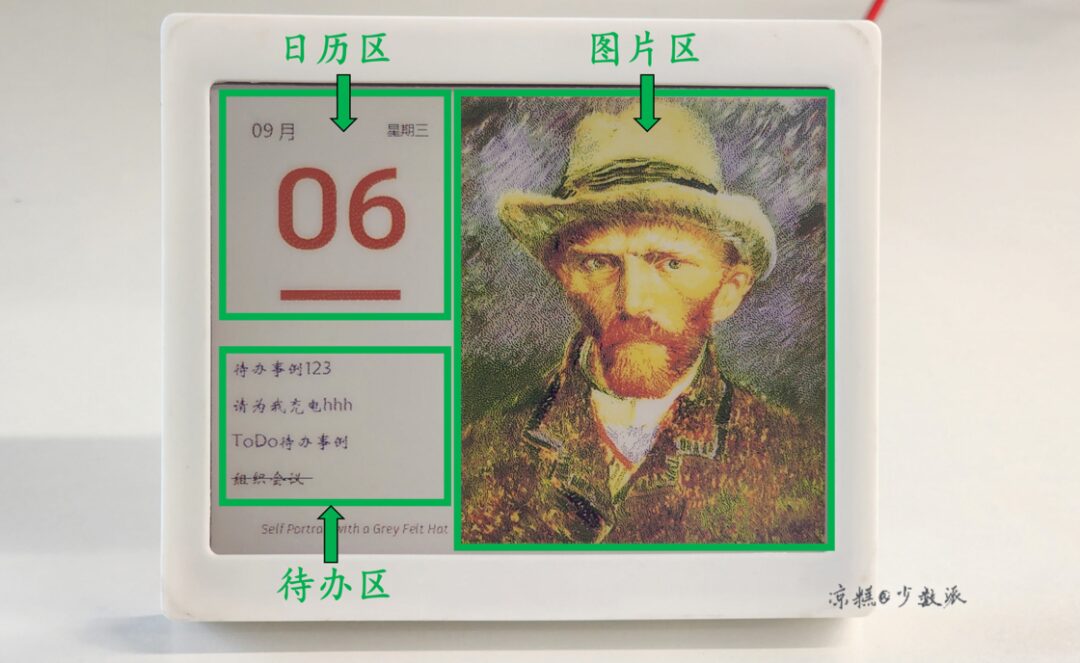
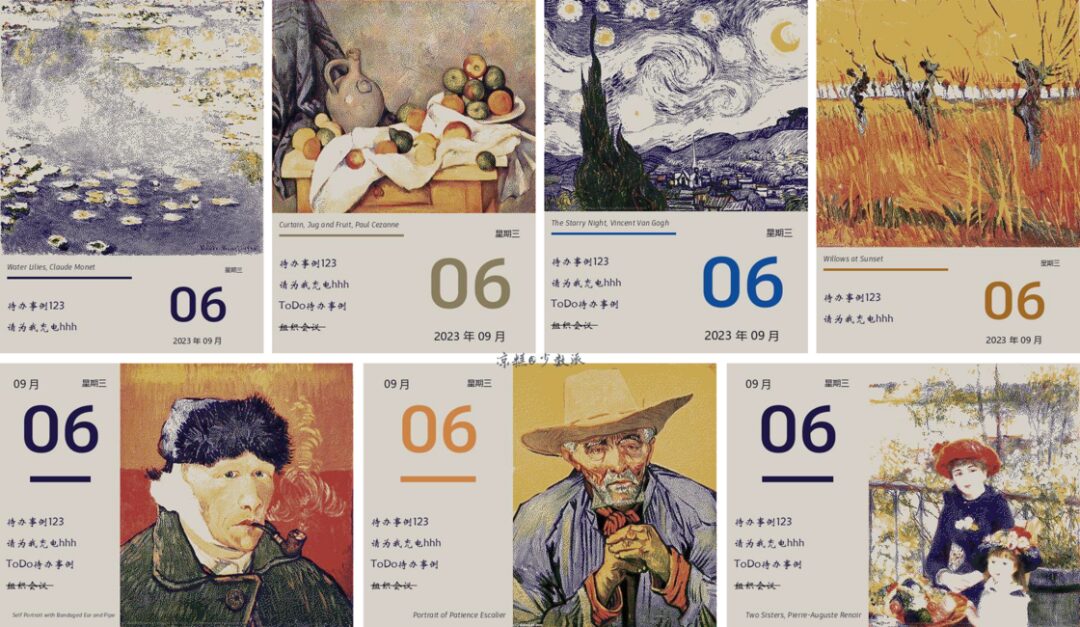
  • Calendar mode settings: Mode 1 “Image + Calendar + ToDo”, Mode 2 “Image + Calendar”, Mode 3 “Image”;
  • Image source settings: “Metmuseum”, “Selected” (TOP1000), “Gallery” (photos);
  • Upload custom images;
  • Select and display specified images.

DIY Electronic Calendar with Color E-Ink Display
Settings interface and uploading custom images
DIY Electronic Calendar with Color E-Ink Display
Select and display specified images
Design and Production

Overall Design Idea

  • Screen: I chose the E-Ink screen because its display effect is the most natural, closest to the paper effect.
  • Data Update: The E-Ink terminal is only responsible for receiving the final image data to be displayed, while the acquisition and processing of basic data are completed on the server. This design is beneficial for maintenance (and remote sending of surprises) since the hardware won’t be at my side during later use.
  • To-Do Data: Must come from existing software, preferably with an API. I chose Microsoft ToDo.
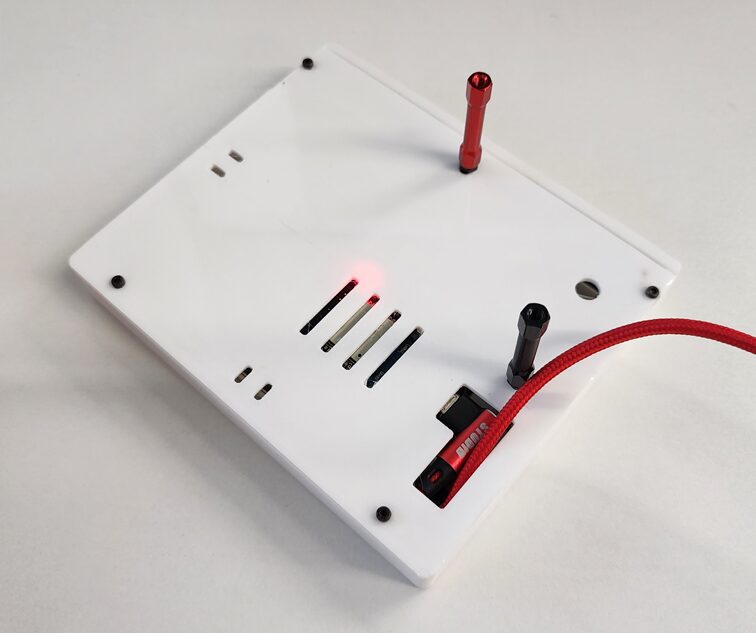
Hardware

The display screen is a 5.65-inch color E-Ink module from Wistron, with 7 colors and a resolution of 600 × 448.
DIY Electronic Calendar with Color E-Ink Display
Screen Calibration. The official claim states that the seven colors are black, white, green, blue, red, yellow, and orange. When I received it, I found that there was a significant color difference in the display. Therefore, I needed to calibrate the actual colors of the display. Without a standard color card, I could only perform a simple calibration: using a color printer to print the seven colors + neutral gray; photographing the image under uniform lighting, and correcting the photo colors in Lightroom using neutral gray; then using the eyedropper tool to obtain the RGB values of the various colors on the E-Ink screen from the photo.
DIY Electronic Calendar with Color E-Ink Display
The following are the values and display conditions after color calibration.
DIY Electronic Calendar with Color E-Ink Display
Optional Driver Boards include Raspberry Pi, Arduino, Jetson Nano, STM32, ESP32/8266. To save trouble, I chose the ESP32 driver board sold by the manufacturer, which has an onboard FFC socket.
Code

esp32

The code for the ESP32 driver board is very simple. It only needs to make an HTTP request to the server, and the returned image data is written to the screen.
// StreamClient.ino
void setup() {
    wifiMulti.addAP(ssid, password);
    DEV_Delay_ms(1000);
}

void loop() {
    if((wifiMulti.run() == WL_CONNECTED)) {
      if(requestGET("newContent")){
        updateEink();
      }
    }
    delay(60000);
}
//获取图片数据
void updateEink(){
...
}
//查询是否有更新内容
bool requestGET(String bodyName){
...
}
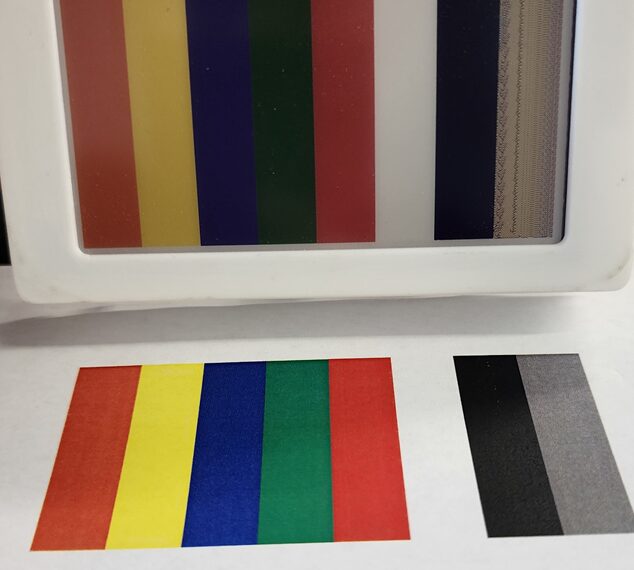
For computers, images are composed of pixels, and the size of the space occupied by each pixel determines the possible states (colors) of that pixel. The simplest black-and-white image occupies one bit (1Bit) per pixel, which can either be 0 or 1—black or white. As the number of colors increases, the space each pixel occupies grows larger, to eight bits, sixteen bits, twenty-four bits…
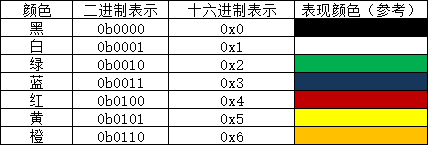
We have seven colors, so at least three bits of data are needed to represent all colors. However, to simplify calculations, we add a 0 in front, meaning we use four bits of data to represent the color of a pixel, allowing one byte (1Byte) to represent two pixels. Therefore, the number of bytes written to the display = 600*448/2=134,400 Bytes.
DIY Electronic Calendar with Color E-Ink Display
For some unknown reason, while the ESP32 has ample memory, it cannot create a full-frame image data cache and can only write in chunks:
DEV_Module_Init();,EPD_5IN65F_Init();,EPD_5IN65F_Display_begin();“EPD_5IN65F_Display_sendData(gImage_5in65f_part1)
void UpdateEink(){
  HTTPClient http;
  http.begin("https://YOUR_SITE.COM");
  int httpCode = http.GET();
  if(httpCode > 0) {
      if(httpCode == HTTP_CODE_OK) {
          int len = http.getSize();
          // create buffer for read
          uint8_t buff[1280] = { 0 };
          // get tcp stream
          WiFiClient * stream = http.getStreamPtr();
          // read all data from server
          int numData = 0;
          String headString = "";
          while(http.connected() && (len > 0 || len == -1)) {
              // get available data size
              size_t size = stream->available();
              int c = 0;
              if(size) {
                  // read up to 1280 byte
                  c = stream->readBytes(buff, ((size > sizeof(buff)) ? sizeof(buff) : size));
                  String responseString((char*)buff, c);
                  responseString = headString + responseString;
                  String temp = ""; 
                  for (int i = 0; i < responseString.length(); i++) {
                    char cAti = responseString.charAt(i);
                    if (cAti == ',') { 
                      if (numData < 67200){
                        gImage_5in65f_part1[numData] = temp.toInt();
                      } else if(numData == 67200){
                        DEV_Module_Init();
                        EPD_5IN65F_Init();                              
                        EPD_5IN65F_Display_begin();
                        EPD_5IN65F_Display_sendData(gImage_5in65f_part1);
                        gImage_5in65f_part1[numData-67200] = temp.toInt();
                      } else if(numData > 67200 && numData < 134399){
                        gImage_5in65f_part1[numData-67200] = temp.toInt();
                      } else if(numData == 134399){
                        gImage_5in65f_part1[numData-67200] = temp.toInt();
                        EPD_5IN65F_Display_sendData(gImage_5in65f_part1);
                        EPD_5IN65F_Display_end();
                        EPD_5IN65F_Sleep();
                      }
                      temp = ""; // Clear temporary string
                      numData++; // Increment array index by 1
                    } else {
                      temp += cAti; // Add character to temporary string
                    }
                  }
                  if (temp.length() > 0) { // Process the last number
                    headString = temp;
                  } else{
                    headString = "";
                  }
                  if(len > 0) {
                      len -= c;
                  }
                }
          }
      }
  }
  http.end();
}
Server
The server is responsible for acquiring and processing art images, ToDo data, and calendar data, handling requests from the ESP32 and interaction behaviors (Apitable).
Art Image Acquisition
  • Metmuseum. The Metropolitan Museum of Art is the largest art museum in the United States, with a collection of 3 million exhibits, providing a selected dataset of over 470,000 artworks from its collection, which can now be used on any media without permission or payment. This can be accessed through their API. Here is a simple use case:parkchamchi/dailyArt[1]. Through the API provided by Metmuseum, we can “randomly” obtain images from specified categories.

  • Famous Oil Paintings. The images obtained from Metmuseum may not necessarily be suitable for the E-Ink display in terms of color and size (too large or too small, colors too faint). Therefore, a locally stored collection of world-famous paintings was constructed. The “TOP1000 Oil Paintings” was obtained from the most-famous-paintings[2] website and stored in Apitable. Below is the Python script.
  • Festival Images. Custom festival and solar term-themed images are stored in Apitable.
  • Photos. Custom photos are stored in Apitable.

import requests
from bs4 import BeautifulSoup
import csv

url = 'http://en.most-famous-paintings.com/MostFamousPaintings.nsf/ListOfTop1000MostPopularPainting?OpenForm'

r = requests.get(url)
soup = BeautifulSoup(r.content, 'html.parser')
artist=[]
images=[]
ratios=[]
for element_img in soup.find_all('div', attrs={'class': 'mosaicflow__item'}):
    artist.append((element_img.text).strip('\n'))
    imgRatio = int(element_img.img.get('width')) / int(element_img.img.get('height'))
    ratios.append(imgRatio)
    images.append(element_img.a.get('href'))

details=[]
rank = 1
for i in artist:
    painter = i[:i.index('\n')]
    painting = i[i.index('\n')+1:i.index('(')]
    ratio = ratios[rank-1]
    img = images[rank-1]
    details.append([rank,painter,painting.strip(),ratio,img])
    rank += 1

with open('famouspaintings.csv', 'w', newline='',encoding="UTF-8") as file:
    writer = csv.writer(file)
    writer.writerow(["Rank", "Name", "Painting","Ratio","Link"])
    for i in details:
        writer.writerow(i)

Image Processing

Since the display only has 7 colors, images need to be processed to display in 7 colors. The Floyd-Steinberg dithering algorithm is very suitable for showcasing rich depth in cases with a limited number of colors, allowing for better shading of the original image. It is particularly suitable for various usage scenarios of E-Ink screens. It is also easy to implement in Python.
from PIL import Image
def dithering(image, selfwidth=600,selfheight=448):
        # Create a palette with the 7 colors supported by the panel
        pal_image = Image.new("P", (1,1))
        pal_image.putpalette( (16,14,27,  169,164,155,  19,30,19,   21,15,50,  122,41,37,  156,127,56, 128,67,54) + (0,0,0)*249)
        
        # Convert the source image to the 7 colors, dithering if needed
        image_7color = image.convert("RGB").quantize(palette=pal_image)

        return image_7color
For images with overly large or small ratios, the canvas is extended to adjust to an appropriate ratio:
  • ratio < 0.67: Fill blank on both sides to ratio=0.67, display horizontally;
  • 0.67 <= ratio <= 1: Display horizontally;
  • 1 < ratio < 1.49: Display vertically:
  • 1.49 < ratio: Fill blank above and below to ratio=1.49, display vertically.

Calendar Data Processing

Calendar data mainly includes dates, days of the week, solar terms, and anniversaries. Solar term data can be obtained through 6tail/lunar-python. Anniversaries are set manually, and on the anniversary, a small firework will appear. The color of the date numbers is derived from the tone of the current art image:
def get_dominant_color(pil_img):
    img = pil_img.copy()
    img = img.convert("RGBA")
    img = img.resize((5, 5), resample=0)
    dominant_color = img.getpixel((2, 2))
    return dominant_color

ToDo Data Processing

ToDo data is sourced from Microsoft ToDo. Since I also use ToDo data in other projects, it is particularly convenient to manage them centrally in n8n. The acquired ToDo data entries are sorted by status and lastModifiedDateTime and saved in the msgToDo.json file.
DIY Electronic Calendar with Color E-Ink Display
n8n acquires ToDo data

Image Stitching

Using Python’s PIL library, art images, calendar, and to-do images are stitched together and converted into byte streams:
# concaten pic
img_concat = Image.new('RGB', (EINK_WIDTH, EINK_HEIGHT),WHITE_COLOR)
if DisplayMode == "Portrait":
    img_concat.paste(img_photo, (0, 0))
    img_concat.paste(img_date, (img_photo.width, 0))
    img_concat.paste(img_info, (img_photo.width, img_date.height))
    img_concat.paste(img_todo, (img_photo.width + img_info.width, img_date.height))
elif DisplayMode == "Landscape":
    img_concat.paste(img_date, (0, 0))
    img_concat.paste(img_todo, (0, img_date.height))
    img_concat.paste(img_info, (0, img_date.height + img_todo.height))
    img_concat.paste(img_photo,(img_date.width, 0))

buffs = buffImg(dithering(img_concat))
if len(buffs) == EINK_HEIGHT * EINK_WIDTH / 2:
    print("Success")
def buffImg(image):
    image_temp = image
    buf_7color = bytearray(image_temp.tobytes('raw'))
    # PIL does not support 4 bit color, so pack the 4 bits of color
    # into a single byte to transfer to the panel
    buf = [0x00] * int(image_temp.width * image_temp.height / 2)
    idx = 0
    for i in range(0, len(buf_7color), 2):
        buf[idx] = (buf_7color[i] &lt;&lt; 4) + buf_7color[i+1]
        idx += 1
    return buf
DIY Electronic Calendar with Color E-Ink Display

Interaction

As mentioned above, through the Apitable WebAPP, the following interactions can be completed: set display orientation, set calendar mode, set image source, upload custom images, select and display specified images.
  • Settings completed through the WebAPP will take effect during the next HTTP request;
  • Uploaded images through custom forms will be added to the “gallery” collection;
  • By utilizing Apitable’s “mini-program” feature, a picture picker can be created to select specified images for display, which will take effect during the next HTTP request.

//YOUR_APITABLE_SPACE Apitable space id
//YOUR_APITABLE_SHEET Apitable sheet id
//YOUR_APITABLE_FILED Apitable field id
//YOUR_WEBHOOK Trigger flow webhook
const datasheet = await space.getDatasheetAsync('YOUR_APITABLE_SPACE');
const record = await input.recordAsync('Please select a record:', datasheet);

const data = {
  datasheet: 'YOUR_APITABLE_SHEET',
  fieldid: 'YOUR_APITABLE_FILED' ,
  record: record.title
};

const response = await fetch('YOUR_WEBHOOK', {
  method: 'POST',
  headers: {
    'Content-Type': 'application/json'
  },
  body: JSON.stringify(data)
});

Structure

Based on the dimensions of the display and driver board, a simple box-shaped exterior was designed and manufactured using 3D printing, with polycarbonate (PC) as the material, which has good toughness and heat resistance. The frame and back panel are connected with nuts, and injection-molded copper nuts are embedded at the connection points of the frame. The back panel has holes for USB cable passthrough, support foot fixing, and hanging.
DIY Electronic Calendar with Color E-Ink Display
Final Thoughts
Thank you for enduring the dull and tedious text in between to reach this point. This was a rushed project with many rough edges, and I hope to have time to optimize and upgrade it in the future. I also hope that my future self will still have the leisure to create some fun things.
I wish you peace and joy every day.
DIY Electronic Calendar with Color E-Ink Display
Related Links
[1] parkchamchi/dailyArt:
https://github.com/parkchamchi/dailyArt
[2] most-famous-paintings:
https://en.most-famous-paintings.com/MostFamousPaintings.nsf/ListOfTop1000MostPopularPainting?OpenForm
Original link:
https://sspai.com/post/82704?utm_source=wechat&utm_medium=social
Author: Liang Gao
Editor: Microhoo
/ More Popular Articles /
DIY Electronic Calendar with Color E-Ink Display

Leave a Comment

×