Source: Zhihu Xiaobai Learns Vision


This article is about 8300 words, and it is recommended to read for more than 15 minutes.
This article introduces what digital image processing is.
[ Introduction ] This article is lengthy and uses many images and formulas to help everyone deeply understand various edge detection operators. I hope everyone can finish reading it. The testing compiler is Matlab, which is a very friendly and simple tool for beginner computer vision. It comes with various advanced library functions, making implementation very quick and more experimental in nature. Without further ado, let’s take a look at today’s topic – edge detection.
1. Introduction
First, let’s briefly understand what digital image processing (Digital Image Processing) is. Let’s take a look at the two main application areas of digital images:
1. Improve visual information for human interpretation;
2. Process image data for storage, transmission, and representation to facilitate machine understanding.
We can simply understand that it transforms a raw image into a form that is more understandable or needed by us, as shown in Figure 1-1, which is a schematic diagram of the automatic segmentation process of immune cell images based on edge detection.
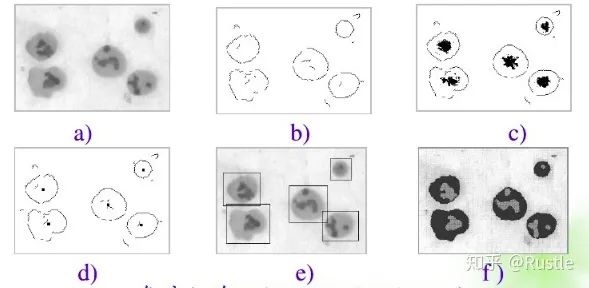 Figure 1-1 Schematic diagram of the automatic segmentation process of cloned cell images.
Let’s look at another example, as shown in Figure 1-2, which is a classic license plate detection algorithm. It performs operations like grayscale conversion, edge detection, morphological erosion, and dilation on the original image to obtain the license plate area. Then, the license plate area is cut out (this was a small demo I did when I was just starting out, and I didn’t use a deep learning model; I used KNN, so the recognition results were poor; I hope the audience will just smile at this).
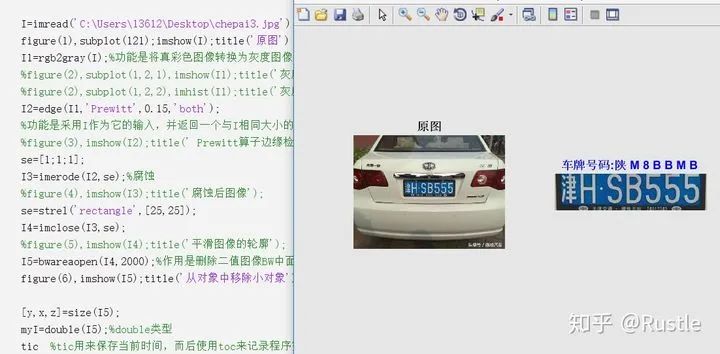 Figure 2 -2 License plate detection
OK, now that we have a general understanding of digital image processing, let’s introduce some basic algorithms of digital image processing.
2. Basic Knowledge and Algorithms of Digital Image Processing
Next, let’s briefly introduce some basic knowledge and algorithms for learning digital image processing.
1). Digital Image
A digital image refers to the current image represented in two-dimensional numbers, where the grayscale value of each pixel is represented by a number ranging from 0 to 255 (2^8).
2). Binary Image, Grayscale Image, Color Image
Binary Image: In a binary image, each pixel’s grayscale value can only be 0 or 1, meaning it is either black or white. A binary image can be understood as a black-and-white image.
Grayscale Image: In a grayscale image, each pixel can be represented by a grayscale value from 0 to 255, specifically showing 255 intermediate gray values from completely black to completely white.
Color Image: Each image is composed of three grayscale images representing the grayscale values of the red, green, and blue channels, known as RGB. At this point, the color image should be viewed as three-dimensional [height, width, 3].
Let’s feel the connection and difference between grayscale images and color images using an image below.
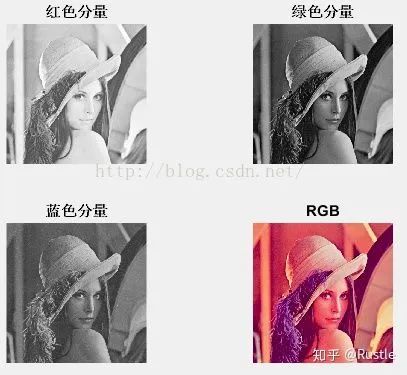 Figure 2 -1 Decomposition of RGB image
There is also a very important formula, which is the calculation formula for converting color images to grayscale images:

Gray represents the grayscale image, while RGB represents the grayscale values of the red, green, and blue channels of the color image.
3). Adjacency, Connectivity
4-neighborhood: Assuming there is a pixel point p with coordinates (x, y), its 4-neighborhood is (x + 1, y), (x – 1, y), (x, y + 1), (x, y – 1);
D-neighborhood: Assuming there is a pixel point p with coordinates (x, y), its D-neighborhood is (x + 1, y + 1), (x + 1, y – 1), (x – 1, y + 1), (x – 1, y – 1);
8-neighborhood: The union of the 4-neighborhood and D-neighborhood is expressed as the 8-neighborhood.
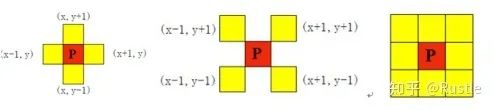 Figure 2 – 2 4-neighborhood (left), D-neighborhood (middle), 8-neighborhood (right)
4-connectivity: Pixels within the 4-neighborhood of pixel point p are all 4-connected to pixel point p;
8-connectivity: Pixels within the 8-neighborhood of pixel point p are all 8-connected to pixel point p.
4). Filtering
The main purposes of filtering are two:
1. To extract image features through filtering, simplifying the information carried by the image for subsequent image processing.
2. To eliminate noise mixed during image digitization through filtering to meet the needs of image processing.
The first point embodies the basic idea used in edge detection, which is to simplify image information, using edge lines to represent the information carried by the image.
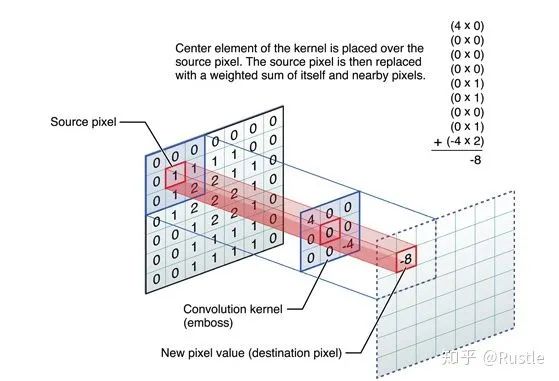
Filtering can be understood as the filter (usually a 3*3 or 5*5 matrix) traversing the image from top to bottom and left to right, calculating the value of the filter with the corresponding pixel and returning the value to the current pixel based on the filtering purpose.
As shown in Figure 2-3, the blue block represents the filter, performing dot product operations on the image and assigning values to the image.
The specific formula is expressed as:
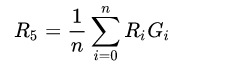
(where  represents the current pixel point,
  represents the value corresponding to the current pixel multiplied by the filter value, n is the size of the filter. For example, if the filter value is all 1, then this formula calculates the average value of the 8-connected pixels of the current pixel, so the image after filtering should appear blurred, with the degree of blurriness depending on the size of the filter; the larger the filter size, the more pronounced the blurring effect).
3. Edge Detection (Sobel, Prewitt, Roberts, Canny, Marr-Hildreth)
1. Basic Edge Detection Operators
After introducing the knowledge of filtering, learning basic edge detection algorithms becomes a straightforward task because edge detection is essentially a filtering algorithm, the difference lies in the choice of filter, and the rules of filtering are completely consistent.
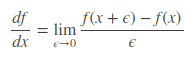
To better understand edge detection operators, we introduce the concept of gradient, which is a very important concept in artificial intelligence, prevalent in the fields of machine learning and deep learning. Students who have studied calculus should know that the first derivative of a one-dimensional function is basically defined as:
As mentioned earlier, image filtering is generally performed based on grayscale images, so the image is two-dimensional at this point. Therefore, let’s look at the partial differential equation of a two-dimensional function:
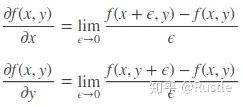
From the formula above, we can see that the image gradient is the partial derivatives of the current pixel point concerning the X-axis and Y-axis, so in the field of image processing, we can also understand the gradient as the rate of change of the pixel grayscale value. Below, we give a simple example:
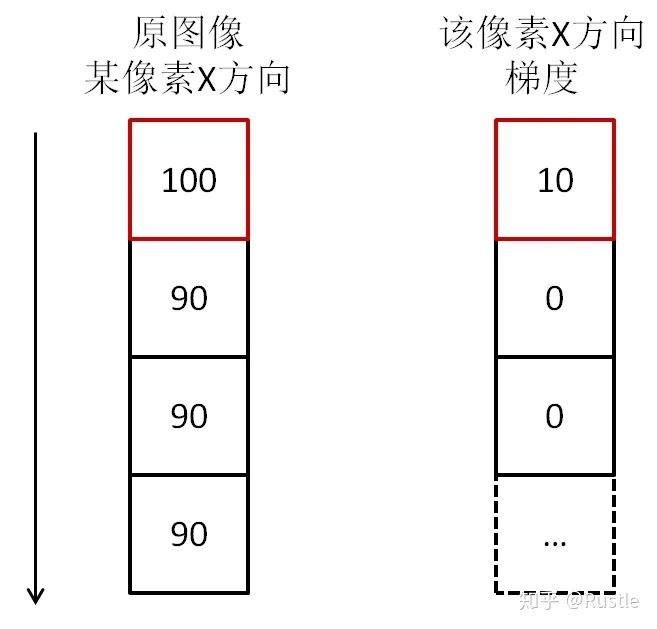
In the image, we can see that the grayscale value difference between 100 and 90 is 10, which means the gradient of the current pixel point in the X-axis direction is 10, while other points are all 90. Thus, we find that in digital image processing, due to the special nature of pixel properties, calculus manifests as calculating the difference of the current pixel point along the direction of partial derivatives. Therefore, in practical applications, there is no need to use derivatives; simple addition and subtraction operations are sufficient.
Another concept of gradient magnitude indicates the amount of increase in the unit distance in the direction of its maximum rate of change, that is:
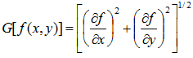
After understanding the concept of gradient, let’s introduce several basic edge detection filters: Sobel, Prewitt, Roberts operators
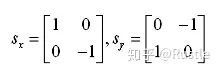 Figure 3-2 Roberts operator
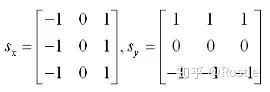 Figure 3-2 Prewitt operator
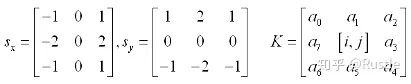 Figure 3-3 Sobel operator
Taking Sobel as an example, where  represent the edge detection operators for the X-axis and Y-axis, we can clearly see from the structure of the
  operator that this filter calculates the difference in grayscale values between the current pixel point and the 8-connected pixels to its right and left. Let’s first understand it through a one-dimensional concept:
Now, let’s consider a one-dimensional array of length 10 with the values:
[ 8, 6, 2, 4, 9, 1, 3, 5, 10, 6 ]
In this case, our one-dimensional edge detection operator is represented as [ -1, 0, 1 ]. Now, we place the edge detection operator on the array to perform a dot product (i.e., multiplying corresponding points and summing them) to obtain the result:
[ 6, -6, -2, 7, -3, -6, 4, 7, 1, -10]
We can see that the resulting values include negative numbers, but our earlier definition states that pixel grayscale values are defined within the range of 0-255. Therefore, the usual operation is to truncate negative numbers to within 0-255 or directly take the absolute value, leading us to:
[ 6, 6, 2, 7, 3, 6, 4, 7, 1, 10]
The size of these numbers indicates the magnitude of the gradient at the current pixel point, that is, how much the grayscale changes. The larger the value, the more certain we can be that the current point is the edge point we are looking for. Through this one-dimensional example, we can better understand the two-dimensional edge detection concept, which involves performing two filtering operations along the X-axis and Y-axis, and then calculating the square sum and taking the square root to derive the image gradient at the current pixel point. Let’s visualize this process with an image:
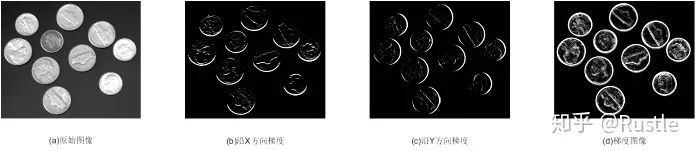
In the image, (a) is the original grayscale image, (b) and (c) are the filtering results of the original image using the Sobel operator shown in Figure 3-3, represented as gradient images along the X and Y axes, and finally, combining the two images gives us the required gradient image (d). Here’s another image to help understand the Sobel algorithm.
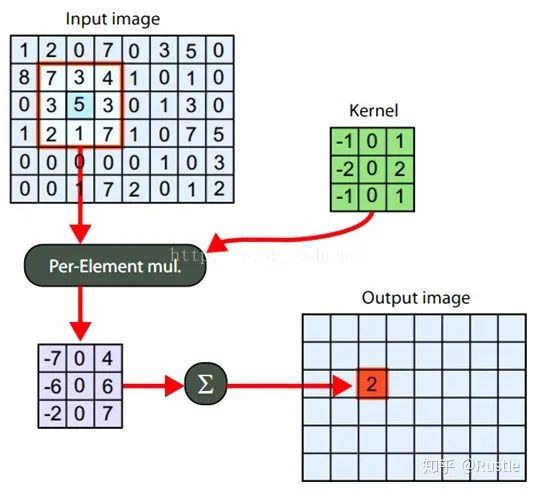
Now that we have a general understanding of the basic idea behind edge detection, looking at Figure 3-4(d), doesn’t it look quite nice? However, just because it looks good doesn’t mean it is the edge image we need. The edge image obtained directly using basic edge operators like Sobel has many issues, such as noise pollution not being eliminated and edge lines being too thick. Therefore, we will next introduce two advanced edge detection operators: Canny operator and Marr-Hildreth operator
1. More Advanced Edge Detection Operators
1). Canny Operator
The Canny operator is a multi-stage edge detection algorithm developed by Australian computer scientist John F. Canny in 1986. Its goal is to find an optimal edge, defined as:
1. Good detection — the algorithm should mark as many actual edges in the image as possible;
2. Good localization — the identified edges should be as close as possible to the actual edges in the image;
3. Minimum response — edges in the image should be marked only once, and any noise present in the image should not be marked as edges.
Next, let’s introduce the specific steps of the popular Canny algorithm:
(1). Gaussian Filtering
Gaussian filtering is currently the most popular denoising filter algorithm. The term Gaussian refers to the same concept as the normal distribution in probability theory, where the principle is to generate parameters based on the grayscale values of the pixel points to be filtered and their neighboring points according to the Gaussian formula for weighted averaging. This effectively filters out the high-frequency noise superimposed on the ideal image.
The two-dimensional Gaussian formula is:
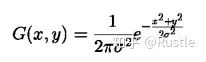
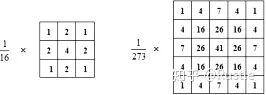 Figure 3-5 Common Gaussian filters
In fact, the Gaussian filter resembles a pyramid structure, where the size of the filter values can be understood as weights. The larger the value, the greater the weight corresponding to the pixel point, and the contribution to the grayscale value increases as well. Thus, we can observe from the Gaussian filter that the farther away from the current pixel point, the smaller the weight, and the lesser the contribution to the grayscale value.
Let’s take an example to understand Gaussian filtering. In the Gaussian filter on the left side of Figure 3-5, we can regard the central point 4 as the ‘protagonist’ and the surrounding points as ‘neighbors’. The noise can be seen as ‘bad people’. Now, let’s assume that among these 9 people, one is a ‘bad person’. We know that bad people will definitely claim to be good people, but what if we have a voting mechanism to decide whether someone is a ‘bad person’? The weights correspond to the weight of each person’s statement, and the voting mechanism represents the weighted average strategy we mentioned. Now, we can intuitively see that Gaussian filtering is a filter that considers its surrounding pixel points. Even if the current point is a noise point, the Gaussian filter will use the grayscale values of the surrounding points to mitigate the influence of noise, generating the Gaussian filter and filtering code as follows:
sigma=1;               % Gaussian standard deviation
% Calculate filter length based on Gaussian standard deviation
filterExtent = ceil(4*sigma);x = -filterExtent:filterExtent;
% Generate one-dimensional Gaussian kernel
c = 1/(sqrt(2*pi)*sigma);gaussKernel = c * exp(-(x.^2)/(2*sigma^2));
% Normalize gaussKernel = gaussKernel/sum(gaussKernel);
% Perform Gaussian filtering on the image
aSmooth=imfilter(a,gaussKernel,'conv','replicate');   % Convolution along X-axis
aSmooth=imfilter(aSmooth,gaussKernel','conv','replicate');  % Convolution along Y-axis
(where gaussKernel’ represents the transposed gaussKernel)
(2). Calculate Gradient Image and Angle Image
Calculating the gradient image is something we have basically understood. It simply involves using various edge detection operators to detect the gradient. However, in Canny, the gradient detection operator used is somewhat advanced, as it uses a Gaussian filter to calculate the gradient, and the results are similar to the Sobel operator, where the weights of the pixels closer to the center point are greater. The code is as follows:
% Numerical gradient function (1-D derivative of Gaussian kernel)
derivGaussKernel = gradient(gaussKernel);
% Normalize
negVals = derivGaussKernel < 0;posVals = derivGaussKernel > 0;
derivGaussKernel(posVals) = derivGaussKernel(posVals)/sum(derivGaussKernel(posVals));
derivGaussKernel(negVals) = derivGaussKernel(negVals)/abs(sum(derivGaussKernel(negVals)));
% Calculate gradient
dx = imfilter(aSmooth, derivGaussKernel, 'conv','replicate');
dy = imfilter(aSmooth, derivGaussKernel', 'conv','replicate');

mag = hypot(dx,dy); magmax = max(mag(:));if magmax>0    magGrad = mag / magmax;   % Gradient normalizationend
The calculation of the angle image is relatively simple, and its role is to guide the non-maximum suppression direction. The formula is as follows:
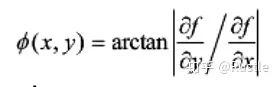
(3). Perform Non-Maximum Suppression on the Gradient Image
The gradient image obtained from the previous step has issues such as thick edges and weak edge interference. Now we can use non-maximum suppression to find the local maxima of the pixel points and set the grayscale values corresponding to non-maximum values to zero. This can eliminate a large portion of non-edge pixel points.
As shown in Figure 3-6, C represents the current non-maximum suppression point, while g1-4 are its 8-connected neighboring points. The blue line segments in the figure represent the gradient values obtained from the angle image calculated in the previous step for point C, indicating the gradient direction. The first step is to check whether the grayscale value of C is the largest among the 8-connected neighbors. If so, we continue to check whether the values of the intersection points dTmp1 and dTmp2 are greater than C. If the value of C is greater than the grayscale values of dTmp1 and dTmp2, then point C is considered a maximum point and is set to 1. Thus, the final generated image should be a binarized image where edges ideally are single-pixel edges.
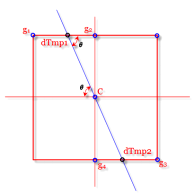
(It should be noted that the gradient direction intersection points do not necessarily fall on the positions of the 8 neighboring points, so dTmp1 and dTmp2 are actually the grayscale values formed by bilinear interpolation of the two neighboring points in practical applications).
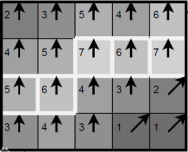
Lastly, to help everyone understand, as shown in Figure 3-7, where the gradient directions are all vertically upward, after non-maximum suppression, the maximum value in the gradient direction is taken as the edge point, forming thin and accurate single-pixel edges.
(4). Use Double Threshold for Edge Linking
After the previous three steps, the quality of the edges obtained is already very high, but there are still many false edges. Therefore, the algorithm adopted in Canny is the double threshold method. The specific idea is to select two thresholds: points below the low threshold are considered false edges and set to 0, points above the high threshold are considered strong edges and set to 1, and pixels in between need further checking.
Based on the high threshold image, edges are linked into contours. When reaching the endpoints of the contour, the algorithm searches for points that meet the low threshold among the 8 neighboring points of the breakpoint, and collects new edges based on this point until the entire image is closed. The specific code is:
function nedge=connect1(nedge,y,x,low,high,magGrad)       % Connectivity analysis after seed positioning    neighbour=[-1 -1;-1 0;-1 1;0 -1;0 1;1 -1;1 0;1 1];  % Eight-connected search    [m n]=size(nedge);
    for k=1:8        yy=fix(y+neighbour(k,1));        xx=fix(x+neighbour(k,2));

        if yy>=1 &&yy<=m &&xx>=1 && xx<=n              if magGrad(yy,xx)>=low && nedge(yy,xx)~=255 && magGrad(yy,xx)<high                  nedge(yy,xx)=255;                %disp('check check');                %nedge=connect1(nedge,yy,xx,low,high,magGrad);            end        end    endend
However, due to the high computational cost of finding weak edge points, as it uses a recursive approach and the number of weak edge points found is often few, this step is often omitted in practical applications, replaced by a morphological edge thinning operation, the specific idea will be mentioned later. The specific code is:
H = bwmorph(H, 'thin', 1);Thus, we have deeply understood the ideas and implementation methods of the Canny algorithm. In practical applications, Canny is generally the first choice for edge detection, and its algorithmic ideas are very worth learning. Next, we will briefly introduce the Marr-Hildreth edge detection operator based on second-order derivatives.
1). Marr-Hildreth Operator
Before learning the Marr-Hildreth operator, let’s first understand why we use second-order derivatives.
As shown in Figure 3-8, the left side shows a grayscale image that transitions smoothly from black (0) to white (255) from left to right. Now, let’s look at its horizontal grayscale profile. The grayscale value rises steadily from low to high, and its first derivative remains constant in the rising region. The information obtained is that the grayscale value of the image transitions smoothly, meaning the gradient values are equal. Next, when we take the second derivative, we find that the starting point of the transition has a positive value, which is the gradient value of the first derivative at this point, and the endpoint is the same as the starting point. Now, the key point is that if we connect these two points, we get an intersection point with the X-axis, which we consider to be the edge point. This is the wonderful application of second-order derivatives in edge detection (I found it amazing the first time I encountered it).
Let’s take a look at the conclusions of Marr and Hildreth:
1. Grayscale changes are independent of image size, so their detection requires operators of different sizes.
2. Sudden changes in grayscale will cause peaks or valleys in the first derivative, equivalently causing zero crossings in the second derivative.
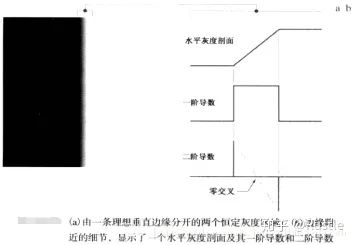 Figure 3-8 Zero crossing principle
Having learned the principle of the Marr-Hildreth algorithm based on second-order derivatives, let’s look at its approach:
(1). Gaussian Filtering
You read that right, it’s still Gaussian filtering. Almost all edge detection algorithms begin with Gaussian filtering to remove high-frequency noise, so I won’t elaborate further. Just review it.
(2). Calculate Laplacian Second Derivative
Marr-Hildreth proves that the operator best suited for image processing needs is the Laplacian of Gaussian (LoG) operator. We won’t elaborate on the specific principles here; let’s look at its formula:
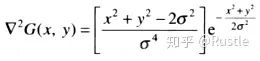
The generated Laplacian filter is also known as the Mexican hat operator because its center is usually a larger positive number, and the 8-connected neighboring points are smaller negative values. Common filters are shown in Figure 3-9:
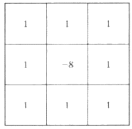 Figure 3-9 Laplacian filter
Next, we use the Laplacian filter to perform filtering operations on the image to obtain the image to be calculated.
(3). Calculate Zero Crossing
Zero crossing is relatively simple to implement. Since zero crossing points mean that at least two adjacent pixel points have pixel values with opposite signs, there are four situations to detect: left and right, up and down, and two diagonals. If the absolute value of the difference in any of these four situations exceeds a set threshold, we can call p a zero-crossing pixel, as shown below:
 Figure 3-10
This is a small part of Marr-Hildreth, detecting whether the [ – +] situation is satisfied, where thresh is the threshold mentioned.
<spanat about="" advanced="" algorithm="" algorithms="" and="" classic="" detection="" edge="" experience="" have="" ideas.="" learned="" let’s="" most="" next,="" of="" point,="" popular="" references.
4. Supplement
1. The size of the filter should be odd, so that there is a center point for assignment operations. Common filters or convolution kernels (Conv kernel) are 3*3, 5*5, etc., hence the concept of radius, for example, the radius of a 5*5 convolution kernel is 2.
2. The sum of all elements in the filter should be 0. This constraint ensures that the overall grayscale value of the image remains unchanged before and after filtering.
3. The Roberts operator, Sobel operator, and Prewitt operator have high operational speeds and a certain noise suppression effect, but the quality of the detected edges is not high, such as edges being too thick, imprecise localization, and many discontinuities.
4. The Canny operator is not easily disturbed by noise, resulting in fine and accurate edges, but its drawback is that it has a high computational cost, making real-time image processing difficult; it is suitable for applications requiring high precision.
5. The Marr-Hildreth operator has relatively superior edge detection effects, but it is sensitive to noise (due to the nature of second-order operations).
5. Conclusion
In general, edge detection algorithms have a wide range of applications across many fields, making them a great way to start learning computer vision. Many of the ideas and principles still leave an impression on me, which is why I chose to start my first article with this topic. Additionally, some parts of the article reflect my own understanding and insights; if there are any mistakes, I hope everyone can point them out. I will continue to write articles about machine learning, deep learning, and face recognition. Finally, I will attach the complete Matlab code implementation of the Canny edge detection algorithm (of course, one can also call the edge function, but for learning, it’s best to implement it from the ground up).
I=imread('cameraman.tif');%I=rgb2gray(I);figure(1);subplot(121);imshow(I);xlabel('Original Image');[m n]=size(I);a=double(I);sigma=1;               % Gaussian standard deviation%highThresh=0.0625;     % Upper threshold%lowThresh=0.0250 ;    % Lower threshold    %=======================Gaussian Filtering & Gradient Calculation=======================%%%%%%%%%%%%%%%%%%%%%%%%%Old%%%%%%%%%%%%%%%%%%%%%%%%%%%%pw = 1:30; %ssq = sigma^2;%width = find(exp(-(pw.*pw)/(2*ssq))>0.0001,1,'last');%if isempty(width)%    width = 1;  %end    %t = (-width:width);%gauss = exp(-(t.*t)/(2*ssq))/(2*pi*ssq);     % One-dimensional Gaussian filter    % [x,y]=meshgrid(-width:width,-width:width);%gauss2=-x.*exp(-(x.*x+y.*y)/(2*ssq))/(pi*ssq);   % Two-dimensional Gaussian filter    % Perform Gaussian filtering on the image% aSmooth=imfilter(a,gauss,'conv','replicate');   % Convolution along X-axis% aSmooth=imfilter(aSmooth,gauss','conv','replicate'); % Convolution along Y-axis    % Use two-dimensional Gaussian for convolution% dx = imfilter(aSmooth, gauss2, 'conv','replicate');% dy = imfilter(aSmooth, gauss2', 'conv','replicate');%%%%%%%%%%%%%%%%%%%%%%%%%%%%%%%%%%%%%%%%%%%%%%%%%%%%%%%%%%%%%%%%

% Calculate filter length based on Gaussian standard deviation
filterExtent = ceil(4*sigma);x = -filterExtent:filterExtent;
% Generate one-dimensional Gaussian kernel
c = 1/(sqrt(2*pi)*sigma);gaussKernel = c * exp(-(x.^2)/(2*sigma^2));
% Normalize gaussKernel = gaussKernel/sum(gaussKernel);
% Numerical gradient function (1-D derivative of Gaussian kernel)
derivGaussKernel = gradient(gaussKernel);
% Normalize
negVals = derivGaussKernel < 0;posVals = derivGaussKernel > 0;
derivGaussKernel(posVals) = derivGaussKernel(posVals)/sum(derivGaussKernel(posVals));
derivGaussKernel(negVals) = derivGaussKernel(negVals)/abs(sum(derivGaussKernel(negVals)));
% Perform Gaussian filtering on the image
aSmooth=imfilter(a,gaussKernel,'conv','replicate');   % Convolution along X-axis
aSmooth=imfilter(aSmooth,gaussKernel','conv','replicate');  % Convolution along Y-axis
% Calculate gradient
dx = imfilter(aSmooth, derivGaussKernel, 'conv','replicate');dy = imfilter(aSmooth, derivGaussKernel', 'conv','replicate');

mag = hypot(dx,dy); magmax = max(mag(:));if magmax>0    magGrad = mag / magmax;   % Gradient normalizationend
% Threshold selection%PercentOfPixelsNotEdges = 0.7; counts=imhist(magGrad, 64);highThresh = find(cumsum(counts) > 0.7*m*n, 1 ,'first' ) / 64;lowThresh = 0.4*highThresh;
%figure(8);imshow(magGrad);%%========================Gaussian Filtering========================================%w=fspecial('gaussian',[5 5]);%img=imfilter(img,w,'replicate');%figure;%imshow(uint8(img))
%%===================Sobel Edge Detection=======================================%hv=fspecial('sobel');%dx=imfilter(img,hv,'replicate');      % Calculate horizontal edges%hh=hv';%dy=imfilter(img,hh,'replicate');      % Calculate vertical edges%img=sqrt(dx.^2+dy.^2);

% magmax = max(img(:));%      (Threshold normalization)%    if magmax > 0%        magGrad = img / magmax;%    end%figure;%imshow(uint8(img));
I = thinAndThreshold(dx, dy, magGrad, lowThresh, highThresh);

%disp(lowThresh);subplot(122);imshow(I);xlabel('Canny Edge Detection');disp("High threshold TL: " + highThresh);disp("Low threshold TH: " + lowThresh);
%========================Non-Maximum Suppression and Edge Linking=======================================function H = thinAndThreshold(dx, dy, magGrad, lowThresh, highThresh)
E = cannyFindLocalMaxima(dx,dy,magGrad,lowThresh);  % Non-maximum suppression
if ~isempty(E)    [rstrong,cstrong] = find(magGrad>highThresh && E);
    if ~isempty(rstrong)         H = bwselect(E, cstrong, rstrong, 8);   % Select strong edges 8-connected target       % figure(2);imshow(H);               % Set(0,'RecursionLimit',1000);      % Weak edge connectivity (not very effective and takes too long)       % [xstrong ystrong]=find(magGrad>highThresh && E);       % for i=1:numel(xstrong);       %     H = connect1(H,xstrong(i),ystrong(i),lowThresh,highThresh,magGrad);       % end       % figure(3);imshow(H);                H = bwmorph(H, 'thin', 1);      % Edge thinning    else        H = false(size(E));    endelse    H = false(size(E));endend
%========================Weak Edge Linking=======================================function nedge=connect1(nedge,y,x,low,high,magGrad)       % Connectivity analysis after seed positioning    neighbour=[-1 -1;-1 0;-1 1;0 -1;0 1;1 -1;1 0;1 1];  % Eight-connected search    [m n]=size(nedge);
    for k=1:8        yy=fix(y+neighbour(k,1));        xx=fix(x+neighbour(k,2));

        if yy>=1 &&yy<=m &&xx>=1 && xx<=n              if magGrad(yy,xx)>=low && nedge(yy,xx)~=255 && magGrad(yy,xx)<high                  nedge(yy,xx)=255;                %disp('check check');                %nedge=connect1(nedge,yy,xx,low,high,magGrad);            end        end    endend
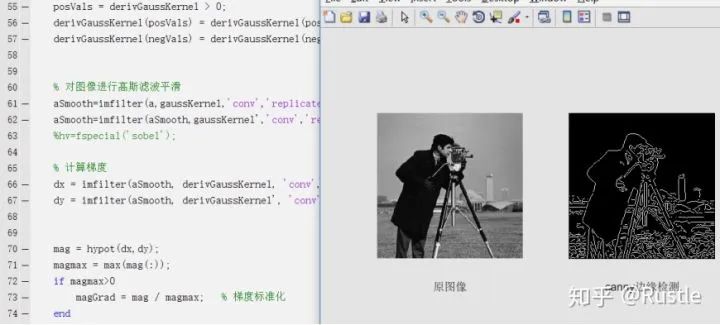
Effect as shown:
 Editor: Yu TengkaiProofreader: Lin Yilin