
Hourglasses are used to visually represent the passage of time. Nowadays, it is hard to find large hourglasses on the market; the common ones are small kitchen hourglasses that can display about 3 to 5 minutes.
In this project, the author creates a complete hourglass that lasts exactly one hour, with the hour displayed on the top glass.
This project is quite simple to build and program, as long as you have some basic Arduino knowledge. Additionally, there is a lot of room for creativity in the design of the hourglass.

Required Materials
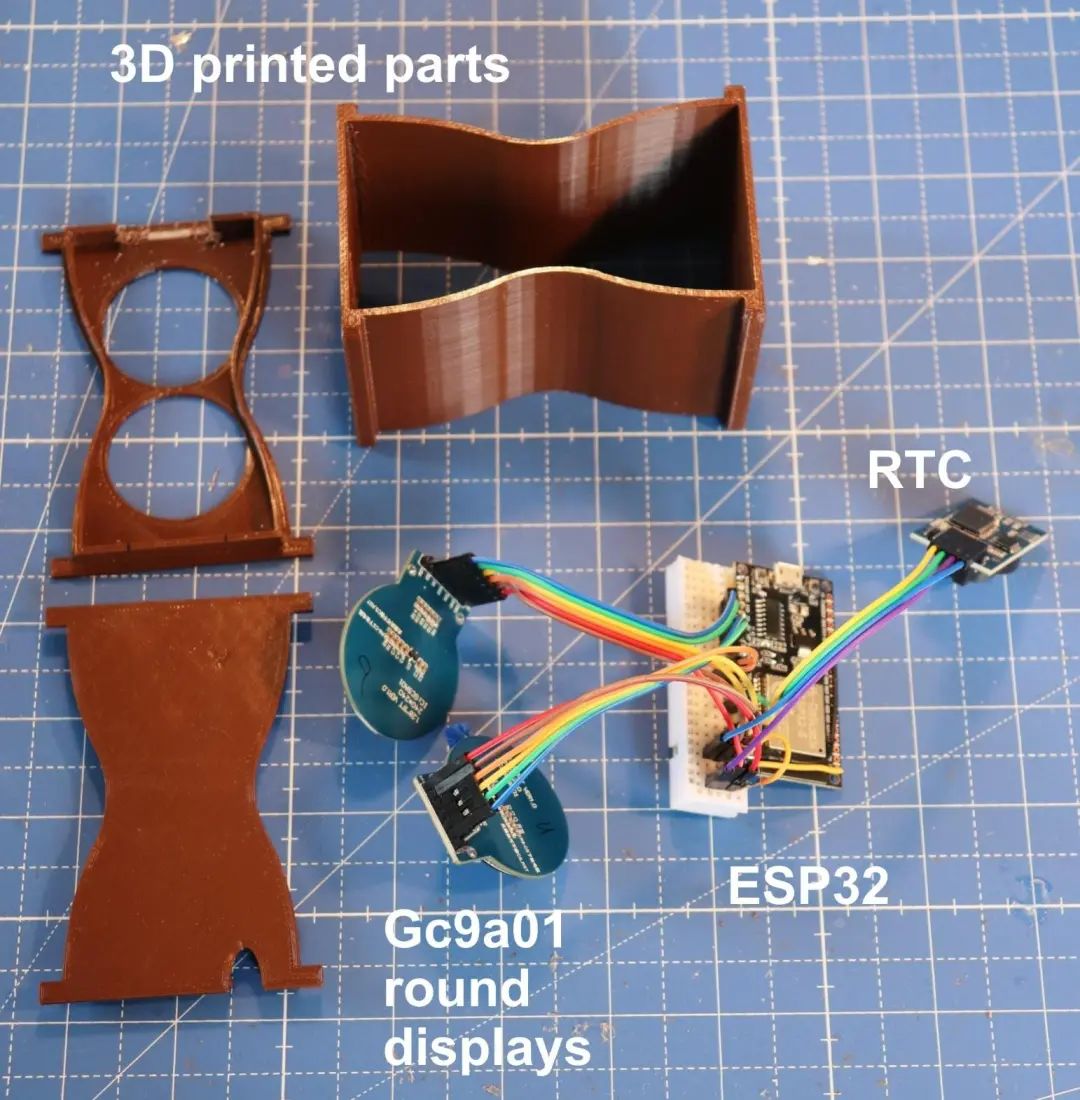
-
ESP32 -
2 GC9a01 circular displays -
RTC module -
Wires -
Materials for the casing: wood, cardboard, plastic, 3D printing, etc.
Step 1: Wiring
This is likely the most complex part of the entire project, but don’t worry, take it step by step, and you’ll find it’s not that hard.
The displays and RTC need a 3.3V power supply and GND.

The RTC also requires two additional connections:

Connect the display according to the table. TFT1 is the upper display, and TFT2 is the lower one.
Step 2: Program and RTC
For the ESP32, you need to set the following in the Arduino IDE:
Upload the program to the ESP32. If the wiring is correct, it should work properly.
The RTC module gets the time via a radio encrypted signal. It may take a few minutes to display the correct time. Extract the minutes and hours from the received data for our program.
The minutes are converted into the coordinates of the sand triangle, ensuring that the flow of sand lasts exactly one hour.
The hour is only displayed on the top glass.
Upload <span>HourGlass.ino</span> or <span>HourGlass-demo.ino</span> to your ESP32. Make sure the <span>colors.h</span> file is in the same folder.
The program can be downloaded as a package at the end of the article.
Step 3: Graphic Working Principle
The graphics consist of simple geometric elements. The sand at the top is initially displayed as a filled rectangle (<span>tft1.fillRect(…)</span>). Due to the circular display, this is actually unrecognizable. The flowing sand is simulated by a black triangle that changes shape and position over time. The sand that accumulates at the bottom is also represented by a triangle.
The hour is simply displayed on the top glass.
Step 4: Casing
The author prefers to use a casing made with a 3D printer, designed using Tinkercad.
The author divides it into three parts so that the clock can be easily placed into the hole. This is the closest design to the shape of an hourglass that can be achieved.

The STL files can be downloaded as a package at the end of the article.
You do not need to flip the hourglass. The sand will magically “move back” into the top glass after one hour.
Original article link: https://www.instructables.com/Digital-Hourglass/
Project Author: Markus Opitz
Translation first published in: DF Maker Community
Please indicate the source when reprinting
Hardware Arsenal
Click to learn more👆

DFRobot Official Brand Store https://dfrobot.taobao.com/
DFRobot Official Flagship Store https://dfrobot.jd.com/
Documents mentioned in the article, can click the lower left cornerto read the original text, or reply “Digital Hourglass” in the public account to obtain!
If you have any comments, feel free to leave a message below!
Previous Project Reviews
Understand the entire series of Raspberry Pi in one article!
Learn these 20 Linux commands to master your Raspberry Pi!
Raspberry Pi Cyberdeck with 6 screens, check it out!
Light up a Christmas tree with Raspberry Pi
Build a Raspberry Pi cloud server that fits in your pocket!
Create a “digital microscope” with Raspberry Pi
Spring is here, you need a retro-style Raspberry Pi camera
3D printed Raspberry Pi spider robot
Make a handheld computer with Raspberry Pi and ESP32!
Build a retro gaming console based on Raspberry Pi Zero
The most comprehensive guide! How to choose Raspberry Pi expansion boards? A video to solve it!
Click to read👆