
LingShun Lab (lingshunlab.com) mainly introduces how to use multithreading with FreeRTOS on the ESP32.
What is Multithreading?
It refers to the technology of implementing multiple threads to execute concurrently from software or hardware. Computers with multithreading capabilities can execute more than one thread at the same time due to hardware support, thereby improving overall processing performance.
The S and S3 series of ESP32 are dual-core, which means when one CPU is working, another CPU is running simultaneously. The Arduino core of ESP32 has Arduino functionality under the premise of using multitasking. The core program of Arduino is created using a real-time operating system called FreeRTOS.
ESP32 FreeRTOS Documentation: https://docs.espressif.com/projects/esp-idf/en/v4.3/esp32/api-reference/system/freertos.html
The Simplest Multithreading Example
TaskHandle_t th_p[1]; // Task handle, the call to xTaskCreate returns. Can be used as a parameter to vTaskDelete to delete the task.
long a_Task = 0;
long b_Task = 0;
void Core0task(void *args) {
while(1){ // A dead loop must be used in multithreading
b_Task++;
delay(1); // Adding a 1ms delay can effectively prevent freezing, errors, and improve efficiency.
}
}
void setup() {
Serial.begin(115200);
xTaskCreatePinnedToCore(Core0task, "Core0task", 4096, NULL, 3, &th_p[0], 0);
}
void loop() {
a_Task++;
Serial.print("a_Task = ");
Serial.println(a_Task);
Serial.print("b_Task = ");
Serial.println(b_Task);
delay(1000);
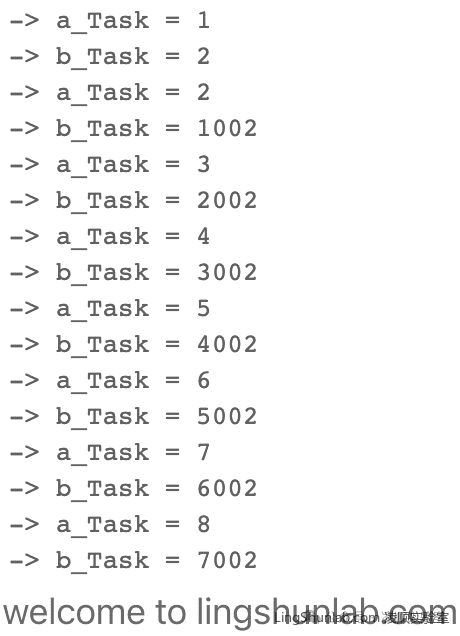
}Execution Result:
Code Explanation:
1. Define Handle
You must define a task handle to store the multithreading. The task handle needs to be passed by address, so it is set as an array here for easier management.
TaskHandle_t th_p[1];2. Define Multithreading Program
Define a void (no type) function to be used as a multithreading task,
void Core0task(void *args) {
    while(1){ // A dead loop must be used in multithreading
        b_Task++;
        delay(1); // Adding a 1ms delay can effectively prevent freezing, errors, and improve efficiency.
    }
}
3. Start Multithreading
Start multithreading in void setup
void setup() {
    ...
    xTaskCreatePinnedToCore(Core0task, "Core0task", 4096, NULL, 3, &th_p[0], 0);
    ...
}
xTaskCreatePinnedToCore Explanation
Create a thread with a specific association, this function is similar to xTaskCreate but allows setting task association in SMP systems.
BaseType_t xTaskCreatePinnedToCore(
  TaskFunction_t pvTaskCode,  // Pointer to the task entry function. The task must implement never returning (i.e., continuous loop), or should use vTaskDelete function to terminate.
  const char *constpcName,  // Descriptive name of the task. This is mainly for debugging convenience.
  const uint32_t usStackDepth, // The size of the task stack specified in bytes. Note that this is different from regular FreeRTOS.
  void *constpvParameters, // Pointer to be used as the parameter for the task being created.

  UBaseType_t uxPriority, // The priority at which the task will run. The larger the number, the higher the priority.
  TaskHandle_t *constpvCreatedTask, // Used to return a handle, the created task can be referenced by this handle
  const BaseType_t xCoreID // Value 0 or 1 indicates the index number of the CPU to which the task should be pinned. Specifying a value greater than (portNUM_PROCESSORS - 1) will cause the function to fail.
)
Example of Creating More Threads
TaskHandle_t th_p[2];

long a_Task = 0;
long b_Task = 0;
long c_Task = 0;
void Core0task(void *args) {
    while(1){ // A dead loop must be used in multithreading
        b_Task++;
        delay(1); // Adding a 1ms delay can effectively prevent freezing, errors, and improve efficiency.
    }
}

void Core1task(void *args) {
    while(1){ // A dead loop must be used in multithreading
        c_Task++;
        delay(2);
    }
}

void setup() {
    Serial.begin(115200);
    xTaskCreatePinnedToCore(Core0task, "Core0task", 4096, NULL, 3, &th_p[0], 0);
    xTaskCreatePinnedToCore(Core1task, "Core1task", 4096, NULL, 4, &th_p[1], 1);
}

void loop() {
    a_Task++;
    Serial.print("a_Task = ");
    Serial.println(a_Task);
    Serial.print("b_Task = ");
    Serial.println(b_Task);
    Serial.print("c_Task = ");
    Serial.println(c_Task);
    delay(1000);
}
References:
12 lines to try multicore on ESP32: https://qiita.com/Ninagawa_Izumi/items/5c3a9d40996836bd825f
ESP32 FreeRTOS Documentation: https://docs.espressif.com/projects/esp-idf/en/v4.3/esp32/api-reference/system/freertos.html