This article mainly refers to the official WindRiver documentation “wr_tilcon_graphics_suite_tutorial_5.8.pdf”, specifically the section “3 Building the Prototype”, and organizes and explains the key steps in the testing process. For detailed testing steps, please refer to the original English document.
Testing Environment
- • HOST CPU: X86
- • HOST OS: Windows XP
- • Target CPU: SIMNT
- • Target BSP: simpc
- • VxWorks IDE: Workbench 3.0
- • VxWorks Version: VxWorks 6.6 for X86
- • WindML: WindML 5.1
- • Tilcon: Tilcon 5.8
Generating TWD Files
Refer to the following three subsections in the documentation to develop the interface in <span>Tilcon IDT</span>, perform simulation testing, and generate TWD files.
- • “3.3 Build Prototype Without Code”
- • “3.4 Simulate and Test Prototype Without Code”
- • “3.5 Generating a TWD File”
Compiling the WindML Library
Refer to “3.6.1 Starting Wind River Workbench” and “3.6.2 Building the Media Library Archives” for the following modifications:
When creating a new <span>DKM</span> project, when reaching the following interface, select <span>Build tool</span> as <span>Librarian</span>

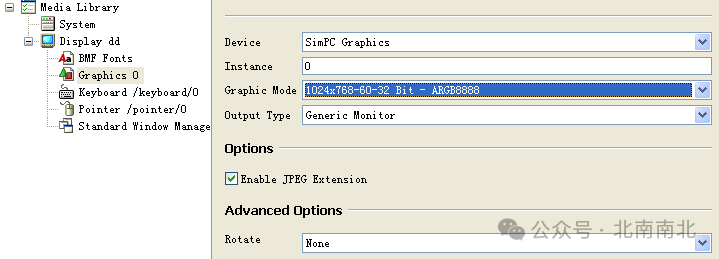
To support testing multiple examples, when configuring <span>WindML</span>, the <span>Graphic Monitor</span> can select larger resolution options such as <span>1024x768-60-32 Bit – ARGB8888</span> or <span>1280x1024-60-16 Bit – RGB565</span>.
Compiling the VIP Project
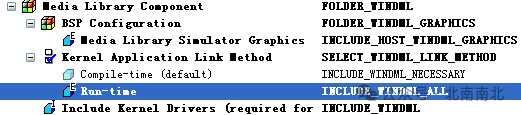
Refer to “3.6.3 Building the VxWorks Image Project”; when configuring <span>WindML</span> components, you need to select <span>INCLUDE_WINDML_ALL</span>:
Compiling the DKM Project
Tilcon Component Template Selection
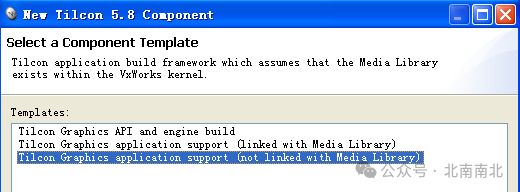
Refer to “3.6.4 Building the Example Application”; when adding <span>Tilcon</span> middleware components, select <span>Tilcon Graphics application support (not linked with Media Library)</span>:
Copying Test Source Code
Copy the source file <span>tiregauge.c</span> from the installation directory <span>\components\tilcon-5.8\samples\tutorials\tiregauge\</span> to the project directory, then select the project in <span>Workbench</span> in the <span>Project Explorer</span> and right-click to select <span>Refresh</span>.
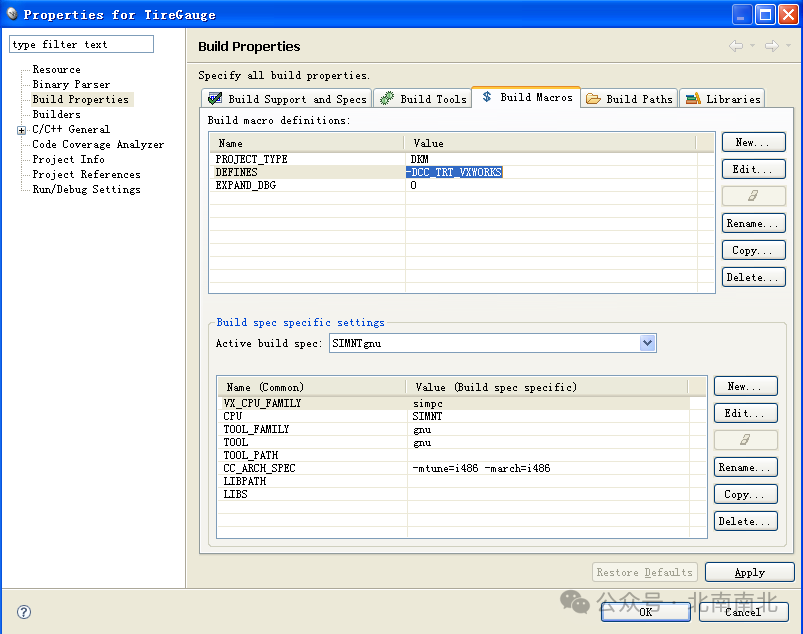
Modifying Build Properties
Select the project, right-click and select <span>Properties</span>, in the pop-up window select <span>Build Properties</span> -> <span>Build Macros</span>, and add the value <span>-DCC_TRT_VXWORKS</span> in the macro <span>DEFINES</span>
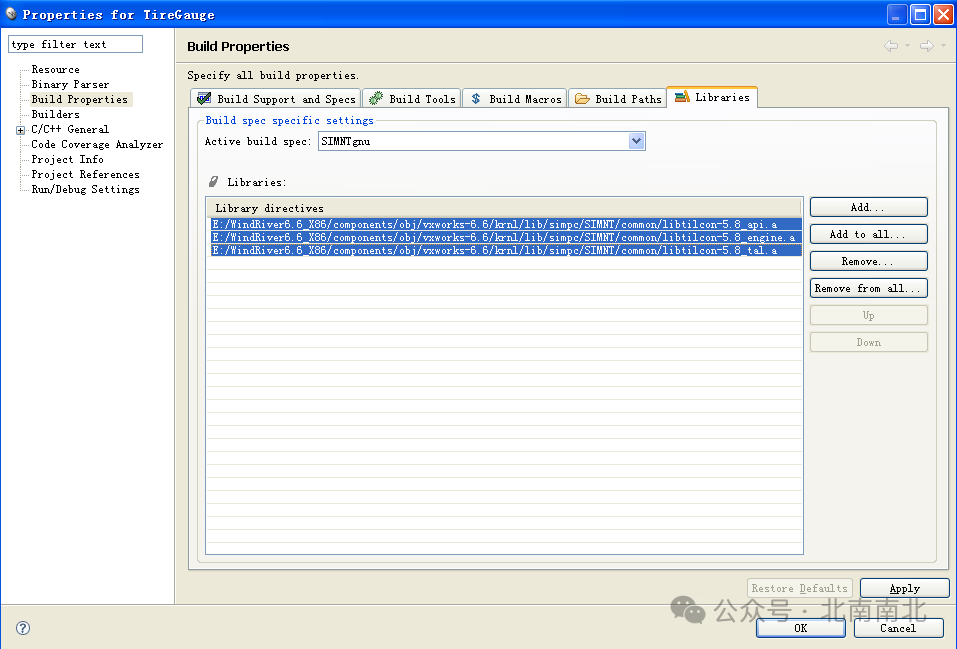
Select the <span>Libraries</span> tab, click <span>Add</span>, and select <span>Add full qualified library file</span>:
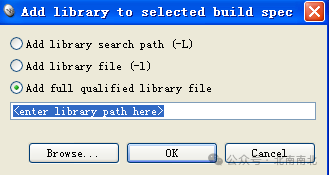
Click <span>Browse</span>, and add the three library files shown in the following image:
Testing Execution
The following introduces two examples: <span>TireGauge</span> and <span>RadarDemo</span>; you can refer to the methods described in this article to test other test cases provided by Tilcon.
TireGauge
Refer to the following three subsections for testing:
- •
<span>3.6.5 Starting the VxWorks Simulator</span> - •
<span>3.6.6 Downloading the Application to the Target</span> - •
<span>3.6.7 Running the Application</span>
Refer to the image below to download the compiled test program <span>TireGauge.out</span>:
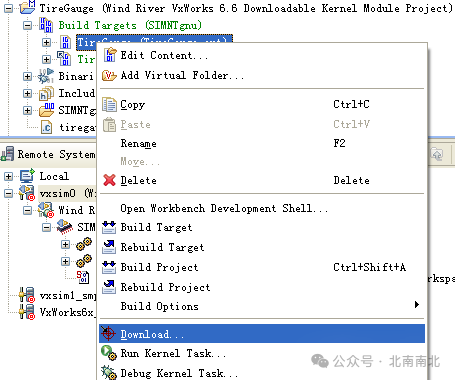
Then click <span>OK</span> to proceed.

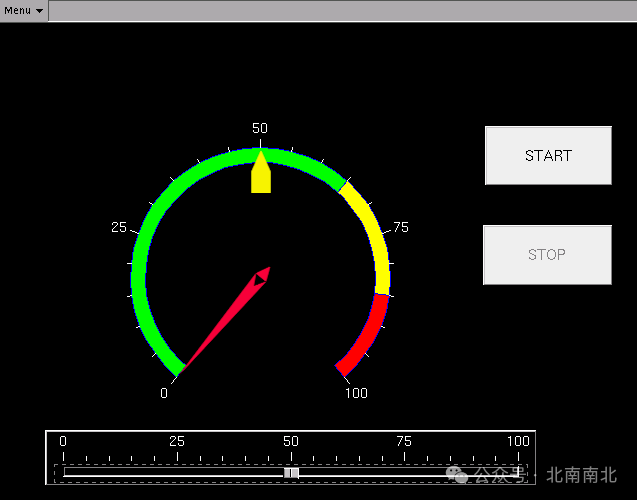
Execute the command <span>sp main</span> in the VxWorks shell console; if the image shown below appears, the test is successful:
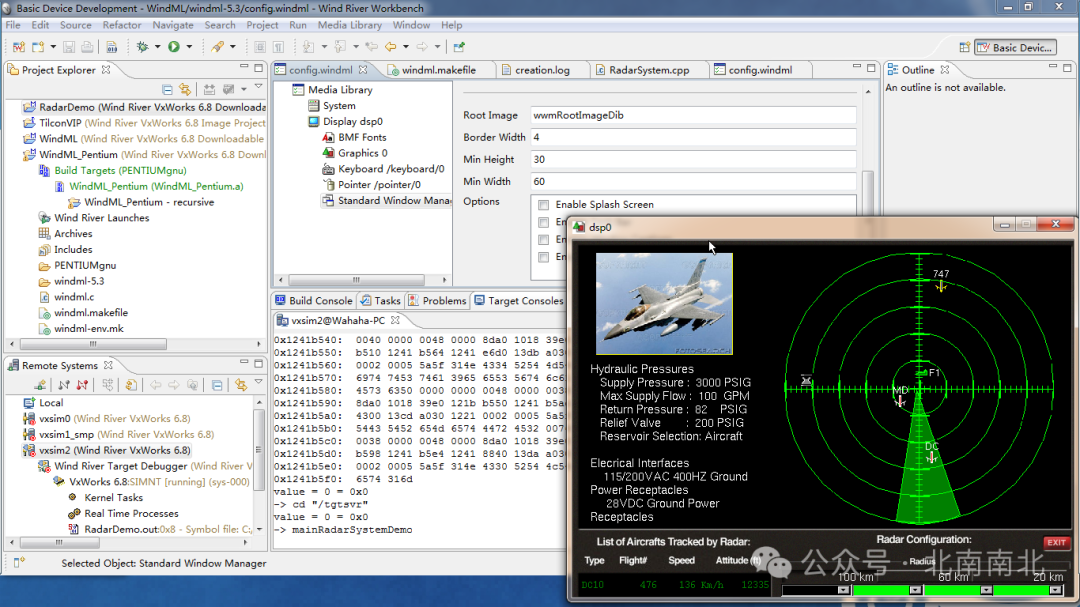
RadarDemo
This test case is located at <span>\tilcon-5.8\samples\demos\RadarDemo</span>; to test this program, you can re-execute the <span>Compiling VIP Project</span> and <span>Compiling DKM Project</span> sections, creating two new projects. For convenience, we will not create new projects here, but directly test on the previous project. You only need to redo the step “4.2 Copying Source Code”.
First, delete the previous source file <span>tiregauge.c</span> in the project directory created in the <span>Compiling DKM Project</span> section, then copy the file <span>RadarSystem.cpp</span> to the project directory, and also copy the entire <span>\tilcon-5.8\samples</span> directory to the <span>Workbench</span> workspace directory.
This is because the file <span>tiregauge.c</span> contains the following definition:
#define CC_WORKINGDIR "/tgtsvr/samples/demos/RadarDemo"During program execution, it will use the file <span>Radar_Window.twd</span> in the <span>samples\demos\RadarDemo</span> directory. The default <span>/tgtsvr</span> path is the <span>workspace</span>. Therefore, during testing, you can also copy the <span>Radar_Window.twd</span> file separately and then modify the definition of <span>CC_WORKINGDIR</span>.
If the test program shows the image below, the test is successful:

Test on Tilcon 5.9 & VxWorks 6.9
If testing the tilcon test cases on new software versions, the process can refer to the above content, and the relevant software versions need to refer to the following:
- • Workbench: Workbench 3.3
- • Vxworks Version: VxWorks 6.9 for x86
- • WindML: WindML 5.4
- • Tilcon: Tilcon 5.9
For specific testing methods, refer to the section “3 Building the Prototype” in “wr_tilcon_graphics_suite_tutorial_5.9.pdf”.
The main difference from Tilcon 5.8 is that the <span>tilcon</span> project has become two (previously there was only one), refer to the following two parts:
- • 3.6.4 Building the TSP (Target Support Package)
- • 3.6.5 Building the Example Application
It should be noted that:
When executing “3.6.2 Building the Media Library Archives”, the project’s <span>Build tool</span> should be selected as <span>Librarian</span>.
Copy the source code of the test case <span>tiregauge.c</span> to the <span>tiregauge</span> project directory. Other steps can be executed according to the documentation.
For detailed information about tilcon, please refer to the application user manuals as follows:
- • “wr_tilcon_graphics_suite_users_guide_5.8.pdf”
- • “wr_tilcon_graphics_suite_users_guide_5.9.pdf”
Click “Read the original text” to access more free resources for VxWorks.