In industrial automation projects, stable communication between the Mitsubishi FX3U PLC and the touch screen is fundamental. The FX3U offers flexible connection options, including the built-in programming port, serial expansion modules (BD board/ADP adapter), and Ethernet adapters. This article will detail these mainstream connection methods to help you quickly complete the configuration!
Overview of Core Connection Methods:
-
Method 1: Direct Connection via Built-in Programming Port – The simplest and most direct method, requiring no additional modules.
-
Method 2: Serial Expansion Connection – Achieve RS232/RS485 communication through FX3U-232BD/ADP or FX3U-485BD/ADP modules.
-
Method 3: Ethernet Expansion Connection – Achieve Ethernet communication through the FX3U-ENET-ADP module (requires the touch screen to have an Ethernet port).
🔧 Method 1: Direct Connection via Built-in Programming Port (Simplest Solution)
-
Features: Utilizes the round programming port of the FX3U PLC, simple wiring, no parameter settings required on the PLC side.
-
Hardware Connection:
-
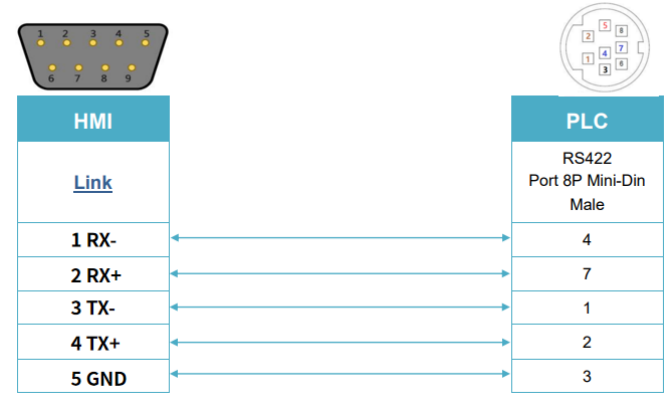
📌 Important Note: There are many ready-made “FX3U Programming Port to Weintek Touch Screen Communication Cables” available on the market. It is highly recommended to purchase a finished cable! This saves time and effort, avoiding wiring errors. If you need to make one yourself, be sure to strictly follow the pin definitions of both sides.
-
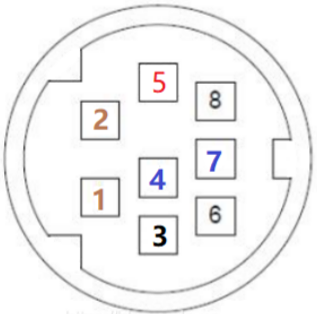
PLC Side (Programming Port):

-
Pin Connections:
-
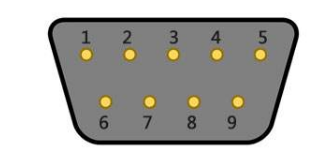
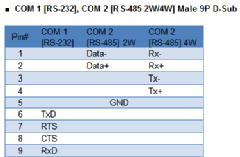
Touch Screen Side (DB9 Female Connector):
-
Touch Screen Parameter Settings:
-
In Weintek EasyBuilder Pro software, go to system parameter settings.
-
Device Type: Add
<strong><span>Mitsubishi FX3U</span></strong>.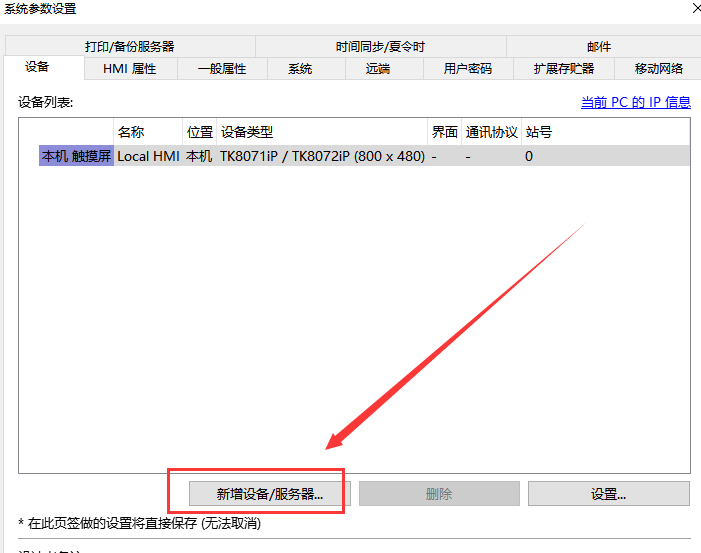
-
Interface Type: RS-485 4W.
-
COM Port: Select the port used for connection, such as
<strong><span>COM2</span></strong>. -
Communication Parameters: Default settings are fine (Baud rate 9600, Data bits 8, Even parity, Stop bits 1).
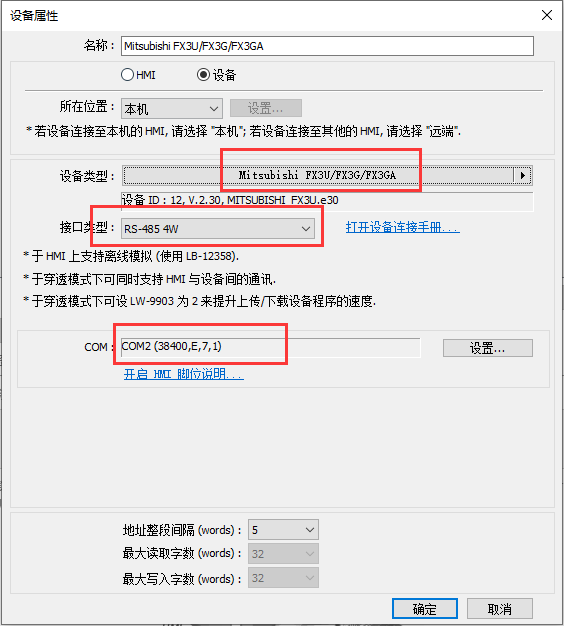
PLC Parameter Settings: ✅ No settings required!
📡 Method 2: Serial Expansion Connection (232/485BD Board or ADP Adapter)
-
Features: Strong expandability, suitable for scenarios requiring long distances or specific interfaces. You need to purchase FX3U-232BD/ADP (RS232) or FX3U-485BD/ADP (RS485) modules.
-
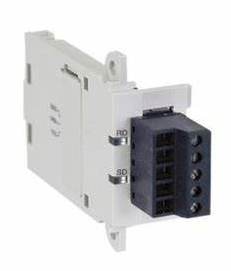
Hardware Connection (FX3U-232BD/ADP):
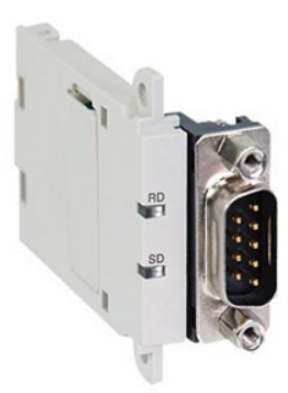
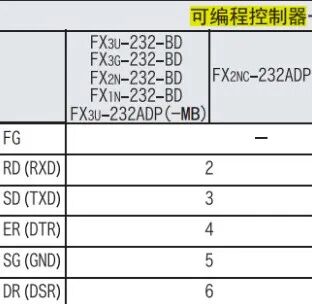
-
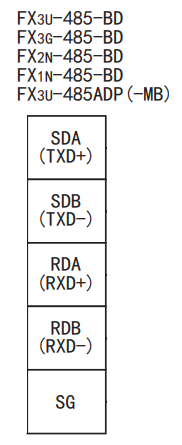
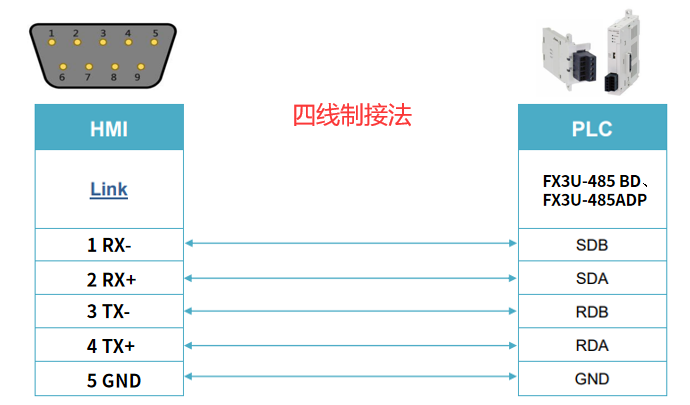
Hardware Connection (FX3U-485BD/ADP):
-
📌 Important Note: It is also recommended to purchase corresponding modules’ finished communication cables. For 485 communication, ensure A/B (+/-) polarity is consistent.
-
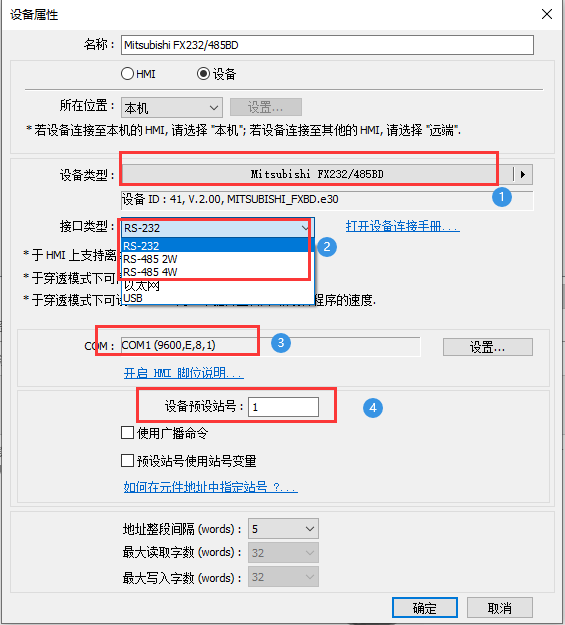
Touch Screen Parameter Settings:
-
Device Type: Uniformly select FX232/485BD (regardless of using BD board or ADP adapter).
-
Interface Type: Select 2W (two-wire) or 4W (four-wire) based on actual wiring.
-
COM Port:
-
RS232 module -> Usually select
<strong><span>COM1</span></strong> -
RS485 module -> Usually select
<strong><span>COM2</span></strong>(please confirm the actual pin definitions of the touch screen)
Communication Parameters: Set to <strong><span>Baud rate 9600</span></strong>, <strong><span>Data bits 8</span></strong>, <strong><span>Parity Even</span></strong>, <strong><span>Stop bits 1</span></strong>.
Station Number: Default <strong><span>1</span></strong>.
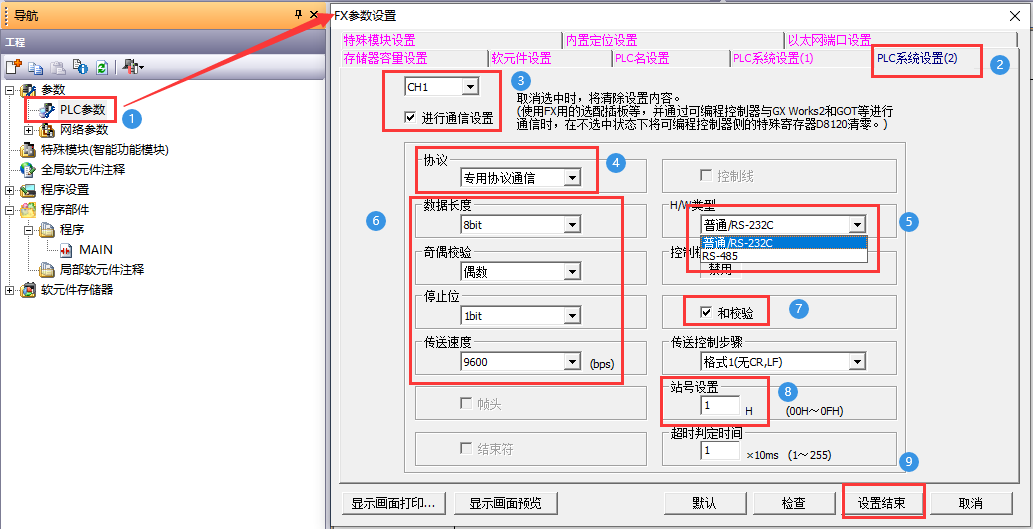
PLC Parameter Settings (Key! 📌 📌):
-
RS232 module -> Select
<strong><span>RS232C</span></strong> -
RS485 module -> Select
<strong><span>RS485</span></strong>
-
If it is plugged into the side of the PLC, BD board -> Select CH1
-
If it is connected to the expansion port on the right side of the PLC, ADP adapter -> Select CH1 or CH2 based on the actual connection interface position.
-
In GX Works2 software, open the project, navigate to Parameters -> PLC Parameters.
-
Switch to the PLC System Settings (2) tab.
-
Select Channel:
-
✅ Check the checkbox for this channel to enable communication settings.
-
Protocol: Select Dedicated Protocol Communication.
-
H/W Type (Hardware Type):
-
Communication Settings: Must be completely consistent with the touch screen settings:
<strong><span>Transmission Speed: 9600</span></strong>,<strong><span>Data Length: 8 bits</span></strong>,<strong><span>Parity: Even</span></strong>,<strong><span>Stop Bits: 1 bit</span></strong>. -
✅ Check the box for parity.
-
Station Number Setting: Set to
<strong><span>1</span></strong>(consistent with the touch screen). -
✅ Be sure to click the Set End button!
-
✅ Finally, click OK in the PLC parameter window to save all parameters and download them to the PLC to take effect.
🌐 Method 3: Ethernet Expansion Connection (FX3U-ENET-ADP)
-
Features: Fast speed, convenient wiring (standard network cable), supports remote access (requires configuration).Requirements: The touch screen must have an Ethernet port (e.g., MT8071IP supported).
-
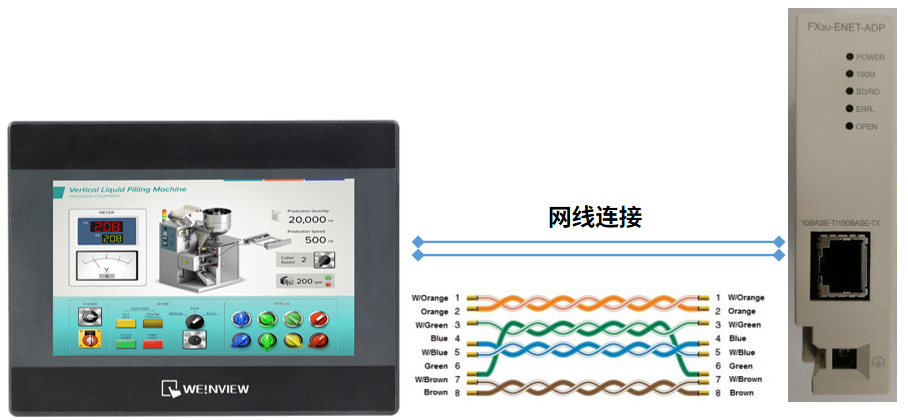
Hardware Connection:
-
Use standard network cables (straight-through or crossover, modern devices usually auto-adapt) to directly connect the RJ45 interface of the FX3U-ENET-ADP module with the RJ45 Ethernet port of the Weintek touch screen.
-
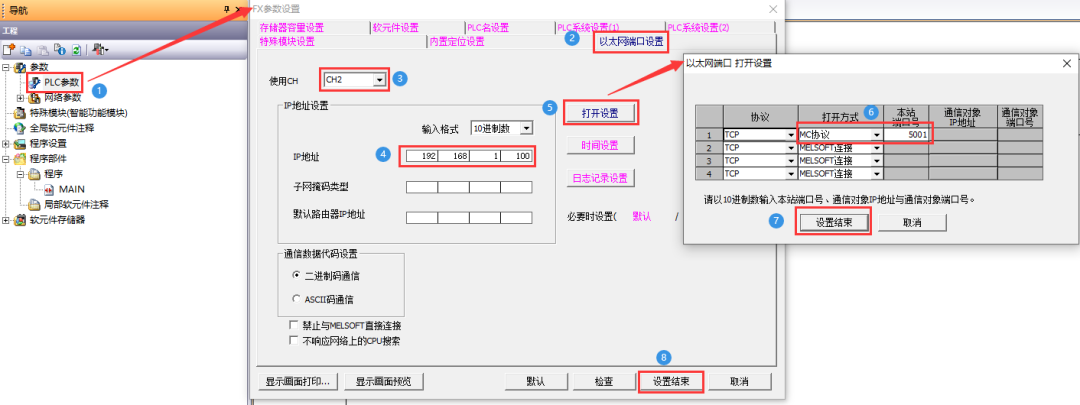
PLC Parameter Settings (Key! 📌 📌):
-
Open Method: Select MC Protocol.
-
Local Port Number: Set a port number, commonly 5001 (or another unoccupied port, range 1-65535).
-
Input the IP address planned for the ENET-ADP module (e.g.,
<strong><span>192.168.1.10</span></strong>). -
Input the subnet mask (e.g.,
<strong><span>255.255.255.0</span></strong>).
-
In GX Works2, navigate to Parameters -> PLC Parameters.
-
Switch to the Ethernet Port Settings tab.
-
Select Channel: Choose CH1 or CH2 based on the actual connection interface of the ENET-ADP adapter.
-
IP Address Settings:
-
Open Settings:
-
✅ Be sure to click the Set End button to save the Ethernet port settings!
-
✅ Finally, click OK in the PLC parameter window to save all parameters and download them to the PLC to take effect.
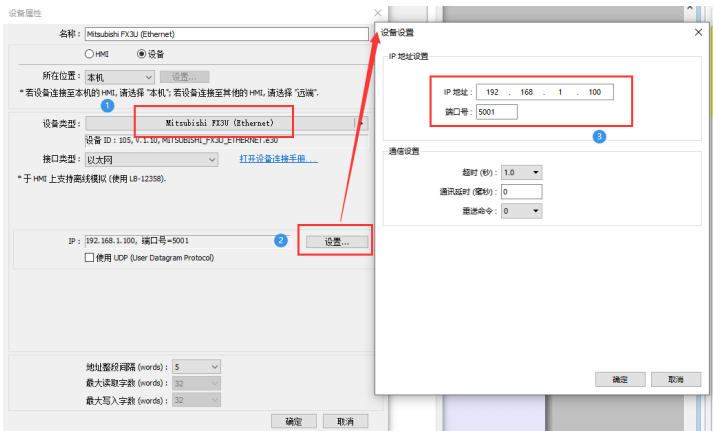
Touch Screen Parameter Settings:
-
Device Type: Select
<strong><span>FX3U (Ethernet)</span></strong>. -
Click the Set button to enter detailed settings.
-
IP Address: Input the IP address set for the ENET-ADP module on the PLC side (e.g.,
<strong><span>192.168.1.10</span></strong>). -
Port Number: Input the local port number set on the PLC side (e.g.,
<strong><span>5001</span></strong>). -
📌 Network Key Point:
The IP address of the touch screen must be in the same subnet as the PLC’s ENET-ADP module IP address! For example: If the PLC is
<strong><span>192.168.1.10</span></strong>, the touch screen can be<strong><span>192.168.1.20</span></strong>(with the subnet mask also being<strong><span>255.255.255.0</span></strong>).
By mastering the above three connection methods and their key configuration points, you can easily establish communication between the FX3U and the Weintek touch screen, laying a solid foundation for your project! If you encounter issues, first check the wiring, IP address subnet, port number, and most importantly—whether the PLC parameters are set correctly and successfully downloaded!
Previous Articles · Recommendations
Old saying, selection of braking resistors for frequency converters (super detailed)
Heart pierced by ten thousand arrows! So close to death for the first time! Dangerous lifting is terrifying!
C# Implementation of Automated Data Collection and Storage from PLC (No interface, runs automatically)
Take a look at foreign electrical cabinets, what new design ideas and principles do you have?
Siemens Time Password Lock—Lock Machine Program—Random Password (Part 2)

Share, view, and like, at least I want to have one!