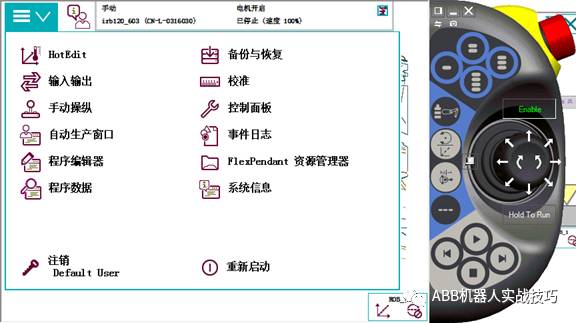
Global Technology Think Tank
To meet you in this life is already
Happily confused
1. How to Configure ABB Robot as Profinet Slave
1. The robot needs to have option 888-2 or 888-3 (using the controller’s network port), or option 840-3 (using the Anybus network port).
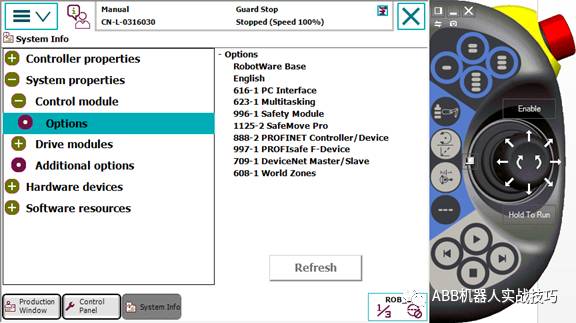
2. Here we take option 888 as an example.
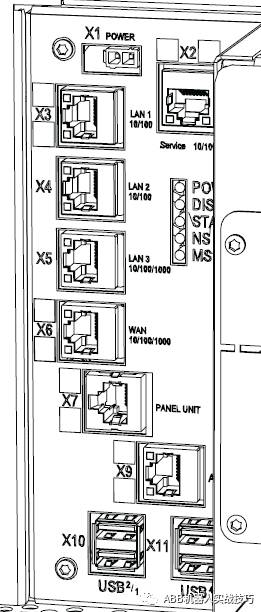
3. The robot controller has the following network ports, among which:
X2 is the service port, fixed IP 192.168.125.1.
X3 is connected to the teach pendant.
X7 is connected to the safety board.
X9 is connected to the axis computer.
4. Profinet can connect to the WAN port or LAN3 port, depending on the settings.
5. Here we take connecting to the WAN port as an example.
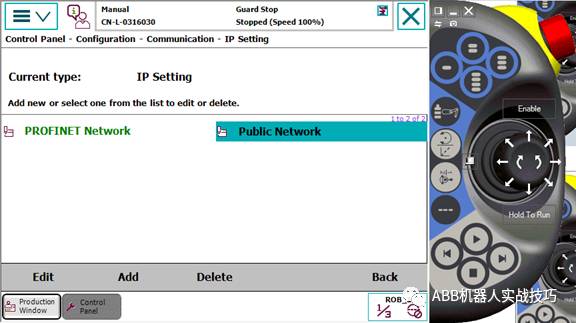
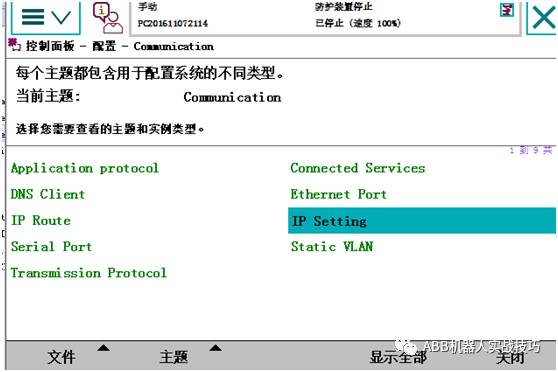
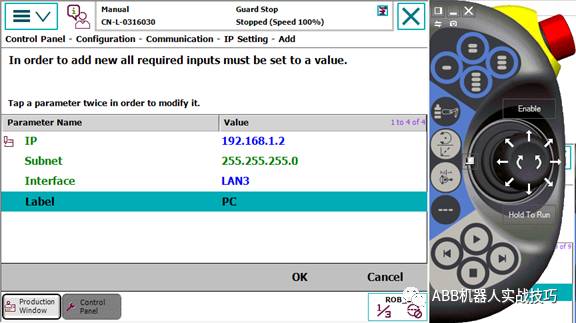
6. Control panel, configuration, theme select communication.

7. Enter IPSETTING.
8. Click ProfinetNetwork.
9. Modify the IP and select the corresponding network port.

10. Restart.
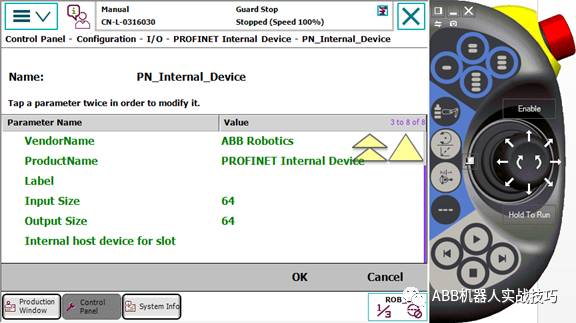
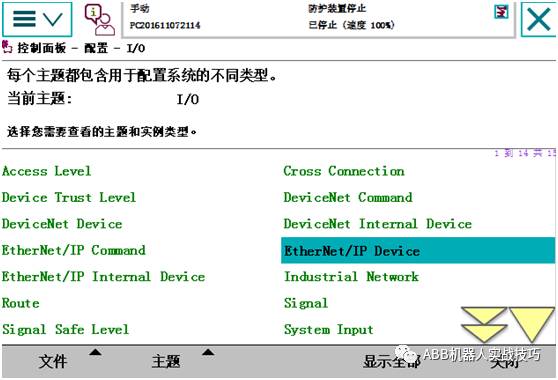
11. Control panel, configuration, theme I/O, PROFINET InternalDevice.
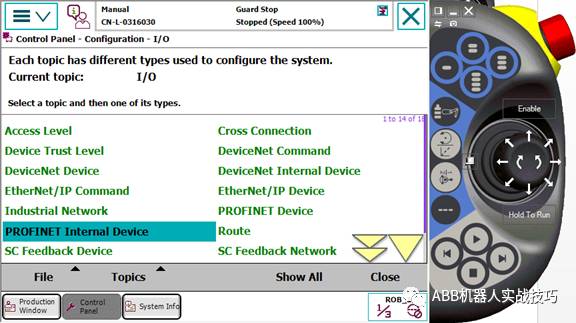
12. Configure the number of input and output bytes. Ensure it matches the settings on the PLC side.
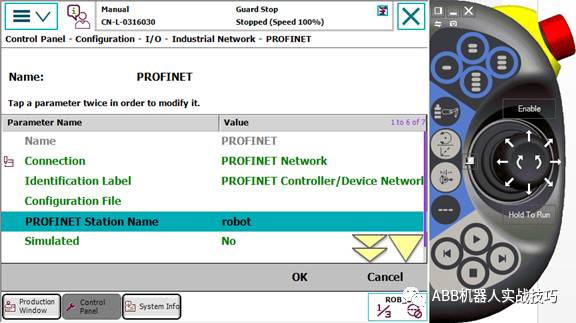
13. In the configuration interface, enter Industry Network, PROFINET.

14. Set the station name, which must match the station settings for the robot on the PLC side.
15. Add signal, select device as profinetInternal device.
2. ABB Robot IO Wiring and Configuration
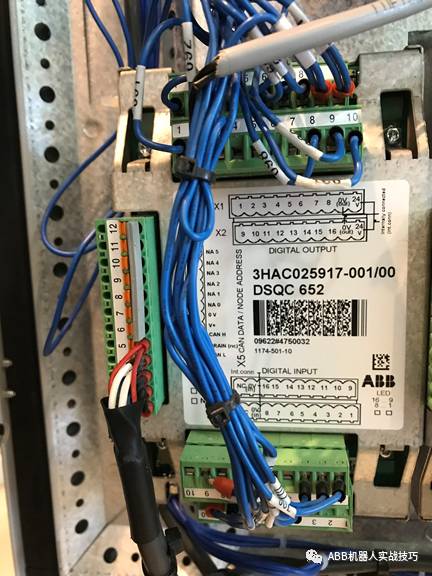
1. Taking DSQC652 as an example (16 inputs and 16 outputs).
2. The upper area has 16 output points, where the 0v and 24v of pins 9 and 10 need to be brought over from the XT31 next to the cabinet door.
3. The lower area has 16 input points, where the 0v of pin 9 needs to be brought over from XT31.
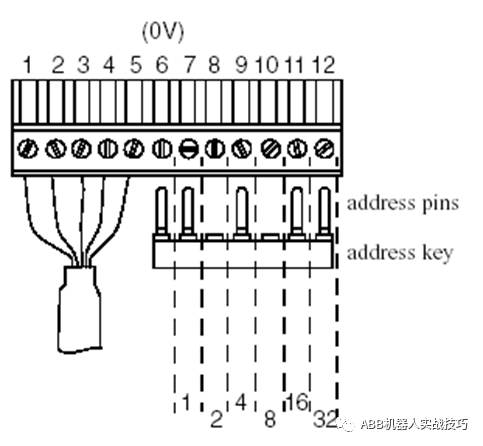
4. The shorting jumpers on the left side are address bits, defaulting to 10, as shown in the figure (the cut one is 1, the one left is 0, high level is valid). If you want to change the card address, modify it here, and corresponding configuration must also be done in the robot.
5.
6. Control panel, configuration, find devicenetdevice, and add it (if it is already displayed, no need to add again).
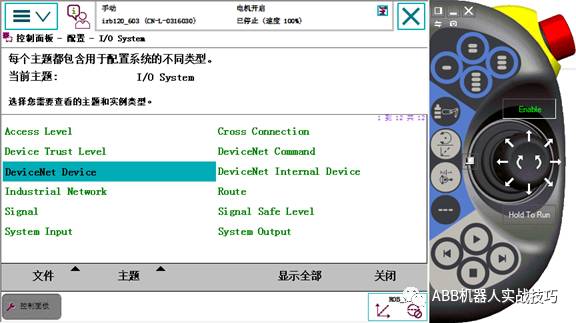
7. Select template 652, and set the address according to the previous shorting jumper settings, defaulting to 10.
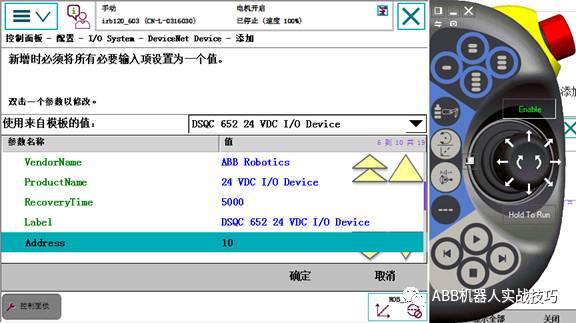
8. After confirming, do not restart for now, restart all at once after completing the configuration.
9. Enter Signal, click Add.
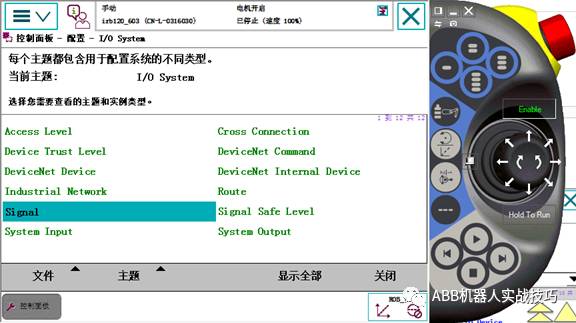
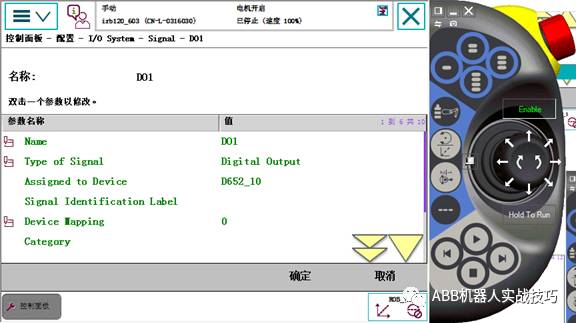
10. For example, one output is set as follows.
Set name, select type as digital output, assigned device as the just configured board, set mapping. Note, actual wiring is pin 1, here the address is 0. And so on.
11. After completing all configurations, restart.
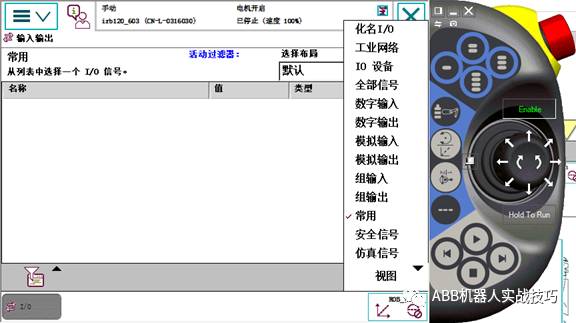
12. You can check in input and output.
13. In the view, select IO devices, choose the corresponding device, and click signal.
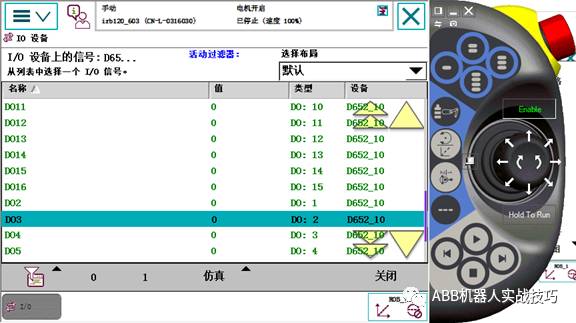
14. The DO signal can be forced, i.e., click below 0 or 1.
3. ABB Robot as EthernetIP Master
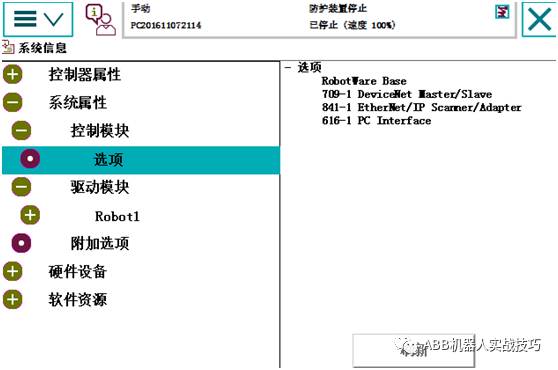
1. The robot needs to have option 841-1 EthernetIP scanner/adaptor option.
2. Control panel – configuration, theme select communication.
3. Enter IP SETTING, edit the existing Ethernet/IP network IP address, and select the network port.
Control panel – configuration – enter Ethernet/IP Device.
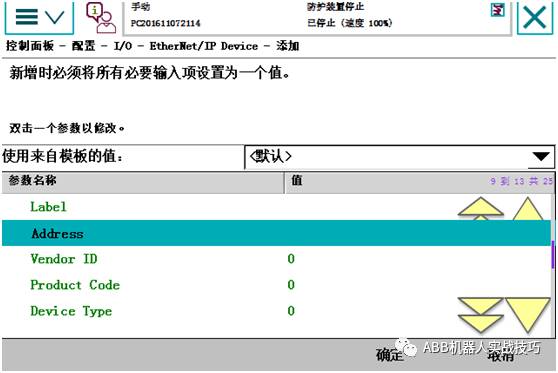
4. Add, select the default template, and fill in the name, IP address, vendor, and other information according to the slave device information.
5. After adding, do not restart, add signal, and select the device just created. Restart after completing all settings.
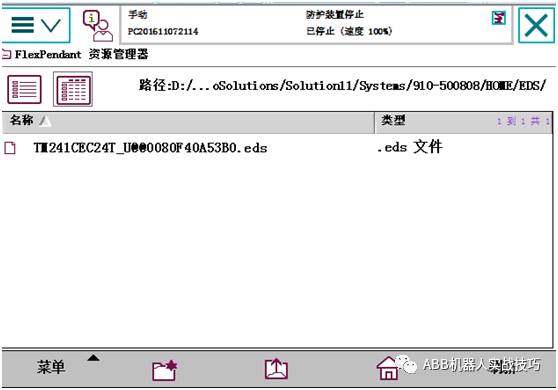
6. If there is an EDS description file for the slave device, you can first copy that EDS file to the robot’s HOME folder under the EDS folder (or transfer the file via RobotStudio).
7. Enter the input/output window, select the industrial network in the view.
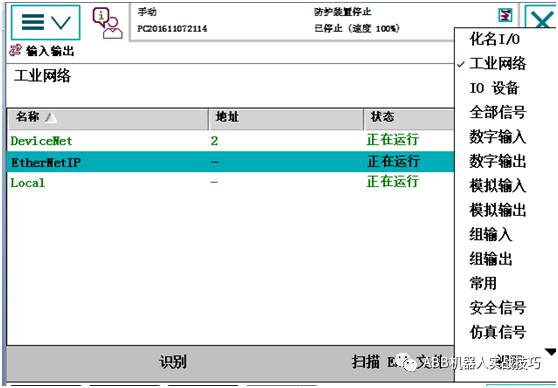
8. Select EthernetIP, click the scan EDS file in the lower right corner.
9. A dialog box pops up, select Yes.

10. At this time, go back to the control panel – configuration, under Ethernet/IP device, create a new one, and you can find the EDS just imported in the template as shown below.
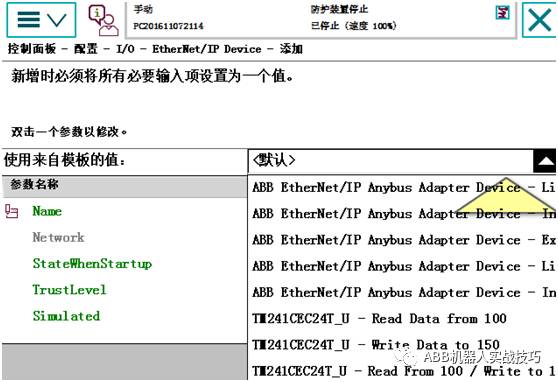
11. Select the corresponding template and complete the settings.
Including setting the IP address, input/output byte count, etc.
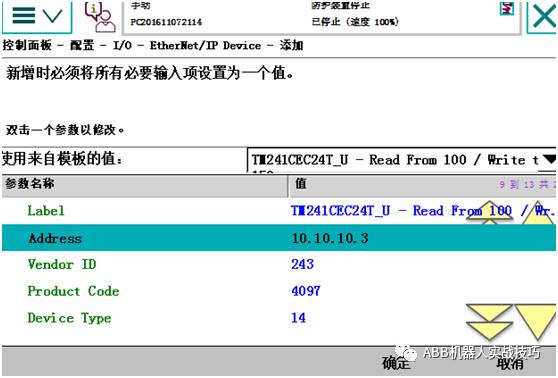
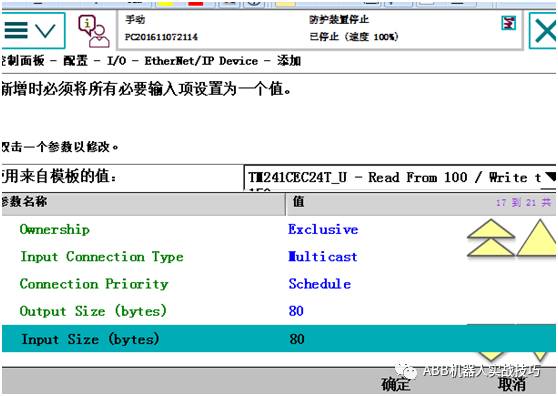
12. Create a signal, and restart after completion.
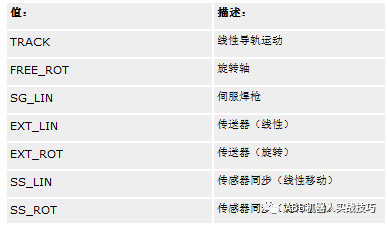
4. How to Change ABB Rotating External Axis to Linear External Axis (Track)
1. After purchasing an external axis for the ABB robot, the default factory configuration adds an external rotating axis, as shown in the figure below (Axis 7 is rotating, displaying degrees).
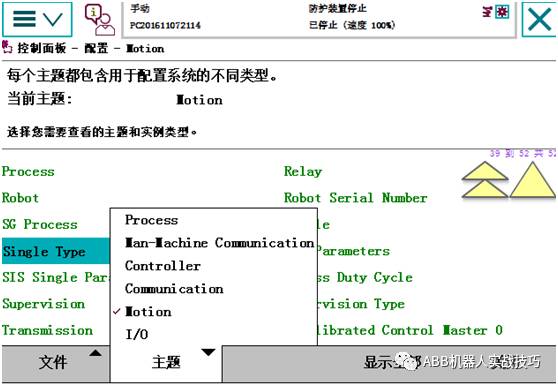
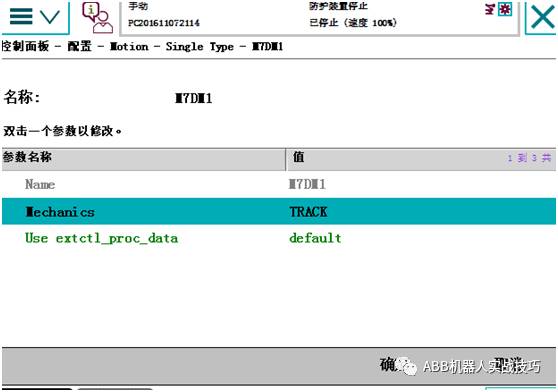
2. If you want to change the external axis to a linear axis (track, displayed in mm), go to the control panel, configuration, select motion, and find single type.
3. After changing mechanics to track (i.e., track), do not restart for now.
If you want to change to other types, refer to the figure below.
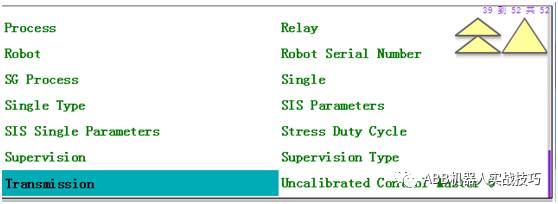
4. Enter transmission, find the external axis.
5. Change rotating move to NO, and you can also change the deceleration ratio here.

6. If the robot rests on the track, enter robot again.

Change base frame moved by, select Axis 7, and restart after completion.
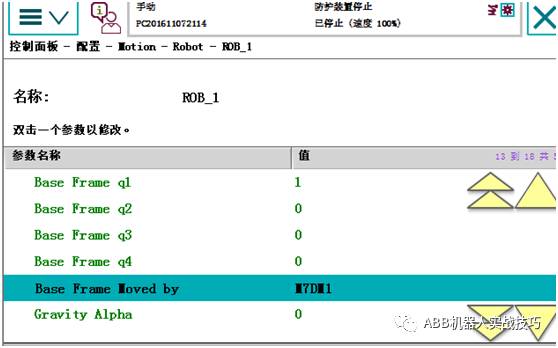
After restarting, the effect is as follows.
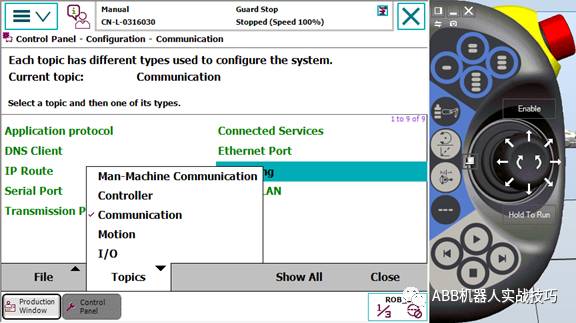
5. How to Change ABB Controller LAN3 Network Port Settings
1. The robot controller has the following network ports, among which:
X2 is the service port, fixed IP 192.168.125.1.
X3 is connected to the teach pendant.
X7 is connected to the safety board.
X9 is connected to the axis computer.

2. Use RobotStudio on the computer to connect to the robot, connecting to the service port.
3. You can also connect to the WAN port.
4. If you want to connect to the LAN3 port to transfer data, you need to modify the LAN3 configuration.
5. Control panel, configuration, theme select communication.

6. Enter IPSETTING.
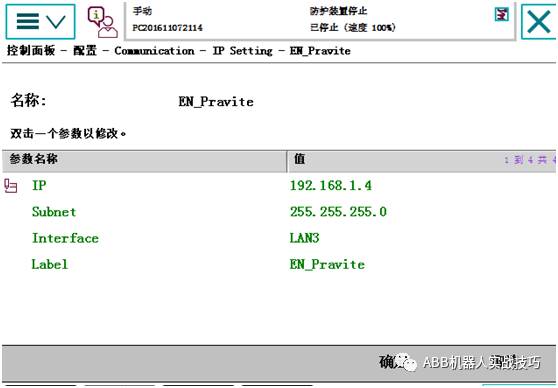
7. Add the IP address as below, selecting the LAN3 port.
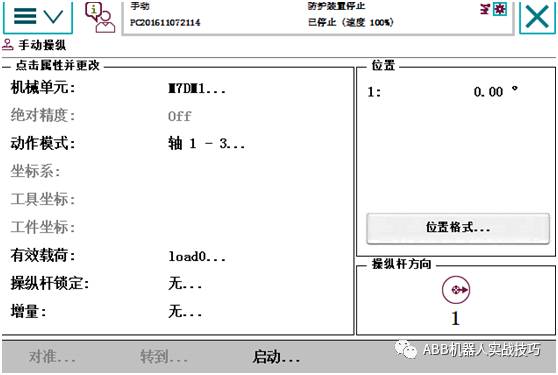
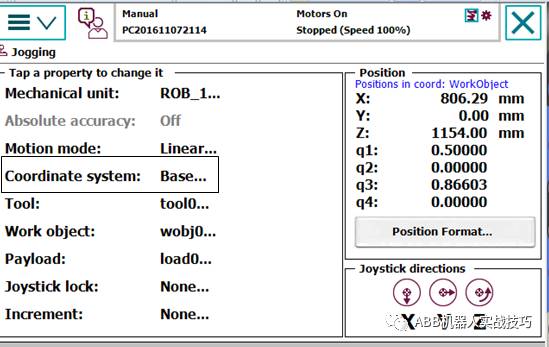
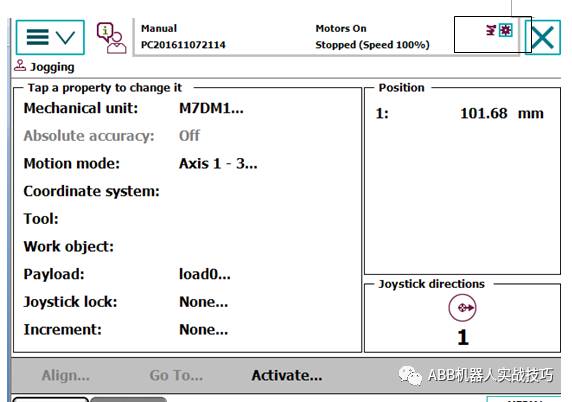
6. Keeping TCP Unchanged While Moving the Robot’s External Axis
1. After configuring the robot with a track, sometimes when moving the external axis, all seven axes of the robot move together, and the TCP remains unchanged. How to set this? If you want to move only the external axis and keep the others still, how to set it?
2.
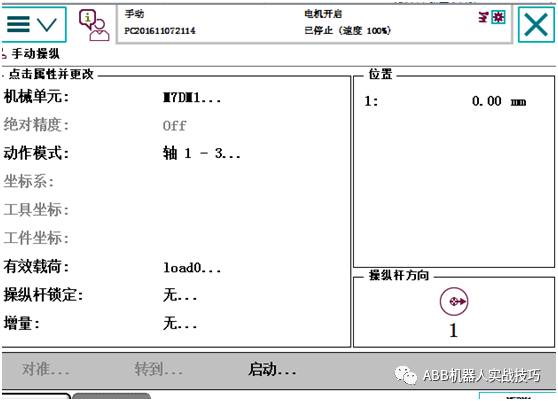
3. After correctly configuring the external axis (track), if in the manual operation interface, the world is selected, when switching to the external axis, both the robot and the external axis are selected, indicating that they are now linked. At this time, moving the external axis will not move the robot’s TCP, and all seven axes will move together.
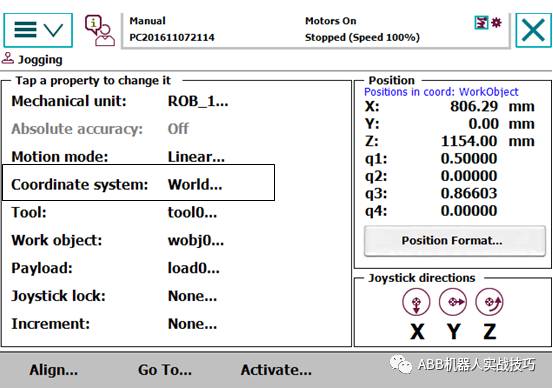
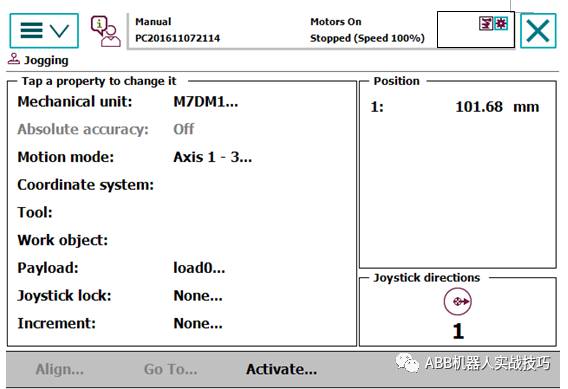
4. If you only want to move the external axis at this time, switch back to the robot interface, select the base coordinate system, and then switch back to the external axis. The icon will show that only the external axis is selected, allowing you to move the external axis separately.
7. How to Change ABB Controller WAN Network Port Settings
1. The robot controller has the following network ports, among which:
X2 is the service port, fixed IP 192.168.125.1.
X3 is connected to the teach pendant.
X7 is connected to the safety board.
X9 is connected to the axis computer.

2. Use RobotStudio on the computer to connect to the robot, connecting to the service port.
3. You can also connect to the WAN port.
4. Modify the WAN port IP address as follows.
5. Control panel, configuration, theme select communication.
6. Enter IPSETTING.
7. Click PublicNetwork.

8. Modify the IP address.
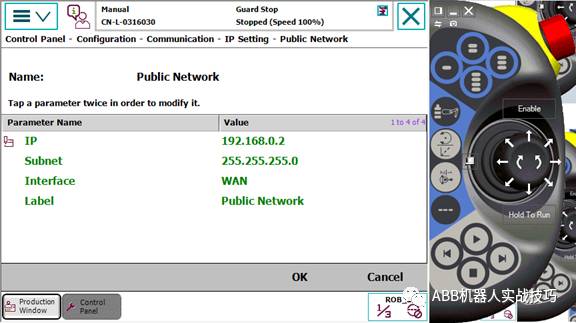
9. Restart.
8. Capturing DI Pulse Signals During Robot Program Execution
1. Robot programs are executed line by line, for example:
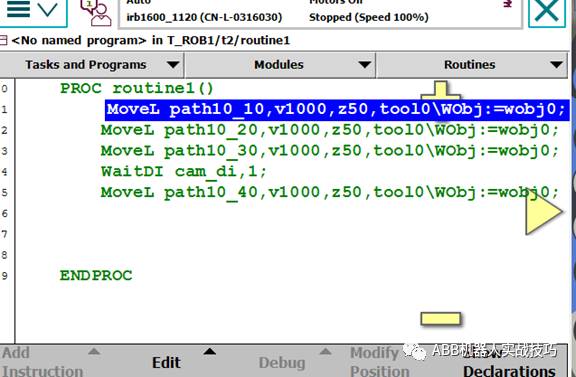
2. If the robot receives the cam_di signal while executing line 1, and by the time it reaches line 3, the cam_di signal has been set to FALSE by the PLC, then when executing line 4, the robot will wait for the signal.
3. In fact, the cam_di signal was present, but the robot did not reach the waitdi statement.
4. You can use interrupts to achieve the above requirements.
5. Create a bool variable flag1, set it to false.
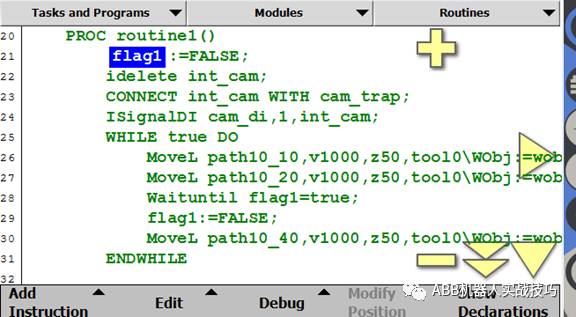
6. Create an interrupt number int_cam.
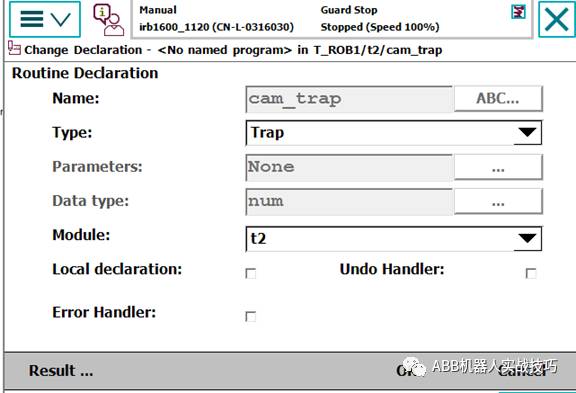
7. Create a new routine, type as interrupt trap; this type of routine cannot be run directly and must be triggered by an IsignalXX-like instruction.
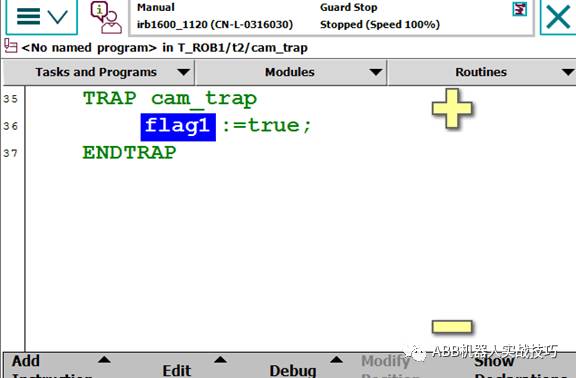
The content of the interrupt program is as follows:

8. The above example lines 22-24 are setting statements, only need to run once.
9. Line 22 deletes the interrupt number.
10. Line 23 connects the interrupt number int_cam with the interrupt program cam_trap.
11. Line 24 sets the trigger condition, that is, when cam_di changes from 0 to 1, it will automatically trigger the cam_trap program (the scanning of cam_di runs in the background, so even if the robot has not reached the relevant di statement, the signal will trigger).
12. This way, even if the program runs to line 25, the PLC sends a signal, and the robot runs to line 26 without the di signal, it has executed the interrupt program (executing the interrupt process, the robot’s motion does not stop), flag1 is set to true.
13. When the robot runs to line 27, since flag1 is true, indicating it has received a signal, the robot can run.
14. Line 28 resets flag1 to false.
9. Creating Socket Connections Between Two Robots in RobotStudio
1. What is socket communication?
It is TCP/IP communication, no protocol, referred to as socket in the Microsoft environment.
2. What can socket communication do?
It can send and receive specified data, including string data, byte arrays, etc.
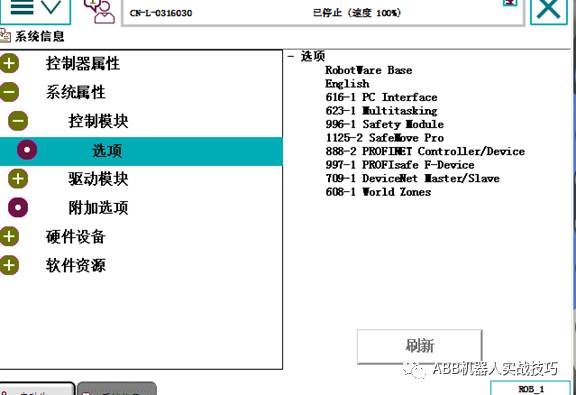
3. What options are needed for creating a socket robot?
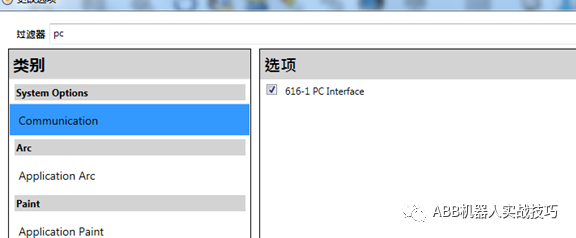
The robot needs the 616-1 PC-INTERFACE option.
4. Which network port should the socket communication cable be plugged into?
It can be plugged into the Service port (fixed IP: 192.168.125.1) or the WAN port (which can be set by yourself).
5. Create an instance of the client side.
Typically, the robot communicates with a camera, with the robot as the client.
6. Create a new robot system, ensuring to include the PC-INTERFACE option when establishing the system.
7. To avoid previous connections not being closed, first insert the socketclose instruction, with socket1 being the newly created socketdev type variable.
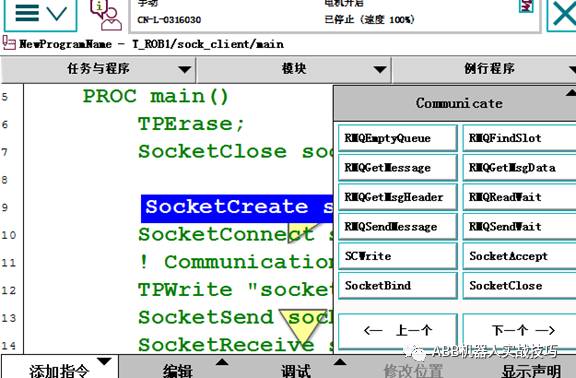
8. Then insert the create connection socketCreate instruction.
9. Insert the establish connection SocketConnect instruction, specifying the Server’s IP and port. If connecting to a computer and another virtual controller, set the IP to “127.0.0.1”, and customize the port, preferably not using the default 1025.
This step ensures the robot establishes a connection with the server; if unsuccessful, it will wait indefinitely; if successful, it will proceed to execute.
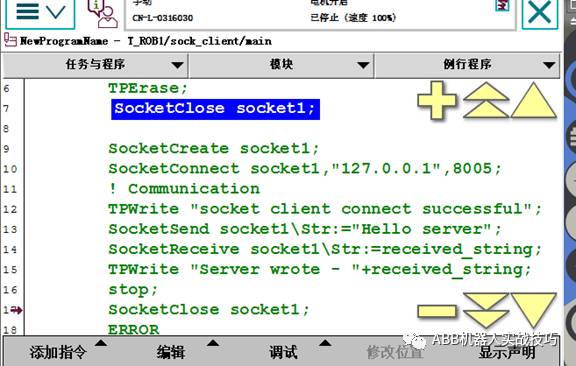
10. For testing, after successful establishment, insert the TPWrite instruction, which will display “socket client connect successful” on the teach pendant.
11. Next, you can send and receive data. In this example, the client sends data to the server first, then receives data sent back from the server.
12. SocketSend can send either a string or a byte array, and you can select different optional variables.
13. After sending, the client receives the data sent back by the server and writes it to the screen.
14. Below is an example for the server side.
15. Recreate a workstation, ensuring to add the PC-INTERFACE option when creating.
16. As a server, the robot needs to create two socketdev variables.
17. To avoid previous connections not being closed, it is also recommended to first perform socketclose.
18.
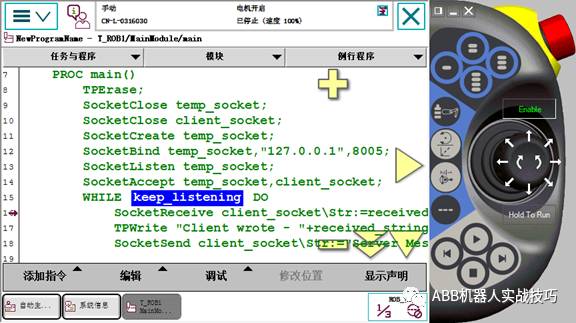
19. Then create socketCreatetemp_socket, the server-side socketdev.
20. SocketBind binds the socket to the monitored IP and port; if it’s a virtual simulation, the IP is 127.0.0.1, and the port should match the client-side settings.
21. SocketListen allows the robot server to listen for client connections.
22. socketAccept accepts the client’s connection.
23. After establishing the connection, the robot can execute a dead loop, remaining in a send/receive state.
24. The previous client program sent first and received later, so here the server receives first and sends later.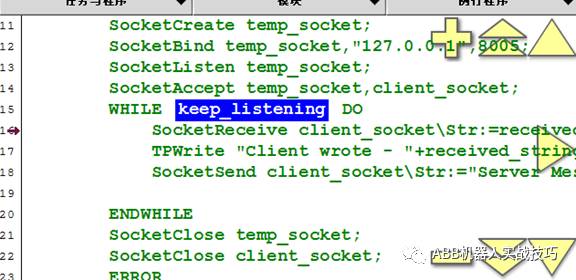
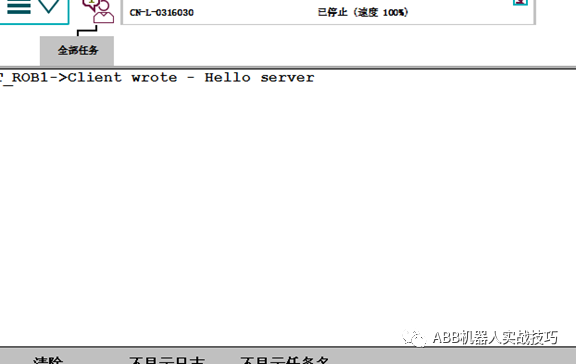
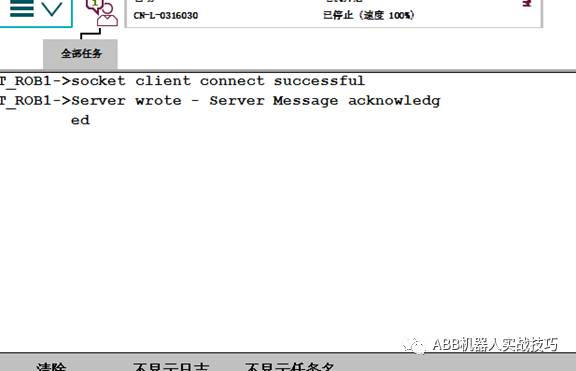
25. After completing the client and server programs, you can run them. Note to run the server side first, so the server robot is in listening mode. If connected, the two will communicate with each other, as shown below.
26. The message received by the server robot is as follows:
27. The message received by the client robot is as follows:
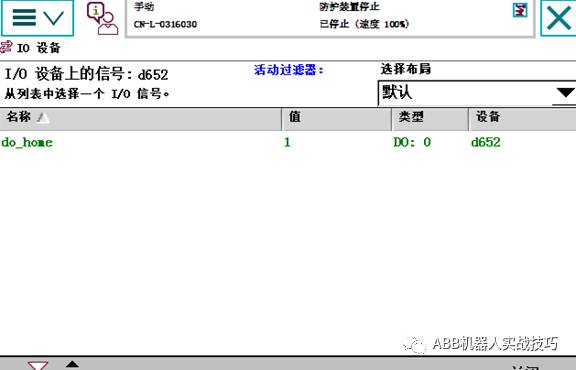
10. Creating HOME Position Signal Output Using WorldZone Function
Using the WorldZone function to create the robot HOME position output function.
1. The robot needs to have the Worldzone function.
2. Create a routine, such as power_on.
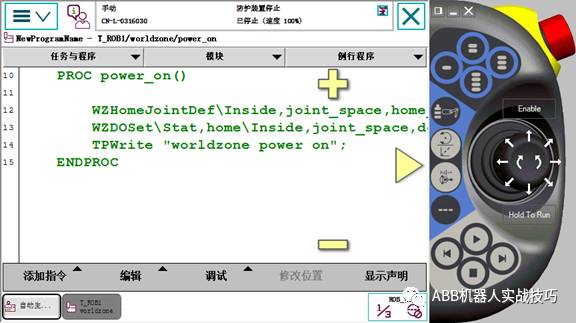
3. Insert the definition worldzoneHome position instruction WZHomeJointDef, as follows:

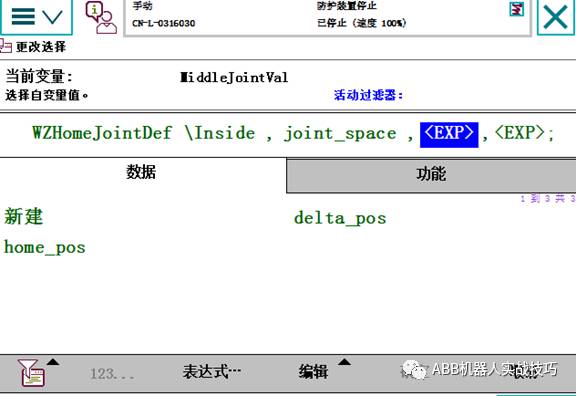
The first is the HOME position, data type is JointTarget, the second is the allowed error for each axis.
4. Insert the WZDOSET instruction to set the corresponding DO output.
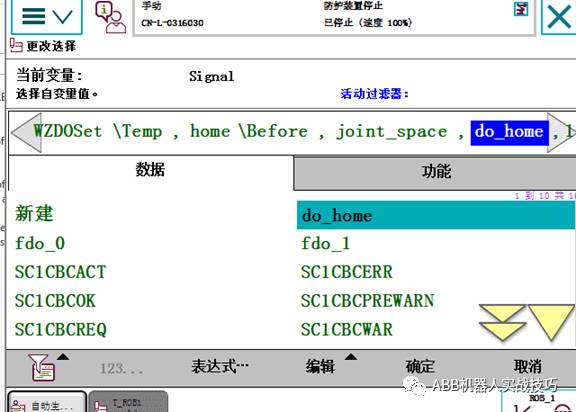
Where do_home is the corresponding output set, and the 1 at the back indicates that if the robot is within the Home range, output 1, otherwise output 0.
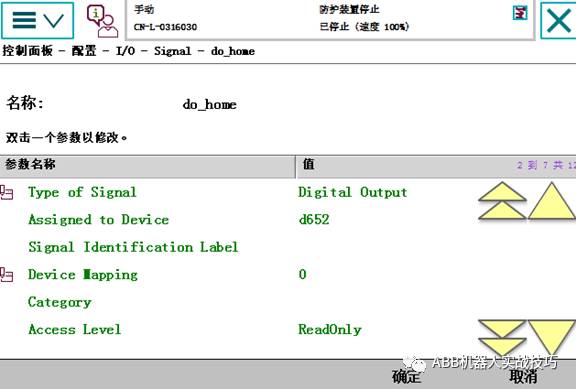
5. In the IO configuration, set the AccessLevel of do_home to readonly.
6. Since the HOME position output is desired to be activated at startup and execution, you also need to set the event routine under the controller theme in the configuration, as follows:

Where Power On is the startup event, and the routine power_on is the program for setting the worldzone.
7. Restart.
8. At this point, if the robot is at the Home position, the output will be 1, otherwise it will be 0.
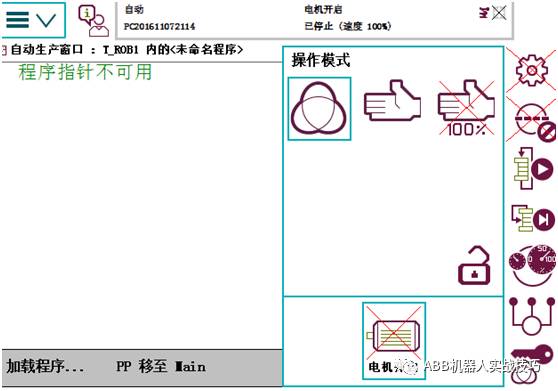
11. Automatic Switching Between Manual and Automatic Modes Without Key Switch for Robots
1. For some robots equipped with safemove2, how to achieve manual and automatic switching without a key in the control cabinet.
2. Click the button in the lower right corner of the teach pendant, as shown in the figure below.
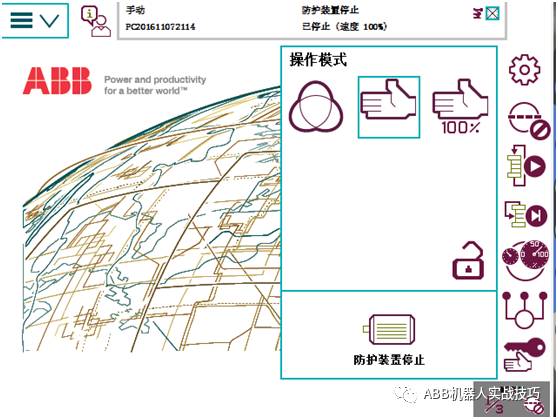
3. The reset and automatic power-on buttons can be pressed using the motor icon.
12. Setting ABB Robot Programs to Auto-Start at Boot
1. Some programs require initialization at boot and can be set to auto-start (the program should not contain motion commands).
2. Remember the routine name, for example, routine1.
3. Control panel – configuration, select controller, EventRoutine.
4. Select the trigger event as poweron (other events can also be selected).
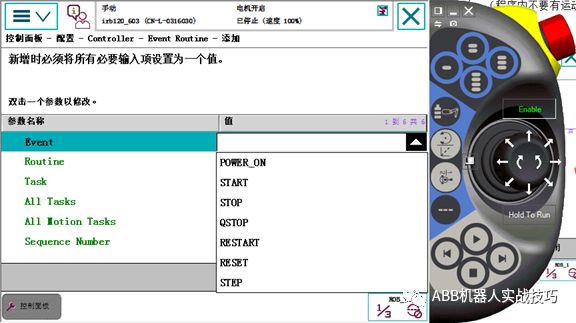
5. Input the routine name, such as routine1, select task.
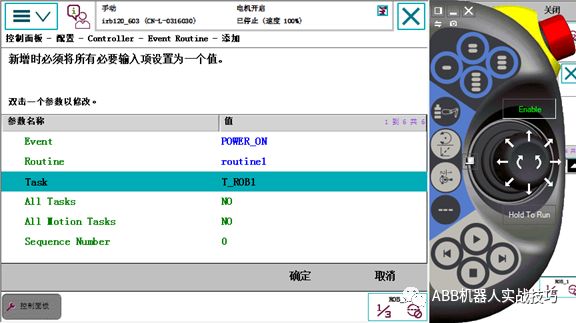
6. After completion, restart.
Have you learned it all? Good resources, share with friends~
——-End——-
Source: ABB Robot Practical Skills

Recently, Everyone is Looking at
1. [Vision] Big Data and Smart Logistics
2. 2017 A-share Market: Chinese Smart Manufacturing Leading New Stock Market
3. Is Laser Welding Really That Amazing?
4. [Laser Technology | Video] Applications of Laser Cutting
5. A Compilation of Knowledge Related to Robot Control Systems
6. [Outlook] In the Next 15 Years, Artificial Intelligence Will Bring Eight Changes to Cities
7. JD’s One-Hour Delivery Based on Accurate Imaging | “Big Data and Smart Logistics”
8. Queen of Venture Capital Xu Xin: How to Quickly Become the Leader in a Niche Market (Highly Recommended)
Want to learn more? Then hurry up and follow Global Technology Think Tank

Long press the QR code to follow us

Here is the latest global technology consulting, please pay attention!
