
In this article, I will discuss how to clone the PyPI repository onto a Raspberry Pi and provide content so that connected devices can install dependencies using the <span>pip install</span> command without an internet connection.
Objective
There are many ways to create your own PyPI mirror, and my method may be suitable for everyone now. The goals of this project are:
-
The hardware for this project must be affordable (<= $100).
-
There must be little to no setup requirements on the client computer.
I decided to use a Raspberry Pi 4 with a 200GB SD card for storage. I will use <span>minirepo</span> to clone PyPI, <span>pypiserver</span> to serve the packages, and <span>nginx</span> to create a reverse proxy.
Creating a local PyPI server involves four steps:
1. Download and install the operating system and system tools
2. Configure the Raspberry Pi as a WiFi hotspot, DHCP, and DNS server
3. Clone/download the PyPI packages
4. Configure a web server to serve the downloaded packages to connected clients.
Below, I will explain the above steps in detail.
1. Download and Install the Operating System and System Utilities
The Raspberry Pi is a small computer about the size of a credit card, starting at $35. In this project, I used the Raspberry Pi 4, but other models should also work. The Raspberry Pi 3 and 4 models have built-in WiFi adapters, making it easier to set up the Raspberry Pi as a WiFi hotspot or access point than using an external wireless adapter.
To get started, download and install Raspbian. Raspbian is a lightweight operating system based on Debian, optimized for the Raspberry Pi. To work as an access point, the Raspberry Pi will need to have access point software installed, as well as DHCP server software to provide network addresses to connected devices.
Next, before configuring the Raspberry Pi, download all the utilities and packages you will need.
You will need the following packages:
dnsmasq – DNS and DHCP server software
hostapd – Access point software
minirepo – For cloning PyPI for offline use.
pypiserver – To create an index from the cloned PyPI packages
nginx – A web server
To install these packages, run the following two commands:
<span>$ sudo apt install dnsmasq hostapd nginx</span> <span>$ pip install minirepo pypiserver</span>
2. Configure the Raspberry Pi as a WiFi Hotspot, DHCP, and DNS
The goal of this step is to configure a standalone network as a server, so the Raspberry Pi needs to have a static IP address assigned to the wireless interface. To configure a static IP, edit the dhcpcd configuration file.
<span>$ sudo nano</span><span>/</span><span>etc</span><span>/</span><span>dhcpcd</span><span>.</span><span>conf</span>
Add the following content:

Configure DHCP
Many default settings in the dnsmasq configuration are unnecessary. Create a new configuration file:
<span>$ sudo mv</span><span>/</span><span>etc</span><span>/</span><span>dnsmasq</span><span>.</span><span>conf</span><span>/</span><span>etc</span><span>/</span><span>dnsmasq</span><span>.</span><span>conf</span><span>.</span><span>orig</span> <span>$ sudo nano</span><span>/</span><span>etc</span><span>/</span><span>dnsmasq</span><span>.</span><span>conf</span>
Add the following configuration:

This sets up DHCP for clients connecting via the wireless interface <span>wlan0</span>. The second line tells the DHCP server (dnsmasq) to listen for connections from the static IP you set up in the previous step. The next line instructs the DHCP server to provide IP addresses from <span>192.168</span><span>.</span><span>4.2</span> to <span>192.168</span><span>.</span><span>4.30</span>, with a lease time of 24 hours.
Create an Access Point
Next, configure the access point software (hostapd):
<span>$ sudo nano</span><span>/</span><span>etc</span><span>/</span><span>hostapd</span><span>/</span><span>hostapd</span><span>.</span><span>conf</span>
Add the following content:
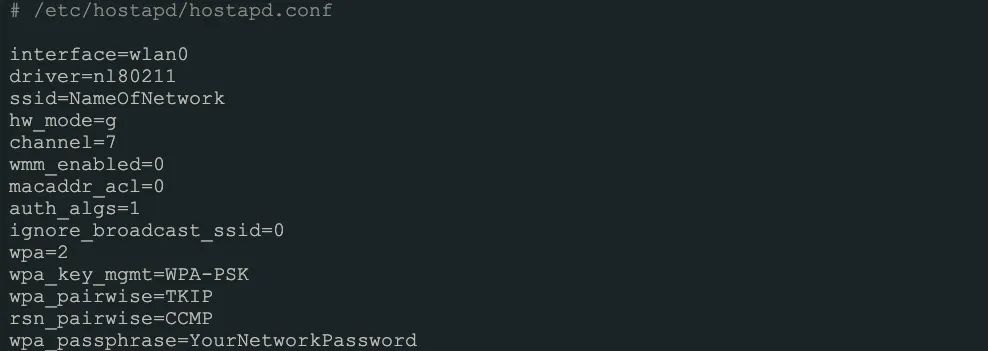
Where it says <span>ssid</span> and <span>wpa_passphrase</span>, add your own network name and network password.
Tell the system where to find this file by opening the <span>hostapd</span> configuration file.
<span>sudo nano</span><span>/</span><span>etc</span><span>/</span><span>default</span><span>/</span><span>hostapd</span>
Find the line with <span>#DAEMON_CONF</span> and replace it with:
<span>DAEMON_CONF</span><span>=</span><span>"/etc/hostapd/hostapd.conf"</span>
Add Routing and Masquerading
Edit <span>/etc/</span><span>sysctl</span><span>.</span><span>conf</span> and uncomment this line.
<span>net</span><span>.</span><span>ipv4</span><span>.</span><span>ip_forward</span><span>=</span><span>1</span>
Add a masquerade for outbound traffic on <span>eth0</span>: <span>sudo iptables</span><span>-</span><span>t nat</span><span>-</span><span>A POSTROUTING</span><span>-</span><span>o eth0</span><span>-</span><span>j MASQUERADE</span>
Save the new rules: <span>sudo sh</span><span>-</span><span>c</span><span>"iptables-save > /etc/iptables.ipv4.nat"</span>
Edit <span>/etc/</span><span>rc</span><span>.</span><span>local</span> and add the following content above <span>"exit 0 "</span> to load these rules at startup.
<span>iptables</span><span>-</span><span>restore</span><span><</span><span>/etc/</span><span>iptables</span><span>.</span><span>ipv4</span><span>.</span><span>nat</span>
If you decide to share an internet connection later or set up a bridge on the Raspberry Pi, this is important.
The Raspberry Pi should now be ready to work as an access point. If you connect directly to it, now is a good time to enable SSH. Restart the Raspberry Pi and test if everything is working correctly.
Using a different WiFi-capable device, such as a phone or laptop, scan for the new wireless network. If everything goes smoothly, you should see the WiFi network you created above. Try connecting to it.
3. Clone PyPI
In this section, you will see how to clone PyPI and configure the following packages.
minirepo
pypiserver
nginx
Minirepo
Minirepo is a command-line program that downloads packages from PyPI.org so you can use pip without internet access. The easiest way to install it is with pip.
<span>$ pip install minirepo</span>
The first time you run it, <span>minirepo</span> will ask for the path to the local repository (where it should save the downloaded packages), which defaults to <span>~/</span><span>minirepo</span> on Linux. A JSON configuration file is created and saved as <span>~/.</span><span>minirepo</span>, which you can edit according to your preferences.
There are many alternatives to cloning PyPI, but I used minirepo because it allows you to selectively download a mirror, for example, downloading all the source code for Python 3 only. At the time of writing this article, the entire PyPI repository is about 1TB, but by using selective downloads, I was able to reduce it to around 120GB. Below is the configuration I used for this project.
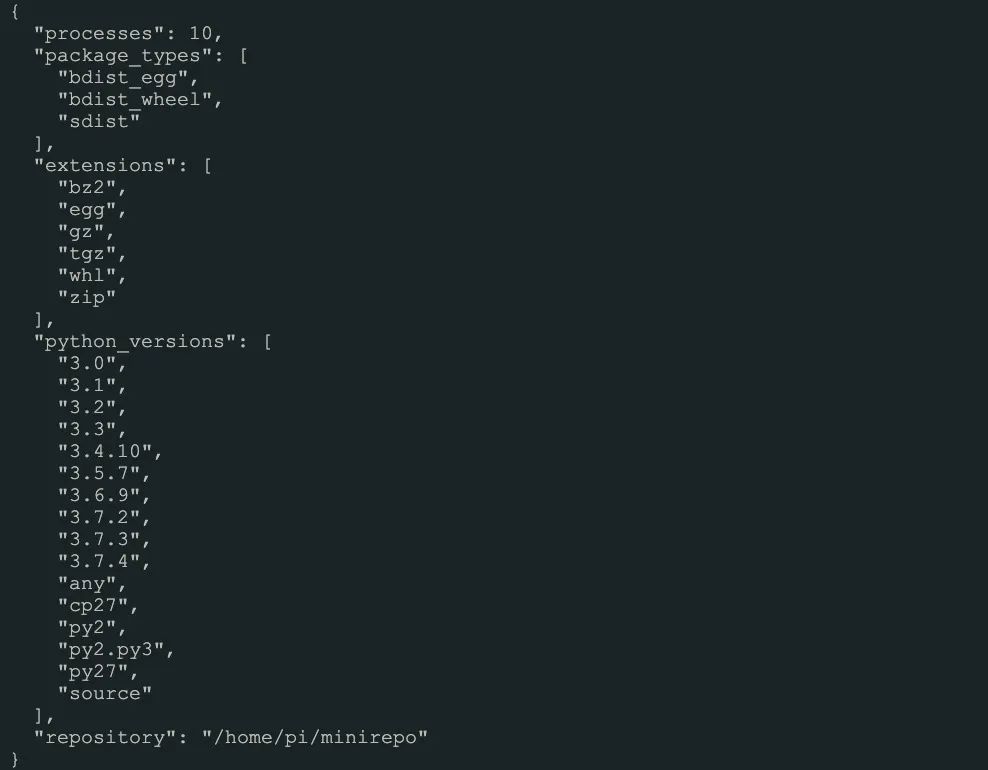
The configuration above downloads the source code for Python 3 and restricts the types of packages to <span>sdist</span>, <span>bdist_wheel</span>, and <span>bdist_egg</span> packages. The downside of using this method is that some packages that do not meet the filtering criteria will not be downloaded.
Cloning PyPI takes a long time, so you want to let it run in the background.
Pypiserver
At this point, you should have mirrored PyPI onto your computer. My local PyPI mirror has over 200,000 packages. Before we proceed to the next step, it is necessary to understand what <span>pip</span> is and how it works.
<span>Pip</span> is the most popular tool for installing Python packages and is included in modern versions of Python. It provides the basic core functionality for finding, downloading, and installing packages from PyPI and other Python package indexes and can be integrated into a wide range of development workflows through its command-line interface (CLI).
<span>Pip</span> supports installing packages from:
-
Installing packages from PyPI (and other indexes) using requirement specifiers.
-
The URL of VCS projects.
-
Local project directories.
-
Local or remote source files.
Since you have cloned the PyPI packages to the local repository, pip can install these packages directly from your newly downloaded local PyPI mirror. However, that is not the purpose of this article. The goal here is to allow remote clients to connect to the Raspberry Pi and download packages over the network. That is the role of pypiserver.
pypiserver will provide a local package index, allowing pip to find the packages in your repository over the network.
First, let’s test if it works.
<span>$ pypi</span><span>-</span><span>server</span><span>-</span><span>p</span><span>8080</span><span>~/</span><span>minirepo</span><span>&</span><span># Will listen to all IPs.</span>
Note that the command to run it is <span>pypi</span><span>-</span><span>server</span> and not <span>pypyserver</span>.
Here, you want to start <span>pypiserver</span> and run it on port 8080. It will find the packages in the <span>minirepo</span> folder. This process will run in the background until you kill it or shut down the Raspberry Pi. I will tell you later how to start it.
If you access the static IP you set for the Raspberry Pi on port 8080 in your browser, you should see a message similar to the one below.
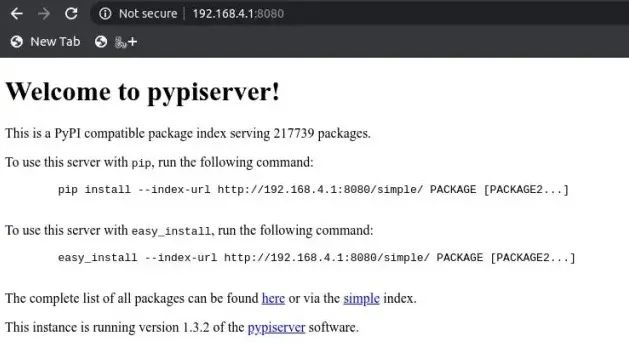
You can now install from the local repository.
<span>pip install</span><span>--</span><span>index</span><span>-</span><span>url http</span><span>:</span><span>//localhost:8080/simple/</span>
Or, install from the client computer.
<span>pip install</span><span>--</span><span>index</span><span>-</span><span>url http</span><span>:</span><span>//192.168.4.1:8080/</span>
If you install <span>pypiserver</span> on a remote URL without HTTPS, you will receive a “untrusted” warning from pip urging you to add the –trusted-host option.
<span>pip</span><span>--</span><span>trusted</span><span>-</span><span>host</span><span>192.168</span><span>.</span><span>4.1</span><span>install</span><span>--</span><span>index</span><span>-</span><span>url http</span><span>:</span><span>//192.168.4.1:8080/</span>
There is also a shorter way. <span>pip</span><span>--</span><span>trusted</span><span>-</span><span>host</span><span>192.168</span><span>.</span><span>4.1</span><span>install</span><span>-</span><span>i http</span><span>:</span><span>//192.168.4.1:8080/</span>
Always specifying the local PyPI URL and trusted host flag on the command line can be cumbersome. If you want to always install packages from your own mirror, create this <span>pip</span> configuration file in your home directory or virtual environment.

Home Directory:
-
On Unix and macOS, the home directory file is:
<span>$HOME</span><span>/.</span><span>pip</span><span>/</span><span>pip</span><span>.</span><span>conf</span> -
On Windows, the file is:
<span>%</span><span>HOME</span><span>%</span><span>\pip\pip</span><span>.</span><span>ini</span>
In a virtual environment:
-
On Unix and macOS, the file is
<span>$VIRTUAL_ENV</span><span>/</span><span>pip</span><span>.</span><span>conf</span> -
On Windows, the file is:
<span>%</span><span>VIRTUAL_ENV</span><span>%</span><span>\pip\pip</span><span>.</span><span>ini</span>
I recommend placing this configuration file in the virtual environment.
4. Set Up a Web Server to Serve Packages
By default, <span>pypiserver</span> scans the entire package directory for every incoming HTTP request. When providing a large number of packages, as we are in this example, this can lead to significant slowdowns.
A faster way to serve files is to place <span>pypiserver</span> behind a reverse proxy and enable your web server’s built-in caching capabilities. In this article, I will use nginx, but feel free to use any web server you prefer.
Set Up a New Virtual Host in Nginx
Create a file <span>/etc/</span><span>nginx</span><span>/</span><span>sites</span><span>-</span><span>available</span><span>/</span><span>cheeshop</span><span>.</span><span>com</span>. For the purposes of this article, I will call the new virtual host cheeshop.com.
Run <span>$ sudo nano</span><span>/</span><span>etc</span><span>/</span><span>nginx</span><span>/</span><span>sites</span><span>-</span><span>available</span><span>/</span><span>cheeshop</span><span>.</span><span>com</span> and add the following content.
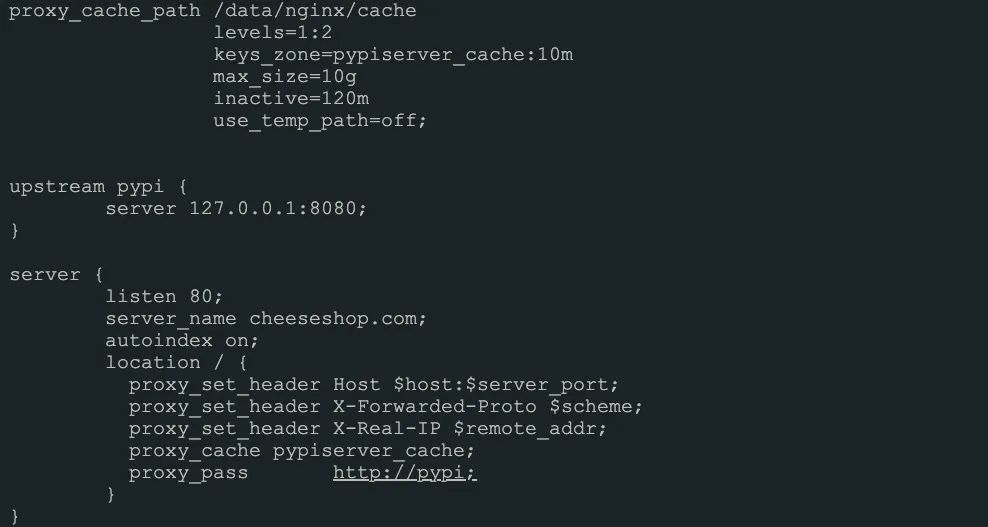
The first part of the configuration instructs nginx to create a 10GB cache that will remain active for 2 hours. The upstream pypi section is responsible for serving content from <span>pypiserver</span> running on port 8080. CheeseShop is the codename for the Python Package Index, which is why I named the server that. You can use any name or IP address you like.
The server section specifies that port 80 will be used for incoming HTTP connections and will forward those requests to the pypi server.
I do not own the cheeseshop.com domain, but I can use it because we are creating a standalone network that cannot access the Internet. To enable client computers to connect to cheeseshop.com, you will need to tell the DNS server how to resolve it. This will be detailed later.
To enable this new virtual host, you need to create a symbolic link to the configuration file you just created in the <span>/etc/</span><span>nginx</span><span>/</span><span>sites</span><span>-</span><span>enabled</span><span>/</span> folder:
<span>$ sudo ln</span><span>-</span><span>s</span><span>/</span><span>etc</span><span>/</span><span>nginx</span><span>/</span><span>sites</span><span>-</span><span>available</span><span>/</span><span>cheeseshop</span><span>.</span><span>com</span><span>/</span><span>etc</span><span>/</span><span>nginx</span><span>-</span><span>sites</span><span>-</span><span>enabled</span><span>/</span>
Doing this will enable the new virtual host. Check everything is working by running <span>sudo nginx</span><span>-</span><span>t</span>. If everything is okay, great! Next, make a small change to DNS to map cheeseshop.com to the IP address.
Open <span>/etc/</span><span>hosts</span> and add an entry for the newly created cheeseshop.com domain:

The hosts file contains mappings of domains to IP addresses, helping the computer serve you the correct content. Dnsmasq will check this file at startup, so it’s best to restart it:
<span>sudo service dnsmasq restart</span>
Also restart nginx for good measure:
<span>sudo service nginx restart</span>
Assuming everything goes smoothly, you should be able to install Python packages from the client computer using the hostname instead of the IP now.
Using the Server
To test this, connect to the WiFi network of the Raspberry Pi and create a new virtual environment on the client computer and run the following command in the virtual environment:
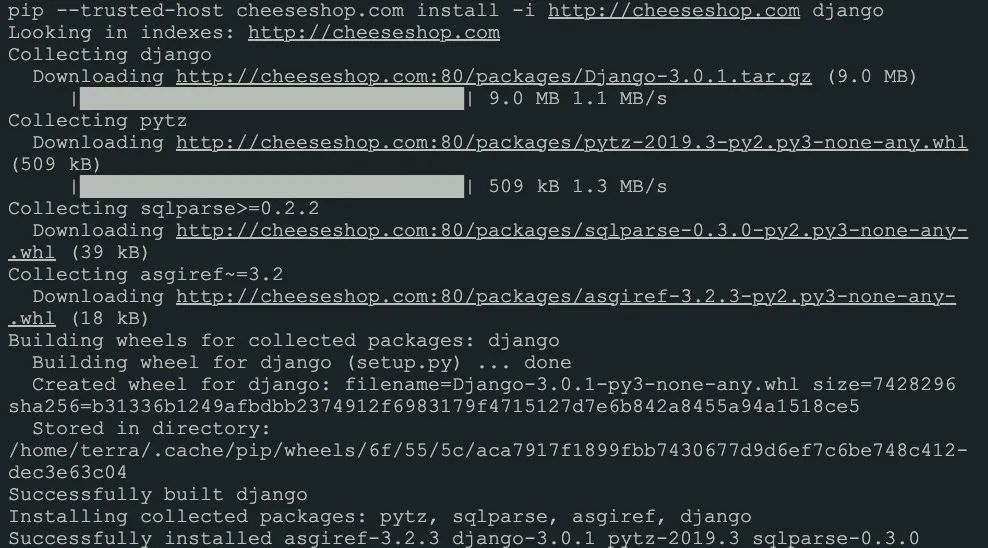
<span>pip</span><span>--</span><span>trusted</span><span>-</span><span>host cheeseshop</span><span>.</span><span>com</span><span>install-</span><span>i http</span><span>:</span><span>//cheeseshop.com django</span>
Running that command will produce the following output:
Start pypiserver at Boot (Optional)
To ensure the pypiserver software starts automatically on boot, create a new Linux service and manage it with <span>systemd</span>.
1. Create a startup script for the service to manage, name it <span>start</span><span>-</span><span>pypi</span><span>-</span><span>server</span><span>.</span><span>sh</span>. Add the following content to it:

2. Copy the script to /usr/bin and make it executable: <span>sudo cp start</span><span>-</span><span>pypi</span><span>-</span><span>server</span><span>.</span><span>sh</span><span>/</span><span>usr</span><span>/</span><span>bin</span><span>/</span><span>start</span><span>-</span><span>pypi</span><span>-</span><span>server</span><span>.</span><span>sh</span> <span>sudo chmod</span><span>+</span><span>x</span><span>/</span><span>usr</span><span>/</span><span>bin</span><span>/</span><span>start</span><span>-</span><span>pypi</span><span>-</span><span>server</span><span>.</span><span>sh</span>
3. Create a unit file to define a systemd service. Name it <span>pypiserver</span><span>.</span><span>service</span>:
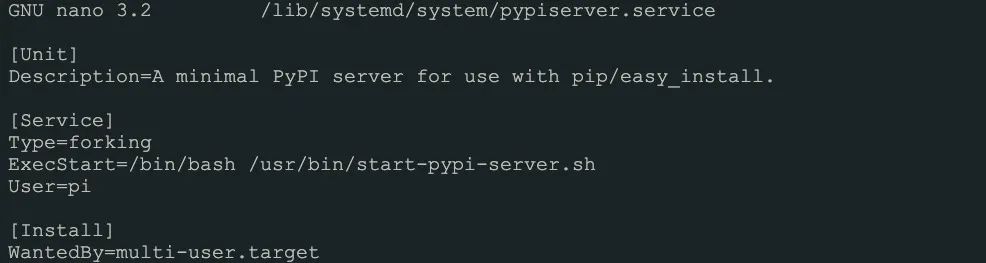
This defines a basic service. The <span>ExecStart</span> directive specifies the command that will run to start the service.
4. Copy the unit file to <span>/etc/</span><span>systemd</span><span>/</span><span>system</span> and set permissions: <span>sudo cp pypiserver</span><span>.</span><span>service</span><span>/</span><span>etc</span><span>/</span><span>systemd</span><span>/</span><span>system</span><span>/</span><span>pypiserver</span><span>.</span><span>service</span>
<span>sudo chmod</span><span>644</span><span>/</span><span>etc</span><span>/</span><span>systemd</span><span>/</span><span>system</span><span>/</span><span>pypiserver</span><span>.</span><span>service</span>
Start and Enable the Service
1. Once the unit file is created, you can test the service:
<span>sudo systemctl start pypiserver</span>
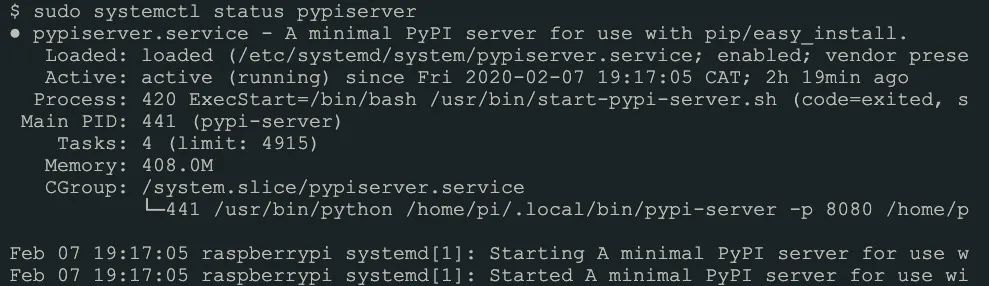
2. Check the status of the pypiserver service:
<span>sudo systemctl status pypiserver</span>
This will produce output similar to this:
3. Stop or restart the service: <span>sudo systemctl stop pypiserver</span> <span>sudo systemctl restart pypiserver</span>
4. Finally, use the <span>enable</span> command to ensure the service starts on system boot:
<span>sudo systemctl enable pypiserver</span>
Conclusion
We have learned how to create our own local PyPI clone on the Raspberry Pi. You have learned how to
-
Set up the Raspberry Pi as an access point
-
Set the Raspberry Pi as a DHCP and DNS server
-
Clone PyPI
-
Serve the cloned packages using a web server.
I did this to demonstrate that a PyPI-like concept can run offline. I am sure there are better or more efficient ways to do this. If you have any suggestions or criticisms, please leave a comment below. Thank you for reading.

– Click below to read the original text to joinCommunity member –