Original Author: Ted Kinsman
Translated by: Hua Shen
* Authorized by Makezin
Every party needs a conversation starter, and what better than a cocktail-making robot? This not only serves as a great talking point but also allows the host to mingle with guests instead of being stuck behind the bar. The Mai Tai cocktail introduced in this article has a low alcohol content, making it suitable even for work-related parties.
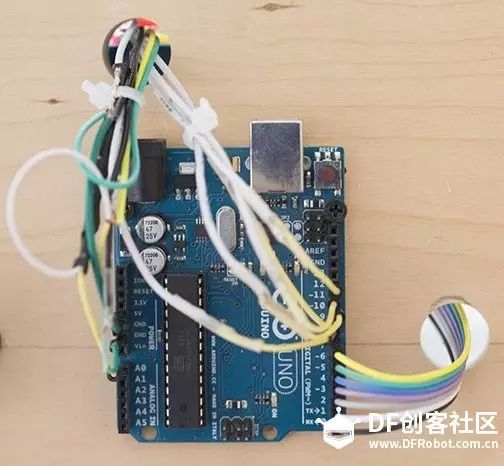
This cocktail robot is essentially made from an Arduino microcontroller (Arduino Uno) and several pumps. I wrote a simple program to activate the pumps for a specific duration to prepare the drinks. With the current design, this robot can only make one type of drink, but with some adjustments to the program and input switches, it can easily make dozens of different cocktails. The main purpose of this article is to get you started on building your own and to learn some basic concepts along the way.
Our cocktail robot can mix the perfect Mai Tai. There are many variations of the Mai Tai recipe, and I would like to call this one Margot’s Mai Tai, as it was my wife Margot who perfected this recipe, with the main difference being a lower alcohol content (changing from three shots of liquor to just a bit more than one). If you could simply press a button to get a Mai Tai, too many people would get drunk, which would be inconvenient. Additionally, in this recipe, we replaced the commonly used orange juice with pomegranate syrup and pineapple juice.
PARTS
Mai Tai Ingredients
• Rum, 30 ml
• Curacao, 12 ml
• Orgeat, 5 ml
• Grenadine Syrup, 6 ml
• Pineapple Juice + Lime, 120 ml. You can squeeze 10 limes and add 1 gallon of pineapple juice.
Robot Components
• Arduino Uno microcontroller
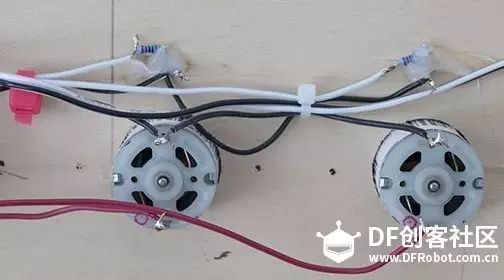
• Small motor (should not exceed 120 mA when operating)
• Aquarium peristaltic pump (2)
• 12V submersible pump
• Elegoo resistor module
• Doorbell switch
Building the Robot
First, we need to calibrate the pumps to see how fast the liquid flows under 12 V DC. The motor I used was purchased online for about $5. When driving the pump, it uses about 120mA, so I need a power supply that can provide several amps to mix the drinks. Another key point is the speed of drink preparation; in my design, it takes about 35 seconds to prepare one Mai Tai.
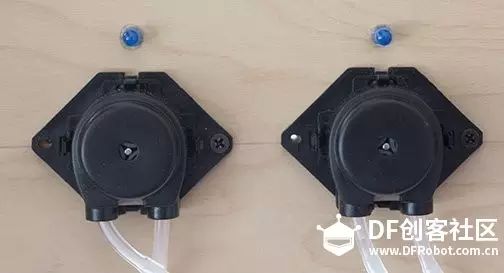
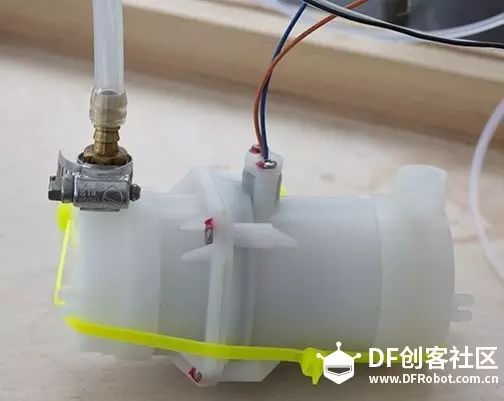
Front view of the peristaltic pump
Back view of the peristaltic pump. You can see the blue LED on top of the pump motor that limits current. From the front view, the LED blinks when the machine is idle. When starting to prepare a drink, the LED shows which pump is operating.
Through the roller mechanism and flexible tubing, the peristaltic pump can dispense a precise amount of liquid. This type of pump is commonly used in the food and medical industries. In this project, we are using a small pump that is often found in the aquarium industry, typically used to add chemicals to aquariums.
The peristaltic pump can dispense 30 ml of liquid in 32 seconds. Please remember to test the pump’s liquid dispensing speed before starting the project. I first used plain water to get a rough estimate of the time and then tested it with the actual drink. I used a timeline graph to show this process:

In the above graph, the shaded area represents the amount of liquid dispensed by the pump. Since the rum requires the largest amount, the rum pump is open the longest, which is one limitation of small peristaltic pumps.
The 12V submersible pump has a faster transport rate and can also pump pineapple pulp!
Another limitation of the small pump is that it cannot pump out pineapple pulp because the Mai Tai recipe requires 120 ml of pineapple juice, and the peristaltic motor is too slow. Therefore, I switched to a submersible motor here, which can solve both the pulp and speed issues. The submersible motor also uses 12V DC and can be controlled with a relay box. Using this motor to dispense 120 ml of pineapple juice only takes 3.2 seconds! Originally, I wanted to use a larger peristaltic motor for this, but I couldn’t find one nearby, so I used the submersible motor left over from another project. Since I only have one motor that can pump out the pulp, I had to mix the pineapple juice and lime juice first and then use this precious submersible motor. If I used a peristaltic motor, the pulp would get stuck. To avoid siphoning, the submersible pump should be placed above the surface of the juice liquid.
Suggestion: The blue LED can also be upgraded to a color LED to add different effects. During the making of this project, due to time constraints, I used a current-limited blue one, with a 300-ohm resistor attached to prevent the LED from burning out.
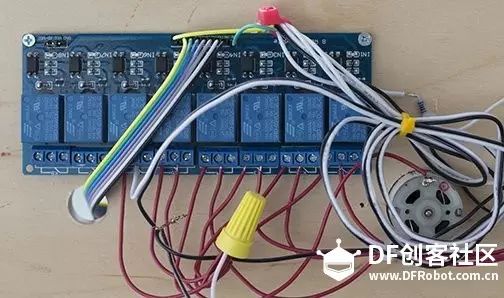
The Elegoo resistor module has 8 channels and is controlled by the 5V voltage from the Arduino Uno.
Note: To turn on the relay with the board, the control pin should be set to LOW.
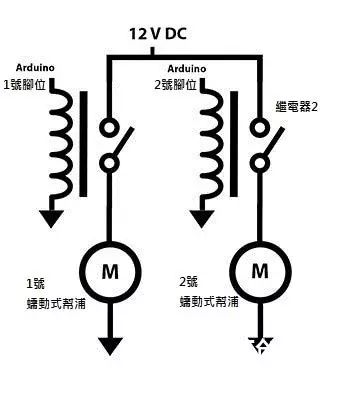
Simplified schematic of the resistor module. The relay controls two peristaltic pumps. Note: The Arduino pins should be set to LOW to activate the relay and pump.
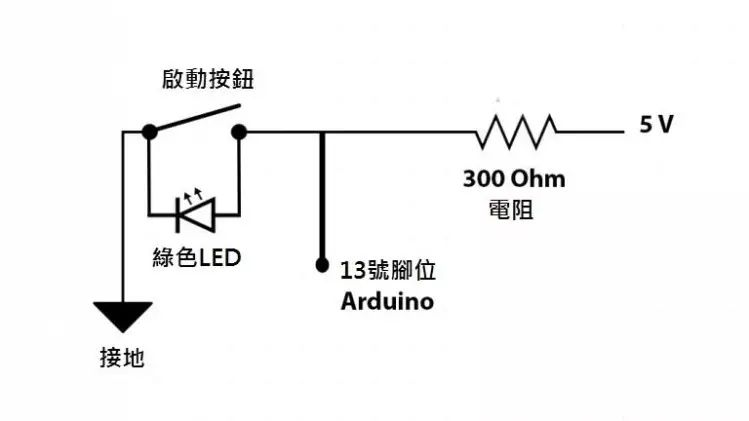
The “Start Button” is actually a doorbell switch, which can be purchased at a hardware store.
I wanted to use a doorbell switch that only connects two wires in this project, so I removed the bulb from the switch and replaced it with a green LED. The problem is that this way, when the switch is pressed, the logic does not stay at HIGH. To solve this, I connected the logic pin to the analog input pin of the Arduino. When the analog value drops below a certain point, it will trigger the drink sequence. Of course, this is not the only solution. The simple program code I wrote makes the doorbell switch activate the drink motor only after the LED has finished blinking. I intentionally kept the program code simple to make it easier to read and understand. I want everyone to feel that these pumps are actually easy to control, and if the amount of liquid dispensed can be accurately controlled, it can be used for many other purposes besides mixing drinks, such as conducting liquid experiments.
By adjusting the program code below, you can create various drinks with different concentrations and strengths. Additionally, this device can mix more than one drink; for example, pressing different buttons can produce different cocktails.
After reading this article, I hope you can also build your own robot. The device itself and the electronic components are not difficult; this project is very suitable for beginners to learn Arduino, programming, and electronic components.
Program Code
/* This program is called Mai Tai Mixing Robot
* The main function is to mix Margot’s Mai Tai
* Author: Ted Kinsman, Rochester Institute of Technology
* March 2017 [url=mailto:[email protected]][email protected][/url]
* 12v DC motor[color=#333333][size=13px] pump[/size][/color] takes 32 seconds to dispense 1 ounce of liquid
*/
#define Rum 1 // (Pump 1[color=#333333][size=13px] pump[/size][/color]) 12VDC motor connected to pin 1, dispenses rum
#define LED8 8 // (Pump 1[color=#333333][size=13px] pump[/size][/color]) LED indicates rum dispensing status
#define Curacao 2 // (Pump 2[color=#333333][size=13px] pump[/size][/color]) Curacao connected to pin 2
#define LED9 9 // (Pump 2[color=#333333][size=13px] pump[/size][/color]) LED indicates Curacao dispensing status
#define Orgeat 3 // (Pump 3[color=#333333][size=13px] pump[/size][/color]) connected to pin 3
#define LED10 10 // Pump 3[color=#333333][size=13px] pump[/size][/color] LED connected to pin 10
#define Grenedine 4 // (Pump 4[color=#333333][size=13px] pump[/size][/color]) connected to pin 4
#define LED11 11 // Pump 4[color=#333333][size=13px] pump[/size][/color] LED connected to pin 11
#define PineLime 5 // Pump 5[color=#333333][size=13px] pump[/size][/color] connected to pineapple and lime juice
#define LED12 12 // Pump 5[color=#333333][size=13px] pump[/size][/color] LED connected to pin 12
#define doorbell 13 // Doorbell start switch
#define pump6 6 // Pin 6 connected to large submersible[color=#333333][size=13px] pump[/size][/color]
int strobe=100; // Control LED blinking speed
int sensorPin = A0; // Analog read: used to detect if the doorbell switch is pressed
int sensorValue = 0; // If the doorbell value is read, it will be written here
void setup()
{
pinMode(Rum, OUTPUT);
pinMode(LED8, OUTPUT);
pinMode(Curacao, OUTPUT);
pinMode(LED9, OUTPUT);
pinMode(Orgeat, OUTPUT);
pinMode(LED10, OUTPUT);
pinMode(Grenedine, OUTPUT);
pinMode(LED11, OUTPUT);
pinMode(LED12, OUTPUT);
pinMode(doorbell, INPUT);
pinMode(pump6, OUTPUT);
digitalWrite (LED8, LOW); // LED 1 is on
digitalWrite (Rum, HIGH); // Turn off pump 1[color=#333333][size=13px] pump[/size][/color]
digitalWrite (LED9, LOW);
digitalWrite (Curacao, HIGH); // Turn off pump 3[color=#333333][size=13px] pump[/size][/color]
digitalWrite (LED10, LOW);
digitalWrite (Orgeat, HIGH); // Turn off pump 3[color=#333333][size=13px] pump[/size][/color]
digitalWrite (LED11, LOW); // Turn off pump 4[color=#333333][size=13px] pump[/size][/color]
digitalWrite (PineLime, HIGH); // Turn off pump 4[color=#333333][size=13px] pump[/size][/color]
digitalWrite (LED11, LOW);
digitalWrite (Grenedine, HIGH);// Turn off pump 5[color=#333333][size=13px] pump[/size][/color]
digitalWrite (pump6, HIGH);// Turn off pump 6[color=#333333][size=13px] pump[/size][/color]
delay(1000); // Allow the relay to prepare before starting
}
void loop() // This part of the program will continuously loop
{
sensorValue = analogRead(sensorPin);
// This part makes the LED blink, making the robot look cooler
// The blinking will stop when the start button is pressed
// When the button is pressed, the LED will indicate which motor is running
digitalWrite (LED8, HIGH); // Turn on LED at pin 8
delay(strobe); // Control LED blinking speed
digitalWrite (LED8, LOW); // Turn off LED at pin 8
delay(strobe);
digitalWrite (LED9, HIGH); // Turn on LED at pin 9
delay(strobe);
digitalWrite (LED9, LOW); // Turn off LED at pin 9
delay(strobe);
digitalWrite (LED10, HIGH); // Turn on LED at pin 10
delay(strobe);
digitalWrite (LED10, LOW); // Turn off LED at pin 10
delay(strobe);
digitalWrite (LED11, HIGH); // Turn on LED at pin 11
delay(strobe);
digitalWrite (LED11, LOW); // Turn off LED at pin 11
delay(strobe);
digitalWrite (LED12, HIGH); // Turn on LED at pin 12
delay(strobe);
digitalWrite (LED12, LOW); // Turn off LED at pin 12
delay(strobe);
sensorValue = analogRead(sensorPin);
if(sensorValue < 300){
digitalWrite (LED8, HIGH); // LED 1 is on
digitalWrite (Rum, LOW); // Pump 1[color=#333333][size=13px] pump[/size][/color] is on
digitalWrite (LED9, HIGH);
digitalWrite (Curacao, LOW); // Pump 2[color=#333333][size=13px] pump[/size][/color] is on
digitalWrite (LED10, HIGH);
digitalWrite (Orgeat, LOW); // Pump 3[color=#333333][size=13px] pump[/size][/color] is on
digitalWrite (LED11, HIGH);
digitalWrite (Grenedine, LOW);// Pump 4[color=#333333][size=13px] pump[/size][/color] is on
delay(8000); // Wait 8 seconds to dispense 1/4 ounce of liquid
digitalWrite (LED10, LOW); // Turn off Orgeat LED P3
digitalWrite (Orgeat, HIGH); // Turn off Orgeat[color=#333333][size=13px] pump[/size][/color] P3
digitalWrite (LED11, LOW); // Turn off pump 5[color=#333333][size=13px] pump[/size][/color] LED
digitalWrite (Grenedine, HIGH); // Turn off pump 4[color=#333333][size=13px] pump[/size][/color]
delay(8000); // Wait 8 seconds to dispense 1/4 ounce of liquid
digitalWrite (Curacao, HIGH); // Turn off Curacao[color=#333333][size=13px] pump[/size][/color] 2
digitalWrite (LED9, LOW); // Turn off Curacao LED 2
// At this point, the Curacao switch is on for a total of 16 seconds, dispensing 1/2 ounce.
delay(16000); // Wait 8 seconds to dispense 1/4 ounce of liquid
digitalWrite (LED8, LOW); // Turn off LED for pump 1[color=#333333][size=13px] pump[/size][/color]
digitalWrite (Rum, HIGH); // Turn off pump 1[color=#333333][size=13px] pump[/size][/color] (rum)
digitalWrite (pump6, LOW); // Turn on pineapple juice[color=#333333][size=13px] pump[/size][/color] (pump 6)
//digitalWrite (PineLime, LOW); // low opens the relay, turning on[color=#333333][size=13px] pump[/size][/color]
delay(2500); // Delay 4 seconds to dispense pineapple juice.
digitalWrite (pump6, HIGH); // Turn off pineapple juice[color=#333333][size=13px] pump[/size][/color] (pump 6)
//digitalWrite (PineLime, HIGH); // Turn off pineapple juice relay
}
}
* No commercial use, copyright belongs to the original author.
* Feel free to share in your circle of friends. For reprints, please contact for authorization.
More Project Resources Click Here
Cute Girl’s Motion Sensing Cat Ears
Smart Wearable – Visualizing Diary in a Dress
Wolverine Claw Production Collection | Desktop Tools for Taiwanese Makers
Smog Self-Rescue | VR Black Technology | OTTO | Pet Robot
3D Printing Pen | Smart Bracelet | Raspberry Pi Instant Camera
Interactive Paper Art Device | HIFI Ultimate Speaker

Click “Read the Original” to download the code…