Air conditioning, once considered a luxury, can now be found in almost every home to endure the summer/winter seasons. However, those who own it often worry about its high power consumption. In this project, we will create a small automated temperature control circuit that adjusts the air conditioning temperature based on the room temperature to minimize electricity usage. By periodically adjusting the set temperature, we can keep the air conditioning running at lower temperature settings for longer periods, thereby consuming less power.
Many of us encounter situations where we have to change the set temperature of the air conditioning at different times of the day to maintain our comfort. To automate this process, this project uses a temperature sensor (DHT11) to read the current room temperature. Based on this value, it will send commands to the air conditioning unit using an infrared transmitter similar to a remote control. The air conditioning unit will respond to these commands just like it would to a remote control, adjusting the temperature accordingly. Sounds cool? Let’s see how to build such a project.
Required Materials:
1. Arduino Mega 2560 board
2. TSOP1738 (or HS0038)
3. IR transmitter
4. DHT11 temperature/humidity sensor
5. Any color LED and a 1K resistor (optional)
6. Breadboard
7. Jumper wires
Working Method:
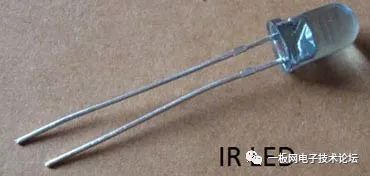
All remote controls we use for our TV, home theater, air conditioning, etc., require an infrared transmitter. An infrared transmitter is simply an infrared LED that emits signals through repeated pulses, which can be read by a receiver in electronic devices. Each button on the remote control sends a unique signal that the receiver reads to perform specific predefined tasks. If we can read the signals from the remote control, we can simulate the same signals using an infrared LED when that specific task needs to be performed.
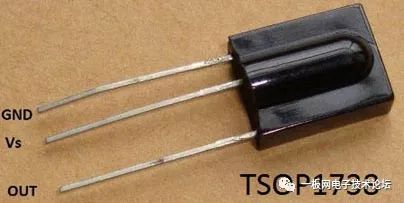
TSOP1738 is an infrared receiver that can decode signals from remote controls. This receiver is connected to the Arduino board to decode the signals from each button, and when needed, the Arduino can simulate the signal. This way, we can control our air conditioning using Arduino.
Now, all that’s left is to read the temperature value using DHT11 and send the corresponding IR signals to the air conditioning unit. To make the project look more attractive and user-friendly, I have also added an OLED display to show the current temperature, humidity, and air conditioning set temperature.
Prerequisites:
This automated air conditioning temperature controller project is slightly above beginner level, but with the following tutorials, anyone can create this in a short time. So if you are new to OLED, DHT11, or TSOP1738, you can review these tutorials to learn some basics and how to get started with them. The list may seem a bit long, but trust me, they are easy and worth learning, and will open the door to many new projects.
1. Basic circuit using TSOP and IR LED, understanding how it works
2. Basic connection guide for DHT11 with Arduino
3. Basic connection guide for OLED with Arduino
4. Connecting TSOP with Arduino to read IR remote values
Make sure you have an Arduino Mega board or any other version of Arduino, as the code is mostly compatible. Also, check if you have installed the following Arduino libraries; if not, please install them from the links below:
1. IR remote library for TSOP and IR Blaster
2. Adafruit library for OLED
3. GFX graphics library for OLED
4. DHT11 sensor library
How the Air Conditioning Remote Works:
Before starting the project, take some time to notice how your air conditioning remote works. It works a bit differently than TV or DVD infrared remotes. The remote may have only 10-12 buttons, but it can send many different types of signals. This means that the remote does not send the same code every time for the same button. For example, when using the down button to lower the temperature to 24°C, you will get a set of data signals, but when you press it again to set it to 25°C, you will not get the same data because the temperature is now 25 instead of 24. Similarly, different codes will be sent for different fan speeds, sleep settings, etc., at 25°C. Therefore, let’s not fiddle with all the options and just focus on the temperature values while keeping the other settings constant.
Another issue is the amount of data each button sends; typically, remotes send 24 or 48 bits, but air conditioning remotes can send up to 228 bits because each signal contains a lot of information such as temperature, fan speed, sleep time, swing style, etc. This is why we need an Arduino Mega board with large storage capacity.
Circuit Diagram and Instructions:
Fortunately, the hardware setup for this automated air conditioning temperature control project is very simple. You can simply use a breadboard and connect it as shown in the diagram below.
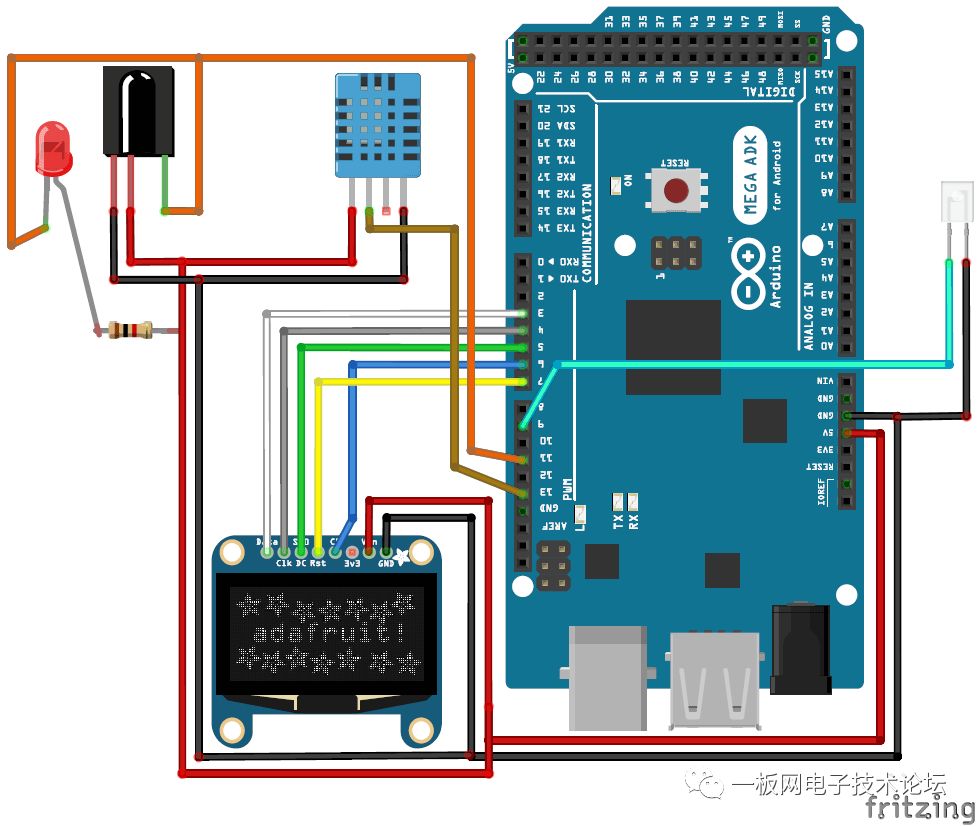
The table below can also be used to verify your connections.
|
Number |
Component Pin |
Arduino Pin |
|
1 |
OLED – Vcc |
5V |
|
2 |
OLED – Gnd |
GND |
|
3 |
OLED-SCK, D0, SCL, CLK |
4 |
|
4 |
OLED-SDA, D1, MOSI, Data |
3 |
|
5 |
OLED-RES, RST, RESET |
7 |
|
6 |
OLED-DC, A0 |
5 |
|
7 |
OLED-CS, Chip Select |
6 |
|
8 |
DHT11 – Vcc |
5V |
|
9 |
DHT11 – Gnd |
GND |
|
10 |
DHT11 – Signal |
13 |
|
11 |
TSOP – Vcc |
5V |
|
12 |
TSOP – Gnd |
GND |
|
13 |
IR LED – Anode |
9 |
|
14 |
IR LED – Cathode |
GND |
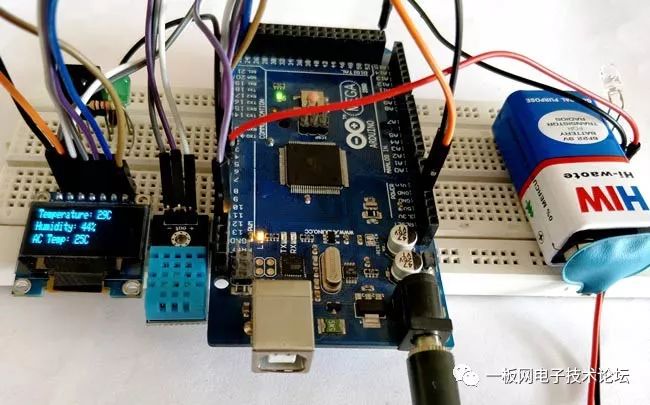
Once the connections are complete, it should look like this. I used a breadboard to connect, but you can also directly connect all the components using wires.
Decoding Your Air Conditioning Remote Signal:
The first step to controlling the air conditioning is to use the TSOP1738 to decode the IR codes from the air conditioning remote. Complete all connections as shown in the circuit diagram and ensure that you have installed all the mentioned libraries. Now open the example program “IRrecvDumpV2”, which can be found in File -> Examples -> IRremote -> IRrecvDumpV2. Upload the program to the Arduino Mega board and open the serial monitor.
Point your remote at the TSOP and press any button. The corresponding signal for each button you press will be read by the TSOP1738, decoded by the Arduino, and displayed in the serial monitor. For each temperature change on your remote, you will get a different set of data. Save this data, as we will use it in our main program. Your serial monitor should look like this, and I also displayed a Word file showing the saved copied data.
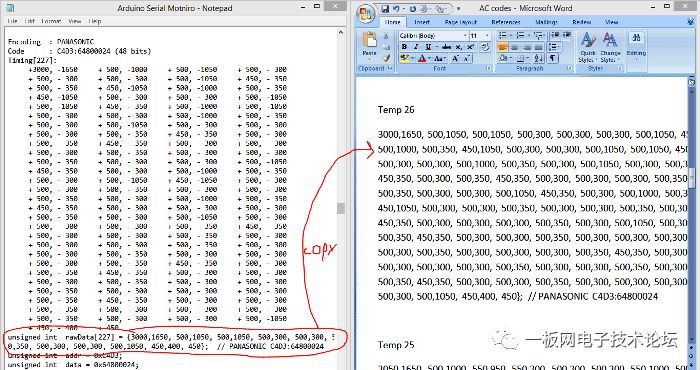
The screenshot shows the code for my air conditioning remote with the temperature set to 26°C. Depending on your remote, you will receive a different set of codes. Similarly, copy all the codes for different temperature levels. You can check all the air conditioning remote IR codes in the Arduino code provided at the end of this tutorial.
Main Arduino Program:
The complete main Arduino program can be found at the bottom of this page, but you cannot use the same program. You must change the signal code values you just obtained from the above example framework. Open the main program on your Arduino IDE and scroll down to the area shown below, where you need to replace the array values with the values obtained from your remote.
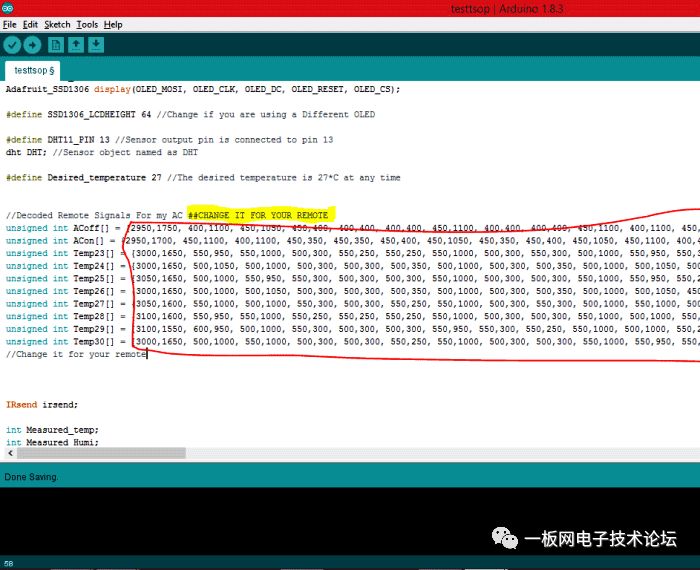
Please note that I have used 10 arrays, two of which are for turning the AC on and off, while the remaining eight are for setting different temperatures. For example, Temp23 is used to set the AC to 23°C, so please use the corresponding code from that array. Once done, just upload the code to your Arduino and place it in front of your air conditioning unit to enjoy a cool breeze.
The explanation of the code is as follows: first, we must use the DHT1 temperature sensor to read the temperature and humidity and display it on the OLED. This is done by the following code.
-
DHT.read11(DHT11_PIN); //Read the Temp and Humidity
-
Measured_temp = DHT.temperature + temp_error;
-
Measured_Humi = DHT.humidity;
-
// text display tests
-
display.setTextSize(1);
-
display.setTextColor(WHITE);
-
display.setCursor(0,0);
-
display.print(“Temperature: “); display.print(Measured_temp);display.println(“C”);
-
display.setCursor(0,10);
-
display.print(“Humidity: “); display.print(Measured_Humi);display.println(“%”);
Copy Code
Once we know the room temperature, we just need to compare it with the desired value. This desired value is a constant set in my program to 27°C. So based on this comparison, we will set the corresponding air conditioning temperature as follows:
-
if (Measured_temp == Desired_temperature+3) //If AC is ON and measured temp is very high than desired
-
{
-
irsend.sendRaw(Temp24, sizeof(Temp24) / sizeof(Temp24[0]), khz); delay(2000);//Send signal to set 24*C
-
AC_Temp = 24;
-
}
Copy Code
If the measured temperature is 30°C (since the desired temperature is 27°C), the air conditioning will be set to 24°C. Similarly, we can create many If loops to set different temperature levels based on the measured temperature as follows.
-
if (Measured_temp == Desired_temperature-1) //If AC is ON and measured temp is low than desired value
-
{
-
irsend.sendRaw(Temp28, sizeof(Temp28) / sizeof(Temp28[0]), khz); delay(2000);//Send signal to set 28*C
-
AC_Temp = 28;
-
}
-
if (Measured_temp == Desired_temperature-2 ) //If AC is ON and measured temp is very low than desired value
-
{
-
irsend.sendRaw(Temp29, sizeof(Temp29) / sizeof(Temp29[0]), khz); delay(2000);//Send signal to set 29*C
-
AC_Temp = 29;
-
}
-
if (Measured_temp == Desired_temperature-3 ) //If AC is ON and measured temp is very very low desired value
-
{
-
irsend.sendRaw(Temp30, sizeof(Temp30) / sizeof(Temp30[0]), khz); delay(2000);//Send signal to set 30*C
-
AC_Temp = 30;
-
}
Copy Code
Working Process of the Automated Air Conditioning Temperature Control System:
Once your code and hardware are ready, upload the code to your board, and you should see something similar on the OLED display.
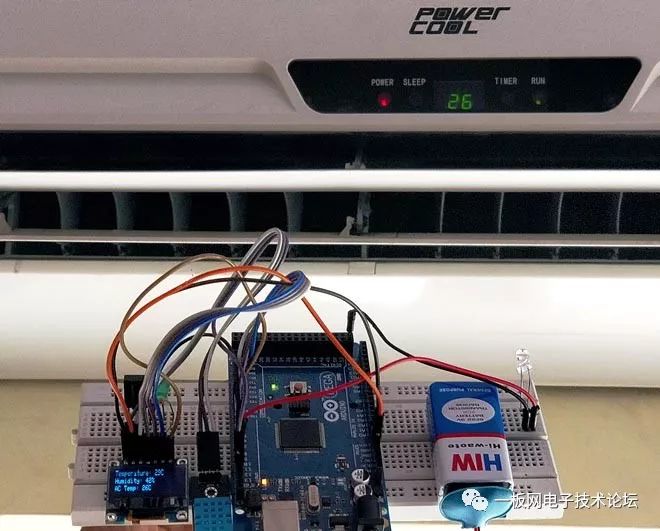
Now place the circuit in front of the air conditioning unit, and you will notice that the air conditioning temperature is controlled based on the room temperature. You can try increasing the temperature near the DHT11 sensor to check if the air conditioning temperature is being controlled.
You can adjust the program to perform any desired actions; all you need is the code you obtained from the example framework. I hope you understand this automated temperature controller project and enjoy making something very similar. I know there are many parts that may be difficult to understand, but don’t worry. Just use forums to describe your issues; people here will surely be happy to help you solve them.
For more exciting tutorials on Arduino boards, click on “Read the Original“.