Account and Permission Management
1. Managing User Accounts and Group Accounts
User Accounts: Superuser, Regular User, Program User
Group Accounts: Primary Group (Private Group), Secondary Group (Public Group)
UID: User Identifier; GID: Group Identifier
User Accounts
Superuser:
The root user has supreme privileges on the local machine. It is recommended to use the root user only for system administration and maintenance tasks; for daily operations, a regular user account should be used. [Root has the highest management privilege with ID=0]
Regular User:
Regular user accounts must be created by the root user or another administrator user, and their permissions are limited. Generally, they have full permissions only in their own home directory.
Program User:
During the installation of the Linux system and some applications, specific low-privilege user accounts are added. These users are generally not allowed to log into the system and are only used to maintain the normal operation of the system or a specific program, such as bin, daemon, ftp, mail, etc. These pseudo-users are typically not used to log into the system but are mainly for maintaining the normal operation of a service, such as: ftp, apache.
Group Accounts
Primary Group (Private Group)
Secondary Group (Public Group)
The primary group is a collection of multiple users based on a specific relationship (e.g., all needing access to FTP services), which constitutes a user group. The accounts of all users in this group are referred to as group accounts. Every user account belongs to at least one group, which is called the user’s primary group (or private group).
Secondary Group: If the user is also part of other groups, these groups are referred to as the user’s secondary groups (or public groups).
UID: The identity identifier (ID card) for each user.
Administrator Group: root, 0 (fixed at 0)
Regular Group: GID
System Group: 1-499 (CentOS 6), 1-999 (CentOS 7)
Regular Group: 500+ (CentOS 6), 1000+ (CentOS 7)
[Secondary Groups (One person with two or more positions)]
1. /etc/passwd: User Account File
This file saves basic information such as file name, home directory, login shell, etc. Each line corresponds to a user account record.
root : x : 0 : 0 : root:/root:/bin/bashroot: user accountx: password placeholder, x indicates no passwordFirst 0: user account IDSecond 0: group account IDFirst root: user descriptionSecond root: home directory/bin/bash: login shellEach character here does not represent actual operations; x, 0, and root are just placeholders.
Detailed explanation of passwd file account record:root : x : 0 : 0:root: / root : / bin / bash is explained as follows:root: username, the username is only for user convenience. The Linux system identifies user identity through UID and allocates user permissions.
x: indicates that this user has a password, but it is not the actual password; the real password is stored in the /etc/shadow file.
The Linux system places the actual encrypted password string in the /etc/shadow file, which can only be viewed and operated by the root user, maximizing password security.
Note: Although “x” does not represent the actual password, it cannot be deleted. If “x” is deleted, the system will consider this user to have no password, allowing login with just the username (only applicable for passwordless login; remote login is not allowed).
0: UID number of the user account.
0: GID number of the primary group account.
root: descriptive information; this field is only used to explain the significance of this user.
/root: home directory, which is the default working directory where the user is located after logging in.
Note: Commonly referred to as the user’s main (home) directory. For example, the root main directory is /root, and the main directory for the regular user odysee is /home/odysee/bin/bash login shell and other information used after the user logs in.
2. /etc/shadow: User Account File
This file saves user passwords, account validity period, and other information.
/etc/shadow (shadow file)Only the root user has read permissions for the /etc/shadow file; other users have no permissions, ensuring the security of user passwords.Like the /etc/passwd file, each line in this file represents a user, also using “:” as a separator. The difference is that each line of user information is divided into 9 fields.
First column: account name
Second column: stores the actual encrypted password, using the SHA512 hash algorithm for enhanced security. !! and * indicate no password and cannot log in; newly created users also have !!. If the password is preceded by double exclamation marks, it indicates that the account is locked.
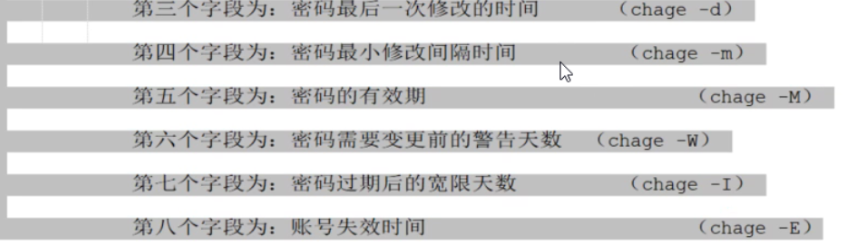
Third column: the last time the password was changed, counted from January 1, 1970, as 1970 is the birth year of Linux. You can check which day it was changed using date -d “1970-01-01 15775 days”.
Fourth column: how long after the last password change can the password be modified; if it is 0, the password can be changed at any time.
Fifth column: password validity period, default 99999, indicating permanent validity.
Sixth column: the number of days before the password expires to issue a warning message, default is 7 days; each time the user logs into the system, a warning message to “change password” will be sent to this account.
Seventh column: grace days after the password expires; if the grace period is exceeded, the system will no longer allow this account to log in and will not prompt for account expiration, effectively disabling it.
Eighth column: account expiration time, using the total number of days since January 1, 1970, as the account expiration time.
Ninth column: reserved, unused.
The chage command
is used to modify account and password validity periods for existing users in the system. chage [options] username
-m: minimum number of days before the password can be changed. If set to zero, it means the password can be changed at any time.
-M: maximum number of days the password remains valid. chage -M 60 root
-w: number of days before the password expires to receive a warning message.
-E: expiration date of the account. After this date, the account will be unavailable.
-d: date of the last change.
-i: inactive period. If a password has expired for these days, the account will become unavailable.
-l: list current settings. Non-privileged users can determine when their password or account expires.
Example: chage -E 2019-04-29 test // where test is the user, the user will expire on April 29, 2019 (unable to log in).
chage -d 2019-06-30 test// sets the last password change date for the test user to June 30, 2019.
chage -d 0 test// indicates that the test user must change the password immediately.
date -d “+45 days” -u // if you don’t know the time, you can use date to check.-u: UTC time
2. useradd: Add User Account
useradd [options] username
Maximum UID limit is 4.2 billion.
Add user account-u: specify the UID number for the user, which must not be used by another user.
-d: specify the location of the user’s home directory (does not take effect when used with -M).
-e: specify the expiration date of the user’s account, using the YYYY-MM-DD date format.
-g: specify the user’s primary group name (or use GID).
-G: specify the user’s secondary group name (or use GID).
-M: do not create a home directory, even if it is set to create one in the /etc/login.defs system configuration.
-s: specify the user’s login shell.
useradd zhangsanid zhangsantail -l /etc/passwd tail -1 /etc/shadow ls /home
Create an auxiliary administrator accountadmin, set its primary group to “wheel”, secondary group to “root”, and home directory to “/admin” useradd -d /admin -g wheel -G root adminid admin

3. passwd: Set/Change User Password
passwd [options] username
useradd xyh
echo “123456” | passwd –stdin username is used for batch setting or changing passwords.
Using the pipe symbol, set the password for the new user xyh. For convenience in system management, the passwd command provides the –stdin option for batch setting initial passwords for users.
-d: clear the specified user’s password, allowing login with just the username.
-l: lock the user account.
-S: view the status of the user account (whether it is locked).
-u: unlock the user account.
4. usermod: Modify User Account Attributes
-l: change the login name of the user account.
-L: lock the user account.
-U: unlock the user account.
-u: modify the user’s UID number.
-d: modify the user’s home directory location.
-e: modify the user’s account expiration date.
-g: modify the user’s primary group name.
-G: modify the user’s secondary group name.
-s: specify the user’s login shell.
5. userdel: Delete User Account
userdel -r username: delete the user along with their home directory.
[userdel username does not completely delete the user; userdel -rf username can force deletion.]
6. Initial Configuration Files for User Accounts
File Source: When a new user account is created, it is copied from the /etc/skel account template directory, which is mostly hidden files.
Main initial configuration files for users:
.bash_logout: executed every time the user logs out.
[When the current user logs out, print logout and the current time.
echo “logout, <span>date</span>“].
.bash_profile: executed every time the user logs in.
.bashrc: executed every time the “/bin/bash” program is loaded (when logging into the system) (can add executable statements set by the user to automatically complete corresponding tasks).
[After modifying .bashrc, use source ~/.bashrc (or . ~/.bashrc) to reload and take effect.]
Generally, the .bashrc file will be called in the .bash_profile file.
When logging into Linux, bash will first read the ~/.bash_profile file, thus executing ~/.bashrc, and personalized settings will take effect.
[Regarding the order of reading environment variables:
User login —- load /.bash_profile —- bash_profile configures to first make/.bashrc effective.]
7. Group Account Files
There are also two configuration files related to group accounts: /etc/group and /etc/gshadow. The former is used to save group account names, GID numbers, group members, and other basic information, while the latter is used to save encrypted password strings for group accounts (but is rarely used). The users that belong to a certain group account will be reflected in the last field of the group file (the user accounts corresponding to the primary group may not be listed by default), with multiple group members separated by commas.
grep “^root” /etc/group #// check which users are in the root group.grep “root” /etc/group // check which groups include the root user.
The groupadd commandgroupadd [-g GID] groupname groupadd -g 1200 markettail -1 /etc/group
The gpasswd command-a: add user to group.
-d: delete user from group.
-A: specify administrator (single).-M: specify group members, similar to -A (multiple).
-r: delete password.-R: restrict user login to the group; only members of the group can use newgrp to join the group.
useradd mikegpasswd -a mike,l,w root # confirm that the mike user has joined the root group.
groups mike view which groups the user belongs to.
groupadd: add group account.
8. Query Account Information
finger username: query detailed information about the user account.
w, who, users # query information about users logged into the host.Typically, tty is used to refer to various types of terminal devices.
In CentOS 7, tty1 represents the graphical interface, and tty2-tty6 represent text interfaces, which can be switched using Ctrl+Alt+F1-F6.
Log in using Ctrl+Alt+F2, execute the w command, and check that the terminal being used is tty2.
User: login usernameTTY: terminal number assigned by the system after login From: remote hostname, i.e., where logged in login@: when logged inIDLE: user idle time. This is a timer; once the user performs any operation, this timer will reset. JCPU: total time occupied by all processes connected to the terminal, including the time occupied by currently running background jobs.PCPU: time occupied by the current process.WHAT: command line of the currently running process.
pts indicates that it is connected using remote tools, such as 1xshell, and the subsequent number represents the order of login time; the smaller the number, the earlier the login.
2. Managing Directory and File Attributes
1. File/Directory Permissions and Ownership
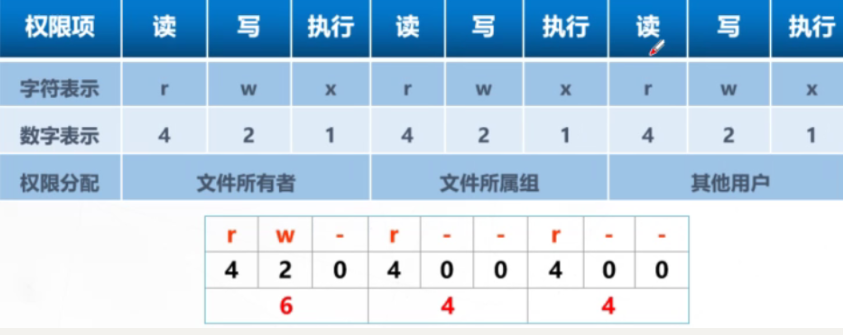
■ Access Permissions● Read r: allows viewing file content, displaying directory list.● Write w: allows modifying file content, allows creating, moving, or deleting files or subdirectories in the directory.● Execute x: allows running programs, switching directories.
Ownership:● Owner: the user account that owns the file or directory.
● Group: the group account that owns the file or directory.
View directory and file attributes for root user, root group.
For example, “drwxr-xr-x” and “-rw-r–r–“. The permission field consists of four parts, each with the following meanings.
The first character: indicates the type of file, which can be d (directory), b (block device file), c (character device file), “-” (regular file), or “l” (link file), etc.
The 2nd to 4th characters: indicate the access permissions of the file’s owner (User).
The 5th to 7th characters: indicate the access permissions of the users in the file’s group (Group).
The 8th to 10th characters: indicate the access permissions of any other users (other).
The 11th character: here, “.” is related to SELinux, which does not need to be focused on at present.
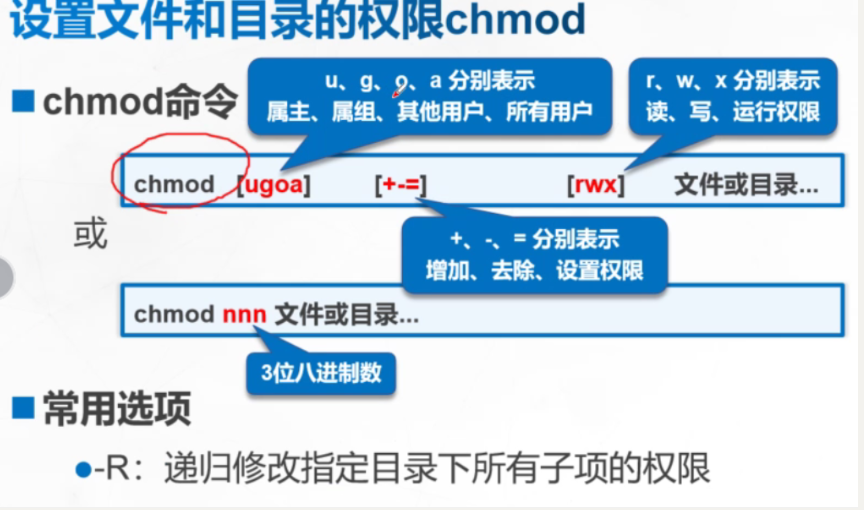
In the above format, the character combination “[ugo..][+-=][rwx]” or the numeric combination “nnn” represents the permission mode to be set. Here, “nnn” is the specific permission value to be set, such as “755” or “644”; while in the format of “[ugoa.][+-=][rwx]”, the meanings and usages of the three components are as follows.
“ugoa” indicates the user category targeted by this permission setting. “u” represents the file owner, “g” represents users in the file’s group, “o” represents any other users, and “a” represents all users (the sum of u, g, and o).
“+-=” indicates the action to set permissions. “+” means to add the corresponding permission, “-” means to remove the corresponding permission, and “=” means to set only the corresponding permission.
“rwx” is the character combination of permissions, which can also be used separately, such as “r” or “rx”, etc.
2. chown: Set File and Directory Ownership
chown: set owner of file or directory.
chown: set group of file or directory.
chown owner:group file or directory Common Options● -R: recursively modify the ownership of all files and subdirectories under the specified directory.
3. umask
Background of umask setting: When copying files from other people’s directories, it is found that many files cannot be copied; when copying a folder, the current file modifies the permissions, resulting in the permissions of the subdirectory not being automatically inherited, causing files in the subdirectory to be unable to be copied.
The changed umask value remains effective until the shell exits or a new umask command is used. To permanently change the umask value, you need to modify the .profile or .bash_profile file in your $HOME directory.
umask view umask value.
Permanently modify:
vim .bash_profile
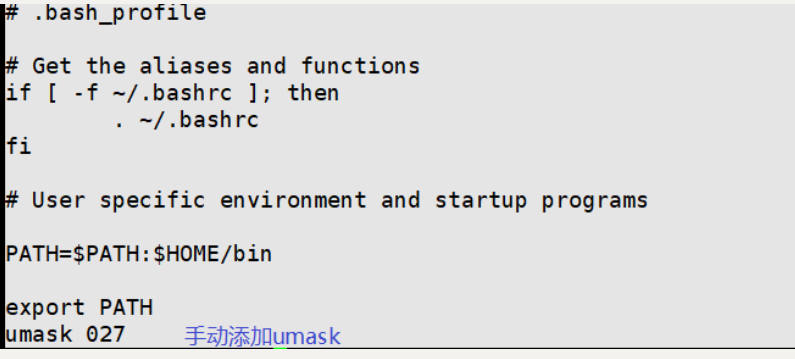
Reload:
source .bash_profile
umask view.
Account Security
Password Complexity: Uppercase, lowercase, numbers, symbols.
Security: Account password expiration time.
SummaryUser Account Management (useradd, passwd, usermod, userdel)Group Account Management (groupadd, gpasswd, groupdel)User Account Files and Group Account FilesCommands to Query Account-Related Information (groups, id, finger, w)Set Directory and File Permissions (chmod)Set Directory and File Ownership (chown)
Link: https://www.cnblogs.com/qfzr2508/p/15728427.html
(Copyright belongs to the original author, please delete if infringed)
Group
WeChat group

To facilitate better communication on operation and maintenance and related technical issues, a WeChat group has been created. Friends who want to join the group can scan the QR code below to add me as a friend (note: join group).

Blog
Guest
Blog
CSDN Blog: https://blog.csdn.net/qq_25599925

Juejin Blog: https://juejin.cn/user/4262187909781751

Knowledge Planet: https://wx.zsxq.com/group/15555885545422

Long press to recognize the QR code to visit the blog website and see more quality original content.