Introduction
Now we will begin addressing topics related to programming robot controllers. We will design a simple controller to avoid the obstacles (boxes) created in the previous tutorial.
This tutorial will introduce you to the basics of robot programming in Webots. By the end of this chapter, you should understand the link between scene tree nodes and the controller API, how to initialize and clean up the robot controller, how to initialize robot devices, how to obtain sensor values, how to command actuators, and how to write a simple feedback loop.
This tutorial only addresses the correct usage of Webots functions. The study of robot algorithms is beyond the scope of this tutorial, so it will not be elaborated here. Some basic programming knowledge is required to handle this chapter.
1. Creating a New World
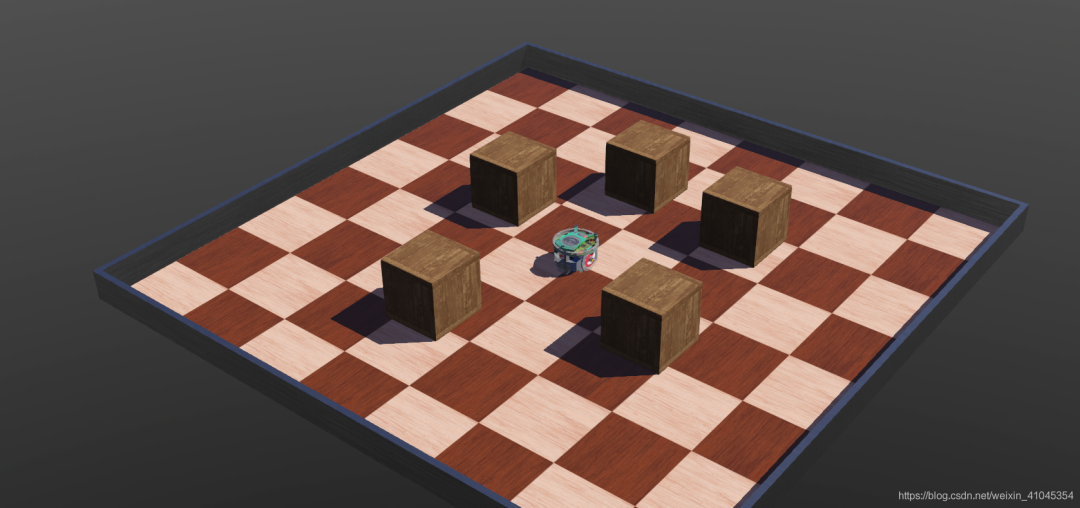
Here we do not intend to create a new environment from scratch; instead, we will save the simulation environment created in the previous article as avoid_collision. We will modify our controller based on this simulation to achieve simple obstacle avoidance functionality. To better demonstrate the obstacle avoidance effect, we will add a few more boxes.
2. E-puck Model
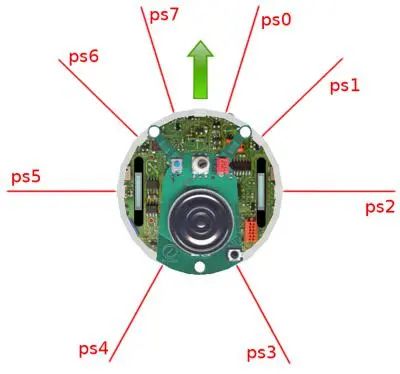
Controller programming requires some information related to the e-puck model. To write the collision avoidance algorithm, we need to read the values from the 8 infrared distance sensors located around its turret and drive the two wheels based on the sensor readings. The distribution of the distance sensors is shown in the figure below.
The distance sensors are modeled by 8 DistanceSensor nodes in the robot hierarchy. These nodes are referenced by their name fields (from ps0 to ps7). We will explain how to define these nodes later.
For now, I just need guidance on how to access the DistanceSensor nodes through the relevant API in Webots (defined in webots/distance_sensor.h).
The values returned by the distance sensors are scaled between 0 and 4096 (linearly varying with distance). A value of 4096 indicates a high amount of light detected (an obstacle is close), while 0 indicates no light detected (no obstacle).
For more documentation on API functions and descriptions of each node, please refer to the Webots reference manual.
3. Obstacle Avoidance Controller
In this chapter, we will write a controller that enables the robot to perform simple collision avoidance behavior. Its simple operating principle is as follows: while the robot moves forward, it continuously monitors the readings from the 8 distance sensors to detect if there are obstacles. If there are, it will turn in the direction without obstacles. Similarly, we will create a new controller named avoid_collision.
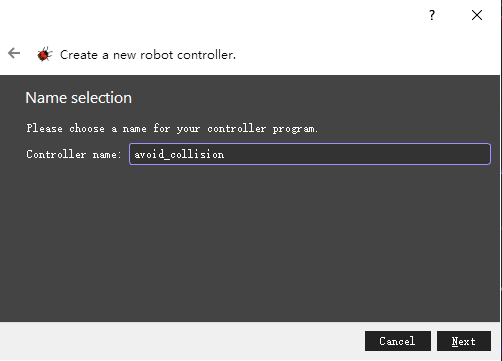
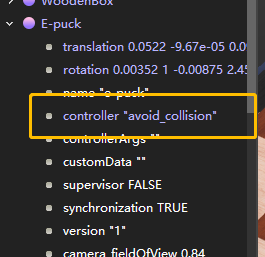
Link the robot to our new controller.
 1. Load Header Files
At the beginning of the controller file, add header files related to the Robot, DistanceSensor, and Motor nodes to be able to use the corresponding APIs:
#include <webots/Robot.hpp>
#include <webots/DistanceSensor.hpp>
#include <webots/Motor.hpp>
After the include statements, add a macro that defines the duration of each physical step. This macro will be used as a parameter for the Robot::step function and will also be used to enable devices. This duration is specified in milliseconds and must be a multiple of the value in the WorldInfo node’s basicTimeStep field.
#define TIME_STEP 64Finally, the namespace required for Webots classes.
using namespace webots;Some code is automatically added when creating a new controller in Webots, and we can modify it as needed.
2. Main Function Section
The main function is where the controller program begins execution. The parameters passed to the main function are given by the Robot node’s controllerArgs field. The default template for the main function is as follows:
// entry point of the controller
int main(int argc, char **argv) {
  // create the Robot instance.
  Robot *robot = new Robot();
  // initialize devices
  // feedback loop: step simulation until receiving an exit event
  while (robot->step(TIME_STEP) != -1) {
    // read sensors outputs
    // process behavior
    // write actuators inputs
  }
  delete robot;
  return 0; //EXIT_SUCCESS
}
3. Adding Functionality
Next, we will add the functionalities we need to the main function. First, we initialize the distance sensors.
// Initialize devices
DistanceSensor *ps[8];
char psNames[8][4] = {  "ps0", "ps1", "ps2", "ps3",  "ps4", "ps5", "ps6", "ps7"}; // Enable sensors by name
for (int i = 0; i < 8; i++) {
  ps[i] = robot->getDistanceSensor(psNames[i]);
  ps[i]->enable(TIME_STEP);
}
Initialize the motors:
// Get motor devices
Motor *leftMotor = robot->getMotor("left wheel motor");
Motor *rightMotor = robot->getMotor("right wheel motor"); // Set motors to velocity control mode
leftMotor->setPosition(INFINITY);
rightMotor->setPosition(INFINITY);
leftMotor->setVelocity(0.0);
rightMotor->setVelocity(0.0);
In the while main loop, after the comment // read sensors outputs, add the following code to read the distance sensor values:
// read sensors outputs
double psValues[8];
for (int i = 0; i < 8 ; i++)
  psValues[i] = ps[i]->getValue();
In the main loop, after // process behavior, add the following code to detect if a collision occurs (i.e., if the values returned by the distance sensors exceed a threshold):
// detect obstacles
bool right_obstacle =  psValues[0] > 80.0 ||  psValues[1] > 80.0 ||  psValues[2] > 80.0;
bool left_obstacle =  psValues[5] > 80.0 ||  psValues[6] > 80.0 ||  psValues[7] > 80.0;
Finally, drive the wheels based on the obstacle information as follows:
#define MAX_SPEED 6.28...
// initialize motor speeds at 50% of MAX_SPEED.
double leftSpeed  = 0.5 * MAX_SPEED;
double rightSpeed = 0.5 * MAX_SPEED;
// modify speeds according to obstacles
if (left_obstacle) {
  // turn right
  leftSpeed  = 0.5 * MAX_SPEED;
  rightSpeed = -0.5 * MAX_SPEED;
} else if (right_obstacle) {
  // turn left
  leftSpeed  = -0.5 * MAX_SPEED;
  rightSpeed = 0.5 * MAX_SPEED;
}
// write actuators inputs
leftMotor->setVelocity(leftSpeed);
rightMotor->setVelocity(rightSpeed);
After adding the relevant functionalities, we compile the code.
4. Complete Code
#include <webots/Robot.hpp>
#include <webots/DistanceSensor.hpp>
#include <webots/Motor.hpp> // time in [ms] of a simulation step
#define TIME_STEP 64
#define MAX_SPEED 6.28 // All the webots classes are defined in the "webots" namespace
using namespace webots; // entry point of the controller
int main(int argc, char **argv) {
  // create the Robot instance.
  Robot *robot = new Robot();   // initialize devices
  DistanceSensor *ps[8];
  char psNames[8][4] = {    "ps0", "ps1", "ps2", "ps3",    "ps4", "ps5", "ps6", "ps7"  };   for (int i = 0; i < 8; i++) {
    ps[i] = robot->getDistanceSensor(psNames[i]);
    ps[i]->enable(TIME_STEP);
  }   Motor *leftMotor = robot->getMotor("left wheel motor");
  Motor *rightMotor = robot->getMotor("right wheel motor");
  leftMotor->setPosition(INFINITY);
  rightMotor->setPosition(INFINITY);
  leftMotor->setVelocity(0.0);
  rightMotor->setVelocity(0.0);   // feedback loop: step simulation until an exit event is received  while (robot->step(TIME_STEP) != -1) {
    // read sensors outputs
    double psValues[8];
    for (int i = 0; i < 8 ; i++)
      psValues[i] = ps[i]->getValue();     // detect obstacles
    bool right_obstacle =      psValues[0] > 80.0 ||      psValues[1] > 80.0 ||      psValues[2] > 80.0;
    bool left_obstacle =      psValues[5] > 80.0 ||      psValues[6] > 80.0 ||      psValues[7] > 80.0;     // initialize motor speeds at 50% of MAX_SPEED.
    double leftSpeed  = 0.7 * MAX_SPEED;
    double rightSpeed = 0.7 * MAX_SPEED;
    // modify speeds according to obstacles
    if (left_obstacle) {
      // turn right
      leftSpeed  = 0.7 * MAX_SPEED;
      rightSpeed = -0.7 * MAX_SPEED;
    }
    else if (right_obstacle) {
      // turn left
      leftSpeed  = -0.7 * MAX_SPEED;
      rightSpeed = 0.7 * MAX_SPEED;
    }
    // write actuators inputs
    leftMotor->setVelocity(leftSpeed);
    rightMotor->setVelocity(rightSpeed);
  }   delete robot;
  return 0; //EXIT_SUCCESS
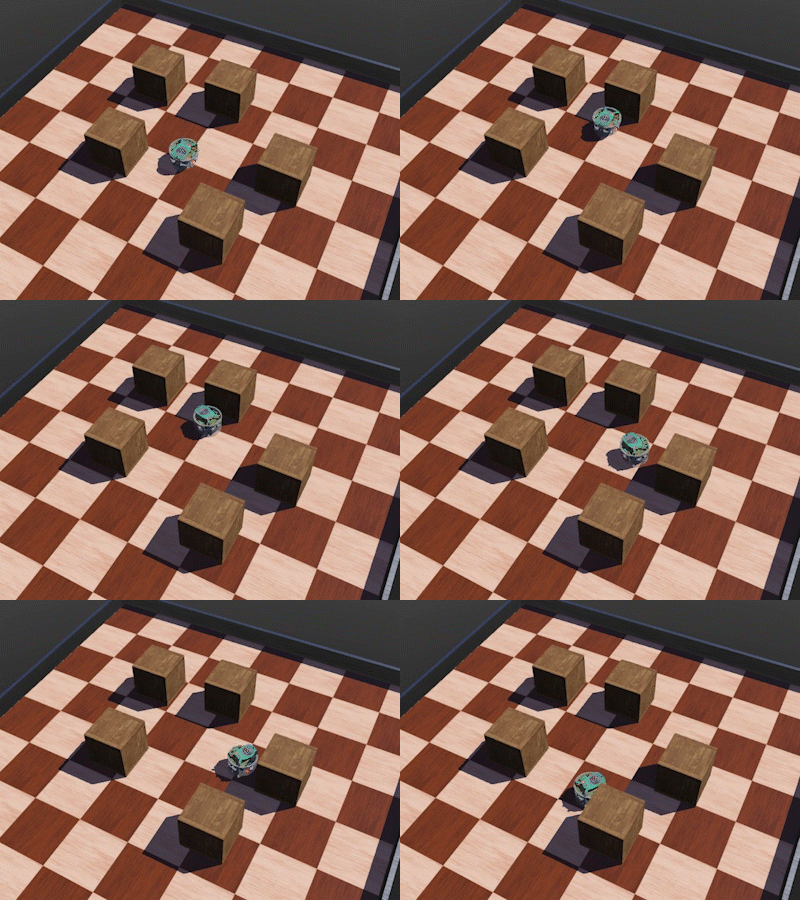
After saving the world and resetting the simulation, we can see the following running effect.
Introduction to Quadruped Robot Control and Simulation The course will use CoppeliaSim (V-rep) as the physical simulation engine and Matlab as the programming language to implement basic motion simulation of a 12-degree-of-freedom quadruped robot.

(Scan the QR code to view course details)