Today we will explore how to develop a high-performance, precise robotic arm using Python and low-cost FPGA.
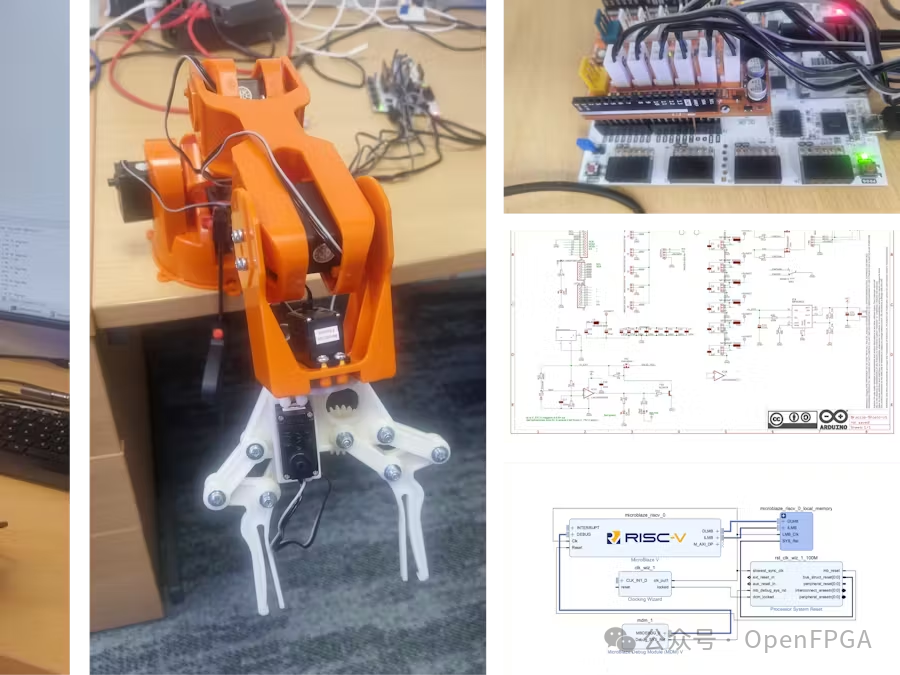
Introduction
Due to the parallel characteristics of FPGA, it excels in precision motor control and robotics. This article explores the development of a ROS2-based solution that allows the robot to autonomously write on a whiteboard.
This project will demonstrate how to create a robotic arm application with the following features:
-
Control 6 axis joints on the arm via FPGA -
Control the robotic arm through Jupyter Lab running on a remote machine -
Communication link via RS232 – can be extended to Ethernet using LwIP -
Track axis positioning information in Jupyter Lab -
Ability to store the arm’s position in a file -
Ability to replay stored files to drive the arm through a series of actions based on application requirements -
Ability to control selected joints to move from one position to another
Design Process
The approach taken in this project is to create an AMD MicroBlaze™ V processor in the FPGA logic, which will execute a command-line interpreter (CLI) to receive the angles of the joints and update the drive logic for specific joints.
Using this method, the CLI can be easily updated to support commands via LwIP and Ethernet for long-distance remote connections.
Each joint on the arm will be labeled from A to F, and the protocol sent via the UART link is:
<joint> <angle> <cr><lf>
Where Joint is A to F, angle is from 0 to 180, CR is carriage return, and LF is line feed.
Inside the FPGA, a simple RTL IP is used to generate the PWM signals required to control the motors. This requires converting the angles into drive signals on the processor.
The servos operate at a 50 Hz PWM period (20 ms). During this 20 ms, the nominal on-time for the PWM period is 1.5 ms, which will position the servo at the 90-degree point, commonly referred to as the neutral position. Reducing the on-time to 1 ms will move the servo to the 0-degree point, while increasing it to 2 ms will move the servo to the 180-degree point.
Thus, the servo has a potential movement of 180 degrees, with a granularity of 1 ms/180 = 5.555 us.
Wiring
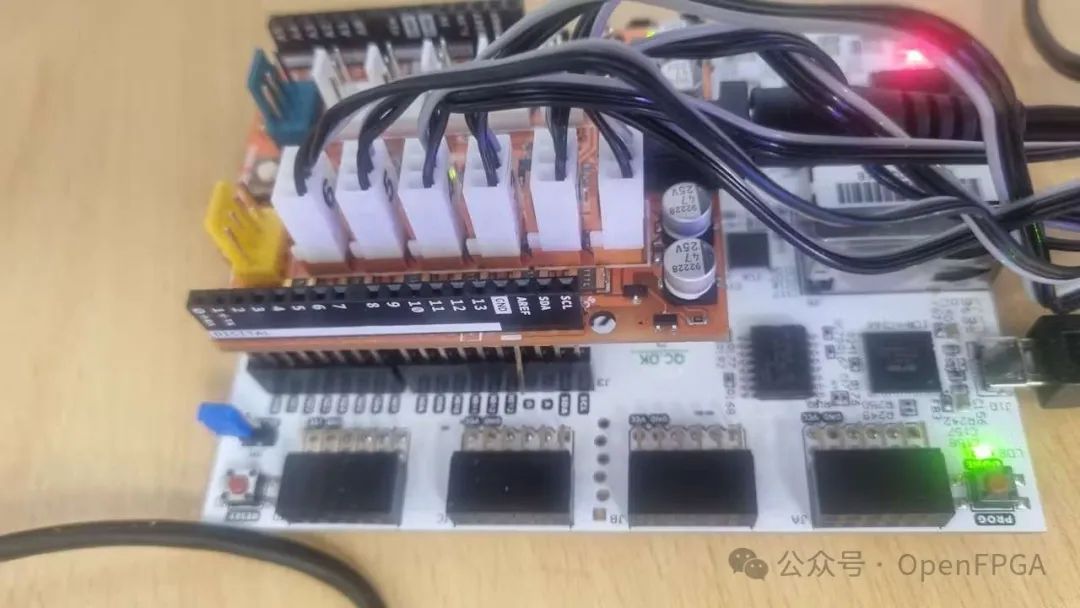
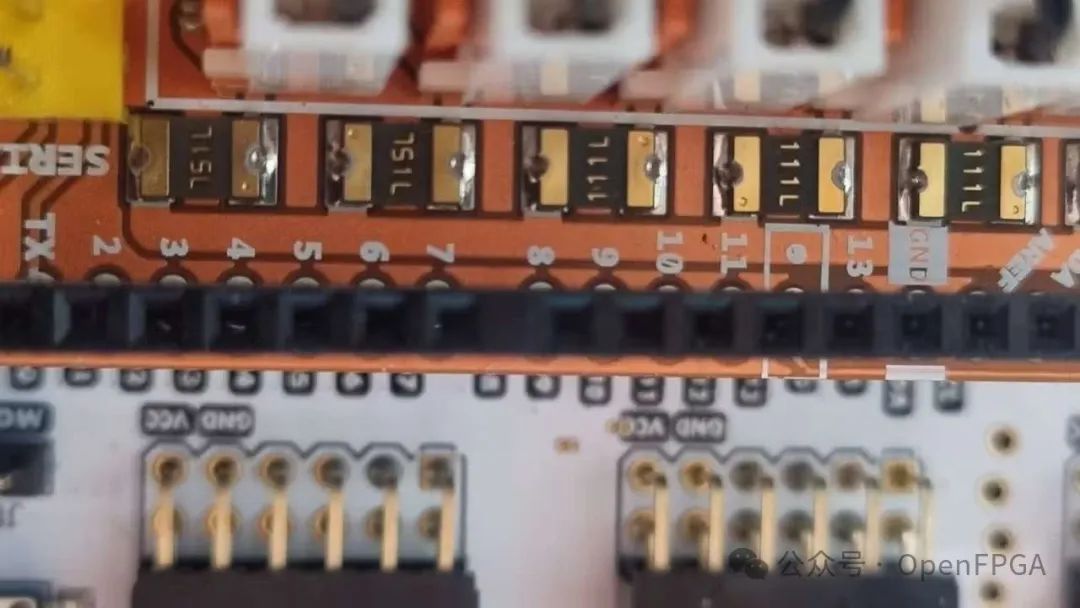
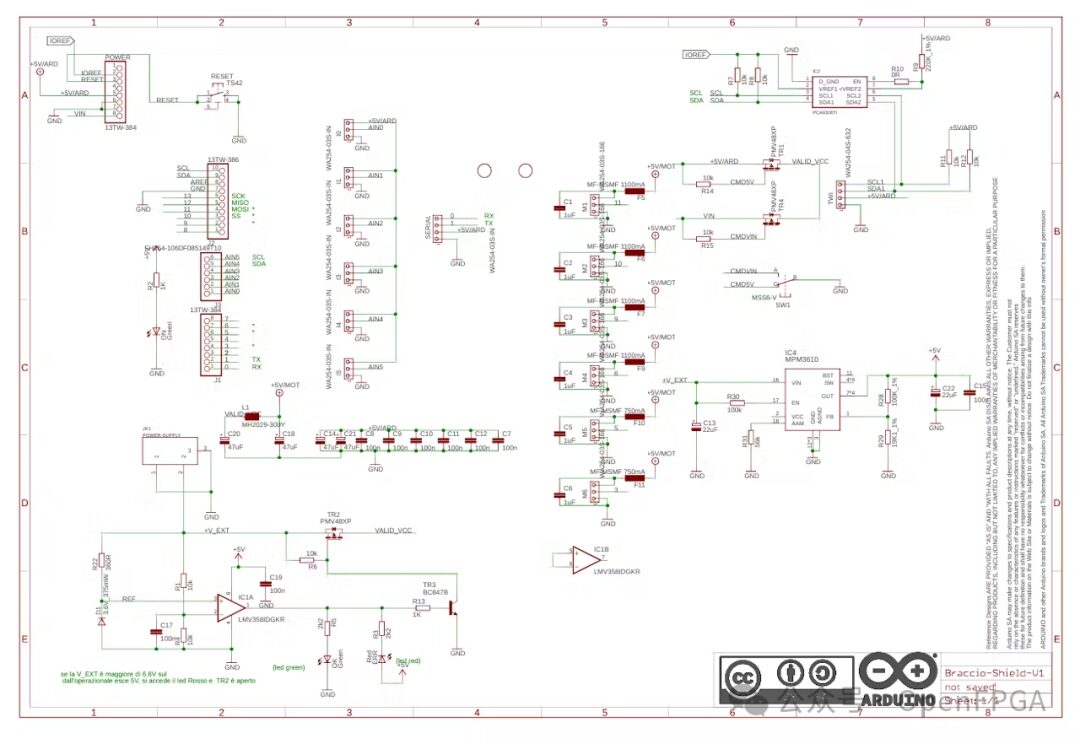
The selected robotic arm connects to the Digilent Arty A7/S7 board via an Arduino interface board. It can be powered externally through the interface board or through the 5V power provided by the connector on the interface board.
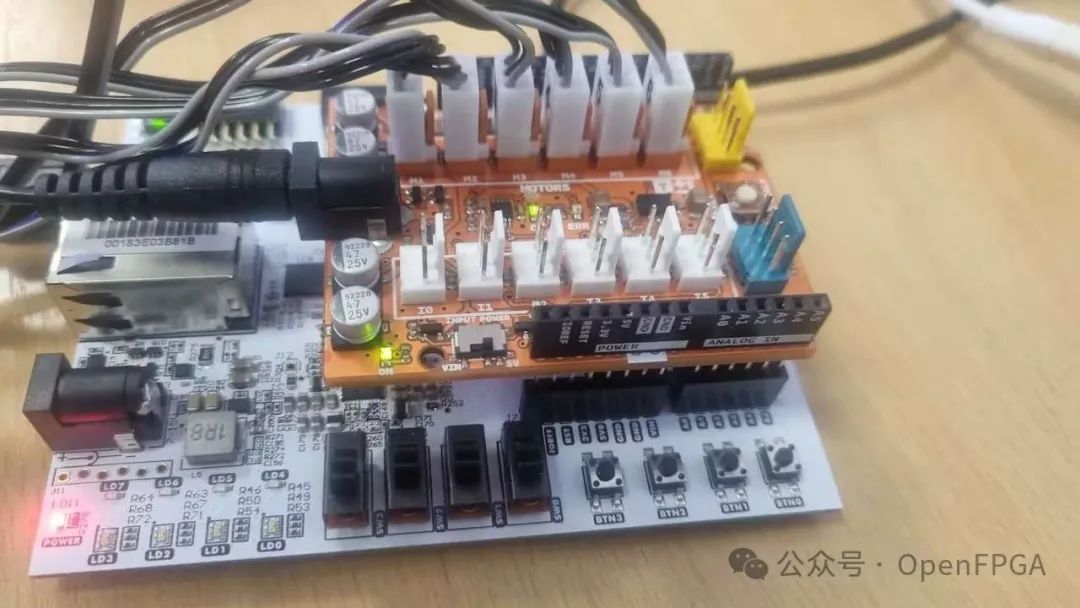
Since the 5V current through the interface board connector may be limited, and the motors may require higher power, an external DC power supply is used to power the robotic arm itself.
Vivado Design
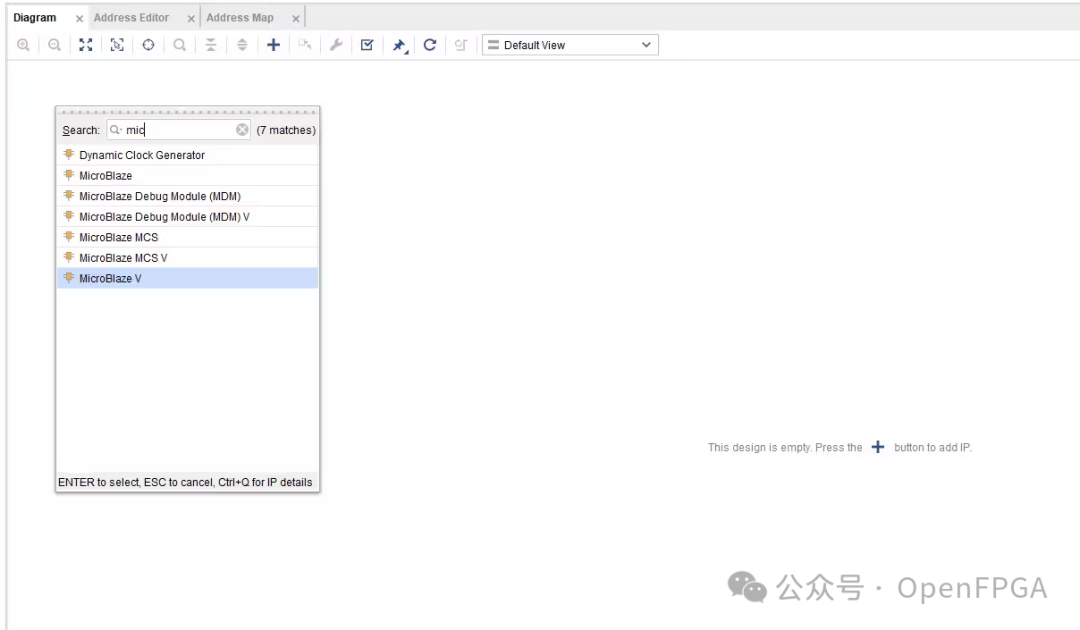
The Vivado design is relatively simple; just add the AMD MicroBlaze V processor and its peripherals.
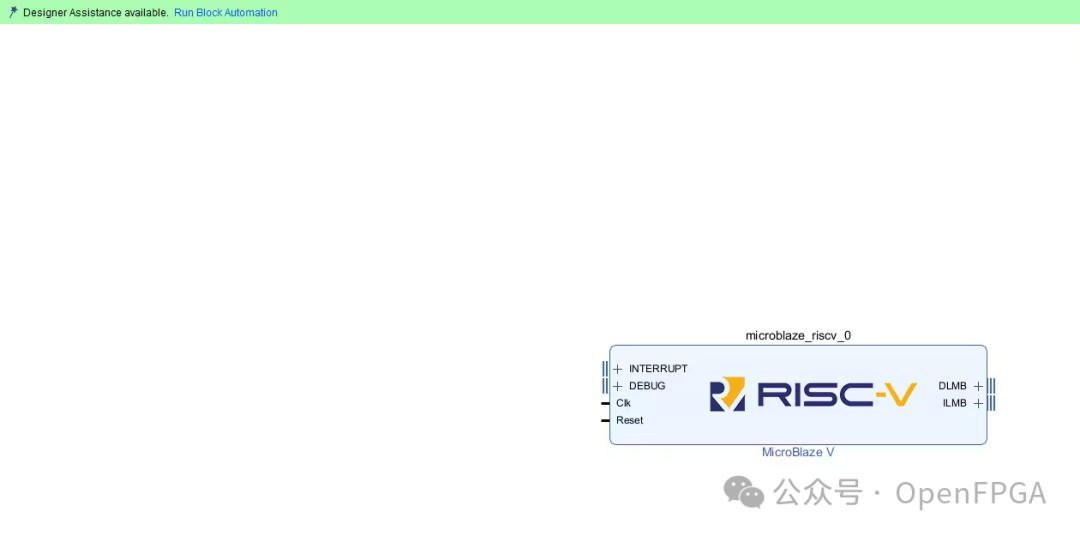
After adding the AMD MicroBlaze V, click to run the automated design.
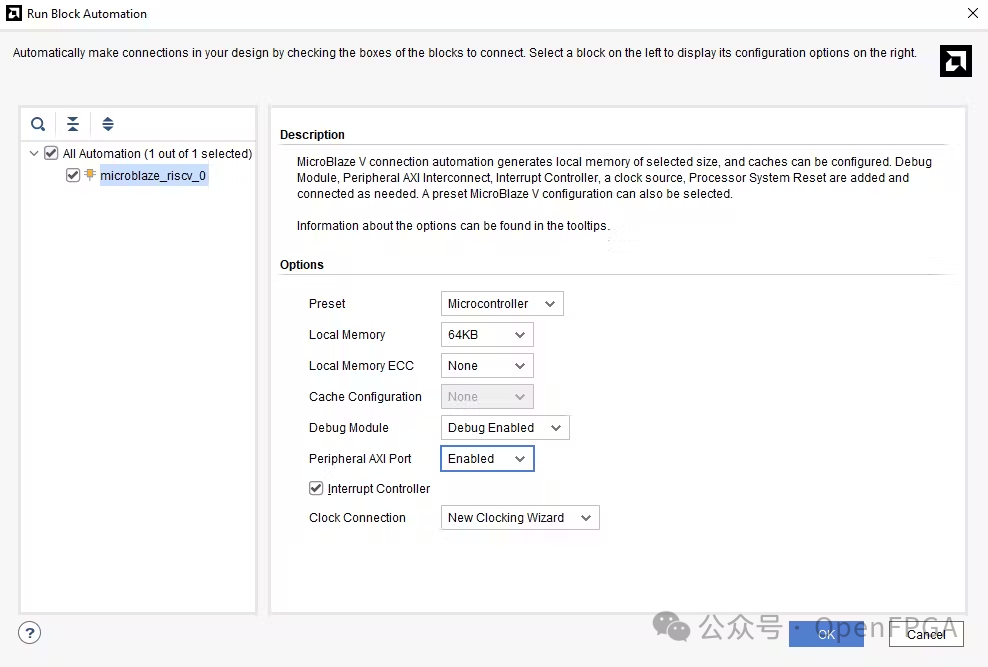
Set up the processor as shown in the following image:
-
64 KB Local Memory -
Enable Debug Module -
Enable Peripheral AXI Port -
Enable New Interrupt Controller and Clock Wizard
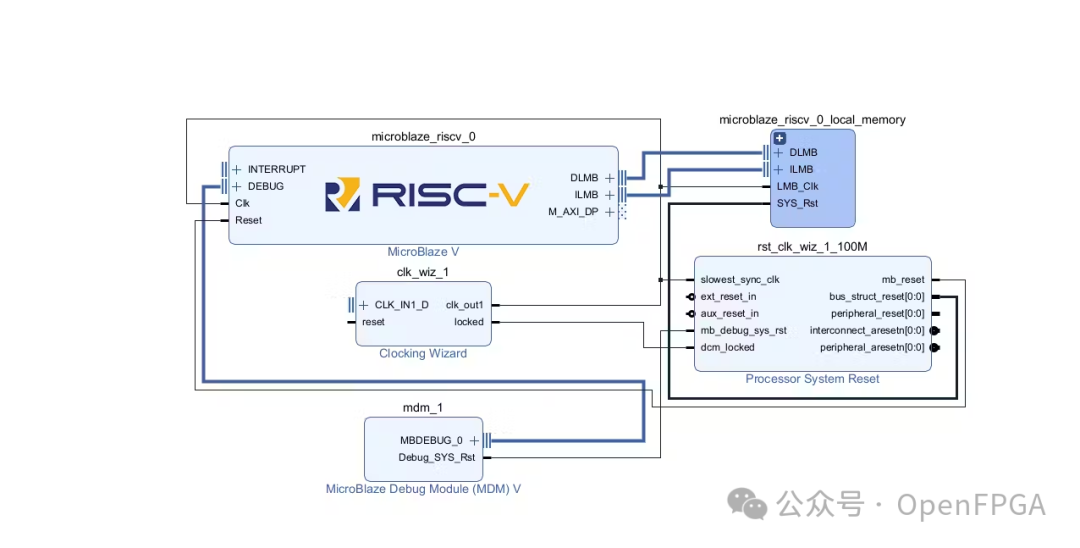
When completed, it should look like this:
The next step is to obtain the Digilent Vivado Library and then add the PWMV2 IP.
https://github.com/Digilent/vivado-library
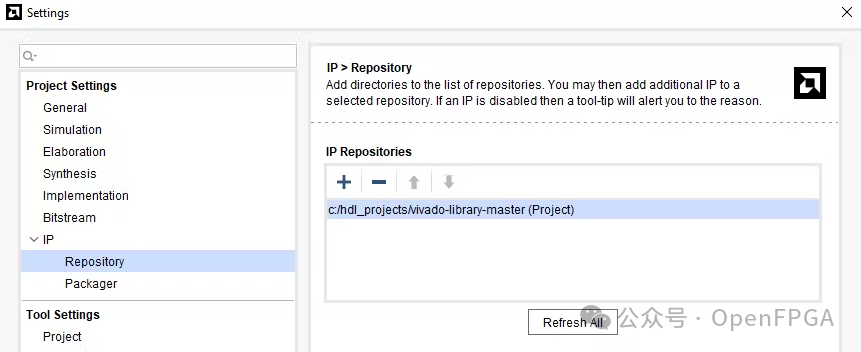
This IP is very suitable for generating PWM and supports multiple PWM outputs.
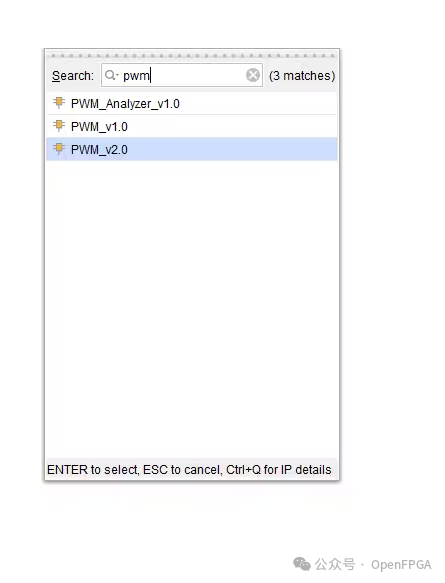
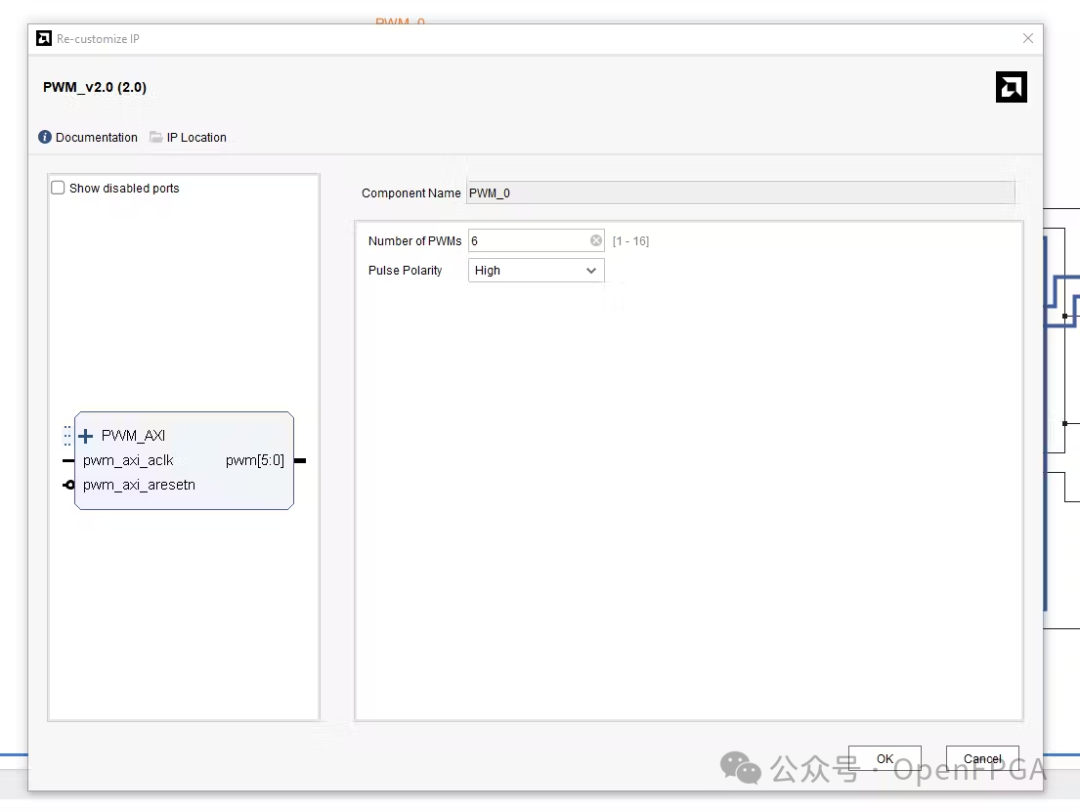
Set this IP as follows:
-
Six PWM outputs
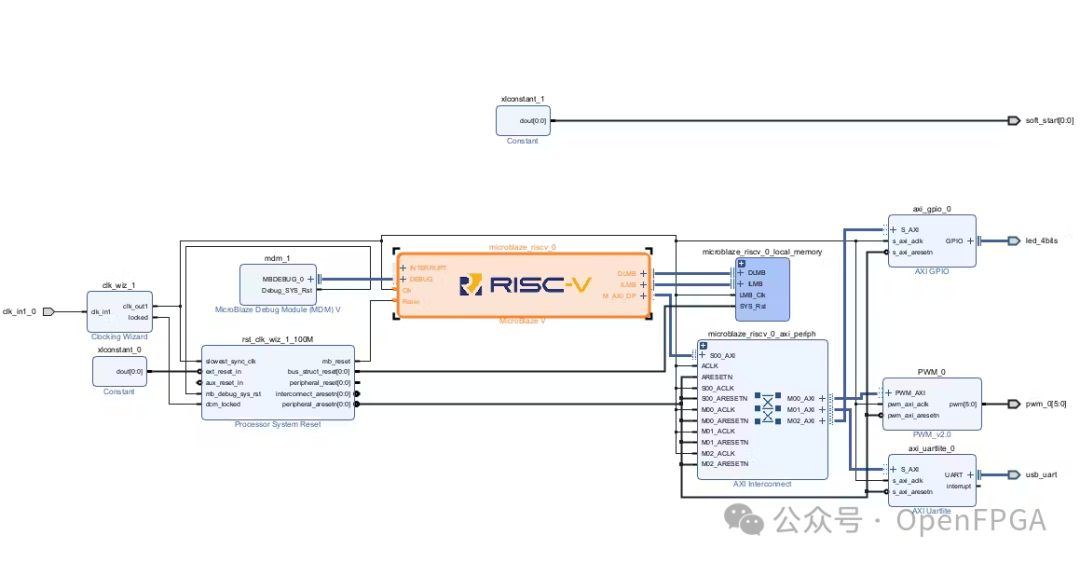
The second to last IP to add is AXI UART.

Finally, a constant IP set to logic high is needed to drive the soft start pin on the robotic arm expansion board.

Then introduce the clock into the system according to the board hardware.
The complete design is shown below.
Then generate the top-level file and add constraints:
set_property IOSTANDARD LVCMOS33 [get_ports {pwm_0[5]}]
set_property IOSTANDARD LVCMOS33 [get_ports {pwm_0[4]}]
set_property IOSTANDARD LVCMOS33 [get_ports {pwm_0[3]}]
set_property IOSTANDARD LVCMOS33 [get_ports {pwm_0[2]}]
set_property IOSTANDARD LVCMOS33 [get_ports {pwm_0[1]}]
set_property IOSTANDARD LVCMOS33 [get_ports {pwm_0[0]}]
set_property PACKAGE_PIN T11 [get_ports {pwm_0[0]}]
set_property PACKAGE_PIN T14 [get_ports {pwm_0[1]}]
set_property PACKAGE_PIN T15 [get_ports {pwm_0[2]}]
set_property PACKAGE_PIN M16 [get_ports {pwm_0[3]}]
set_property PACKAGE_PIN V17 [get_ports {pwm_0[4]}]
set_property PACKAGE_PIN U18 [get_ports {pwm_0[5]}]

set_property IOSTANDARD LVCMOS33 [get_ports {soft_start[0]}]
set_property PACKAGE_PIN R17 [get_ports {soft_start[0]}]
The schematic of the expansion board for this design:
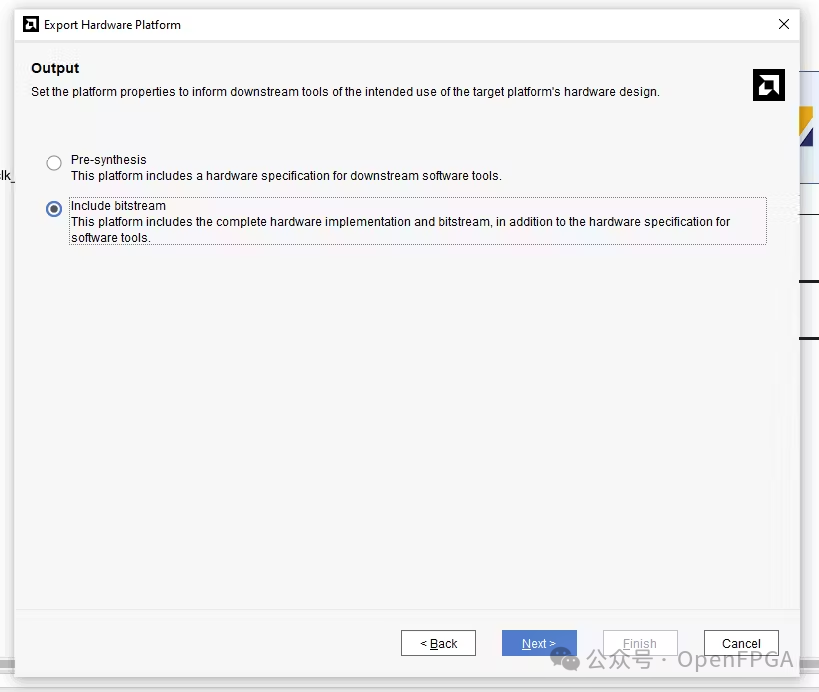
Finally, generate the bitstream and export it to Vitis.
AMD Vitis Design
The next phase of development is to create an application suitable for the AMD MicroBlaze V processor.
First, create a new platform that includes the XSA configuration.
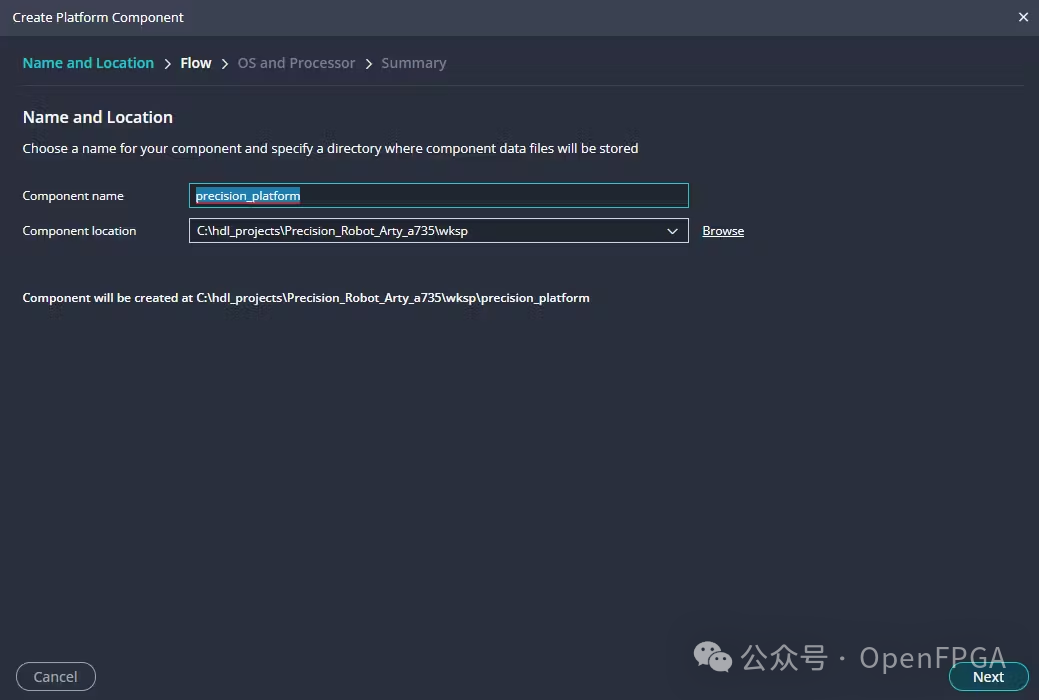
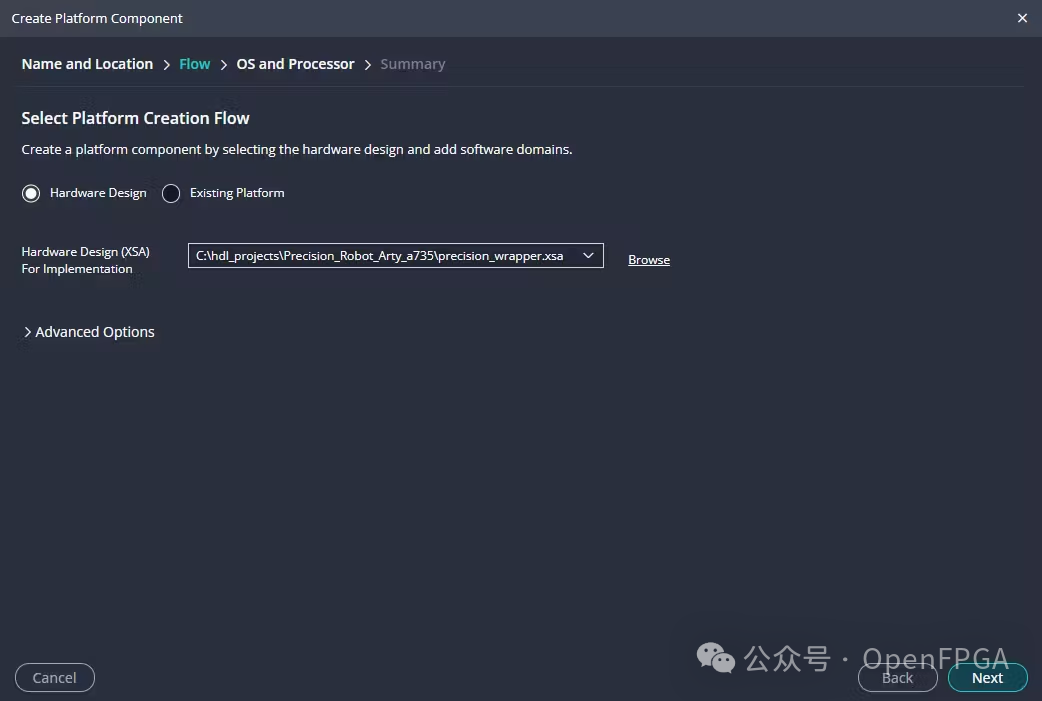
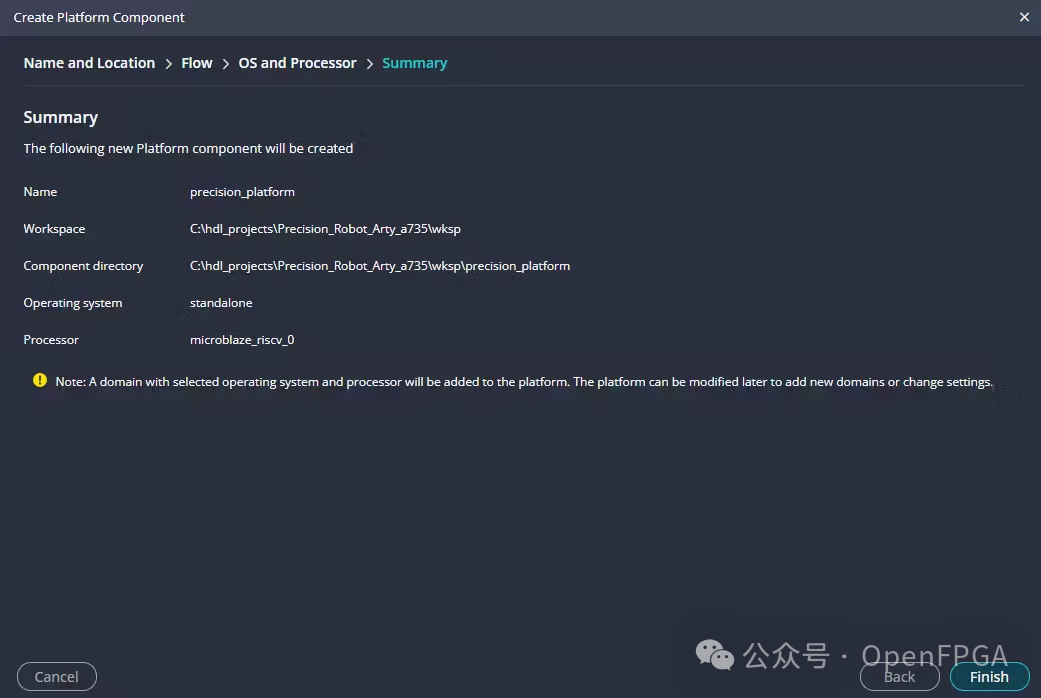
Click “Finish”.
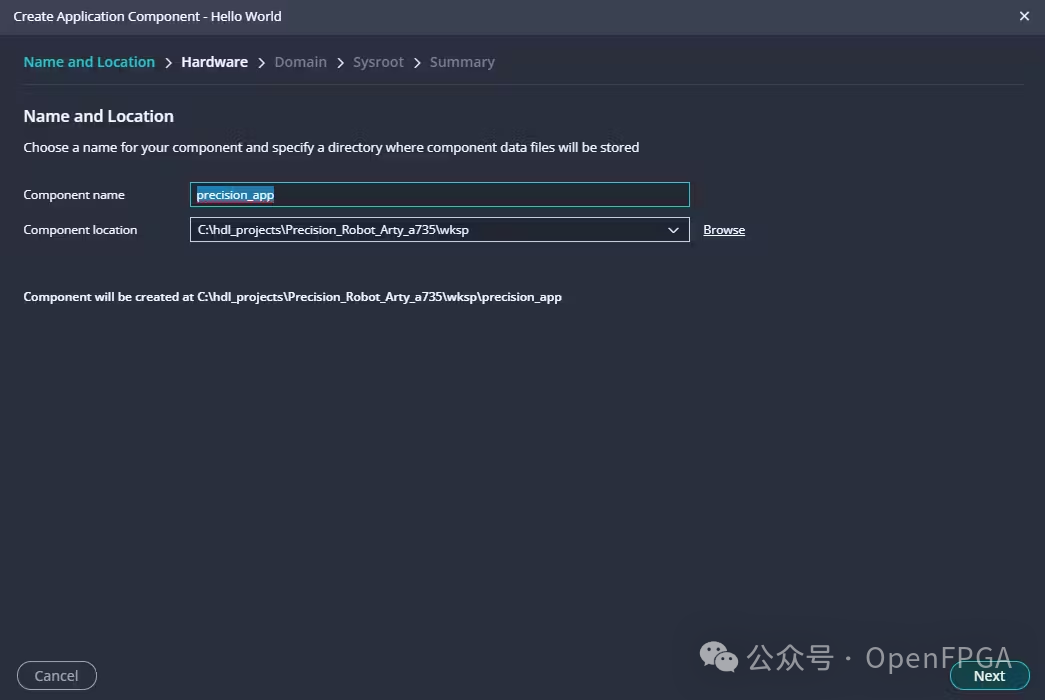
Create a New Application.
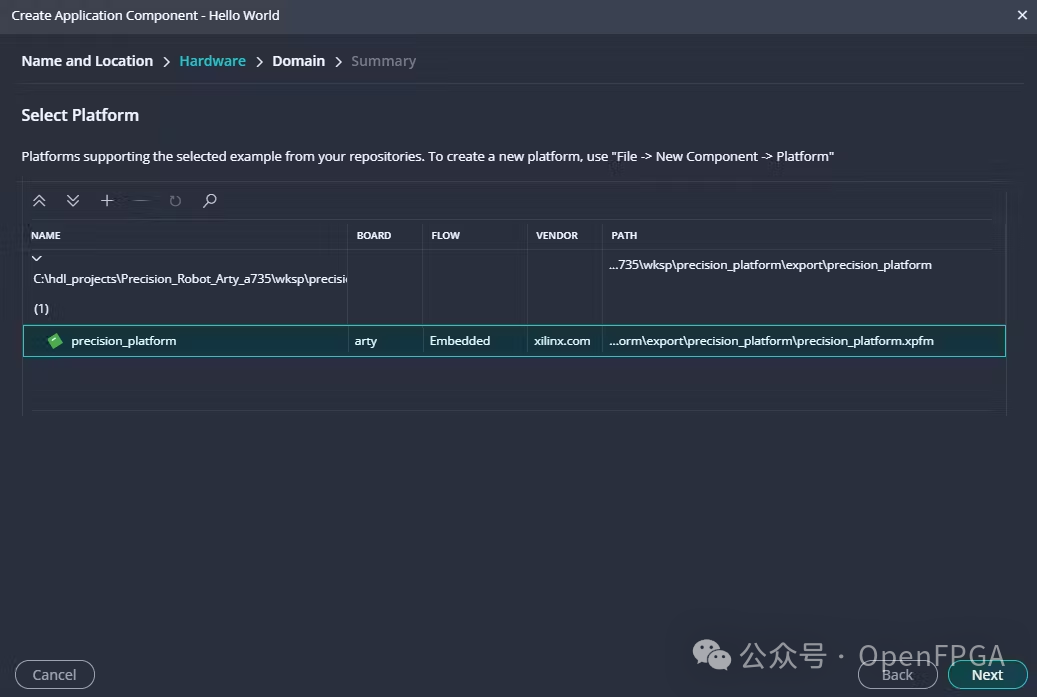
Select the platform we just created.
Next, create files, which can be found in the final open-source link.
The descriptions of the files are as follows:
-
main.c: This file serves as the entry point for the application. It includes master_include.h and defines two main functions: main() and setup_pwm(). The main() function initializes the platform, sets up PWM, and continuously parses user cli_parse_command() commands. The setup_pwm() function is responsible for writing the appropriate values to the control and duty cycle registers to configure the PWM hardware. This file manages the main application flow and hardware interactions. -
cli.h: This is the header file for the command line interface (CLI) functions. It defines several functions and constants that support UART operations and command parsing, such as read_serial(), init_uart0(), and cli_parse_command(). It also declares some global variables used throughout the CLI system. This header file acts as an interface for handling serial communication and command processing functions. -
cli.c: This is the implementation file for the CLI functions declared in cli.h. It includes master_include.h and provides implementations for initializing UART (init_uart0()), reading serial commands (read_serial()), and parsing user commands (cli_parse_command()). It also includes helper functions for type conversion, such as string_to_u8() and char_to_int(). This file manages the interaction between the user and the system, interpreting commands and converting them into corresponding actions. -
master_include.h: This header file serves as the central include point for the project, bringing together various standard and external library header files. It includes libraries such as stdint.h and stdio.h, as well as Xilinx-specific header files (e.g., xil_types.h, xil_io.h). It also includes cli.h for CLI functions and defines constants for PWM register offsets (PWM_AXI_CTRL_REG_OFFSET, PWM_AXI_PERIOD_REG_OFFSET, PWM_AXI_DUTY_REG_OFFSET). This file simplifies the inclusion paths for the required libraries throughout the project, ensuring all necessary dependencies are available.
Key functions used in the cli.c file include:
Convert Angle to Servo Drive Duration.
// Function to convert angle to PWM value
unsigned int angle_to_pwm(int angle) {
    // Clamp angle within valid range
    if (angle < ANGLE_MIN) angle = ANGLE_MIN;
    if (angle > ANGLE_MAX) angle = ANGLE_MAX;
    // Map angle to pulse width in ms
    double pulse_width_ms = MIN_PULSE_WIDTH_MS + ((double)(angle - ANGLE_MIN) / (ANGLE_MAX - ANGLE_MIN)) * (MAX_PULSE_WIDTH_MS - MIN_PULSE_WIDTH_MS);
    // Convert pulse width in ms to counter value
    unsigned int pwm_period = CLOCK_FREQUENCY / PWM_FREQUENCY;
    unsigned int pulse_width_counts = (unsigned int)((pulse_width_ms / 1000.0) * CLOCK_FREQUENCY);
    return pulse_width_counts;
}
Xil Print Float – Allows XIL_PRINTF to print floating-point numbers.
void xil_printf_float(float x){
    int integer, fraction, abs_frac;
    integer = x;
    fraction = (x - integer) * 100;
    abs_frac = abs(fraction);
    xil_printf("%d.%3d\n\r", integer, abs_frac);
}
Joint handling in the CLI loop.
if (strcmp(ptr, "a") == 0)
{
    ptr = strtok(NULL, command_delim);
    val = char_to_int(strlen(ptr), ptr);
    unsigned int pulse_width = angle_to_pwm(val);
    Xil_Out32(XPAR_PWM_0_BASEADDR + PWM_AXI_DUTY_REG_OFFSET,pulse_width);
    val = Xil_In32( XPAR_PWM_0_BASEADDR + PWM_AXI_DUTY_REG_OFFSET);
    xil_printf(" Val: 0x%x (%d)\r\n", val, val);
}
Jupyter Application
The control of the robotic arm uses a Jupyter Lab notebook, which communicates via serial port to implement most of the control functions of the robotic arm.
The code design is as follows:
import serial # pyserial library
import ipywidgets as widgets
from IPython.display import display, clear_output
import json
import time

# Define the serial port and the baud rate
port = 'COM4'  # Replace with your serial port name, e.g., '/dev/ttyUSB0' on Linux
baud_rate = 9600  # Common baud rate
try:
    # Open the serial port
    #ser = serial.Serial(port, baud_rate, timeout=1)

    # Function to send command to the serial port
    def send_command(change):
        joint = change['owner'].description.split(' ')[1].lower()  # Get joint identifier
        angle = change['new']
        command = f"{joint} {angle}\n\r"
        print(f"Message to be sent: {command.strip()}")
        ser.write(command.encode('ascii'))
        clear_output(wait=True)  # Clear previous output to keep it clean
        print(f"Sent command: {command.strip()}")

    # Function to save the current joint settings to a file
    def save_settings():
        with open('joint_settings.json', 'a') as file:
            for joint, value in sliders.items():
                command = f"{joint} {value.value}\n"
                file.write(command)
        print("Joint settings saved to joint_settings.json")

    # Function to execute the settings from the file
    def execute_saved_settings():
        try:
            with open('joint_settings.json', 'r') as file:
                for line in file:
                    joint, angle = line.strip().split()
                    command = f"{joint} {angle}\n\r"
                    ser.write(command.encode('ascii'))
                    sliders[joint].value = int(angle)  # Update slider to reflect current position
                    print(f"Executing command: {command.strip()}")
        except FileNotFoundError:
            print("No saved settings file found.")

    # Function to reset all joints to 90 degrees
    def home_position():
        for joint, slider in sliders.items():
            slider.value = 90
            command = f"{joint} 90\n\r"
            ser.write(command.encode('ascii'))
            print(f"Resetting {joint} to 90 degrees")
        print("All joints reset to home position (90 degrees).")

    # Function to transition a joint from a start point to an end point
    def transition_joint(joint, start, end, step=1, delay=0.05):
        if start < end:
            for angle in range(start, end + 1, step):
                command = f"{joint} {angle}\n\r"
                ser.write(command.encode('ascii'))
                sliders[joint].value = angle  # Update slider to reflect current position
                print(f"Transitioning {joint} to {angle} degrees")
                time.sleep(delay)
        else:
            for angle in range(start, end - 1, -step):
                command = f"{joint} {angle}\n\r"
                ser.write(command.encode('ascii'))
                sliders[joint].value = angle  # Update slider to reflect current position
                print(f"Transitioning {joint} to {angle} degrees")
                time.sleep(delay)

    # Function to get the current position of all sliders
    def get_current_positions():
        positions = {joint: slider.value for joint, slider in sliders.items()}
        print("Current joint positions:", positions)
        return positions

    # Function to execute saved settings by transitioning joints
    def execute_saved_settings_with_transition():
        try:
            with open('joint_settings.json', 'r') as file:
                for line in file:
                    joint, target_angle = line.strip().split()
                    target_angle = int(target_angle)
                    current_positions = get_current_positions()
                    start_angle = current_positions[joint]
                    transition_joint(joint, start_angle, target_angle)
        except FileNotFoundError:
            print("No saved settings file found.")

    # Create sliders for each joint (a to f)
    sliders = {}
    slider_widgets = []
    for joint in ['a', 'b', 'c', 'd', 'e', 'f']:
        slider = widgets.IntSlider(value=90, min=0, max=180, step=1, description=f'Joint {joint.upper()}')
        slider.observe(send_command, names='value')
        sliders[joint] = slider
        slider_widgets.append(slider)
    sliders_box = widgets.VBox(slider_widgets)

    # Button to save the current joint settings
    save_button = widgets.Button(description="Save Current Settings")
    save_button.on_click(lambda x: save_settings())
    display(save_button)

    # Button to execute the saved settings
    execute_saved_button = widgets.Button(description="Execute Saved Settings")
    execute_saved_button.on_click(lambda x: execute_saved_settings())
    display(execute_saved_button)

    # Button to reset all joints to home position
    home_button = widgets.Button(description="Home Position")
    home_button.on_click(lambda x: home_position())
    display(home_button)

    joint_selector = widgets.Dropdown(options=['a', 'b', 'c', 'd', 'e', 'f'], description='Joint:')
    start_box = widgets.BoundedIntText(value=0, min=0, max=180, step=1, description='Start:')
    end_box = widgets.BoundedIntText(value=180, min=0, max=180, step=1, description='End:')
    move_button = widgets.Button(description="Move Joint")

    transition_box = widgets.HBox([joint_selector, start_box, end_box, move_button])

    # Button to execute saved settings with transition
    execute_transition_button = widgets.Button(description="Execute Saved Settings with Transition")
    execute_transition_button.on_click(lambda x: execute_saved_settings_with_transition())
    display(execute_transition_button)

    def on_move_button_click(_):
        joint = joint_selector.value
        start = start_box.value
        end = end_box.value
        transition_joint(joint, start, end)

    move_button.on_click(on_move_button_click)

    # Button to get current positions of sliders
    get_positions_button = widgets.Button(description="Get Current Positions")
    get_positions_button.on_click(lambda x: get_current_positions())

    close_button = widgets.Button(description="Close Serial Port")
    close_button.on_click(lambda x: close_serial_port())
    display(close_button)

    # Arrange buttons in a structured layout
    buttons_box = widgets.VBox([
        widgets.HBox([save_button, execute_saved_button, execute_transition_button]),
        widgets.HBox([home_button, get_positions_button, close_button])
    ])

    # Display all widgets in a structured layout
    display(sliders_box, transition_box, buttons_box)

    # Close the serial port when done
    def close_serial_port():
        if ser.is_open:
            ser.close()
            print("Serial port closed.")

    # Create a button to close the serial port


except serial.SerialException as e:
    print(f"Error: {e}")
except Exception as e:
    print(f"An unexpected error occurred: {e}")
This code aims to provide an interactive interface for communication with the robotic arm.
To make the Jupyter Lab notebook interactive, a series of sliders and buttons are created using the ipywidgets library, allowing users to adjust the positions of each joint of the robot, save, execute specific joint configurations, and transition smoothly between positions.
The core functionality is established using the PySerial() library to communicate with the AMD MicroBlaze V via serial. This allows commands to be sent directly to the robotic arm based on interactions within the Jupyter Lab notebook.
Using interactive widgets simplifies the process of controlling complex multi-joint movements by enabling real-time visualization and adjustments of the robot’s state. These position indicators update during the application runtime, showing the current positions of the arm joints.

Each joint is represented by a slider widget, which can be set to values between 0 and 180 degrees. Whenever the user changes the value of the slider, the corresponding joint is updated immediately by sending a command to the AMD MicroBlaze V via the serial port.
To facilitate the arm’s ability to replace sequences, buttons are provided to save the current joint configuration to a file.
This allows users to move the arm to a position and store that position, then move it to the next position and store that position again. Like a walk-stop animation, this enables the robotic arm to establish a movement sequence. The commands are stored in a simple json file.
The saved sequence can then be executed using the button for executing saved sequences.
To ensure smooth movements without jerkiness, a Python function is provided, which implements a smooth transition function.
This function iteratively changes the joint values in small steps, sending incremental commands with slight delays in between.
To ensure a smooth and user-friendly experience, the code also includes functionality for safely closing the serial port and displaying the current positions of all joints.
Test Video
Summary
This project demonstrates how to create a CLI to control the PWM drivers of a robotic arm. A detailed Python application is also created, which works with the AMD MicroBlaze™ V, and further interesting robotic applications can be developed. Therefore, this project is very suitable for learning about robotic development, FPGA, and embedded system development.
The completed project link is as follows:
https://github.com/ATaylorCEngFIET/Arty_a7_precision