In the view of 3D Science Valley, detection in traditional manufacturing mainly serves quality inspection, whereas in the additive manufacturing sector, detection is actually core to the process. This is not only due to the value of detection but also the value of big data. This plays a crucial role in product quality management (from raw material input, processing, processing results, to the final product after post-processing) to understanding and improving processes (through data correlation analysis, artificial intelligence processing of detection and other data), and later certification (how to pass various certifications in aviation, automotive, etc.). Detection is essentially the lifeline of additive manufacturing.
microCT – Micro-Computed Tomography

Just as engineers have long used standard X-ray inspections to check the internal structure of traditional manufacturing parts, according to market research by 3D Science Valley, developers and quality assurance personnel worldwide are now beginning to apply the deeper functionalities of microCT – Micro-Computed Tomography to parts produced by additive manufacturing (AM).
Micro-CT is a three-dimensional X-ray imaging technique that uses the same method as hospital CT scans but on a much smaller scale, significantly enhancing resolution. Micro-CT is a true three-dimensional microscopy technique, allowing for precise imaging of the intricate internal structures of objects.
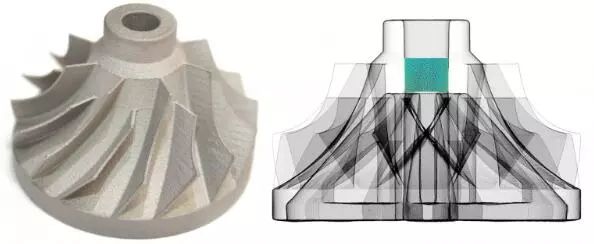
For instance, in the case of a 5 cm diameter impeller made of 17-4 stainless steel, the internal and external surfaces identified in a microCT scan are presented on the right side of the image below. The scan was completed in 3.5 hours with a voxel size of 43μm. If internal microCT scanning is required to analyze surface roughness areas, an additional 1.5 hours is needed, with a voxel size of 15μm.

Image Source: Expanse Microtechnologies
One of the many advantages of metal additive manufacturing is the ability to produce complex internal structures. Not only do the parts meet dimensional specifications visually, but due to the laser 3D printing technology being a point-by-point discrete melting deposition method, the laser heating area at each point is small, allowing heat from the melt pool to dissipate rapidly into the substrate. This results in a cooling rate of the melt pool that far exceeds the critical cooling rate of amorphous alloys, allowing the melt pool to avoid crystallization during solidification, thus achieving an amorphous state. This enables the possibility of fabricating amorphous alloys without size limitations. Additionally, laser 3D printing uses metal powder as raw material, melting and stacking the powder layer by layer with a high-energy laser beam, completing the manufacturing of fully dense, high-performance, complex metal parts in a single step from a digital model, providing an ideal means for fabricating complex amorphous alloys.
High Resolution at Large Working Distances (RaaD) Imaging

According to market observations from 3D Science Valley, international efforts are underway to use MicroCT for non-destructive testing from powder to parts. While prototypes and sample parts can be examined for internal details through physical slicing (destructive testing) and imaging methods, destructive testing not only results in waste from part destruction but also provides fragmented data that cannot be used for correlation analysis with processing parameters, thereby losing the value of big data.

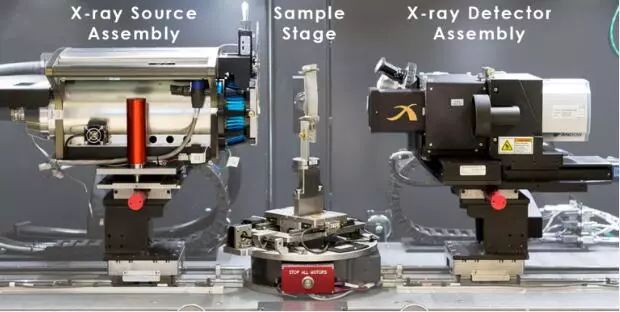
Image: Zeiss Xradia 520 Versa Internal Components
According to market observations by 3D Science Valley, the Zeiss Xradia 520 Versa X-ray achieves non-destructive 3D imaging, expanding the application limits of non-destructive imaging with its high resolution and contrast imaging technology. Traditional X-ray tomography relies on single geometric magnification, while the high-resolution imaging of the Xradia 520 Versa is achieved through optical devices with two-stage magnification. The benefit of two-stage magnification is the ability to achieve “High Resolution at Large Working Distances (RaaD)” imaging, maintaining sub-micron resolution at larger and more flexible working distances. By employing advanced imaging contrast capabilities (such as patented enhanced absorption contrast technology and adjustable propagation phase contrast technology), images of challenging samples can be obtained. The enhanced absorption contrast detector collects low-energy X-ray photons that generate contrast differences to a greater extent, which is crucial for imaging different material types. Furthermore, 3D Science Valley understands that the Xradia 520 Versa can non-destructively characterize the 3D microstructure of materials, uniquely characterizing the microstructure and temporal evolution (4D) features of in situ experiments.


MicroCT equipment can detect metals from various alloys such as aluminum and titanium (like stainless steel and chromium-nickel iron alloys), primarily depending on the energy of the X-rays emitted from the light source. According to market observations by 3D Science Valley, regarding 3D printing, Zeiss has developed a microscopy technology solution related to additive manufacturing that can:
– Gain insights into the causes of defects, such as impurities, residues, and incorrect geometries.
– Understand the impact of material properties, powder quality, laser parameters, and layout from CAD drawings.
– Utilize high-contrast, high-resolution imaging to distinguish different phases within materials.
– Non-destructively confirm three-dimensional sub-surface features within the microstructure.
A video shows the MicroCT scanning of metal additive manufacturing raw powder. Scanning at a voxel size of 2μm lasts for 2 hours. Typically, imaging tens of thousands of particles in a single scan can identify foreign particle contamination and provide statistical data on particle size, shape, and porosity.
The Role of Big Data from Raw Material Detection to Printing Result Detection

The application scope of microCT covers a large part of the entire additive manufacturing process, including characterization of raw powder, optimization of build process parameters, and inspection of 3D printed or post-processed parts. In terms of raw material detection, microCT image data can be used to detect foreign particle contaminants, measure particle size and shape distribution, and detect porosity within particles. Metal raw powders used for additive manufacturing can be characterized using microCT scans in terms of particle size, shape, and porosity.
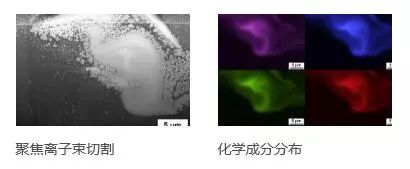
The printing result is another aspect of CT detection. Taking the Zeiss associated microscopy technology as an example, it has been proven to successfully identify impurities in 3D printed parts and understand their causes through the application of multiple workflows. The Zeiss Xradia Versa is used for large-scale scanning, then suspicious bright spots are transferred to the Zeiss Crossbeam for relocation, and finally analyzed using EDX. This method can identify the source of impurities, which often stem from previous 3D printing operations where different powder materials were used without thoroughly cleaning the powder containers.
With this data, process parameter optimization can be constructed by systematically studying the impact of different parameter settings on the desired results (porosity, surface finish, etc.), with results measured by microCT on carefully designed test specimens. For parts produced by 3D printing or post-processing, various measurements can be conducted, including surface and dimensional measurements or internal void measurements in terms of size, shape, and spatial distribution.
Of course, there is still a long way to go to achieve better process control through detection data. In the view of 3D Science Valley, this includes not only the challenges of algorithm capabilities based on big data but also the challenges of detection technology accuracy and speed.
White PaperData Download, please join3D Science Valley 3DIndustry Chain QQ Group:529965687
For more information or to find previous articles, please visit www.51shape.com and search keywords on the homepage.
Welcome to reprint. For long-term reprint authorization, please leave a message directly below this article.
Further Reading:
Interview with BHGE Detection Control Global CEO
Driving 3D Printing to Become a Mainstream Manufacturing Technology through Rapid Part Inspection
How to Control the Quality of Metal 3D Printing? How about a “Print Preview”?
Feedforward Control: Is it Going to Disrupt 3D Printing Technology Itself?
An Overview of Quality Control in Metal Printing Processes