In this article, we will implement the functionality of pushing video streams from the ESP32-CAM to a server, which will then forward the video stream. This is a preparation for future applications such as 5G network video remote-controlled cars, video surveillance, and live streaming. To facilitate learning for beginners, this article highlights the main functionalities that need to be implemented. In actual usage, considerations for authorization, encryption, and security must also be taken into account. The functionality implemented in this article only forwards the video stream from a single video device; in practical applications, it should be expanded to support multiple video devices.
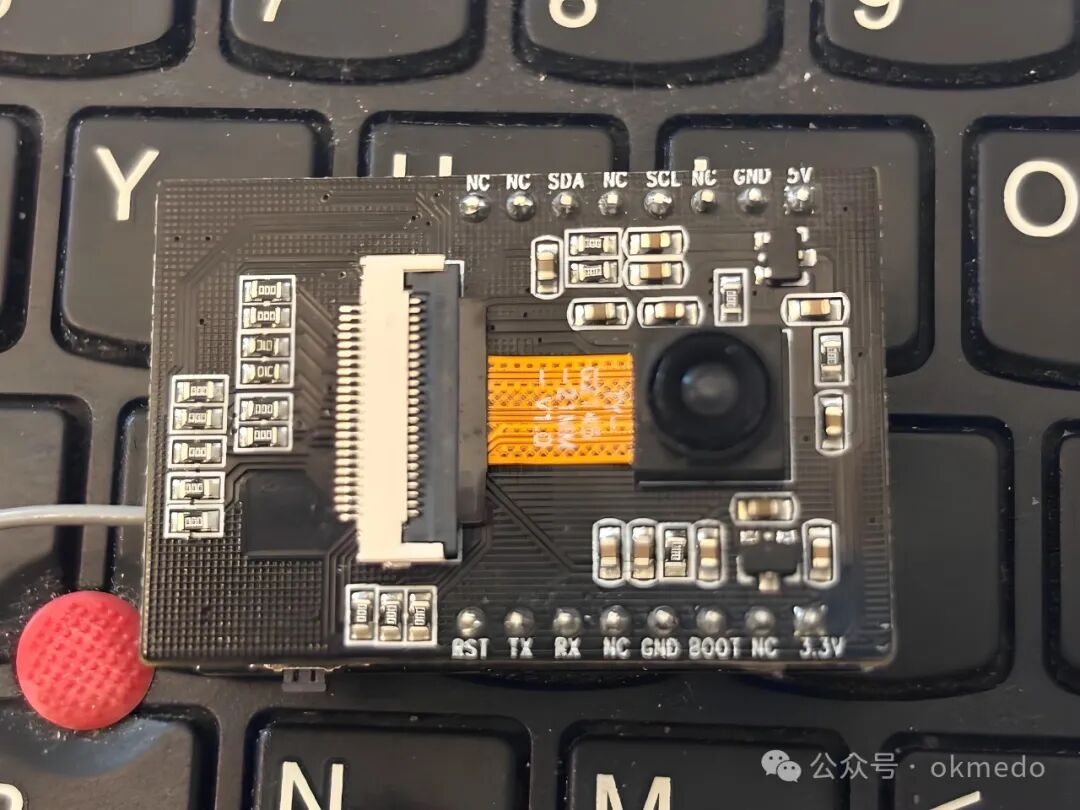
1. ESP32-CAM Module Used in This Article

2. Development Platform Chosen for This Article
The development software chosen for the ESP32-CAM module as the video stream pushing device is Arduino. The server-side software used for forwarding the video stream is SharpDevelop 5.0, a lightweight and user-friendly C# development environment.
3. Functional Logic Topology Diagram Implemented in This Article
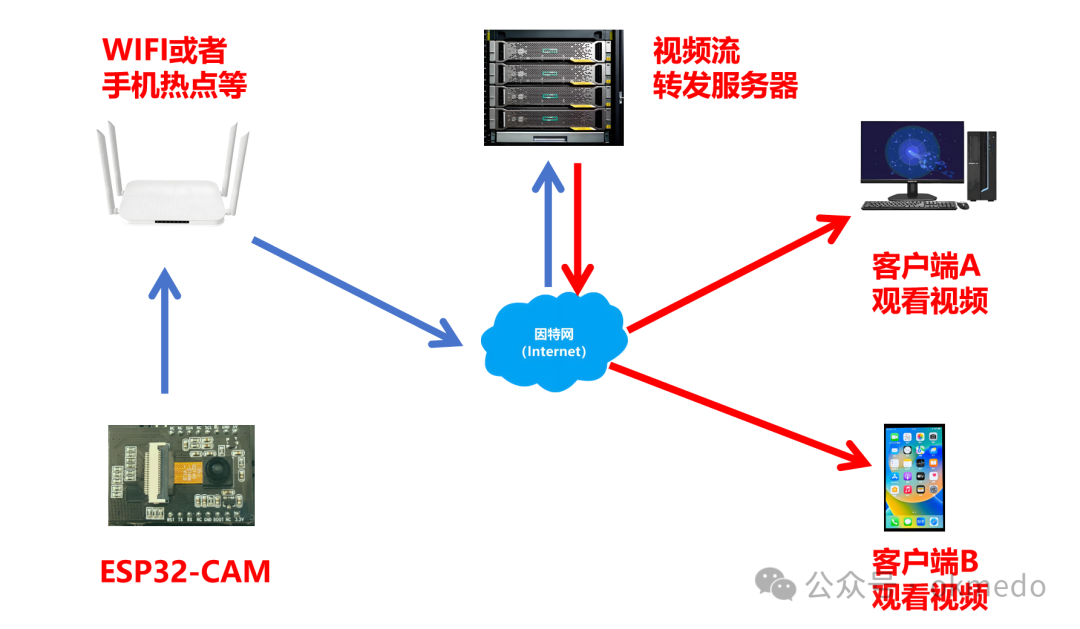
1. The ESP32-CAM connects to a Wi-Fi network or mobile hotspot.
2. The ESP32 captures video image data frames.
3. The video image data frames are pushed to the internet video stream forwarding server via the Wi-Fi network.
4. Clients watching the video access the video stream forwarding server to view the video stream.
4. ESP32-CAM Video Stream Pushing Program Code
#include "esp_camera.h"
#include <WiFi.h>
#define CAMERA_MODEL_ESP32S3_EYE // Has PSRAM
#define FRAMES_PER_SECOND 12
#include "camera_pins.h"
#include "HTTPClient.h"
camera_fb_t *fb = NULL;
uint8_t *_jpg_buf;
size_t _jpg_buf_len;
HTTPClient http;
String temp;
void Camera_init();
void upload_frame();
void WIFI_STA_INIT();
String localIP="";
void setup() {
Serial.begin(115200);
Camera_init();
WIFI_STA_INIT();
Serial.print("Camera Ready! Use 'http://");
localIP=WiFi.localIP().toString();
Serial.print(localIP);
Serial.println("' to connect");
}
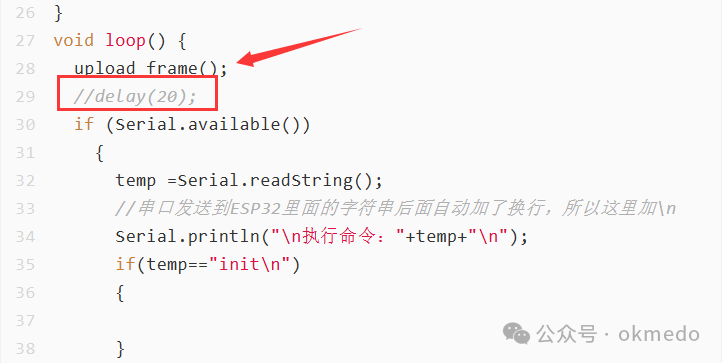
void loop() {
upload_frame();
//delay(20);
if (Serial.available()) {
temp =Serial.readString();
//串口发送到ESP32里面的字符串后面自动加了换行,所以这里加\n
Serial.println("\n执行命令:"+temp+"\n");
if(temp=="init\n") {
}
}
//Serial.println(millis()); // delay(1000);
}
void WIFI_STA_INIT() {
WiFi.disconnect(); //先关闭已有的WIFI连接
WiFi.mode(WIFI_STA); //STA
//AP模式IP配置
// 配置固定IP
//设备IP,默认网关,子网掩码,首选DNS,备用DNS
//if (!WiFi.config(IPAddress(192,168,1,188),IPAddress(192,168,1,1),IPAddress(255,255,255,0),IPAddress(192,168,1,1),IPAddress(192,168,1,1))) {
// Serial.println("STA Failed to configure");
//}
WiFi.begin(ssid, password); //你的WIFI名称及密码
WiFi.setSleep(false);
while (WiFi.status() != WL_CONNECTED) {
delay(500);
Serial.print(".");
}
Serial.println("WiFi connected");
}
void upload_frame() {
fb = esp_camera_fb_get();
if(!fb) {
Serial.println("摄像头捕获失败");
return;
}
// 转换JPEG
if(!frame2jpg(fb, 80, &_jpg_buf, &_jpg_buf_len)) {
Serial.println("JPEG转换失败");
esp_camera_fb_return(fb);
return;
}
//http.begin("http://192.168.1.102:8080/upload");
http.setReuse(false); // 禁用连接复用
//http.setTimeout(5000); // 设置5秒超时
// http://192.168.0.102:8080/upload
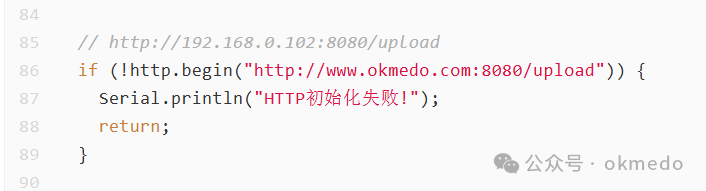
if (!http.begin("http://www.okmedo.com:8080/upload")) {
Serial.println("HTTP初始化失败!");
return;
}
http.addHeader("Content-Type", "image/jpeg");
int httpResponseCode = http.POST(_jpg_buf,_jpg_buf_len);
if(httpResponseCode != 200) {
Serial.printf("上传失败,错误码:%d\n", httpResponseCode);
}
if(httpResponseCode <= 0) {
Serial.printf("HTTP错误代码: %d\n", httpResponseCode);
Serial.printf("内部错误信息: %s\n", http.errorToString(httpResponseCode).c_str());
Serial.printf("响应头: %s\n", http.header("Server").c_str());
}
http.end();
// 清理资源
esp_camera_fb_return(fb);
free(_jpg_buf);
fb = NULL;
_jpg_buf = NULL;
}
//摄像头初始化
void Camera_init() {
camera_config_t config;
config.ledc_channel = LEDC_CHANNEL_0;
config.ledc_timer = LEDC_TIMER_0;
config.pin_d0 = Y2_GPIO_NUM;
config.pin_d1 = Y3_GPIO_NUM;
config.pin_d2 = Y4_GPIO_NUM;
config.pin_d3 = Y5_GPIO_NUM;
config.pin_d4 = Y6_GPIO_NUM;
config.pin_d5 = Y7_GPIO_NUM;
config.pin_d6 = Y8_GPIO_NUM;
config.pin_d7 = Y9_GPIO_NUM;
config.pin_xclk = XCLK_GPIO_NUM;
config.pin_pclk = PCLK_GPIO_NUM;
config.pin_vsync = VSYNC_GPIO_NUM;
config.pin_href = HREF_GPIO_NUM;
config.pin_sccb_sda = SIOD_GPIO_NUM;
config.pin_sccb_scl = SIOC_GPIO_NUM;
config.pin_pwdn = PWDN_GPIO_NUM;
config.pin_reset = RESET_GPIO_NUM;
config.xclk_freq_hz = 15000000;
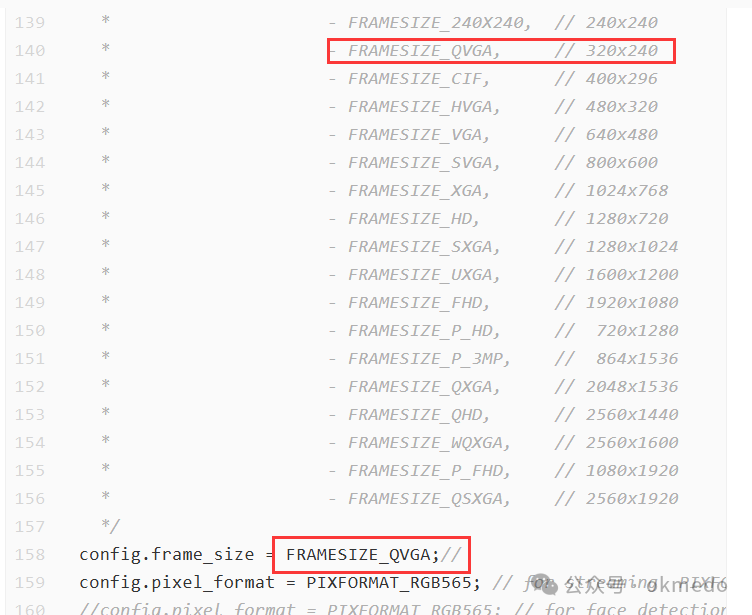
/* @param frame_size One of * - FRAMESIZE_96X96, // 96x96 * - FRAMESIZE_QQVGA, // 160x120 * - FRAMESIZE_QCIF, // 176x144 * - FRAMESIZE_HQVGA, // 240x176 * - FRAMESIZE_240X240, // 240x240 * - FRAMESIZE_QVGA, // 320x240 * - FRAMESIZE_CIF, // 400x296 * - FRAMESIZE_HVGA, // 480x320 * - FRAMESIZE_VGA, // 640x480 * - FRAMESIZE_SVGA, // 800x600 * - FRAMESIZE_XGA, // 1024x768 * - FRAMESIZE_HD, // 1280x720 * - FRAMESIZE_SXGA, // 1280x1024 * - FRAMESIZE_UXGA, // 1600x1200 * - FRAMESIZE_FHD, // 1920x1080 * - FRAMESIZE_P_HD, // 720x1280 * - FRAMESIZE_P_3MP, // 864x1536 * - FRAMESIZE_QXGA, // 2048x1536 * - FRAMESIZE_QHD, // 2560x1440 * - FRAMESIZE_WQXGA, // 2560x1600 * - FRAMESIZE_P_FHD, // 1080x1920 * - FRAMESIZE_QSXGA, // 2560x1920 */ config.frame_size = FRAMESIZE_QVGA; // config.pixel_format = PIXFORMAT_RGB565; // for streaming PIXFORMAT_RGB565 //config.pixel_format = PIXFORMAT_RGB565; // for face detection/recognition config.grab_mode = CAMERA_GRAB_WHEN_EMPTY;
config.fb_location = CAMERA_FB_IN_PSRAM;
config.jpeg_quality = 6; //12
config.fb_count = 1;
// if PSRAM IC present, init with UXGA resolution and higher JPEG quality // for larger pre-allocated frame buffer. if(config.pixel_format == PIXFORMAT_JPEG) {
if(psramFound()) {
config.jpeg_quality = 10;
config.fb_count = 2;
config.grab_mode = CAMERA_GRAB_LATEST;
} else {
// Limit the frame size when PSRAM is not available
config.frame_size = FRAMESIZE_VGA;
config.fb_location = CAMERA_FB_IN_DRAM;
}
} else {
// Best option for face detection/recognition
// config.frame_size = FRAMESIZE_240X240;
#if CONFIG_IDF_TARGET_ESP32S3
config.fb_count = 2;
#endif
}
#if defined(CAMERA_MODEL_ESP_EYE)
pinMode(13, INPUT_PULLUP);
pinMode(14, INPUT_PULLUP);
#endif
// camera init
esp_err_t err = esp_camera_init(&config);
if (err != ESP_OK) {
Serial.printf("Camera init failed with error 0x%x", err);
return;
}
Serial.println("Camera init ok");
sensor_t * s = esp_camera_sensor_get();
}Points to Note:
1. The functionality to be implemented in this article is to allow the video from the ESP32-CAM to be viewed over the internet through the pushing and forwarding of video streams. Therefore, before studying the content of this article, you can refer to this article on implementing first-person perspective FPV video remote control functionality based on the ESP32-CAM vision module, which first achieves normal access to the ESP32-CAM video within a local area network.
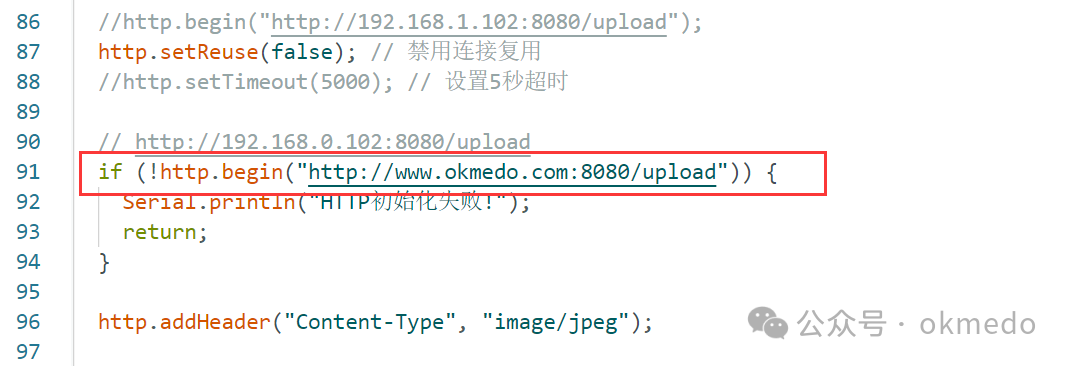
2. Below is the function that calls to submit the video image data frames to the video stream forwarding server via POST. During the debugging phase, you can uncomment the delay below and set it to around 2000ms, so that you can see the status of each frame of image data in the output logs of the forwarding server.
3. Here, you mainly set the address of your video stream forwarding server. During debugging, it is generally the local machine’s IP address, which acts as both the client and the video stream forwarding server, as well as the client for viewing the video. It is important to note that the local firewall may sometimes block connection access, resulting in the local server being inaccessible. You can check the firewall configuration and it is best to disable the firewall.
4. Here, you mainly configure the video resolution. The higher the resolution, the clearer the image, but it requires a higher network bandwidth and may cause lag. If you feel the video is not smooth, you can adjust the configuration here.

5. Video Stream Forwarding Server Program (C#)
using System;
using System.IO;
using System.Net;
using System.Text;
using System.Threading;
//注意防火墙
class Program {
// 共享帧数据
private static byte[] _latestFrame = Array.Empty<byte>();
private static DateTime _lastUpdate = DateTime.MinValue;
private static readonly object _frameLock = new object();
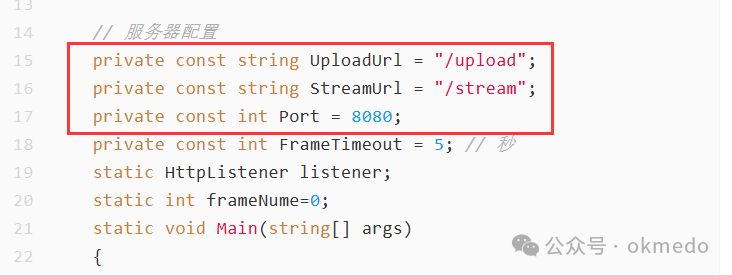
// 服务器配置
private const string UploadUrl = "/upload";
private const string StreamUrl = "/stream";
private const int Port = 8080;
private const int FrameTimeout = 5; // 秒
static HttpListener listener;
static int frameNume=0;
static void Main(string[] args) {
AppDomain.CurrentDomain.ProcessExit+= new EventHandler(OnProcessExit);
//Console.ReadKey();
//Thread HTTPServer = new Thread(HTTPServerFun);
//HTTPServer.Name = "HTTPServer";
//HTTPServer.Start();
HTTPServerFun();
while(true) {
Thread.Sleep(1000); //避免CPU占用过高
}
}
static void HTTPServerFun() {
listener = new HttpListener();
listener.Prefixes.Add("http://*:"+Port+"/"); //要注意需要管理员权限
listener.Start();
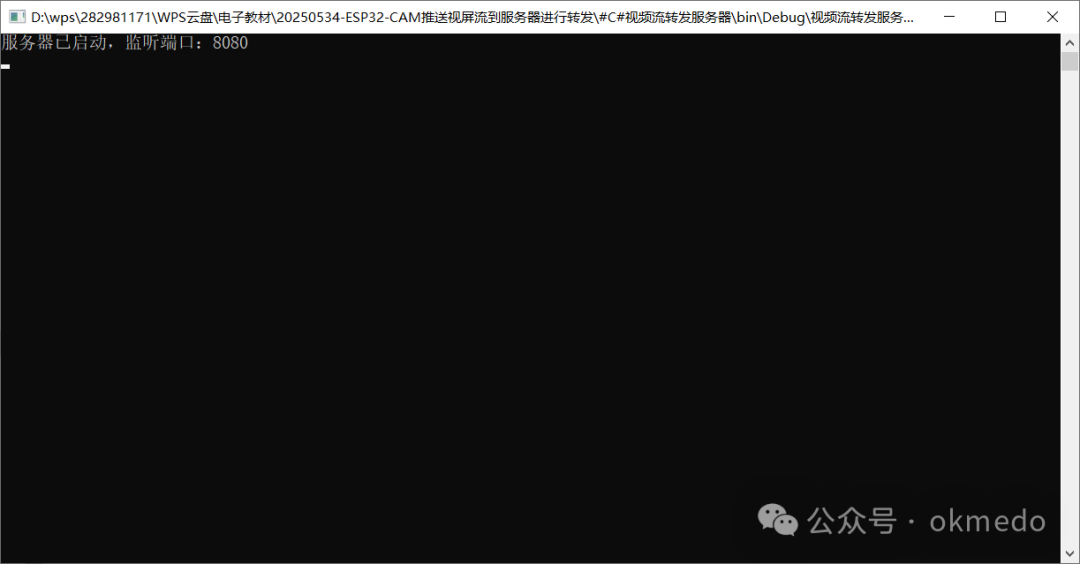
Console.WriteLine("服务器已启动,监听端口:"+Port);
listener.BeginGetContext(HandleRequest, null);
}
static void OnProcessExit(object sender, EventArgs e) {
try {
listener.Stop();
listener.Close();
} catch(Exception ex) {}
}
private static void HandleRequest(IAsyncResult result) {
try {
// 获取请求上下文
HttpListenerContext context =listener.EndGetContext(result);
// 继续监听下一个请求(保持循环)
listener.BeginGetContext(HandleRequest, null);
// 使用线程池处理当前请求(避免阻塞监听循环)
//ThreadPool.QueueUserWorkItem(ProcessRequest,context);
ProcessRequest(context);
} catch (ObjectDisposedException) {
// 监听器已关闭,忽略异常
} catch (Exception ex) {
Console.WriteLine("Error accepting request:"+ex);
}
}
private static void ProcessRequest(HttpListenerContext context) {
try {
HttpListenerRequest request = context.Request;
HttpListenerResponse response = context.Response;
if (request.HttpMethod == "POST"&&request.Url.AbsolutePath == UploadUrl) {
HandleUpload(request,response);
} else if (request.HttpMethod == "GET"&&request.Url.AbsolutePath == StreamUrl) {
HandleStream(response);
} else {
response.StatusCode = 404;
response.Close();
}
} catch (Exception ex) {
context.Response.StatusCode = 500;
var error = Encoding.UTF8.GetBytes("Server Error: "+ex.Message);
context.Response.OutputStream.Write(error, 0, error.Length);
context.Response.Close();
}
}
private static void HandleUpload(HttpListenerRequest request, HttpListenerResponse response) {
//Console.WriteLine("收到来自"+request.RemoteEndPoint+"的请求");
//Console.WriteLine("内容类型:"+request.ContentType);
Console.WriteLine("内容长度: "+request.ContentLength64+"bytes");
frameNume++;
if(frameNume>50) {
frameNume=0;
Console.Clear();
}
MemoryStream ms = new MemoryStream();
request.InputStream.CopyTo(ms);
lock (_frameLock) {
//Console.WriteLine("正在接收新的数据帧");
_latestFrame = ms.ToArray();
_lastUpdate = DateTime.Now;
}
response.StatusCode = 200;
var responseBytes = Encoding.UTF8.GetBytes("Frame received");
response.OutputStream.Write(responseBytes, 0, responseBytes.Length);
response.Close();
}
private static void HandleStream(HttpListenerResponse response) {
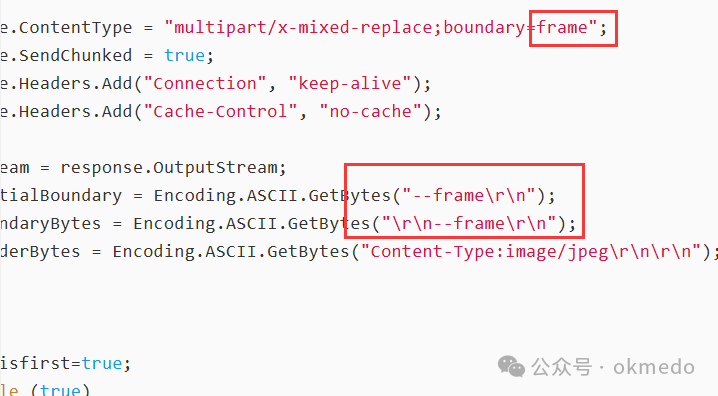
response.ContentType = "multipart/x-mixed-replace;boundary=frame";
response.SendChunked = true;
response.Headers.Add("Connection", "keep-alive");
response.Headers.Add("Cache-Control", "no-cache");
var stream = response.OutputStream;
var initialBoundary = Encoding.ASCII.GetBytes("--frame\r\n");
var boundaryBytes = Encoding.ASCII.GetBytes("\r\n--frame\r\n");
var headerBytes = Encoding.ASCII.GetBytes("Content-Type:image/jpeg\r\n\r\n");
try {
bool isfirst=true;
while (true) {
byte[] frameCopy;
lock (_frameLock) {
//Console.WriteLine("正在执行帧拷贝");
frameCopy = (byte[])_latestFrame.Clone(); // 深拷贝避免数据竞争
}
//Thread.Sleep(3000);
//continue;
if (frameCopy.Length > 0) {
if(isfirst) {
//发送初始边界
isfirst=false;
stream.Write(initialBoundary, 0, initialBoundary.Length);
} else {
stream.Write(boundaryBytes, 0, boundaryBytes.Length);
}
stream.Write(headerBytes, 0, headerBytes.Length);
stream.Write(frameCopy, 0, frameCopy.Length);
stream.Flush();
}
if ((DateTime.Now - _lastUpdate).TotalSeconds > FrameTimeout) {
Console.WriteLine("无有效帧数据"+_lastUpdate);
Thread.Sleep(2000);
}
//Thread.Sleep(20); // 约25 FPS
}
} catch (Exception ex) {
Console.WriteLine("客户端断开连接");
} finally {
response.Close();
}
}
}Points to Note:
1. Here, you mainly configure the address to which the ESP32-CAM video image frames are pushed, the address to which the video stream forwarding server forwards the video, and the listening port of the video stream forwarding server.
2. Below is the configuration of the video image frame data separator, which must correspond strictly.
3. This server program involves multithreading operations and access to shared data by multiple threads. During debugging, you can uncomment the debugging output statements in the program and add some thread sleep to observe the data operation process, even if it means viewing one image per second at the beginning.
6. Experimental Demonstration
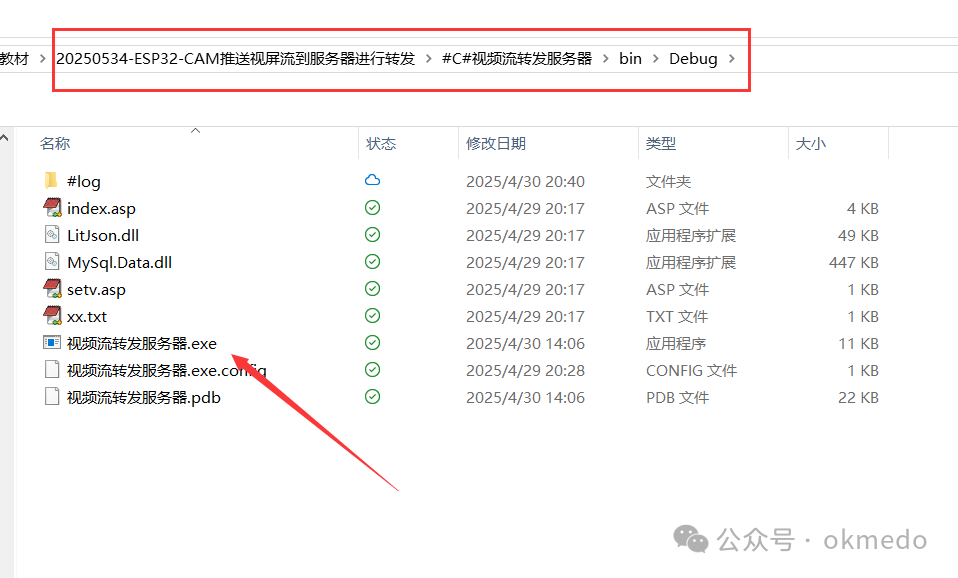
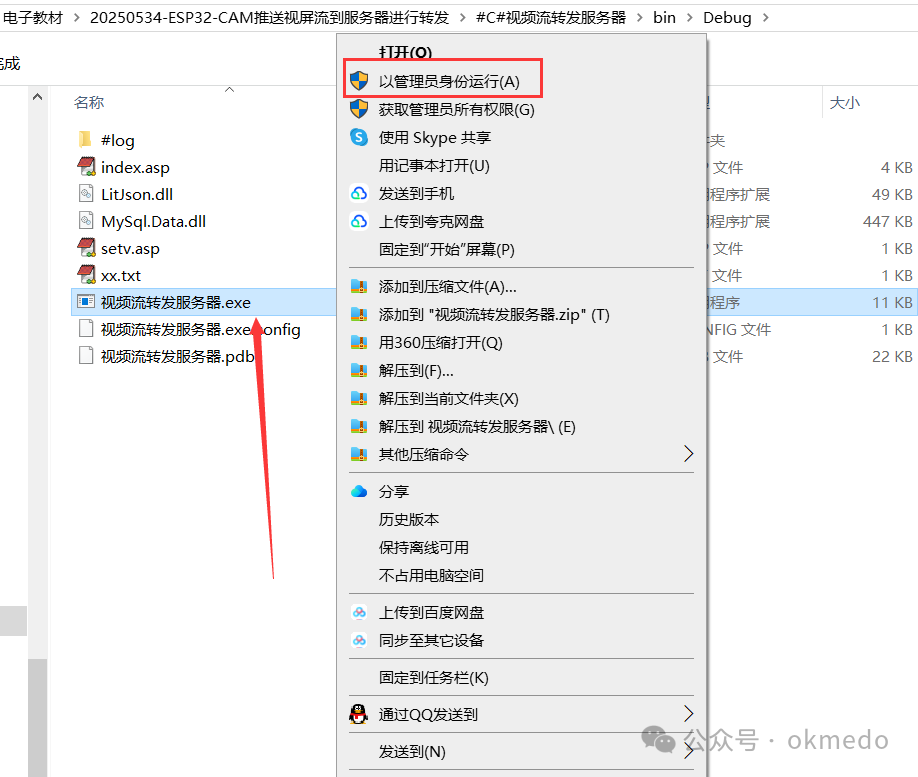
1. Refer to the file path below to start the video stream forwarding server. It is especially important to note that if the server is inaccessible after starting, close it and right-click → Run as administrator.
2. Use the ipconfig command to check the local machine’s IP address.
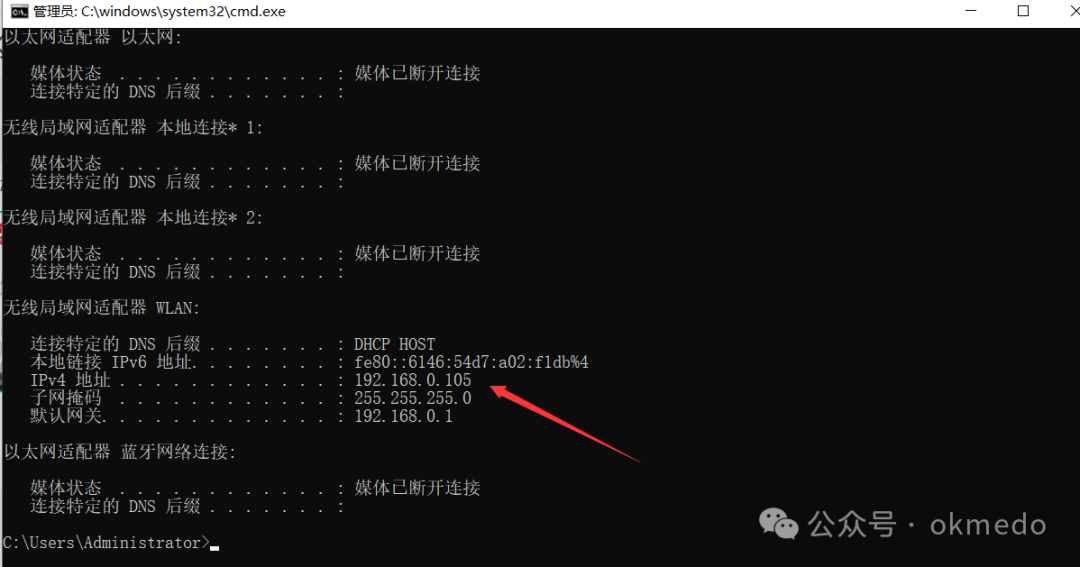
3. In addition to modifying the Wi-Fi name and password for the ESP32-CAM program, you also need to change the following to match the IP address you checked:
http://192.168.0.105:8080/upload
Then upload the program to the ESP32-CAM module.
4. Refer to the file path below to open the serial debugging software and view the debugging information output by the ESP32-CAM module.
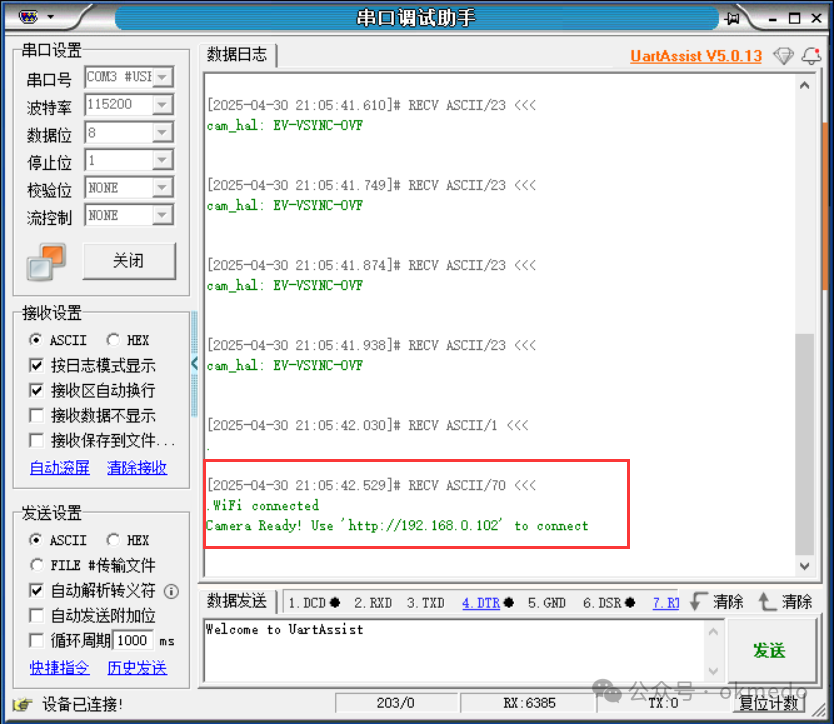
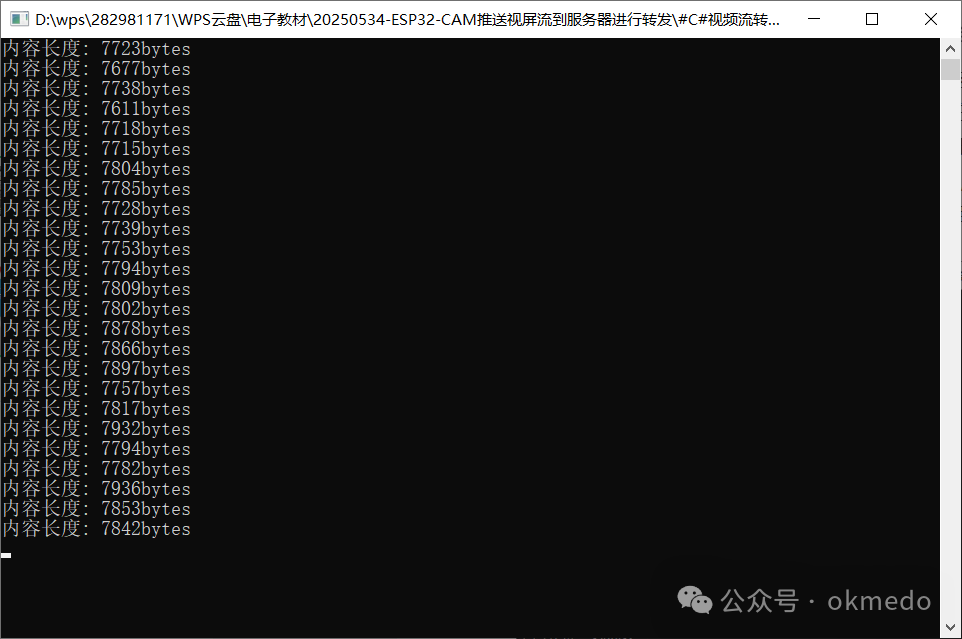
5. If everything is normal here, you will see the video image frame data pushed by the ESP32-CAM module in the output logs of the video stream forwarding server. Here, we can also see that each frame of data is approximately 8kb. If the frame rate is 25, the required network bandwidth is about 200kbps. From the camera configuration part in the ESP32-CAM module program, we can see that I am using a resolution of 320×240, which has been tested to be sufficient for video remote-controlled cars. For video remote-controlled cars, smoothness is more important than clarity.
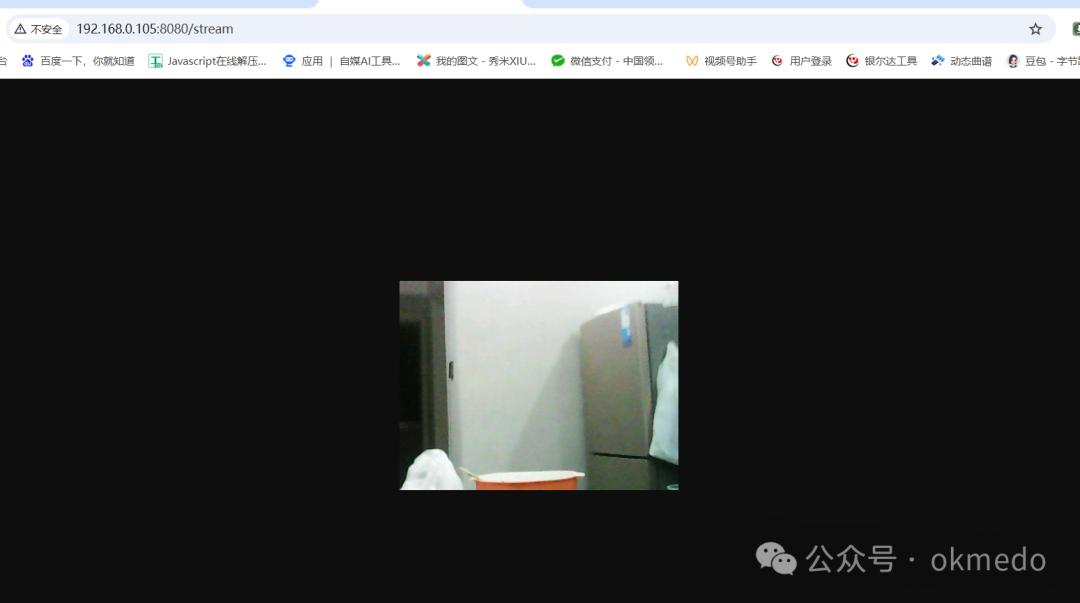
6. If everything is normal up to this point, then you can witness the miracle by accessing
http://192.168.0.105:8080/stream
in your browser.
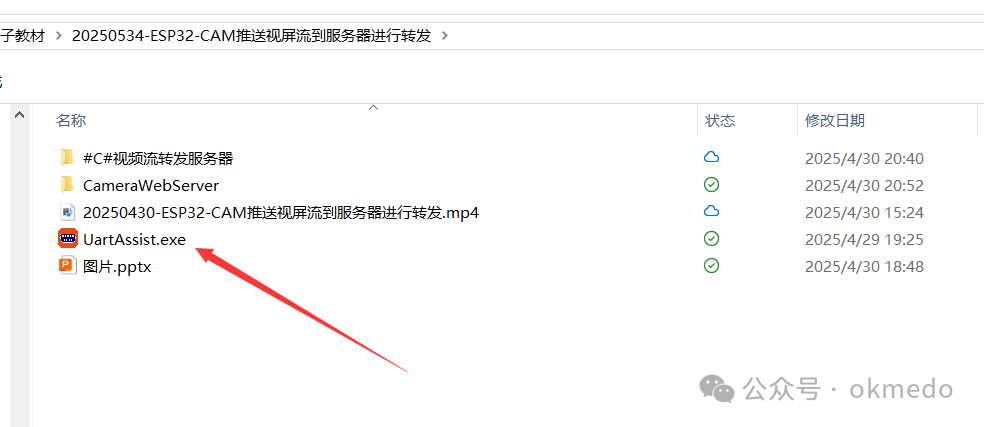
7. Related File Resources Mentioned in This Article