My Hardware List
Raspberry Pi 4 Board with 4GB RAM
64GB Memory Card
Mobile Phone Charger
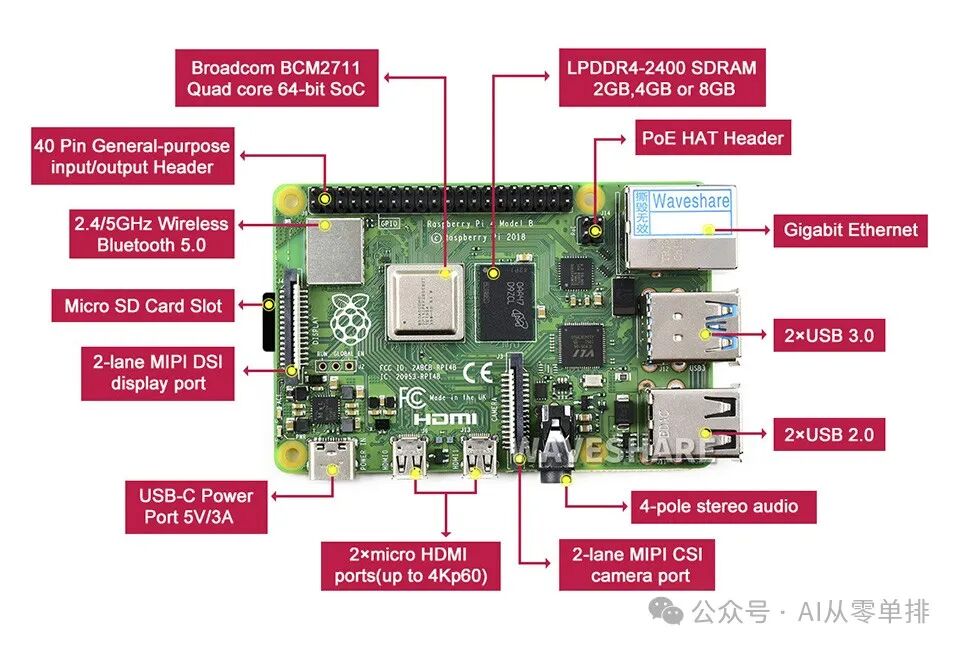
Raspberry Pi 4 Specifications
-
Processor: Broadcom BCM2711, quad-core Cortex-A72 (ARM v8) 64-bit SoC @ 1.5GHz
-
Memory: 4GB LPDDR4
-
Connectivity:
- 2.4 GHz and 5.0 GHz IEEE 802.11b/g/n/ac wireless
- LAN, Bluetooth 5.0, BLE
- Gigabit Ethernet
- 2 × USB 3.0 ports
- 2 × USB 2.0 ports
-
GPIO: Standard 40-pin GPIO header (fully backward-compatible with previous boards)
-
Video & Sound:
- 2 × micro HDMI ports (up to 4Kp60 supported)
- 2-lane MIPI DSI display port
- 2-lane MIPI CSI camera port
- 4-pole stereo audio and composite video port
-
Multimedia:
- H.265 (4Kp60 decode)
- H.264 (1080p60 decode, 1080p30 encode)
- OpenGL ES, 3.0 graphics
-
SD card support: Micro SD card slot for loading operating system and data storage
The advantage of Raspberry Pi is its low cost and low power consumption. The integrated GPU may also provide acceleration for neural networks in the future. The purpose of installing Ollama is mainly to verify the performance of large models on resource-limited hardware.
1. Install the Operating System
Refer to the official Raspberry Pi website for steps, download the system imaging software Raspberry Pi Imager.
Insert the memory card into the card reader and connect the reader to the computer.
Open Raspberry Pi Imager, select the Raspberry Pi device type and the OS to be imaged (I installed Raspberry Pi OS, which is a Debian-based operating system for Raspberry Pi), pre-configure the user password, Wi-Fi connection information, and enable SSH connection. Save the settings, start the imaging process, and once completed, insert the memory card into the Raspberry Pi.
Power the Raspberry Pi using the mobile phone charger. After plugging it in, the system will automatically start, and after a few minutes, you can log in to the terminal via SSH. For the first login, use the command sudo passwd to initialize the root user password, and run sudo apt update; sudo apt upgrade to update the software to the latest version.

2. Install Ollama
Run the following command in the Raspberry Pi terminal to install Ollama:
sudo curl -fsSL https://ollama.com/install.sh | sh
Downloading the Linux bundle in China can be a bit slow.
xx@pi4:~ $ sudo curl -fsSL https://ollama.com/install.sh | sh
>>> Cleaning up old version at /usr/local/lib/ollama
>>> Installing ollama to /usr/local
>>> Downloading Linux arm64 bundle
##################                                                        25.0%
##################                                                        25.0%
##################                                                        25.0%
###################                                                       26.7%
####################################################################      94.8%
######################################################################## 100.0%
>>> Creating ollama user...
>>> Adding ollama user to render group...
>>> Adding ollama user to video group...
>>> Adding current user to ollama group...
>>> Creating ollama systemd service...
>>> Enabling and starting ollama service...
Created symlink /etc/systemd/system/default.target.wants/ollama.service → /etc/systemd/system/ollama.service.
>>> The Ollama API is now available at 127.0.0.1:11434.
>>> Install complete. Run "ollama" from the command line.
WARNING: No NVIDIA/AMD GPU detected. Ollama will run in CPU-only mode.
yuezht@pi4:~ $
Ollama installation successful.
yuezht@pi4:~ $ ps -ef|grep ollama
ollama     24160       1  0 10:12 ?        00:00:00 /usr/local/bin/ollama serve
yuezht     24172   23800  0 10:14 pts/0    00:00:00 grep --color=auto ollama
yuezht@pi4:~ $ netstat -tln
Active Internet connections (only servers)
Proto Recv-Q Send-Q Local Address           Foreign Address         State
tcp        0      0 0.0.0.0:22              0.0.0.0:*               LISTEN
tcp        0      0 127.0.0.1:11434         0.0.0.0:*               LISTEN
tcp        0      0 127.0.0.1:631           0.0.0.0:*               LISTEN
tcp6       0      0 ::1:631                 :::*                    LISTEN
tcp6       0      0 :::22                   :::*                    LISTEN

yuezht@pi4:~ $ ollama --help
Large language model runner

Usage:
  ollama [flags]
  ollama [command]

Available Commands:
  serve       Start ollama
  create      Create a model from a Modelfile
  show        Show information for a model
  run         Run a model
  stop        Stop a running model
  pull        Pull a model from a registry
  push        Push a model to a registry
  list        List models
  ps          List running models
  cp          Copy a model
  rm          Remove a model
  help        Help about any command

Flags:
  -h, --help      help for ollama
  -v, --version   Show version information

Use "ollama [command] --help" for more information about a command.
yuezht@pi4:~ $

yuezht@pi4:~ $ ollama -v
ollama version is 0.5.12
- Install and Run DeepSeek-R1:1.5b
Use ollama pull deepseek-r1:1.5b to download the model, which takes up a little over 1GB of space and should load easily into memory. After downloading the model, use ollama run deepseek-r1:1.5b to run the model.
yuezht@pi4:~ $ df -h
Filesystem      Size  Used Avail Use% Mounted on
udev            1.6G     0  1.6G   0% /dev
tmpfs           380M  1.3M  378M   1% /run
/dev/mmcblk0p2   57G  8.0G   46G  15% /
tmpfs           1.9G  204K  1.9G   1% /dev/shm
tmpfs           5.0M   16K  5.0M   1% /run/lock
/dev/mmcblk0p1  510M   68M  443M  14% /boot/firmware
tmpfs           380M   48K  380M   1% /run/user/1000
yuezht@pi4:~ $

yuezht@pi4:~ $ ollama pull deepseek-r1:1.5b
pulling manifest
pulling aabd4debf0c8... 100% ▕████████████████████████████████████████████████████████████████████████████████████████████████████████████▏ 1.1 GB
pulling 369ca498f347... 100% ▕████████████████████████████████████████████████████████████████████████████████████████████████████████████▏  387 B
pulling 6e4c38e1172f... 100% ▕████████████████████████████████████████████████████████████████████████████████████████████████████████████▏ 1.1 KB
pulling f4d24e9138dd... 100% ▕████████████████████████████████████████████████████████████████████████████████████████████████████████████▏  148 B
pulling a85fe2a2e58e... 100% ▕████████████████████████████████████████████████████████████████████████████████████████████████████████████▏  487 B
verifying sha256 digest
writing manifest
success
yuezht@pi4:~ $ df -h
Filesystem      Size  Used Avail Use% Mounted on
udev            1.6G     0  1.6G   0% /dev
tmpfs           380M  1.3M  378M   1% /run
/dev/mmcblk0p2   57G  9.1G   45G  17% /
tmpfs           1.9G  204K  1.9G   1% /dev/shm
tmpfs           5.0M   16K  5.0M   1% /run/lock
/dev/mmcblk0p1  510M   68M  443M  14% /boot/firmware
tmpfs           380M   48K  380M   1% /run/user/1000
yuezht@pi4:~ $
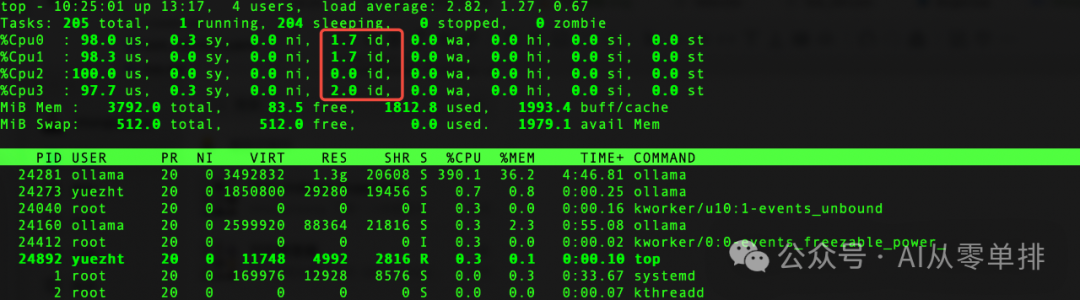
During runtime, resource usage is around 1.4GB of memory, and the CPU is nearly maxed out. The performance is as shown in the video below, processing about 5 tokens per second. The next step is to perform some performance optimization.