Whether you are building your first machine learning model or delving into complex neural networks, the WSL2 + Ubuntu virtualization platform provides a perfect starting point for both AI beginners and seasoned experts, offering essential tools and abundant resources to support your AI journey.
Table of Contents
1. Installing the AI Practice Virtualization Platform
2. Installing Conda Management Tool and Python Virtual Environment
3. Deploying PyTorch and TensorFlow AI Machine Learning Frameworks
4. Common Domestic Mirror Sources
1. Installing the AI Practice Virtualization Platform
Introduction
With the Windows Subsystem for Linux (WSL), developers can install Linux distributions (such as Ubuntu, OpenSUSE, Kali, Debian, Arch Linux, etc.) and directly use Linux applications, utilities, and Bash command-line tools on Windows without any modifications or the costs associated with traditional virtual machines or dual-boot setups.
Prerequisites
You must be running Windows 10 version 2004 or higher, or Windows 11 to use the following commands.
Step 1: Enable Native Virtualization Support
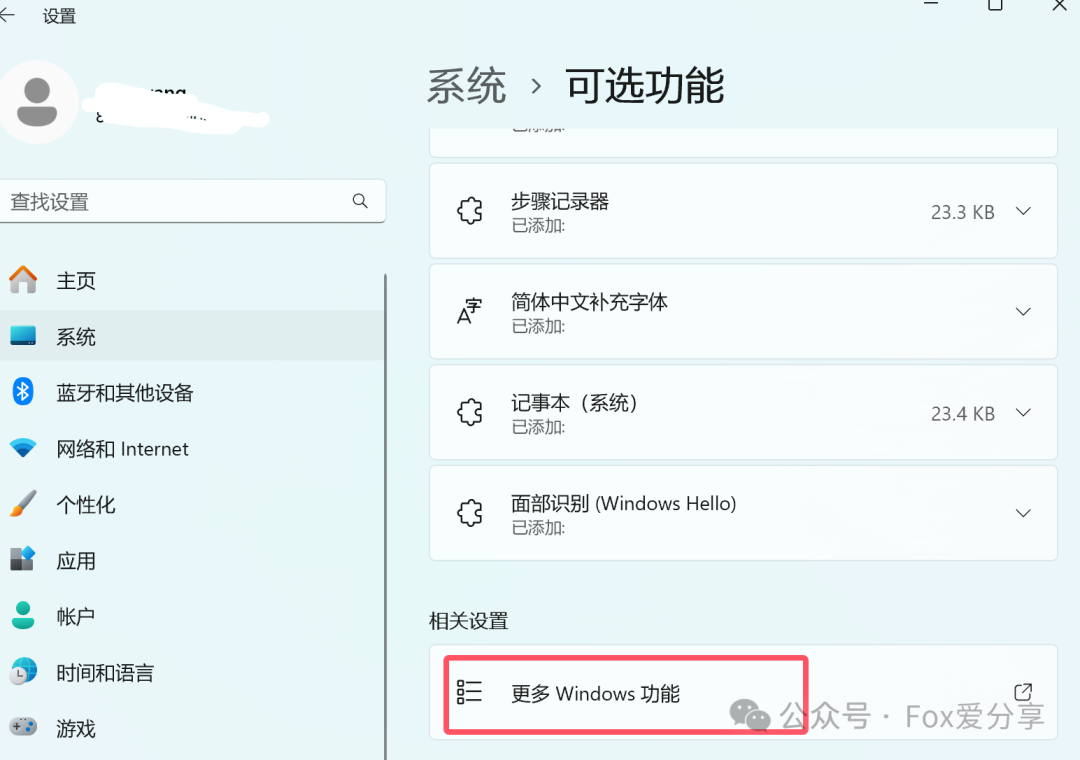
1.1 While connected to the internet, click the Windows button, select Settings -> search for “Optional Features” -> enter the menu, and enable “More Windows Features” at the bottom.
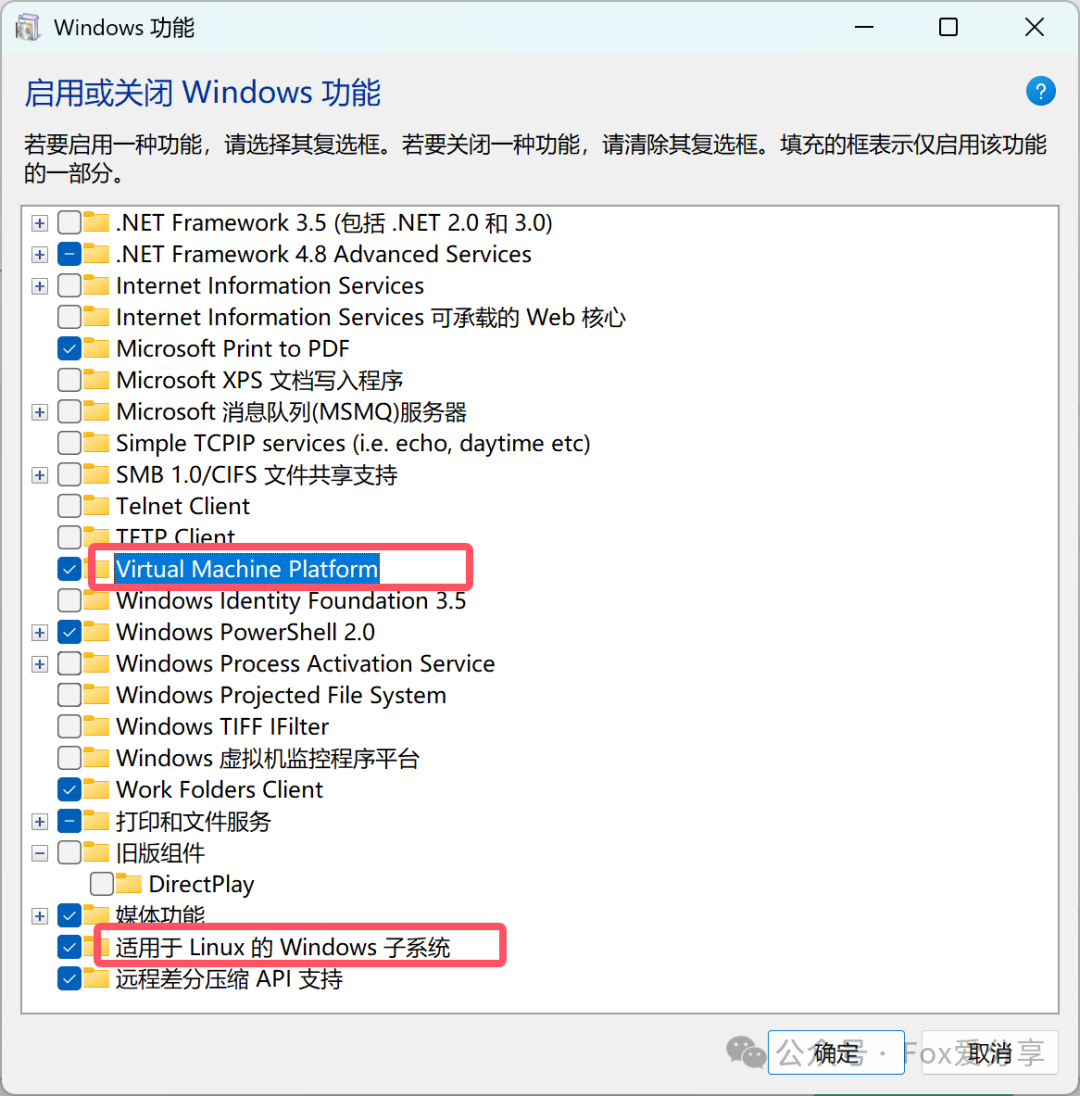
1.2 Check “Windows Subsystem for Linux” and “Virtual Machine Platform”, click OK, and follow the prompts to add these two features.
Step 2: Install Windows Subsystem for Linux
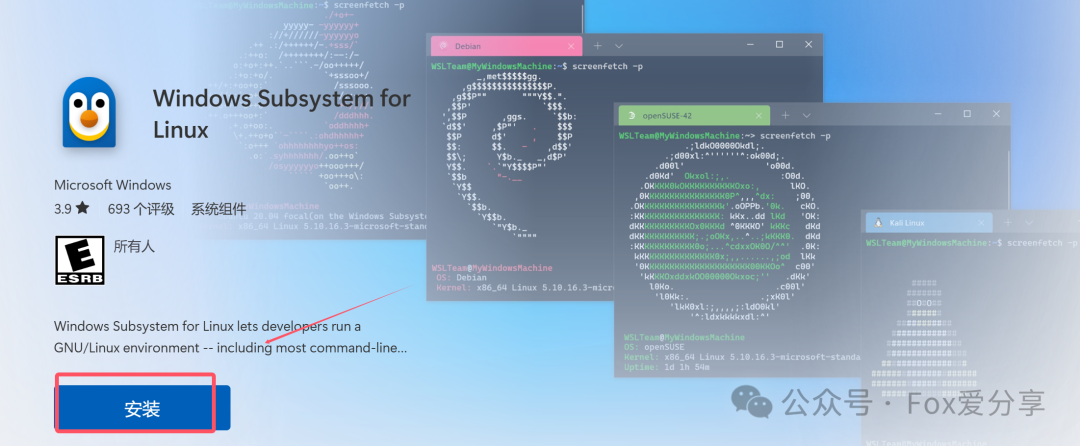
2.1 Click the link below to automatically install Windows Subsystem for Linux (WSL2) from the Microsoft Store.
Automatically install via Microsoft Store
https://apps.microsoft.com/detail/9p9tqf7mrm4r?hl=zh-cn&gl=US
Step 3: Install Ubuntu 20.04.6 LTS Subsystem
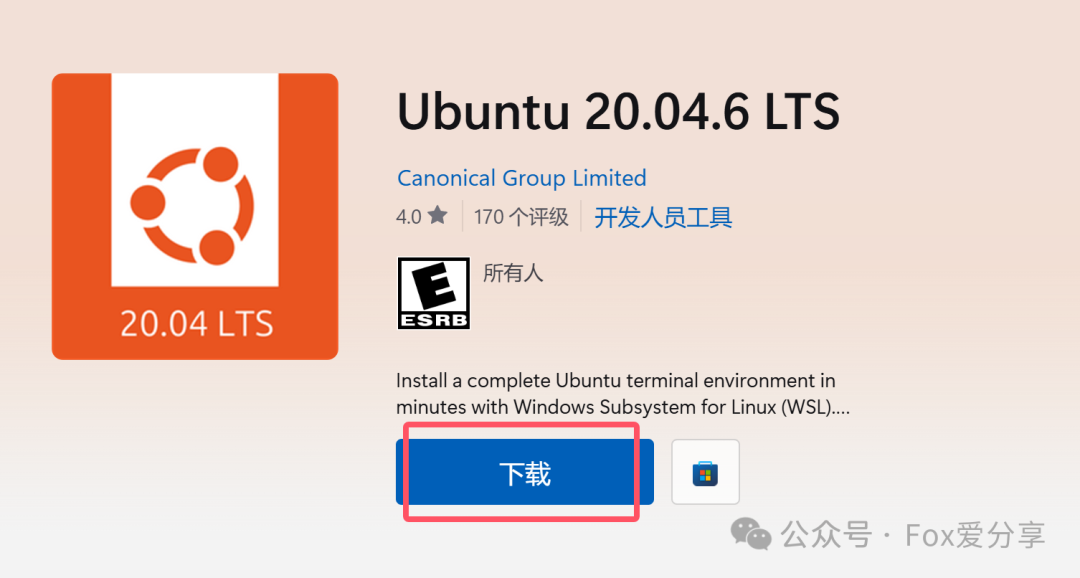
3.1 Click the link below to automatically install the Ubuntu 20.04.6 LTS subsystem from the Microsoft Store.
Automatically install via Microsoft Store
https://apps.microsoft.com/detail/9mttcl66cpxj?hl=zh-cn&gl=US
3.2 After installation, you can find Ubuntu 20.04.6 in the Start menu. Click it to start; the first time you start Ubuntu, the system will prompt you to create a user account and password. This information will be used for logging into the Ubuntu environment.
Installation Complete
At this point, the AI practice virtualization platform has been successfully installed. Please remember your account/password.
2. Installing Conda Management Tool and Python Virtual Environment
Installing Miniconda in the Ubuntu 20.04.6 LTS subsystem to manage your Python environments and dependencies is a great way, especially for machine learning projects. Miniconda is a free minimal installer for the conda environment management system. It allows you to quickly install, run, and update packages and environments. Using Miniconda for machine learning projects can help you create isolated environments to avoid dependency conflicts.
Step 1: Create Installation File Storage Directory
Open the Ubuntu terminal and create a directory for storing installation files.
mkdir -p ~/miniconda3Step 2: Download Miniconda Installation Script
Use wget to download the Miniconda installation script. Make sure to get the latest version link from the Miniconda official website.
wget https://repo.anaconda.com/miniconda/Miniconda3-latest-Linux-x86_64.sh -O ~/miniconda3/miniconda.shStep 3: Run the Installation Script
Use bash to run the downloaded script.
bash ~/miniconda3/miniconda.sh -b -u -p ~/miniconda3During the installation, you will need to read the license agreement, press Enter to continue, and then type yes to agree to the license agreement. Next, you will be prompted to enter the installation location (you can accept the default location or specify a new one).
Step 4: Initialize Conda Environment
After installation, you need to run the following command to initialize your shell so that you can use the conda command directly in the terminal.
~/miniconda3/bin/conda init bashYou need to close and reopen your terminal window or run source ~/bashrc to make the changes effective.
Step 5: Test Installation
After installation, you can run the following command to test if Miniconda was successfully installed.
conda listIf the installation was successful, this command will list the installed packages.

Step 6: Create a New Conda Environment
You can create a new environment to isolate your machine learning projects and their dependencies. For example, create an environment named ml-env and install Python 3.9 in it.
conda create --name ml-env python=3.9Activate this new environment:
conda activate ml-envThrough the above steps, you have successfully installed Miniconda in the Ubuntu 20.04.6 LTS subsystem and learned how to create and manage conda environments. This will greatly simplify your dependency management and environment isolation for machine learning projects.
3. Deploying PyTorch and TensorFlow AI Machine Learning Frameworks
Installing PyTorch or TensorFlow in the Ubuntu 20.04.6 LTS subsystem, along with enabling DirectML, is to leverage these powerful machine learning libraries in the same environment. Below is a brief overview of the installation process, prerequisites, and operational methods.
-
PyTorch: An open-source machine learning library for deep learning projects in applications such as computer vision and natural language processing.
-
TensorFlow: An open-source machine learning framework developed by Google for numerical computation in data flow graphs.
-
DirectML: A machine learning API for Windows DirectX12, which can be enabled in the Linux subsystem through specific settings.
Prerequisites
-
Ubuntu 20.04.6 LTS subsystem installed.
-
Miniconda or Anaconda installed.
-
For DirectML, Windows 10 or higher is required, and WSL2 must be enabled.
Step 1: Download and Install PyTorch
1.1 Create a new conda environment and activate it:
conda create --name pytorch-env python=3.9conda activate pytorch-env1.2 Visit the PyTorch official website to get the installation command. Make sure to match the CUDA version.
Visit the PyTorch official website for installation commands
https://pytorch.org/get-started/locally/
The following is an example command; ensure to select the command compatible with your CUDA version:
conda install pytorch torchvision torchaudio cudatoolkit=11.2 -c pytorch -c nvidiaStep 2 (Optional): Download and Install TensorFlow
2.1 Install TensorFlow in the same environment:
conda install -c conda-forge tensorflowStep 3: Enable DirectML
Since DirectML is designed for Windows, to use it in the Ubuntu subsystem, you need to run TensorFlow code that supports DirectML through the TensorFlow-DirectML plugin on the Windows system. This means you will run the TensorFlow code supporting DirectML in the Windows environment rather than directly in the Ubuntu subsystem. Ensure that your Windows system has TensorFlow-DirectML installed. You can find the installation guide below.
Get DirectML configuration enablement guide
https://learn.microsoft.com/zh-cn/windows/ai/directml/dml
Step 4: Install TensorBoard to Enhance Visualization and Debugging Capabilities in Machine Learning Projects
Installing TensorBoard in the Ubuntu 20.04.6 LTS subsystem and configuring TensorBoard for TensorFlow and PyTorch can greatly enhance visualization and debugging capabilities in machine learning projects.
4.1 Install TensorBoard for TensorFlow
If you have already installed TensorFlow, TensorBoard should already be installed. You can verify the installation and start TensorBoard with the following command:
tensorboard --logdir=path_to_your_logsIf you need to install or update TensorBoard separately, you can use pip:
pip install tensorboard4.2 Install TensorBoard for PyTorch
PyTorch users can use TensorBoard by installing the tensorboard package. If you have not installed TensorBoard yet, you can install it with the following command:
pip install tensorboardThen, in your PyTorch code, use torch.utils.tensorboard to log data:
from torch.utils.tensorboard import SummaryWriterwriter = SummaryWriter('path_to_log_dir')# Log data...writer.close()Start TensorBoard to view the data logged by PyTorch:
tensorboard --logdir=path_to_log_dirThrough the above steps, you have successfully installed PyTorch and TensorFlow in the Ubuntu 20.04.6 LTS subsystem and learned how to enable DirectML support on the Windows system. This provides you with a powerful environment for developing and testing various machine learning projects, and you have installed and configured TensorBoard for TensorFlow and PyTorch, along with the key dependencies. This will help you monitor and analyze the model training process more effectively, thereby improving model performance.
4. Common Domestic Mirror Sources
Due to the specific network environment, using domestic mirror sources can significantly improve the download speed of packages. Below are some recommended mirror sources that can be used for Ubuntu, conda, pip, apt-get, git, etc.
The following operation instructions are based on Tsinghua University mirror as an example; more mirror sources recommendations can be found at the end of this article.
Ubuntu (apt-get)
For Ubuntu packages, you can use mirror sources from Tsinghua University, Tencent Cloud, Alibaba Cloud, etc. For the Tsinghua University mirror, edit the /etc/apt/sources.list file and replace the original source address with the following:
deb https://mirrors.tuna.tsinghua.edu.cn/ubuntu/ focal main restricted universe multiversedeb-src https://mirrors.tuna.tsinghua.edu.cn/ubuntu/ focal main restricted universe multiversePlease adjust according to your Ubuntu version (e.g., 20.04 is focal).
Conda
For Conda, you can use Tsinghua University’s mirror source. Run the following command in the terminal to add the mirror source:
conda config --add channels https://mirrors.tuna.tsinghua.edu.cn/anaconda/pkgs/main/conda config --set show_channel_urls yesPip
For Python’s pip package manager, you can use Alibaba Cloud, Tsinghua University, and other mirror sources. For example, using Tsinghua University mirror, you can add the following content to the ~/.pip/pip.conf (Linux/Unix) or %HOME%\pip\pip.ini (Windows) file:
[global]index-url = https://pypi.tuna.tsinghua.edu.cn/simpleGit
For Git, if you need to clone foreign repositories, you can consider using Gitee’s mirror service, which provides mirroring functionality for GitHub repositories. The method is to search for the required GitHub repository on Gitee and then use the clone address provided by Gitee.
Common Domestic Mirror Sources
Tsinghua University
https://mirrors.tuna.tsinghua.edu.cn/Alibaba Cloud
https://developer.aliyun.com/mirror/Tencent Cloud
https://mirrors.cloud.tencent.com/Please note that the availability and speed of mirror sources may change over time, so it is recommended to regularly check and update the mirror source list.
If you find this article helpful, feel free to give it a “Recommendation” or share it with more friends! Follow the public account “Fox Loves Sharing“, unlock more exciting content!