1. Core Prerequisites
-
Python 3 installed (recommended version 3.7+ to avoid compatibility issues)
-
Basic ability to write unittest test cases (examples will be provided below)
2. Step 1: Download the HTMLTestRunner_PY3 package
HTMLTestRunner is a third-party test report generation tool for Python, and HTMLTestRunner_PY3 is the version compatible with Python 3, which needs to be downloaded from GitHub:
Download options (choose one)
-
Directly download the ZIP package (recommended for beginners): Open the GitHub link: https://github.com/huilansame/HTMLTestRunner_PY3, click the Code button in the upper right corner → Download ZIP, and download the compressed package to your local machine (e.g., desktop).
-
Git clone (for users with a Git environment): Open the terminal and execute the command:
git clone https://github.com/huilansame/HTMLTestRunner_PY3.git
3. Step 2: Extract core files and configure project structure
1. Unzip the downloaded file
-
Locate the downloaded ZIP package (e.g., HTMLTestRunner_PY3-main.zip), right-click and extract it to any location (e.g., desktop).
-
Enter the extracted folder, the core files are as follows:
-
HTMLTestRunner_PY3.py: The core script for generating HTML reports (must be retained)
-
test folder: Example test files (for reference only, no need to copy)
2. Set up the project directory
Create a custom project folder (e.g., unittest_html_report), the final directory structure should be as follows (simple and clear):
unittest_html_report/├─ HTMLTestRunner_PY3.py # Core file copied from the extracted package├─ test_cases.py # Your own test case file└─ run.py # Entry file (integrates test suite + generates report)3. Copy the core file
Directly copy HTMLTestRunner_PY3.py from the extracted package to the unittest_html_report directory (ensure it is at the same level as test_cases.py and run.py).
4. Step 3: Write test cases (test_cases.py)
Create test_cases.py and write example test cases using unittest (including success, failure, and skip cases for easy report validation):
import unittest# Test class must inherit from unittest.TestCaseclass TestDemo(unittest.TestCase): # Test methods must start with test_ def test_success(self): """Test case 1: Success example""" self.assertEqual(1 + 1, 2) # Assertion success def test_fail(self): """Test case 2: Failure example""" self.assertEqual(1 + 1, 3) # Assertion failure def test_skip(self): """Test case 3: Skip example""" self.skipTest("This case will not be executed") # Skip case self.assertTrue(True)if __name__ == "__main__": unittest.main() # Running this file alone can verify if the cases are normal5. Step 4: Write the entry point (run.py)
Refer to the example files in the test folder of the extracted package (the last few lines of core code) to write run.py, which functions to: collect test cases → execute → generate HTML report.
Core code (copy directly):
import unittestimport os# Import the core report generation class (note the correspondence between file name and class name)from HTMLTestRunner_PY3 import HTMLTestRunnerdef run_test(): # 1. Define the test case directory (current directory, i.e., project root directory) test_dir = "./" # 2. Find all .py files starting with test_ in the directory for test cases discover = unittest.defaultTestLoader.discover( start_dir=test_dir, pattern="test_*.py", # Rule for matching test case files top_level_dir=None ) # 3. Define the save path and file name for the test report # It is recommended to place the report in the reports folder (automatically created to avoid directory confusion) report_dir = "./reports" if not os.path.exists(report_dir): os.makedirs(report_dir) # Create the folder if it does not exist report_file = os.path.join(report_dir, "test_report.html") # Report file name # 4. Open the report file, execute the tests and generate the report with open(report_file, "wb") as fp: runner = HTMLTestRunner( stream=fp, # Write to file stream title="unittest Test Report", # Report title description="Test case execution results: includes success, failure, and skip examples", # Report description tester="Tester Name" # Tester (can be customized) ) # Execute the test suite runner.run(discover)if __name__ == "__main__": run_test()6. Step 5: Execute the code and view the report
1. Execute the command
Open the terminal, navigate to the project directory unittest_html_report, and execute:
python run.py2. Verify the execution results
-
The terminal will output the test progress (e.g., total cases, success count, failure count, skip count).
-
A reports folder will be automatically generated in the project directory, containing the test_report.html report file.
3. View the HTML report
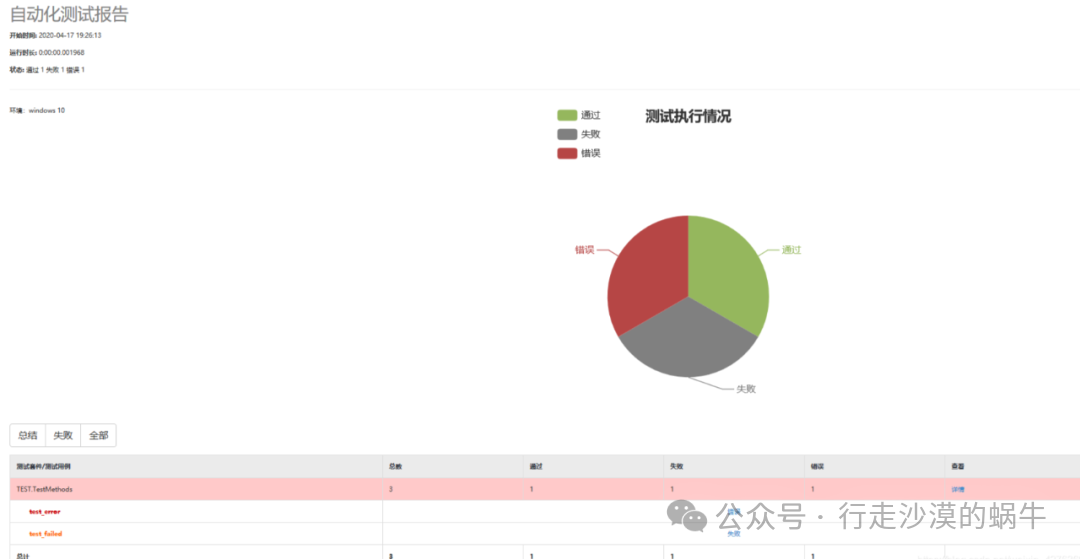
Open test_report.html in any browser, the report contains the following core information:
-
Test overview: execution time, total cases, pass rate, success / failure / skip counts.
-
Detailed cases: each case’s name, description, execution result, failure reason (if any).
-
Beautiful style: supports filtering by result, highlighting failed cases for quick problem identification.
7. Common Problem Solutions
1. Import error: ModuleNotFoundError: No module named ‘HTMLTestRunner_PY3’
-
Reason: HTMLTestRunner_PY3.py is not placed in the project root directory, or the file name is misspelled (e.g., missing _PY3).
-
Solution: Ensure the file name is HTMLTestRunner_PY3.py and is at the same level as run.py.
2. Report generation failure (no reports folder)
-
Reason: Insufficient permissions or incorrect path.
-
Solution: Manually create the reports folder, or ensure that os.makedirs(report_dir) is not commented out in the code.
3. Test cases not collected
-
Reason: The pattern=”test_*.py” rule does not match the test case file name (e.g., if the test file name is demo_test.py, it should be changed to test_demo.py).
-
Solution: Ensure test case files start with test_, or modify the pattern rule (e.g., pattern=”*_test.py”).
4. Python2 compatibility issues
-
Reason: HTMLTestRunner_PY3 only supports Python 3, Python 2 will throw an error.
-
Solution: Switch to Python 3 environment (recommended to execute with python3 run.py).
8. Additional Notes
-
Custom report styles: Modify the HTML template in HTMLTestRunner_PY3.py (e.g., colors, table styles), basic HTML/CSS knowledge is required.
-
Batch execution of test cases from multiple directories: Change test_dir to the parent directory (e.g., test_dir=”../test_cases”), and set top_level_dir=test_dir.
-
Email report sending: You can add email sending logic in run.py to send test_report.html as an attachment to relevant personnel.
By following the above steps, you can quickly generate HTML visual reports for unittest test cases, suitable for implementing automated testing and team collaboration.