Discuss common types of Python questions.
One

The first type: Direct Decompilation Type
In addition to directly obtaining the Python file for the question, the question setter can also slightly modify it by providing the corresponding .pyc file, which is the bytecode of Python.
PYC files are the main intermediate files that appear during the compilation process in Python. PYC files are binary, similar to Java bytecode, and can be executed directly by the Python virtual machine.
At this time, we generally use uncompyle6 (suitable for Python 3.8) or Pycdc to decompile the .pyc file back into a .py file.
Download and Use Uncompyle6: https://github.com/rocky/python-uncompyle6
<span>pip install uncompyle6</span>
After installation, you can check if it was successful by using:
<span>uncompyle6 --version</span>
If the version number is displayed, the installation was successful.
(Note: It is best not to download a version of uncompyle6 that is higher than the Python version in use.)
<span>uncompyle6</span><span> -o output_file.py your_file.pyc</span>
-o Target generated Python file name Original pyc file name
Download and Use Pycdc:
https://github.com/extremecoders-re/decompyle-builds
pycdc -o output_file.py your_file.pyc
You can also use some online websites to convert PYC files to Python files.
Two

The second type: Packed into an exe py file
Generally, the icon of the exe generated from the py file is:
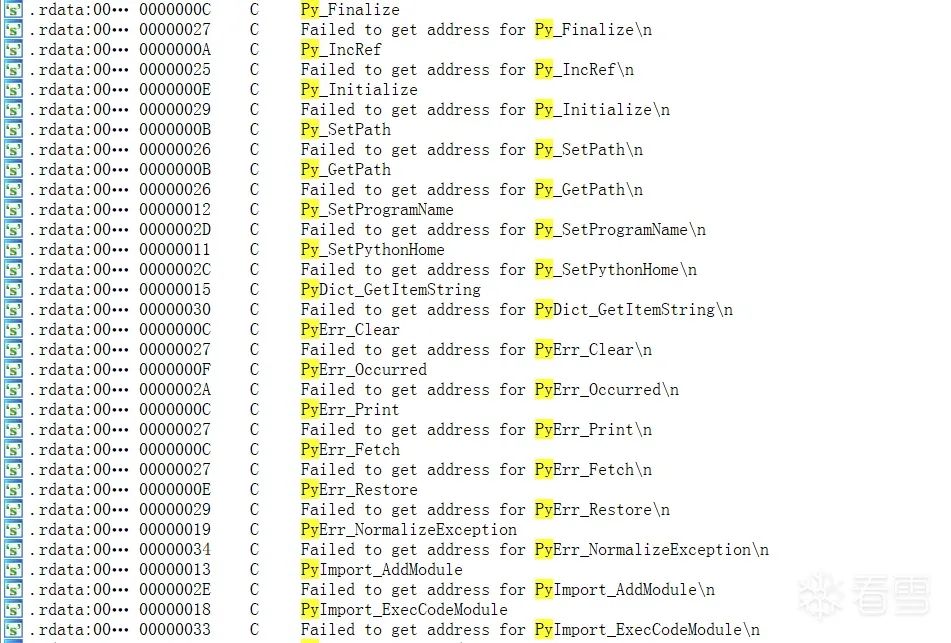
And if you directly open it with IDA, there will be many mentions of Python.
Then it can be determined that it is an exe made from a Py file.
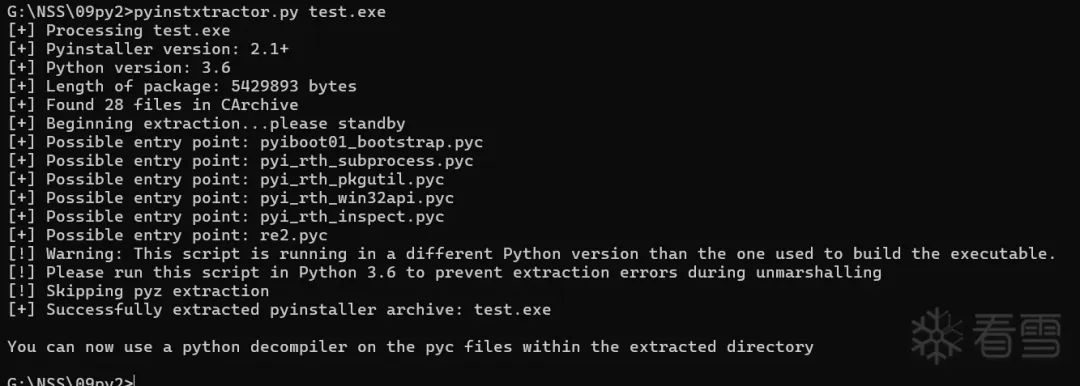
At this time, we need to use the Pyinstxtractor tool to unpack the exe file.
<span>pyinstxtractor.py</span> Tool download address: https://sourceforge.net/projects/pyinstallerextractor/Copy the downloaded pyinstxtractor file to the directory where the question is located, then directly open the terminal in the path of the packed exe.
Use the command: python pyinstxtractor.py File name to be unpacked .exe:
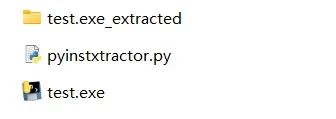
Then obtain the generated unpacked folder.
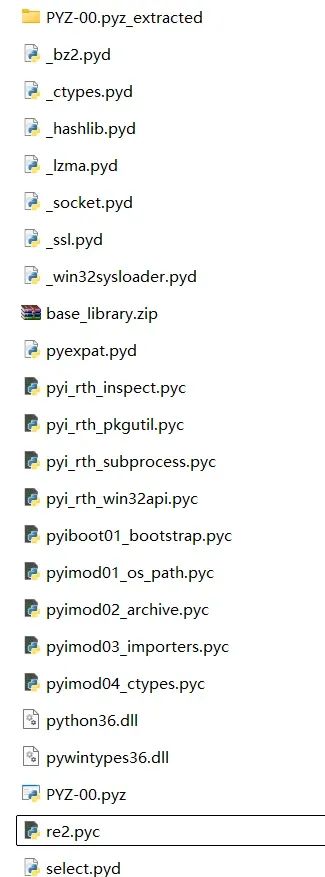
Open the extracted folder:
Generally, we will obtain a .pyc file with the same name as the unpacked exe, at which point we can perform reverse engineering by restoring the .pyc file to a .py file like the first type of question.
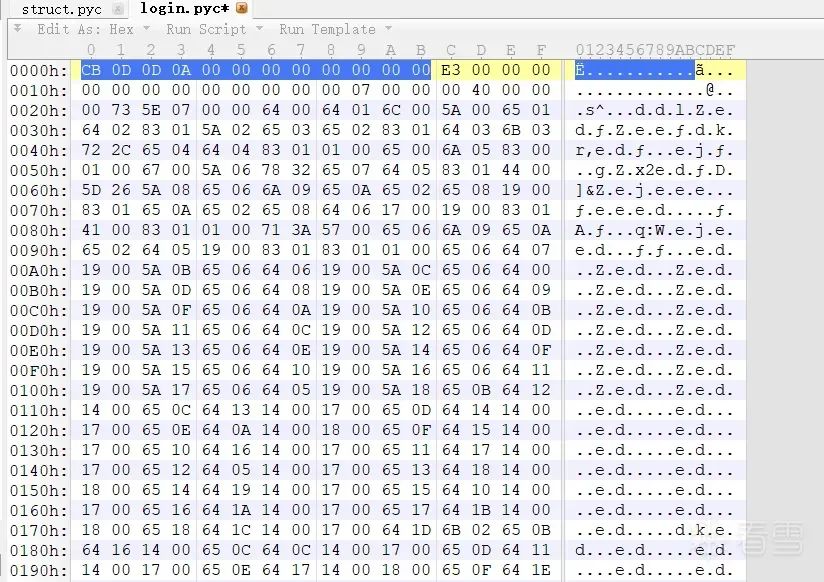
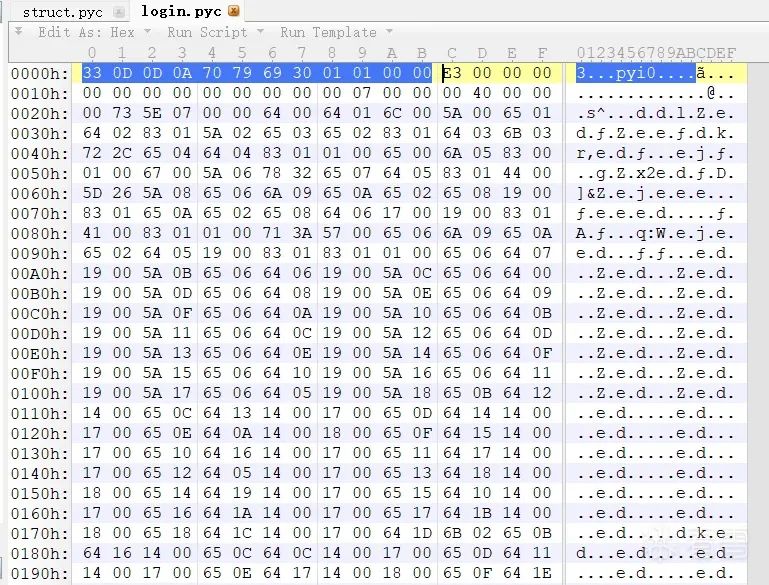
However, there are special cases. After unpacking with Pyinstxtractor, the source file generally does not contain the original magic number and timestamp, which may cause errors during decompilation, as shown in the following figure when viewing login.pyc.
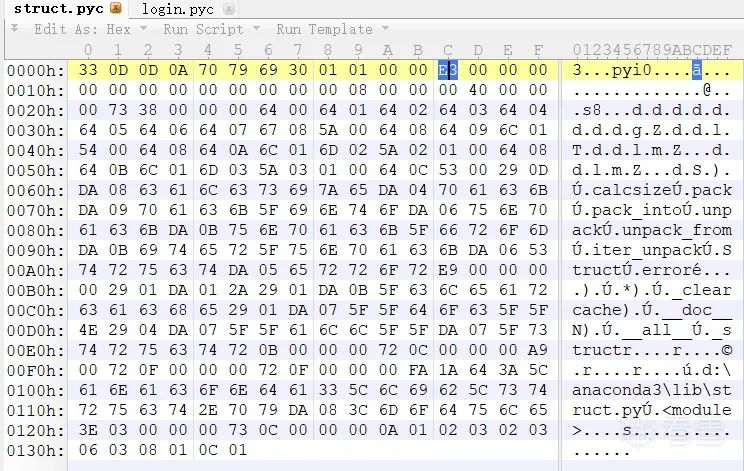
And the unpacked<span>struct.pyc</span> file will retain its original Python<span>.pyc</span> file’s magic number and timestamp information.
So we usually use the information in struct.pyc to supplement the original PYC.
Copy and paste the number before E3 into test.pyc.
Then save to normally obtain the Py file.
Three

The third type: Given pyc bytecode (like assembly)
If the question setter provides the question in the following format, how should we operate?
Previously mentioned:
1. dis library:
Used to disassemble Python bytecode. It can convert the bytecode instruction sequence of Python functions or code objects into a readable format, showing the opcode and operand of each bytecode instruction.
<span>dis.dis</span> function’s role:
◆ Accepts a Python function object or code object as a parameter.
◆ Disassembles the bytecode instruction sequence of this function or code object into an easily understandable format.
◆ Displays the opcode and operand of each bytecode instruction, along with the corresponding line number and position information.
For example, for a simple Python function:
def add_numbers(a, b):
    return a + b
Using<span>dis.dis</span> to see its bytecode:
2. marshal:
A module in the Python standard library that provides functionality for serializing (converting to byte streams) and deserializing (restoring from byte streams to objects) Python objects.
Different Python Versions’ PYC File Headers
The first four bytes of the PYC file in Python 2 are a fixed magic number (03 F3 0D 0A), followed by four bytes indicating the version number of the Python interpreter that compiled this<span>.pyc</span> file.
The first four bytes of the PYC file in Python 3 are a fixed magic number (33 0D 0D 0A), followed by a two-byte timestamp indicating the last modification time of the<span>.py</span> file, followed by four bytes of the source file size, and finally the string of the source file name, ending with a null byte.
Note: The header of Python 3’s PYC file is not a fixed 16 bytes, but an uncertain length, at least 12 bytes, plus the length of the source file name string.
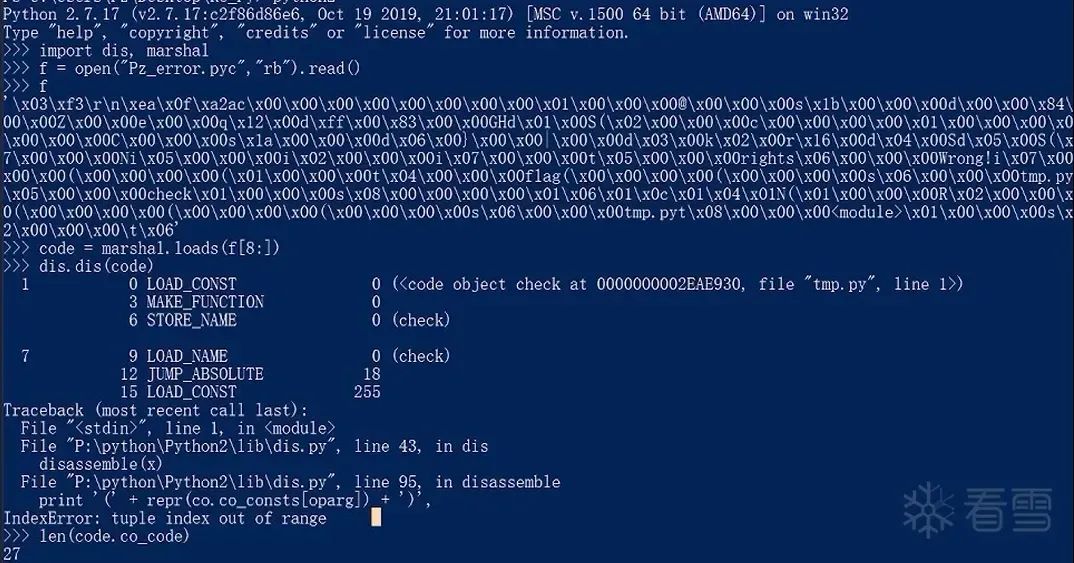
How to Obtain PYC Bytecode
import dis,marshal
# Import Python's two standard library modules dis and marshal. dis is used to disassemble bytecode, marshal is used for serialization and deserialization of objects
f=open("Pz.pyc","rb").read()
# Open the file Pz.pyc in binary read mode
f
# Store the read byte stream content in variable f
code=marshal.loads(f[8:])
# Skip the header part to load the bytecode into code
code
# View
dis.dis(code)
Finally, the output obtained (can be understood as Python assembly).
If you do not understand, you can refer to the official documentation to search for the meaning of restoring bytecode.
32.12. dis — Disassembler for Python bytecode — Python 2.7.18 documentation
Here are a few common meanings:
LOAD_CONST: Load const variables, such as numbers, strings, etc., generally used to pass as parameters to functions.
LOAD_FAST: Generally used to load the value of local variables, i.e., read values for calculations or function calls.
STORE_FAST: Generally used to save values to local variables.
CALL_FUNCTION:<span>CALL_FUNCTION n</span>, where<span>n</span> indicates the number of parameters passed during the function call. This indicates that a function is called here, passing n parameters.
Four

The fourth type: Decorated pyc
Here, it is necessary to understand the structure of the pyc file.
PYC files are divided into PYC file header part and PyCodeObject part.
The header part is the magic number and timestamp part mentioned above, while PyCodeObject is the structure used to represent the compiled code object in CPython (the official interpreter implementation of Python). In fact, the PYC file is just the saved form of the PyCodeObject object on disk.
Different Versions of Python’s Magic Number Headers
PyObject_HEAD
Different Python versions will have different PyObject_HEAD:
| Python Version |
Hexadecimal File Header |
|
|
|
|
|
|
|
|
|
|
|
|
|
|
|
|
|
|
|
|
|
|
|
|
|
|
420d0d0a000000000000000000000000
|
|
|
55 0d 0d 0a 00 00 00 00 00 00 00 00 00 00 00 00
|
|
|
610d0d0a000000000000000000000000
|
|
|
6f0d0d0a000000000000000000000000
|
|
|
a70d0d0a000000000000000000000000
|
The structure of PyCodeObject is as follows:
int co_argcount; /* Number of positional parameters */
int co_nlocals; /* Number of local variables */
int co_stacksize; /* Stack size */
PyObjectco_code; / Bytecode instruction sequence */
PyObjectco_consts; / Collection of all constants */
PyObjectco_names; / Collection of all symbol names */
PyObjectco_varnames; / Collection of local variable names */
PyObjectco_freevars; / Collection of variable names used by closures */
PyObjectco_cellvars; / Collection of variable names referenced by internally nested functions */
/* The rest doesn’t count for hash/cmp */
PyObjectco_filename; / Name of the file where the code is located */
PyObjectco_name; / Module name|Function name|Class name */
int co_firstlineno; /* Starting line number of the code block in the file */
PyObjectco_lnotab; / Correspondence between bytecode instructions and line numbers */
voidco_zombieframe; / for optimization only (see frameobject.c) */
In PyCodeObject, there is a part we need to pay special attention to when doing reverse engineering questions, which is
PyObjectco_code; / Bytecode instruction sequence */
The value represents the byte count of the Pyc bytecode instructions.
If we reduce the instructions in Pyc, we need to modify the value of PyObject *co_code to reflect the reduced byte count.
To check the number of instructions, the reference command is:
len(code.co_code) where the first code is the variable you named for the loaded bytecode.
For example, in the figure below, we can see that the instruction length before modification is 27.
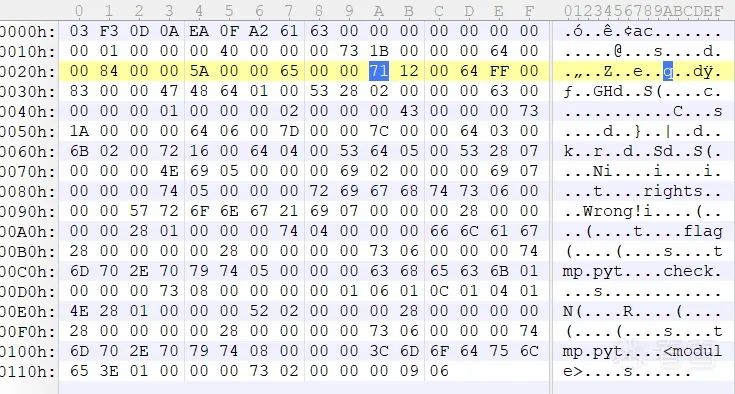
In the read bytecode, we see that the offsets are at 12 and 15.At 12, we can see that the instruction will jump to offset 18.At 15, LOAD_CONST 255 indicates loading the constant with index 255 from the constant table and pushing it onto the stack.
But here we obviously don’t have that many constants.So we can judge that this place is a flower instruction.Similar to C assembly flower instructions, we need to remove the instructions at 12 and 15 (analogous to C’s nop).
So we choose to open the pyc file with 010Editor and search for the corresponding hexadecimal data to locate the instructions.
For example, searching the official documentation, we find that the opcode for JUMP_ABSOLUTE corresponds to the hexadecimal 0x71, so the three bytes after 0x71 are the instructions at offset 12.
And the opcode for LOAD_CONST corresponds to the hexadecimal 0x64.
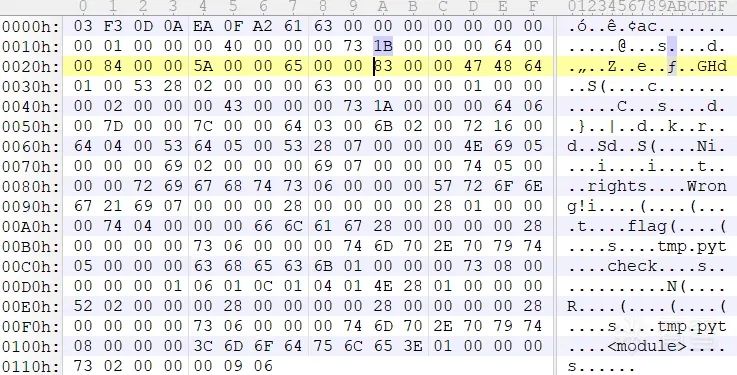
So we only need to delete all the bytes from 71 downwards and then modify the value of PyObject *co_code accordingly.
Initially, we know that the value of PyObject *co_code is 27, hexadecimal 1B.
Then we reduced six bytes, so we need to change 27 to 21 (0x15).
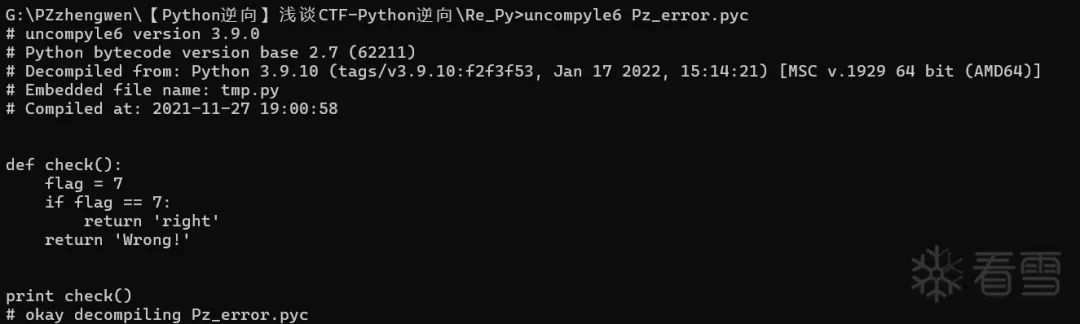
Finally, you can correctly use uncompyle6 to obtain the corresponding Python source code.
Content reference excellent video【Python Reverse】 A Brief Discussion on CTF-Python Reverse (https://www.bilibili.com/video/BV1JL4y1p7Tt/?spm_id_from=333.880.my_history.page.click&vd_source=d7f903c8e55e49011126ea9ac27a3d31)
# Previous Recommendations
1、Complete Process of APP Reverse Engineering
2、Implement an LLVM Pass and Simple Modification of OLLVM
3、PWN Introduction – Big Trouble with ASLR
4、Analysis of Spring and Autumn Cup Re 2024 Competition Questions
5、A Reverse Analysis of a Mining Trojan on the School Server