
Long Article, Many Images Warning!!!
8300 words in total, estimated reading time is 21 minutes.
Last week, I assembled a desktop computer from scratch.
Followed Follow Replay Share Like Watch MoreMr. Xiao Liang
0/0
00:00/00:53Progress bar, 0 percentPlay00:00/00:5300:53Full Screen Playing at 0.5x speed 0.5x 0.75x 1.0x 1.5x 2.0x Ultra Clear Smooth
Continue Watching
My feelings and experiences assembling a computer from scratch in a week are all here
Reprinted, my feelings and experiences assembling a computer from scratch in a week are all hereMr. Xiao LiangAdded to Top StoriesEnter comment Video Details
The idea came to me last weekend because of personal needs to assemble a desktop computer. I went for it, thus began my computer assembly journey, 2 days to select all the components, and 1 night to complete the assembly, taking a total of 5 days (including 2 days of logistics delivery time).
To begin with, this is my first assembly, and I was basically a hardware novice before, I had a rough idea of each component, but I knew nothing about specific models or compatibility, including the assembly process which was a learn-as-I-go experience. Today, I will share my entire experience and some insights I gathered during the process. Not everything may be correct, but it is definitely firsthand and authentic. If there are any inaccuracies or shortcomings, feel free to criticize and correct me.
Let’s start with a mind map of this article:
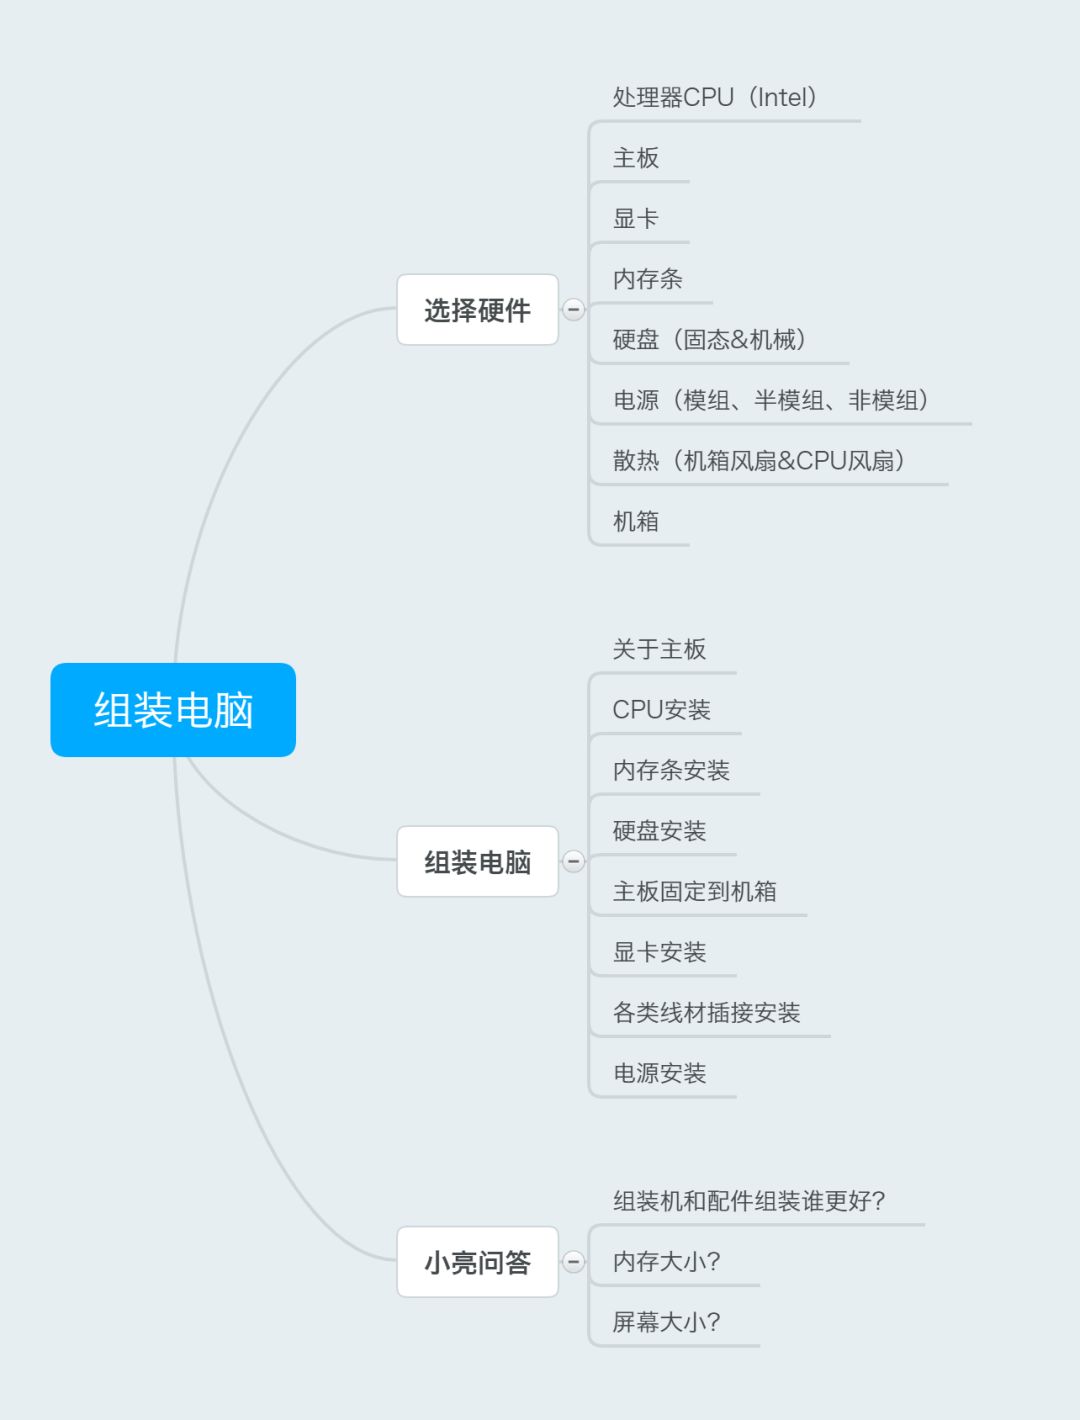
1. Choosing Hardware
Choosing hardware is the first step to assemble a computer, of course, there is a prerequisite that you have a direction, such as overall budget, usage needs, special requirements, etc. With these prerequisites, you can start researching and selecting components.
Let me explain my selection process briefly. After deciding to assemble a computer myself and clarifying the price range, I first consulted a few knowledgeable friends for recommendations on some main components to lay a foundation for my choices. Then I started to browse a large number of articles and videos on platforms like WeChat, Zhihu, Weibo, Bilibili about assembling computers. Honestly, at the beginning, I felt completely lost, the more I watched, the more complicated it seemed, and I understood less and less. However, after reading more articles, I gradually began to get a sense of it.
Through the above two methods, I gained an understanding of the various hardware needed for the computer, and at this point, I began comparing products on JD.com, looking at descriptions and reviews, and adding items of interest to my cart. This way, I slowly developed a preliminary list, and this process also helped me gain a basic understanding of the hardware assembly.
Next, let’s discuss each component needed for assembly, along with some of my thoughts during selection. The components required to assemble a computer include: processor (CPU), motherboard, graphics card, memory stick, hard drive (SSD & HDD), power supply, cooling (air/water & CPU fan/chassis fan), and the chassis; then for external devices, everyone is familiar with: monitor, keyboard, mouse, speakers, etc.

This article will not introduce the professional issues of each hardware, because I am just a novice, having not systematically studied it, and I can’t say much that is professionally sound. So I will simply share my feelings and thoughts, which might be helpful to you.
1. Processor (CPU)
Everyone should be familiar with the CPU; it is the core component of a computer, akin to the human brain, and is crucial. The most commonly used brands in the market are Intel and AMD. There is an abundance of information online regarding the pros and cons of these two manufacturers, so I won’t elaborate further. Personally, I have a preference for Intel, so I chose Intel without considering other brands.
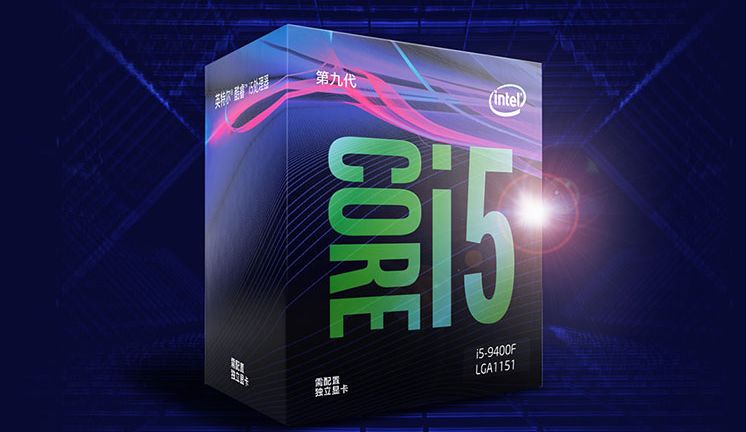
When selecting a processor, I was a bit torn between i5 and i7, and of course, within 5 and 7, there are 7th and 8th generations, with distinctions like U, K, core counts, threads, etc. (There are many professional introductions online, which you can check out). The price can vary significantly even for a small difference in specs. Due to budget constraints, I ultimately chose the i5 9400F and opted for a bundle with a MSI motherboard, which saved about 200-300 yuan compared to buying separately.
Here, I want to highlight an important point about purchasing CPUs. CPUs generally come in boxed and tray versions. However, JD.com only offers boxed versions, while Taobao has tray versions available. The price can vary by several hundred depending on the model’s high or low end. Regarding the choice between boxed and tray, I consulted professionals about quality concerns, and there is basically no need to worry about the quality of tray CPUs; it’s nearly impossible to counterfeit a CPU due to the high technological content. Furthermore, CPUs have a very long lifespan and rarely fail. However, for logistics convenience and personal habits, I ultimately chose the boxed version from JD.com (the boxed version comes with a free CPU cooler, which is seldom used), which was about 100 yuan more expensive than Taobao.
2. Motherboard
There are many choices for motherboards, and many brands are recognized as good, including ASUS, MSI, and Mingxuan. The price varies significantly based on functionality, interfaces, materials, etc.

I chose the MSI B360M MORTAR motherboard. I purchased it as a bundle with the processor from JD.com. When I received the board, I was impressed with its high aesthetic value and solid build quality, and it has all the necessary interfaces to meet standard requirements, with some extra features as well.
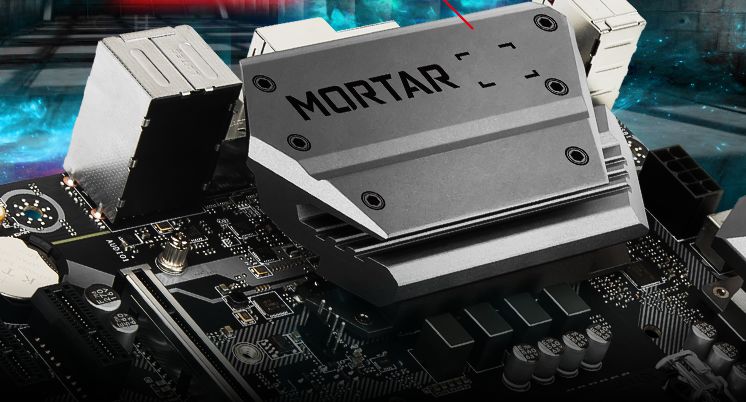
When selecting a motherboard, it’s important to ensure compatibility with the processor (Intel and AMD motherboards are not interchangeable), the size of the motherboard fits the chosen chassis, and the number of interfaces meets the requirements of the other components. All these issues need to be considered; otherwise, you may encounter installation or compatibility problems after purchasing.
3. Graphics Card
The graphics card is one of the most important and relatively expensive components, primarily used to connect the motherboard and the display (I hope this explanation is clear). It is one of the crucial components for “human-computer interaction”.
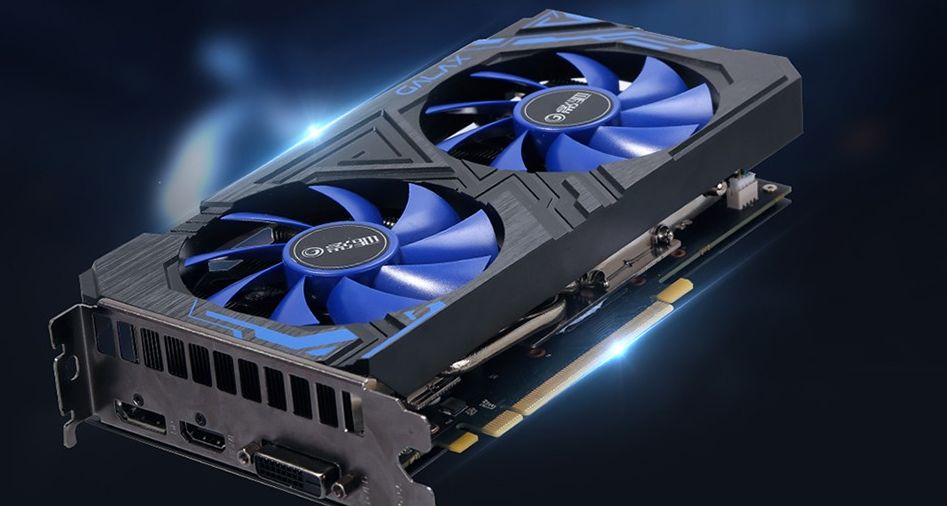
There are many manufacturers of graphics cards, and a search on shopping sites reveals a dazzling array of options. I was indecisive when choosing a graphics card because I wanted a better configuration while also hoping to stay within budget. Initially, a friend recommended the Colorful iGame 1060 Flame God, and later another friend recommended the Galaxy GTX 1060 6G General. After weighing all factors, I chose the latter.
Regarding the graphics card, I still don’t have much understanding, so I can’t offer better advice. My point is to do some comparisons before purchasing, such as searching “Graphics Card Bar” on Baidu, and always consider your own needs when configuring.
4. Memory Stick
The memory stick is also a particularly important component in a computer. The size of RAM refers to the capacity of the memory, which should be quite familiar to those who know about smartphones; in layman’s terms, it refers to the operating memory.
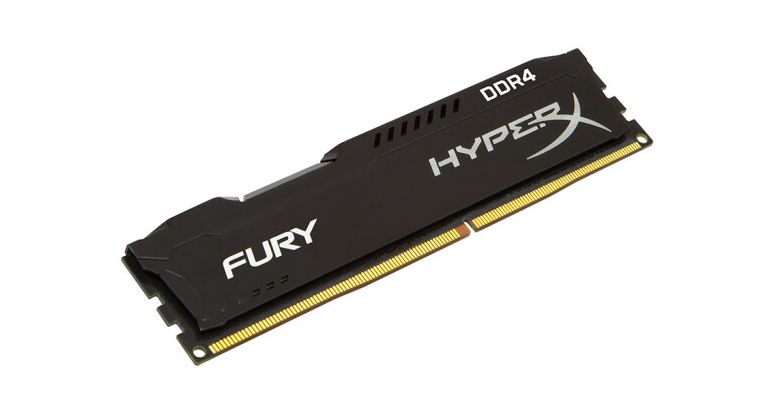
Currently, the mainstream memory is DRR4, with common computers generally having between 8-32GB. This can be determined based on your needs, but generally, doubling the memory will increase the price by several hundred. I chose Kingston HyperX DDR4 8G, which had good reviews online.
Regarding memory sticks, it’s important to note the size of the memory. Many people tend to hesitate between 8G and 16G. Memory isn’t necessarily better just because it’s larger. I read a very illustrative saying: if you need to use 7G of memory, there’s no difference between using 8G and 16G, but if you need to use 8.1G, switching to 16G will make a significant difference. So, it’s about being appropriate; having too much is wasteful. Ultimately, the choice should be determined by your usage needs, though if budget isn’t an issue, 16G is generally better.
5. Hard Drive
When we talk about hard drives, we generally refer to solid-state drives (SSD) and mechanical drives. First, it’s clear that SSDs are significantly faster than mechanical drives, so currently, the common configuration is SSD + HDD.
First, regarding SSDs, they are generally more expensive than mechanical drives for the same storage size. Typically, you can choose a 120G or 240G SSD as a system disk, which should be sufficient. It’s particularly important to mention the SATA interface and m.2 interface for SSDs. In terms of experience, those who have used both say that m.2 is significantly faster than SATA, though it is also more expensive. You can find detailed introductions comparing the advantages and disadvantages of these two types online.
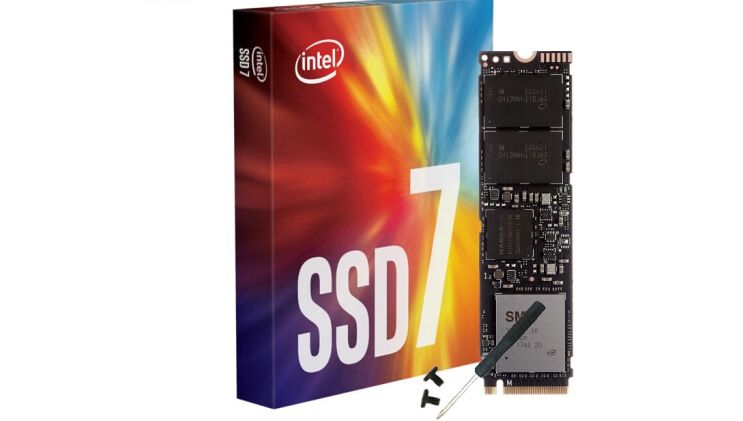
In terms of hard drive configuration, try to choose the SSD + HDD option. If the budget allows, using all SSDs would certainly provide a better experience. I chose the Intel 760P series 256G M.2 SSD, partitioning 140G for the C drive during the system installation and using the remaining space for software data.
6. Power Supply
The power supply is quite easy to understand; it is the device that supplies power to the entire setup. There are several key points to share about choosing a power supply.
Firstly, the brand of the power supply is very important. When choosing, you shouldn’t just focus on the price; instead, you should consider the quality and stability of the power supply. Currently, some Taiwanese power supply manufacturers like Delta, SeaSonic, and Zhenhua are quite good. Among domestic brands, Great Wall and Hantang have good reviews, so they can be considered.
Secondly, regarding power supply certification. Common certifications include 3C and 80 Plus certification, which is further divided into white, bronze, gold, platinum, etc. The higher the level, the better, so remember to pay attention to this when purchasing.
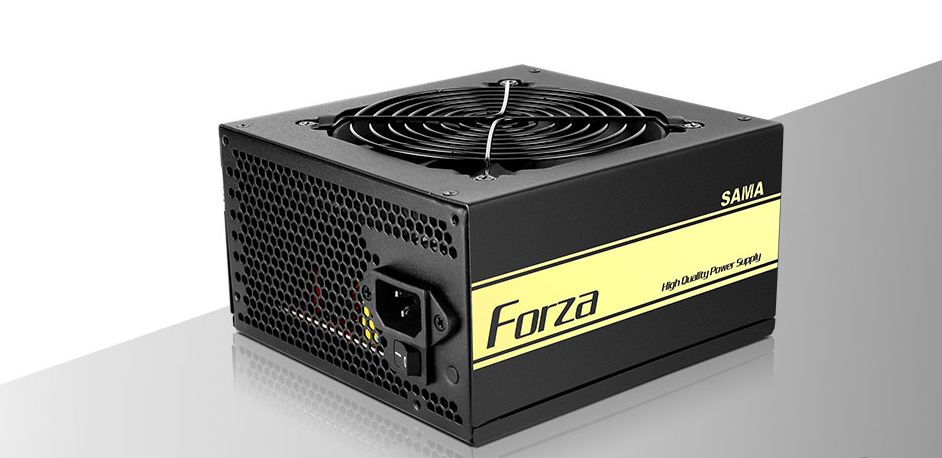
Thirdly, regarding power supply wattage. This is very important; when purchasing, you need to estimate the total power consumption of the entire setup. It is generally recommended to have a higher wattage for better stability. Of course, “tailoring” is key; having 100W more than the maximum power is usually sufficient. I chose a gold-rated 500W power supply.
Fourthly, regarding modularity. Power supplies are currently divided into non-modular, semi-modular, and fully modular types, with the main difference being whether the power cables can be plugged in or not. Non-modular cables cannot be detached, which can create a mess during assembly; semi-modular means that essential cables cannot be removed, while some less common ones can be; fully modular means all cables can be plugged in or removed at will, but this comes at a significantly higher price.
7. Cooling
Cooling can be briefly discussed. It can be categorized into air cooling and water cooling, and functionally divided into CPU fans and chassis fans. Water cooling is generally more effective than air cooling but is also more expensive.
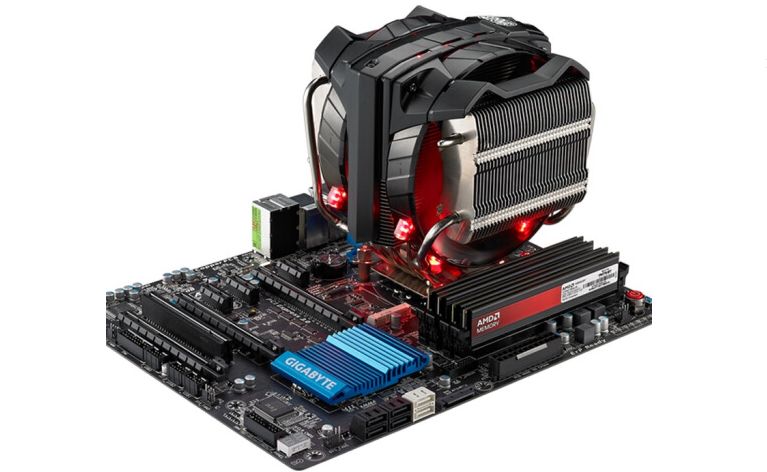
The CPU fan is used to cool the CPU. Boxed CPUs come with a small fan, but the quality and effectiveness are usually not great, so most people tend to buy one separately. Chassis fans are installed inside the case for cooling, but many people treat them more as decoration since most modern chassis fans are designed to be visually appealing.
8. Chassis
After all the components have been selected, it’s time to consider the chassis; of course, going “naked” is also an option.
Regarding the chassis, I just want to mention the size issue. Chassis come in large, mid, small, and mini sizes, so you just need to ensure that your motherboard and graphics card can fit. Generally, standard chassis should work fine.

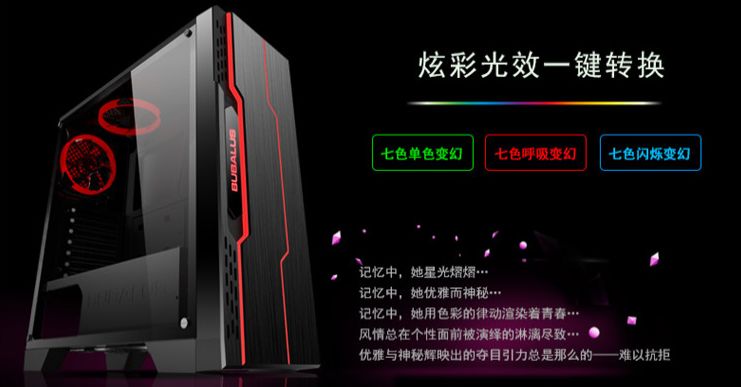
In terms of specific selection, it’s entirely based on personal preference; just choose the one you find visually appealing. However, I personally suggest that the size shouldn’t be too small, and it should at least allow for cable management. The following section will discuss the assembly process. Additionally, I recommend choosing a chassis with a transparent side panel for aesthetics.
I initially selected a small chassis from Xingu, but upon receiving it, I found it unsatisfactory as I prefer larger ones. I switched to a larger chassis from Dazhong, which has a full side panel and looks great without being too expensive.
Finally, here is the list of components I ultimately selected. It may not be the most cost-effective, but my feeling is that it works great; video editing is very smooth, and rendering/exporting speed is also good. I am very satisfied so far.
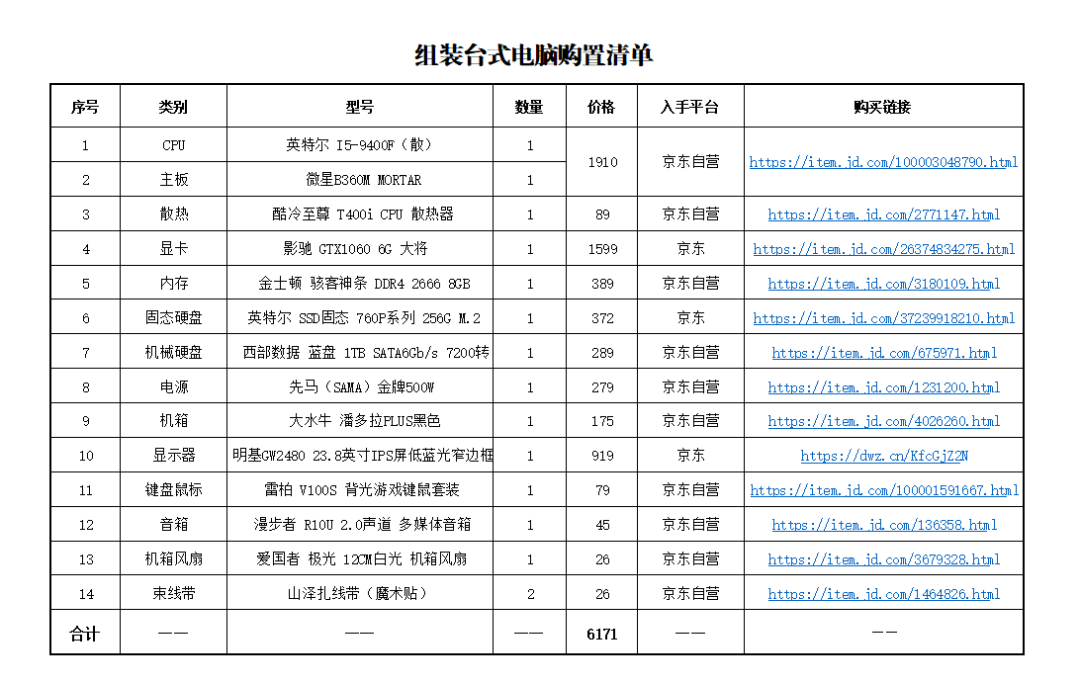
▲ Click the image for HD
Reply in the backend: Configuration List
You can obtain the configuration list Excel file

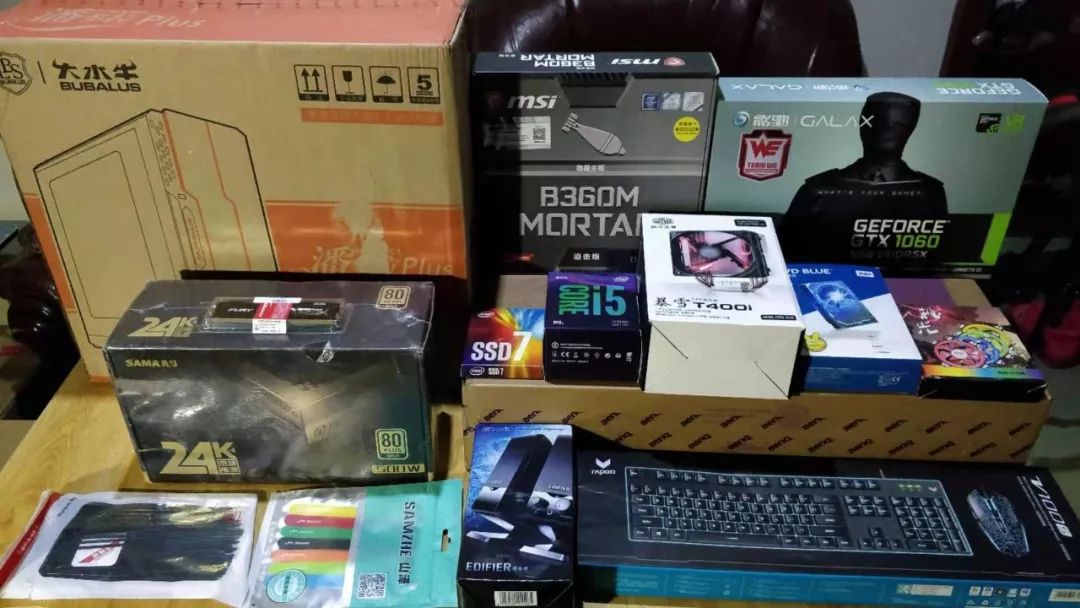
After receiving the components, they piled up into quite a large heap, giving me a strong sense of accomplishment.
2. Assembling the Computer
Once all the components are purchased, you can truly begin the assembly. For complete novices, it’s best to watch assembly videos online. I watched several videos on Bilibili, some of which were quite detailed. Only by watching videos can you get the most intuitive understanding of the assembly process.
Of course, you can also refer to this article because I started with zero knowledge, but by watching tutorials, videos, and reading manuals, along with hands-on practice, I managed to get it to light up on the first try, even though it took longer the first time. While writing this article, I helped my brother-in-law select and assemble two more computers, and the speed was significantly faster on the second assembly. Additionally, I gained some new insights after going through the process again.

Today, I will share the entire assembly process, focusing on some insights and problems I encountered during assembly, as well as key points I believe should be emphasized for beginners.
Also, I want to emphasize one point: if you are a beginner, be sure to read the manual first, absolutely!
The following are the contents from the motherboard manual, which are indeed clear and easy to understand.

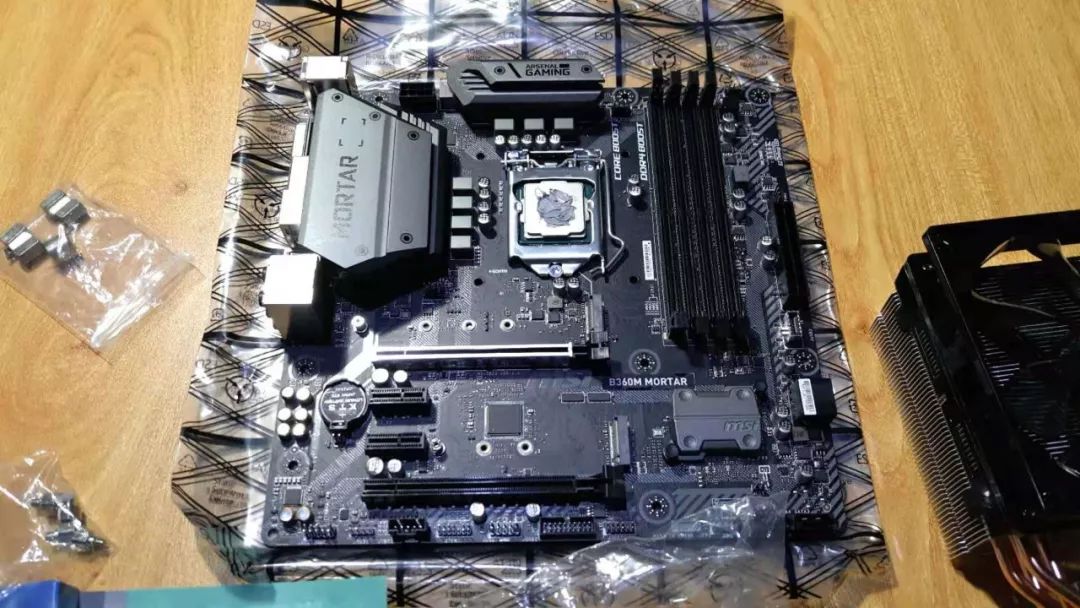
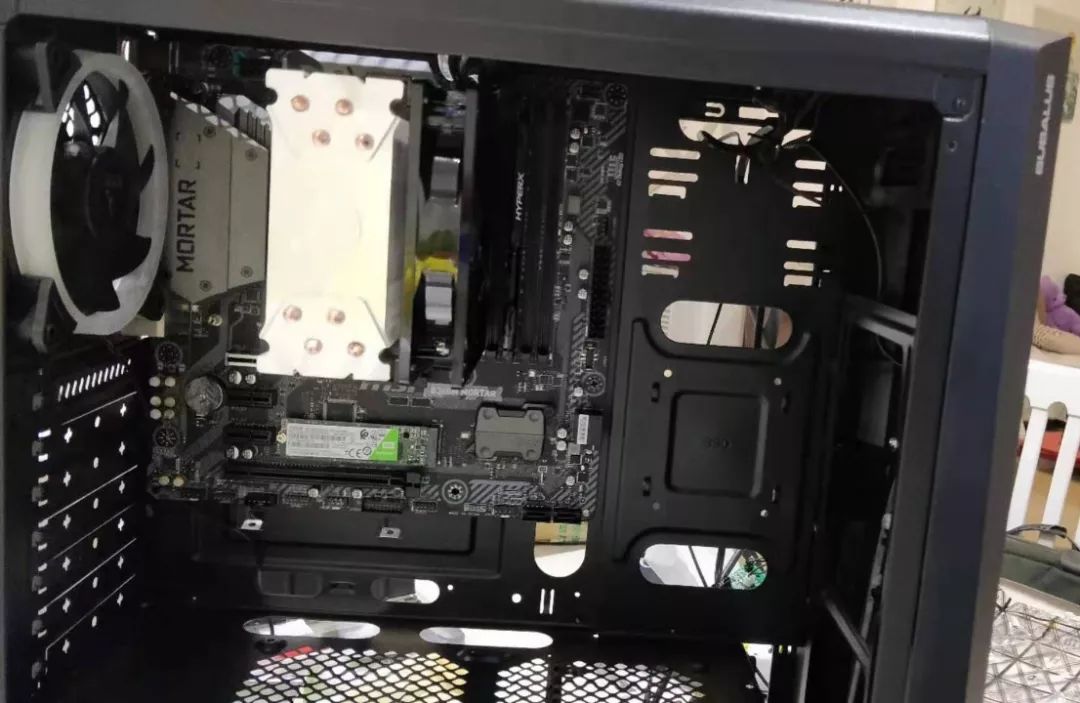
1. About the Motherboard
During assembly, the first step is to take out the motherboard and familiarize yourself with the various functional areas and interfaces of the motherboard to smoothly proceed with the subsequent steps.
I found a picture of the motherboard online, which is the one I used. I also found a labeled diagram highlighting key areas, which can help everyone familiarize themselves with the entire motherboard area.
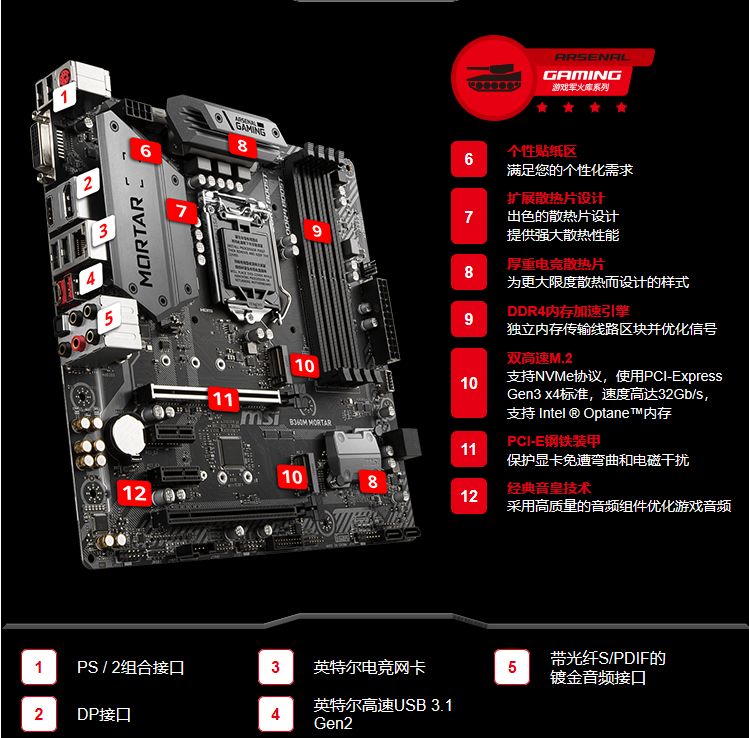
By looking at the above diagram, you can gain an understanding of the various areas of the motherboard. Additionally, be sure to carefully read the motherboard manual, as it usually contains intuitive illustrations that describe the various interfaces and installation instructions for major components, which are very helpful for successfully assembling the computer.
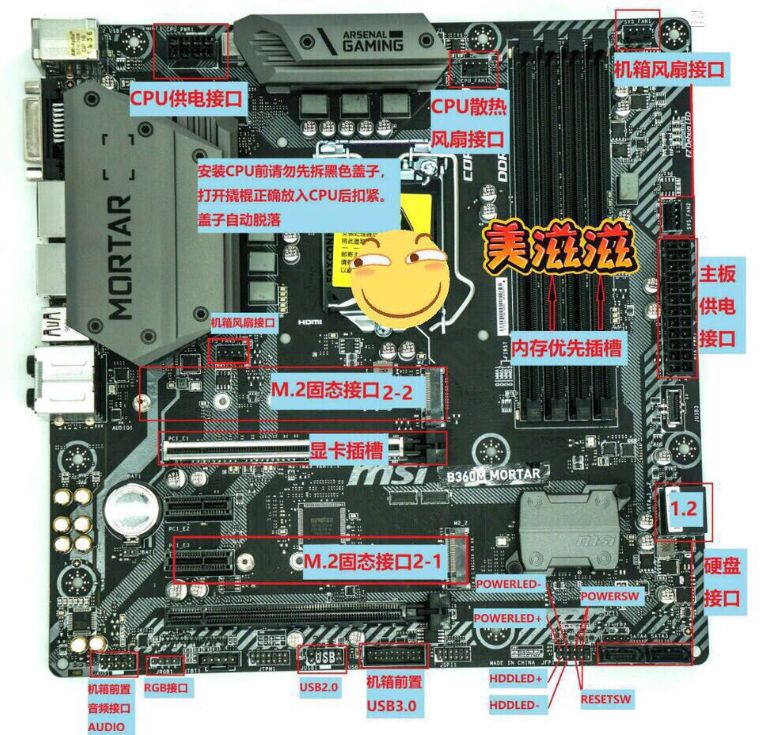
Furthermore, the motherboard has various markings, and each interface has a corresponding label. For instance, there are clear indications for which interface connects to the front USB, which connects to the CPU fan, etc.
2. CPU Installation
The CPU installation involves two parts: installing the CPU itself and installing the CPU cooler.
To begin with, installing the CPU is quite simple. Here, I will use Intel chips as an example. The diagram I previously showed for the motherboard already illustrates this clearly. Be careful when opening the CPU protection cover on the motherboard; you will see a “small notch”. The CPU will also have a “small groove” to match the position; gently place it on top and close the cover. The image below clearly explains the installation method.
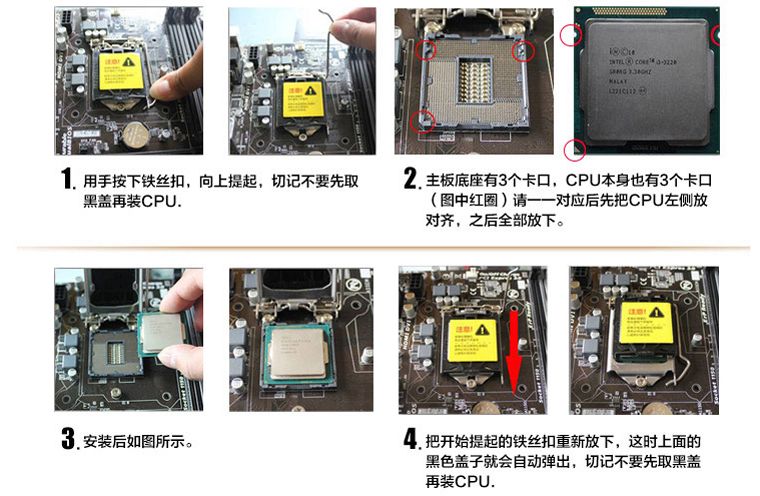
After installing the CPU, before installing the CPU cooler, you need to apply “thermal paste”, which helps with heat dissipation and protects the CPU. When applying, just place a small amount in the center; you don’t need too much.

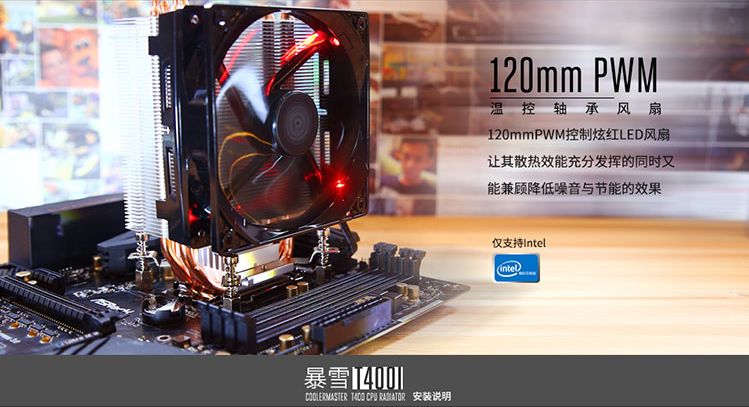
Next, install the CPU cooler. The installation of the cooler depends on the specific model, and you can quickly complete it by following the illustrations in the manual. Just a few reminders: first, if it’s a cooler you purchased separately, the installation method may be slightly more complicated; generally, there will be a tray at the bottom, and you need to remove the fan section first, install the screws, and then attach the fan. Second, do not tighten the screws too much to avoid pressing down on the CPU. Third, remember that the fan should face the side of the memory stick, and the installation should look something like this:
3. Memory Stick Installation
Installing the memory stick is quite simple; the memory slots have distinguishing notches. One side is shorter, and the other is longer; when you receive the memory stick, the distribution of the “gold fingers” should be clear at a glance.
It’s important to remind you that, if you have only one memory stick, you can technically install it in any of the available slots on the motherboard. However, the manual suggests that if you have one stick, it should preferably be installed in: DIMMA2. If you are building a dual-channel setup, it should be: DIMMA2 and DIMMB2. Always follow the manual’s instructions for installation.
4. Hard Drive Installation
Earlier, we discussed the difference between SATA and m.2 hard drives, so let’s talk about the installation methods for both types.
First, for m.2. This installation is very simple; just install it directly onto the motherboard. It’s important to note that if the motherboard has more than one m.2 interface, it’s advisable to install it in the first one. Last week, I assembled a computer and mistakenly installed it in the second interface, which resulted in the system not recognizing it. I had to reinstall it in the first interface to resolve the issue. This installation location should be checked in the motherboard manual for detailed instructions.

Additionally, a small point to mention for those without assembly experience is that m.2 hard drives come in different lengths; some brands are longer, and some are shorter. The screws that secure the hard drive on the motherboard can be adjusted in position. I also spent a long time figuring this out during my first assembly, so I’m mentioning it here in advance.
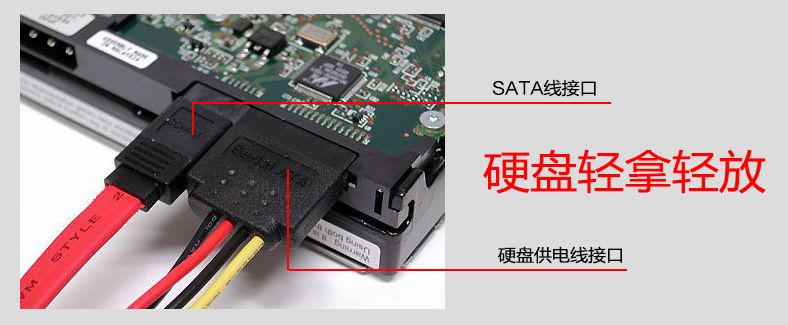
Now let’s discuss SATA drives. These are installed in different locations depending on whether they are SSDs or mechanical drives. Generally, SATA drives are installed in a designated spot within the chassis; if you are unsure where to place them during your first assembly, check the chassis manual or the product detail page on shopping sites. It’s worth noting that SATA drives require separate power supply, which is also not complicated; just ensure you connect a power cable during the power supply installation.
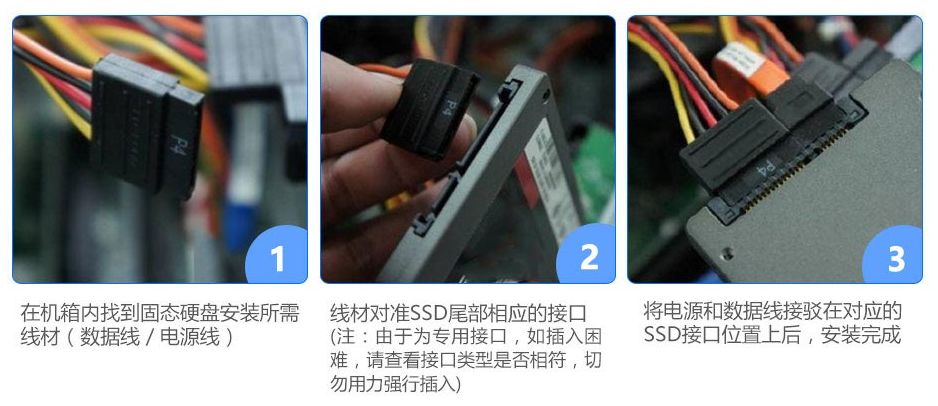
During my first assembly, I initially didn’t know where to place the mechanical hard drive, which resulted in a lengthy search. I eventually found the installation method by checking the product detail page on JD.com, which wasted a lot of time. I recommend that first-time assemblers clarify this in advance to avoid unnecessary detours.
5. Fixing the Motherboard to the Chassis
After installing the CPU (including the cooler), memory stick, and hard drive on the motherboard, the next step is to fix the motherboard in the chassis.
Before fixing the motherboard, you need to first install the motherboard I/O shield onto the chassis, which is the item shown below.
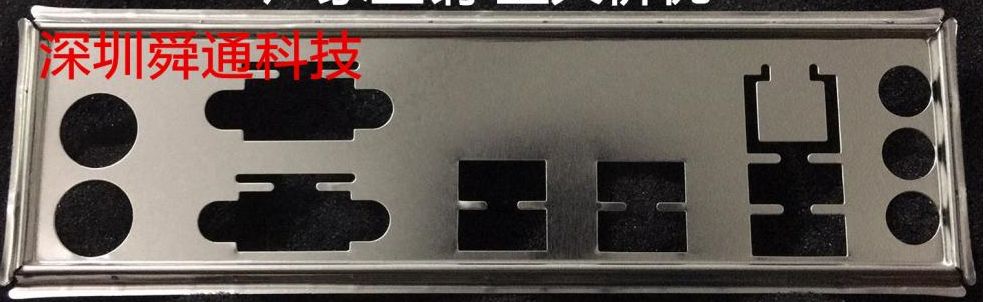
After installing the shield, you can fix the motherboard in the chassis. This is not complicated; just remember to screw all the holes that can be screwed to ensure that the motherboard is securely installed.
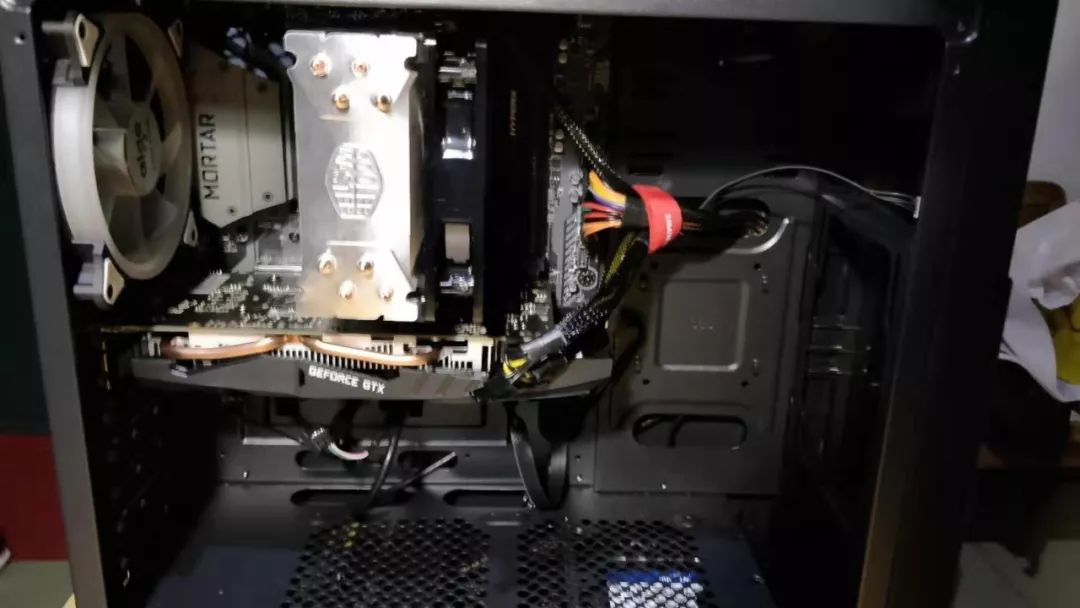
6. Installing the Graphics Card
Once the motherboard is fixed in the chassis, you can start installing the graphics card. The graphics card installation is also straightforward, and the slots are easy to distinguish; the motherboard has a slot marked “PCI-E”. You also need to remove the corresponding bracket from the chassis.
During my first assembly, I encountered a problem where I didn’t realize I needed to remove a fixed piece from the chassis, as shown below.
This caused the graphics card to get stuck and not fit in place. I even thought there might be a problem with the chassis, but after a closer look, I realized I needed to remove that fixed piece first. After inserting the graphics card, secure it with screws. So, remember to avoid this mistake during your first assembly; looking back, I realize how silly it was.
7. Connecting Various Cables
This step may be the most complex for beginners, mainly concerning the connection methods for the front panel power cable, reset cable, and other small connectors. Let’s discuss them one by one.

First, regarding the front panel jumpers: the power indicator light, power switch, reset switch, and hard drive indicator light are all connected in a small area.
During the first installation, you can quickly figure this out by looking at the diagram in the motherboard manual. It’s not as complicated as it seems. Let’s take a look at the illustration from the manual:
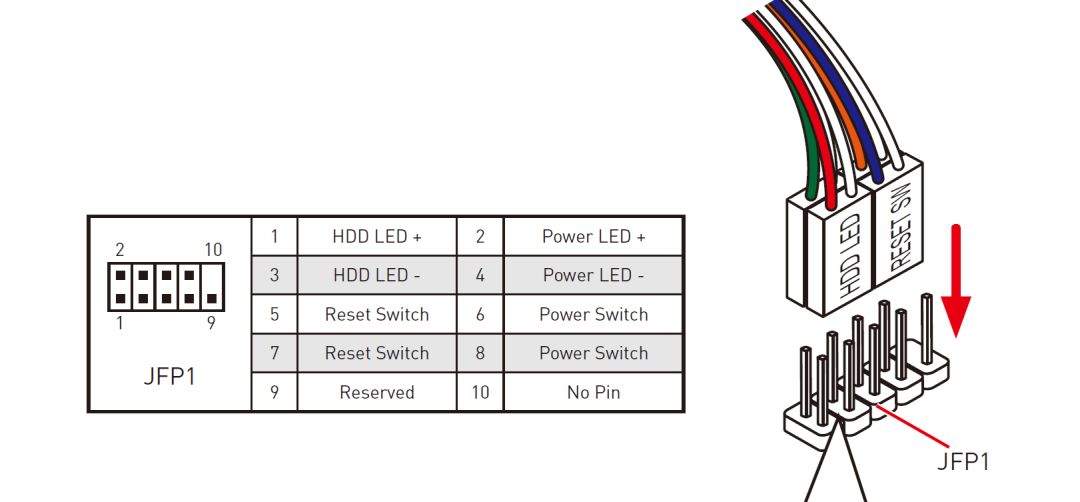
Additionally, I found a labeled diagram online for clarity.
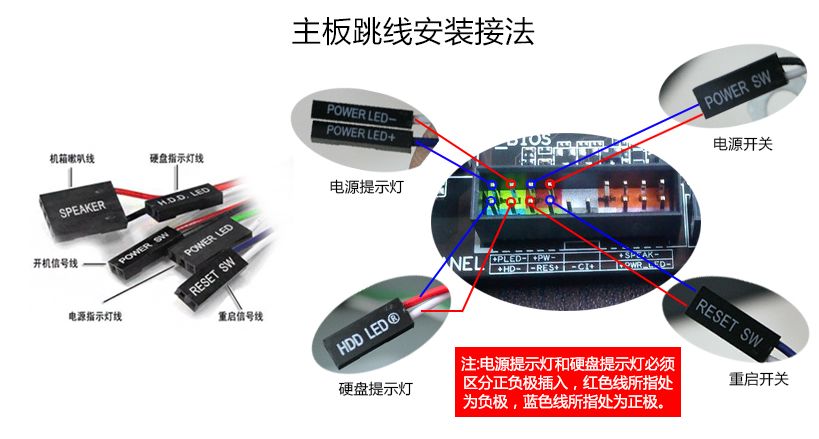
When connecting, you need to locate the pins on the motherboard; there are five pins at the bottom and four at the top. The diagram has numbered each pin; 1 is the bottom left corner, 2 is the top left corner, and so on, which corresponds to the table nearby, indicating which pin corresponds to which function. You simply connect the corresponding wires to the appropriate pins. Using this diagram, even the most complex connections become simple.
Special Reminder: When assembling the second machine last week, I encountered a bug where the power and reset wires on the chassis were marked incorrectly, resulting in the system not powering on after assembly. I accidentally pressed the reset button, and it turned on. I realized the issue and switched the two wires, resolving the problem. This is generally uncommon, but if you encounter a situation where it doesn’t power on, this could be a troubleshooting approach to consider.
Next, connect the USB and front audio cables. The front panel has both USB 3.0 and regular USB cables. USB 3.0 is easy to identify; it’s the largest connector among the cables. The motherboard slot has a small notch to differentiate the front and back; just align it and connect it properly.
USB 2.0 is also labeled on the motherboard and is easy to distinguish since it has 5 pins on the top and 4 on the bottom, matching the configuration of the connectors, so just ensure you connect them correctly.
The audio cable also has some characteristics; it has 5 pins on the bottom and 4 on the top (3 on the left, 1 on the right), and the motherboard marking is “JAUD1”.
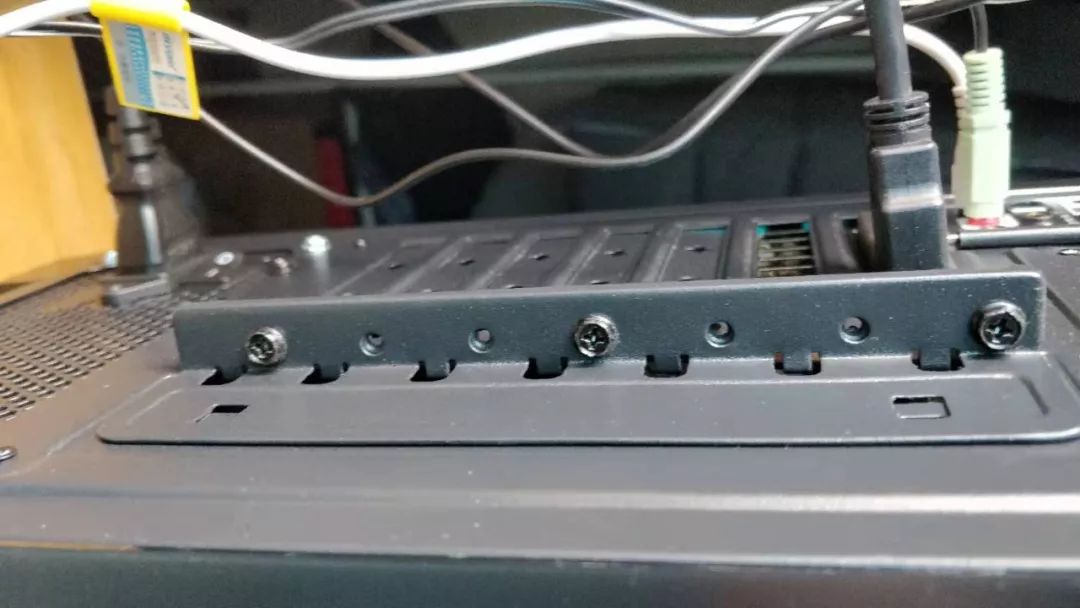
Lastly, regarding SATA interface hard drives. Previously, we discussed how to install hard drives in the chassis; this step involves connecting the SATA cables for the hard drives. One end connects to the hard drive, and the other connects to the motherboard. The motherboard will have a marking for “SATA” followed by numbers (1/2/3/4) since there are generally several interfaces available; just choose one and connect it.
With that, we have completed the installation of the cables. I want to recommend “cable management in the chassis”. In traditional assembly, there was no need for this; if you open the case of an old desktop computer, you’ll see a chaotic mess of cables, which is not visually appealing. Nowadays, aesthetics are increasingly emphasized, so cable management has become a trend. The benefit of this is that it makes the inside of the chassis look neat and tidy, enhancing the overall visual effect, similar to how electrical wiring is concealed within walls during home renovations. Below is my cable management effect:
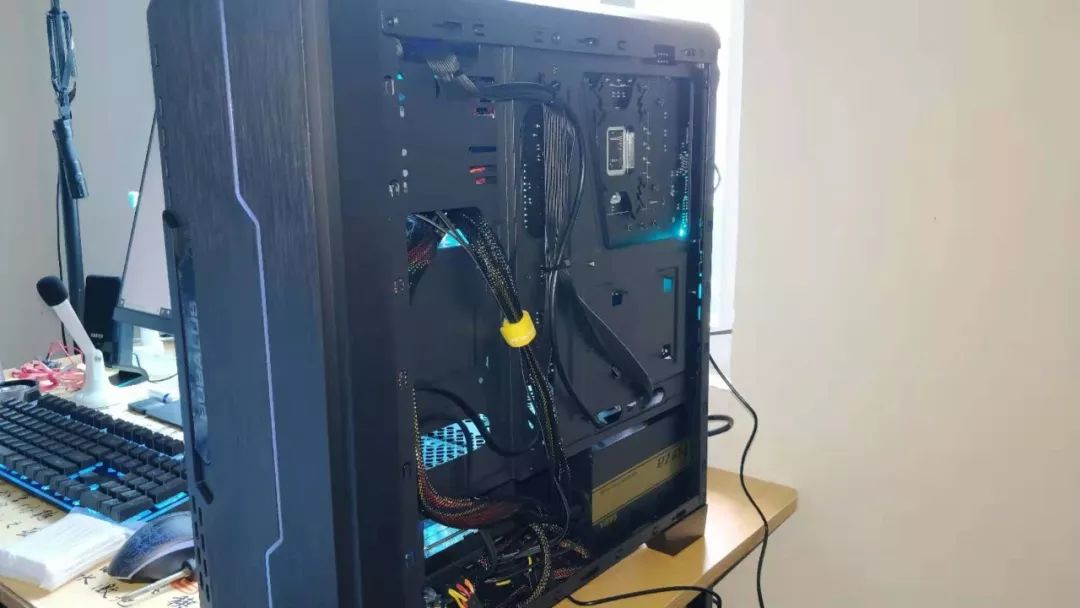
Nowadays, most chassis support cable management, but if you’re using a small chassis, it may not support it. So, be sure to inquire whether the chassis supports cable management when purchasing.
8. Power Supply Installation
After completing all the previous steps, you can start installing the power supply. Power supplies are categorized based on the chassis type into top-mounted and bottom-mounted power supplies. The installation method is straightforward; just place the power supply in the designated compartment of the chassis and secure it with screws. This section mainly discusses how to connect the power supply cables.
The following image shows the typical power supply connection diagram:
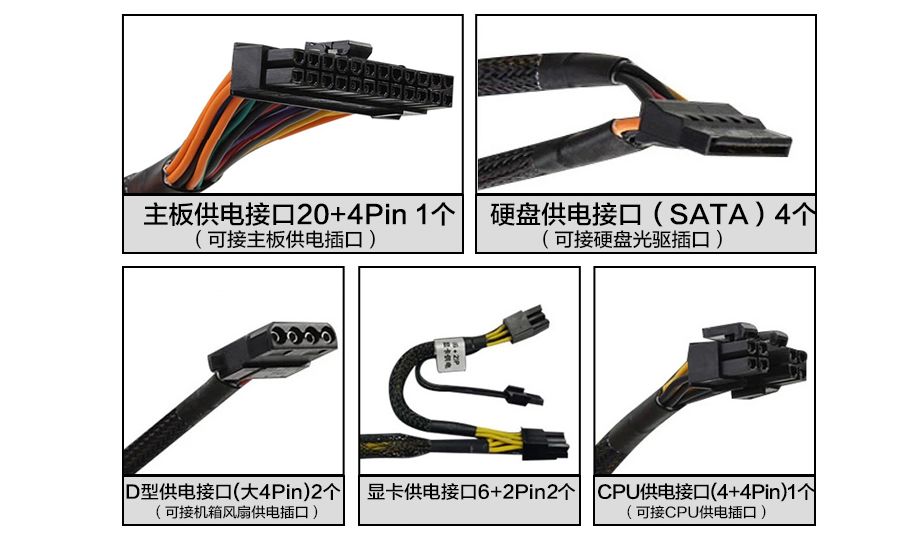
The connections we need to make are: motherboard power, CPU power, graphics card power, hard drive power, and possibly fan power, though it’s generally recommended to connect fans directly to the motherboard.
This connection isn’t complicated; the main power connector is the largest and connects directly to the motherboard at the “ATX_PWR” interface. Other CPU and graphics card power connectors are usually labeled on the cables, though some may have 4-pin or 6-pin connectors. The power supply cables can be adjusted in length according to the number of pins required.
Once all the above steps are completed, you can connect the power supply, press the power button firmly, and start the machine. Generally speaking, if you follow the steps outlined above, it should light up on the first try without any issues. If it doesn’t light up, don’t panic; check if something isn’t plugged in correctly. Hardware isn’t that complicated; as long as everything is connected properly, it should work.
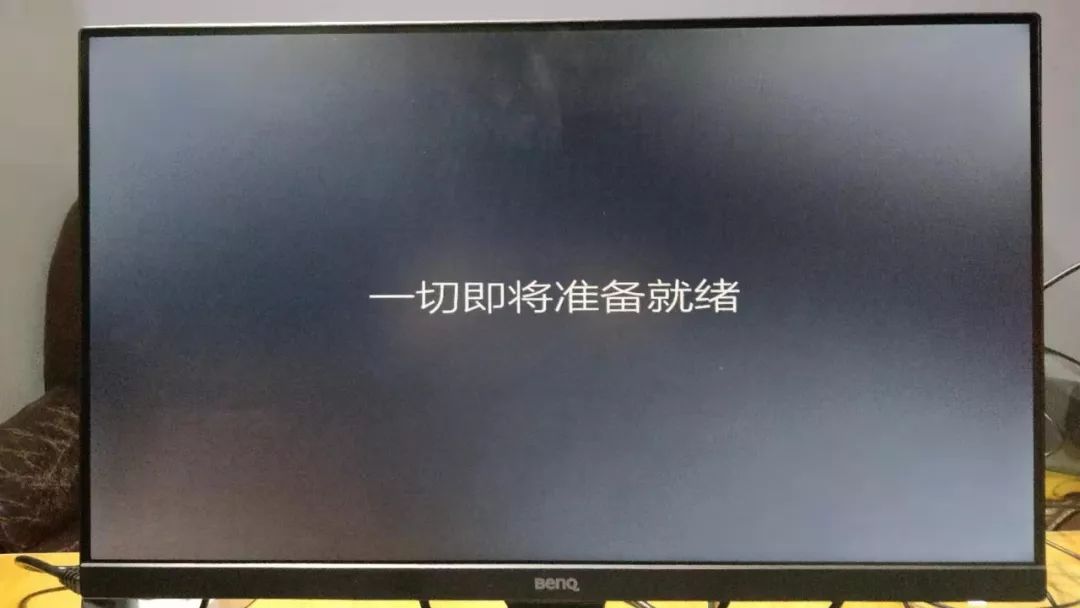
I sincerely hope that everyone can achieve a successful first boot and enjoy the assembly process. Don’t give up on “tinkering” as it makes our lives more interesting.
If it lights up, you can then connect the monitor and install the system. Regarding system installation, it’s quite simple and isn’t the focus of this article, so I won’t elaborate further. However, if there’s demand, I can create a tutorial on system installation based on everyone’s situation; I have tested two methods for clean installation of Windows, which are worth having.

3. Q&A with Mr. Xiao Liang:
Q: Why assemble your own components instead of buying a pre-assembled computer online?
A: There are many introductions about this online. For instance, pre-assembled machines on JD.com appear to have very high configurations at very low prices. But if you think about it, if you were to buy those components separately, the price would absolutely not be that low. Thus, there are likely things we don’t know about that the seller won’t disclose. Another point is that the joy of assembly is also very appealing, which cannot be experienced with pre-assembled machines. Lastly, here’s a detailed article highlighting the differences.
Q: Is more memory always better?
A: As mentioned earlier in the memory selection section, this isn’t necessarily the case; it depends on your needs. Of course, if your budget allows, you can certainly go for it all at once.
Q: What size computer screen is appropriate?
A: I was also indecisive about this initially; I was planning to buy a 27-inch screen, but some friends said it might be too large for home use. Ultimately, I chose a 23.8-inch screen, and it feels just right for home use. Later, I also saw a physical 27-inch screen, which indeed is larger and provides a good experience. You can choose between these two sizes.
These are the questions I could think of for now. If anyone has more questions, feel free to leave a message in the comments or send me a private message to discuss.
Attachment 1
Special thanks to:
Kai Kai (provided me with significant support during my computer assembly, both mentally and materially, directly contributing half of the funds and accompanying me during assembly, much appreciated.)
Liro (a reader of Mr. Xiao Liang, provided substantial help in hardware selection, directly giving me a list and offering very professional advice, greatly aiding my final selection.)
Xiong Ge (the first person I consulted, recommended CPU, graphics card, monitor, and other core components, helping me open the first door.)
Wang Luo (my ideal expert, who provided two detailed plans, offering valuable references for my selection.)
He Ge (accompanied me in the office while discussing assembly and provided a complete set of assembly tools, including a screwdriver.)
Andrew Orange (his public account: Orange Technology, focused on computers and digital products, provided me with some good advice.)
Attachment 2
This article took a week to complete, during which I assembled three computers and accumulated some experience, but overall, I still consider myself a novice. There may be many things not covered in the article; if I have new thoughts or insights in the future, I will organize and share them as appropriate. Please continue to follow me.

◤ If you think it’s good, remember to click “Like” ◢