Zephyr Basics Series: Starting from Scratch with Embedded Development
Hello everyone, welcome to Lixin Embedded. Today, we are embarking on a brand new journey – the “Zephyr Basics Series”. The goal of this series is to guide you step by step into the powerful embedded real-time operating system, Zephyr, and to understand its core functionalities. If you are interested in embedded development or want to add some “hardcore” elements to your projects, this series is definitely worth saving for a deep dive.
Introduction: Installation and Basic Setup
First, we need to set up the Zephyr environment. This section will guide you through the installation of Zephyr and help you create the simplest application skeleton. You will learn how to compile, flash, and debug this skeleton project, and you will also get to know a very useful tool – West. Don’t worry, the first article is just a warm-up; in the following parts, we will unlock more potential of West to boost your development efficiency.
Kconfig: The Art of Configuration
While setting up the skeleton, you might notice something called Kconfig. Don’t panic; this is actually Zephyr’s configuration tool. We will delve into how it works, how to view, modify, and save Kconfig symbols, and even define a custom symbol for your application. By the way, Kconfig can also handle build settings, such as specifying different build types, which is super practical!
Introduction to Device Tree
Zephyr uses a structure called “Device Tree” to describe hardware, which defines all microcontrollers and development boards. In this section, we will first explore the device tree files in Zephyr, familiarize ourselves with its syntax, and then write a few files ourselves to play around with the device tree. Don’t worry, we will start from the basics and progress step by step.
Device Tree Bindings: Giving Hardware a Soul
Having a device tree is not enough; we need to add semantics through “bindings”. Zephyr translates the device tree into code through bindings. In this section, we will write a few bindings ourselves and see what the generated results look like. Finally, we will use Zephyr’s device tree API to access this data. Sounds cool, right? Let’s try it out!
Workspaces: The Right Approach to Professional Development
To keep the tutorial simple and understandable, we mostly used “freestanding applications” before, which require separate installation of Zephyr’s source code. However, in real projects, Zephyr’s West tool supports a “workspace” mode – all source code, locations, and versions are written in a manifest file, and West will automatically set up the environment without relying on external files. This section will teach you how to use West to create the simplest workspace application and experience the joy of professional development.
Prerequisites: What You Need to Know
This series is aimed at friends with some embedded background, so we won’t start from “What is a microcontroller”. It would be better if you are familiar with build systems like CMake, but it is not a strict requirement. If you have no idea what Zephyr is, I recommend taking a quick look at the official documentation’s introduction; it only takes a few seconds.
Our examples will use Nordic’s nRF52840 development board. However, if you don’t have this board, it’s okay; Zephyr supports a wide range of boards, and you should be able to follow along with any of them. If all else fails, you can use emulation, but we won’t cover emulation in this series. Most of the content actually doesn’t require hardware; we will just compile a project to play with.
For the editor, I will use VS Code for demonstrations, but you can use whatever you like. During debugging, I will show how VS Code plugins can make life easier; we won’t discuss other editors.
On the operating system side, I will use Linux shell commands; Windows users should prepare a bash environment (like WSL), as we won’t be dealing with Windows scripts.
Installation: Quick Start
Installing Zephyr and the toolchain can be quite a challenge, as everyone has different preferences. To save time, I chose a convenient method – using Nordic’s toolchain manager to pull the “full package” directly. This is not the only option, but it is indeed convenient.
We won’t use Nordic’s complete IDE; instead, we will write a shell script to set up the terminal environment. This way, we can clearly see how Zephyr’s environment variables work and follow the tutorial using a pure terminal. Of course, if you want to install Zephyr manually, you can follow the official documentation, and we will regroup later!
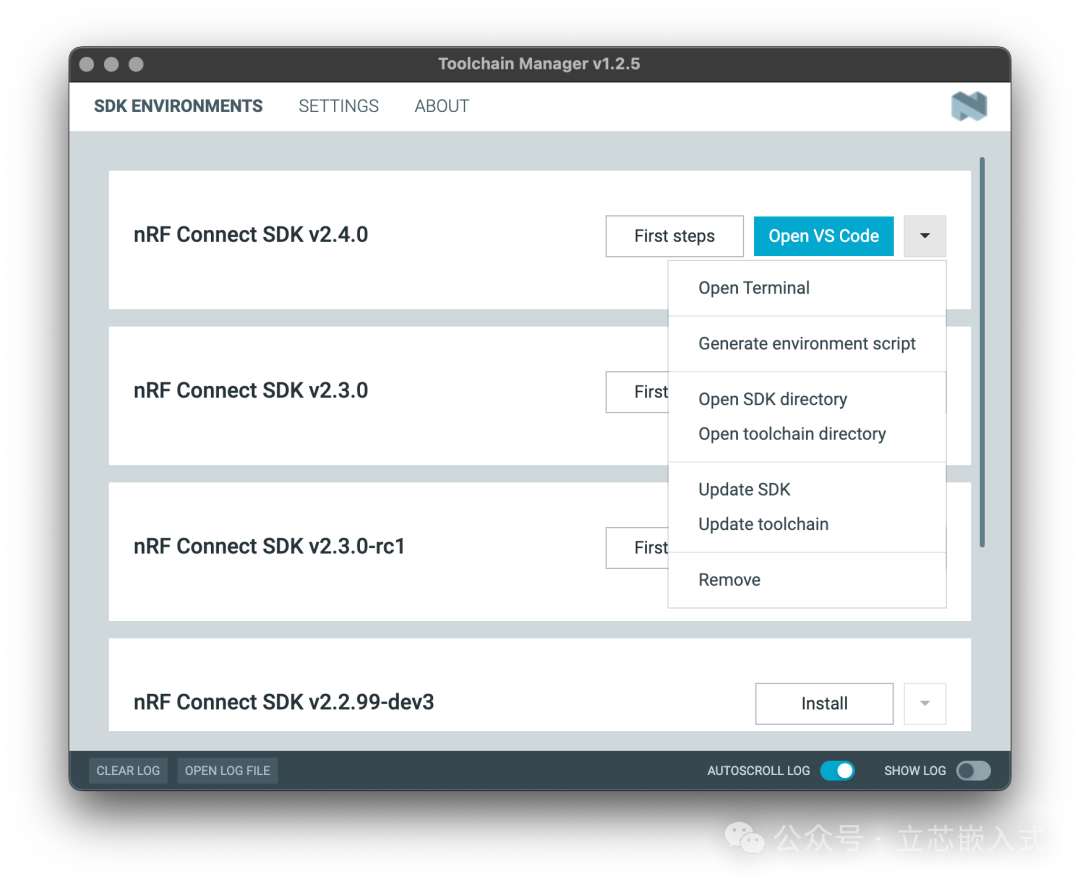
Quick Setup with Nordic Toolchain
Nordic’s nRF Connect SDK is based on Zephyr and comes with a very useful toolchain manager that can pull different versions of the SDK and Zephyr with one click. We will start with it:
- Follow the toolchain manager’s instructions to install the latest version.
- (Optional) Install the nRF Kconfig and DeviceTree plugins for VS Code.
- If using Nordic’s boards, also install a command-line tool.
After installation, we will write a <span>setup.sh</span> script to configure the paths and variables. Here are the key points:
- Add the toolchain’s
<span>bin</span>directory to the<span>PATH</span>. - Set
<span>ZEPHYR_TOOLCHAIN_VARIANT</span>(choose zephyr) and<span>ZEPHYR_SDK_INSTALL_DIR</span>(toolchain path). - Load Zephyr’s built-in
<span>zephyr-env.sh</span>, and then run<span>west zephyr-export</span>to register the CMake packages.
Once done, you can use <span>west</span> and <span>cmake</span> in the terminal. This is just a temporary solution; later we will use workspace mode to pull the source code directly into the project, which will be much more elegant.
Creating an Empty Application Skeleton
With the environment set up, let’s get to the main task – building the simplest Zephyr application. Zephyr supports several types of applications:
- Freestanding Application: Source code and Zephyr are separate, relying on environment variables to find Zephyr.
- Workspace Application: Use West to pull all dependencies into the project, perfect for team development.
- In-repo Application: Write code directly in the Zephyr repository, usually for official demos.
We will start with a freestanding application, which is the simplest and can be completed in just a few steps.
File Structure
Create a project directory that looks like this:
.
├── src
│   └── main.c
├── CMakeLists.txt
└── prj.conf
<span>src/main.c</span>: Where the code goes.<span>CMakeLists.txt</span>: CMake build script.<span>prj.conf</span>: Kconfig configuration file, even if empty, it must exist.
Writing a Super Simple Code
<span>main.c</span> will start with a simple infinite loop to let the MCU sleep:
#include <zephyr/kernel.h>

void main(void) {
    while (1) {
        k_msleep(100); // Sleep for 100 milliseconds
    }
}
This code does nothing but occupy a spot. We won’t use Zephyr’s threading features for now; we will add them later.
Configuring the Build
<span>CMakeLists.txt</span> is the core of the build and looks like this:
cmake_minimum_required(VERSION 3.20.0)
find_package(Zephyr REQUIRED HINTS $ENV{ZEPHYR_BASE})
project(EmptyApp VERSION 0.1 DESCRIPTION "Empty Zephyr Application" LANGUAGES C)
target_sources(app PRIVATE src/main.c)
<span>find_package</span>uses<span>ZEPHYR_BASE</span>to locate Zephyr.<span>project</span>defines the project name and language.<span>target_sources</span>adds<span>main.c</span>to the<span>app</span>target (<span>app</span>is predefined by Zephyr).
The board (for example, <span>nrf52840dk_nrf52840</span>) can be specified here or during the build.
Compiling
Compile using CMake:
cmake -B ../build -DBOARD=nrf52840dk_nrf52840
cmake --build ../build -j4
Or use West:
west build --board nrf52840dk_nrf52840 -d ../build
West is Zephyr’s “universal tool”; besides building, it can do other things, which we will discuss in detail later.
Flashing and Debugging
Once compiled, let’s flash the program onto the board:
west flash -d ../build
West will automatically find the board (for example, using Nordic’s <span>nrfjprog</span>), and once done, you’re finished.
Debugging is also simple:
west debug -d ../build
This will start gdb, set a breakpoint, and you can step through:
(gdb) break main
(gdb) continue
(gdb) next
Want to debug with VS Code? Install the <span>cortex-debug</span> plugin and configure a <span>launch.json</span>, and you can click through the interface.

Summary
In this article, we installed Zephyr using Nordic’s toolchain, built the simplest freestanding application, and compiled, flashed, and debugged it. We also clarified the differences between West and CMake; we will use West more in the future, as it aligns better with Zephyr’s ecosystem.
In the next issue, we will discuss Kconfig and see how to use <span>prj.conf</span><code> to manage configurations.
If you have any questions, feel free to leave a message on our public account. See you next time!