
In today’s DIY computer era, the motherboard is not just the core of hardware connections; it also carries many powerful and practical functions. Whether it’s the cool RGB lighting effects, the TPM module for data security, or the overclocking button for performance enhancement, these advanced interfaces and functions hidden on the motherboard frequently refresh your computer, bringing a brand new user experience and performance enhancement. Today, we will reveal these treasure functions on the motherboard in detail and see how to use them reasonably to make your computer a high-end device that combines aesthetics and performance!
Other Advanced Interfaces of the Motherboard
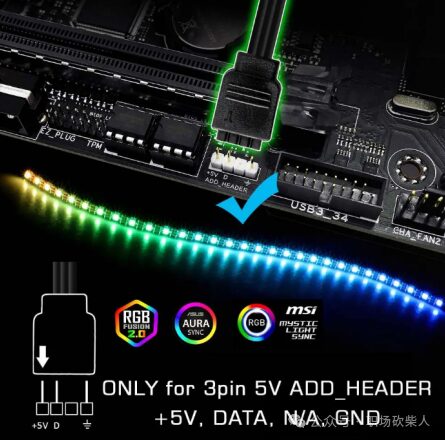
(1)RGBLighting Strip Connector and Digital LED Socket
The RGB lighting strip connector and digital LED socket on the motherboard are used to connect and control RGB lighting strips and digital LEDs (such as ARGB strips), adding visual effects and personalized customization to the computer system.
Function and Role
Connect RGB lighting strips:Used to connect standard 12V RGB lighting strips, allowing the strips to achieve various colors and lighting effects through motherboard control.
Lighting Effect Control:Achieved through the motherboard’s built-in software (such as ASUS Aura Sync, MSI Mystic Light, Gigabyte RGB Fusion, etc.) to synchronize and customize RGB lighting effects, enhancing visual effects.
The RGB lighting strip connector and digital LED socket on the motherboard provide rich lighting effect customization options for computer systems. Through the correct connection and control, personalized visual effects and dynamic lighting effects can be realized. By using the software provided by manufacturers, users can easily customize and synchronize lighting effects, enhancing the appearance and user experience of the computer.
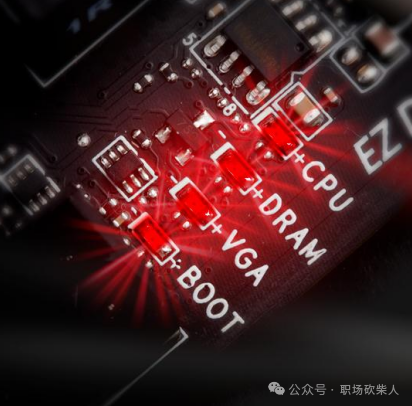
(2)Debug LED
Debug LED (debug indicator light) is a diagnostic tool located on the motherboard, used to display error codes during system startup, helping users identify and resolve hardware or startup issues.
The main functions of Debug LED
① Startup Process Monitoring
Debug LED will display a series of codes during system startup, representing the status of each stage of the startup process. These codes can help users understand the progress of system startup and identify if any errors occurred during the startup process.
② Error Diagnosis
When the system fails to start normally, Debug LED will display specific error codes that correspond to specific hardware or system problems. By referring to the error code table in the motherboard manual, users can quickly locate the source of the fault.
③ Real-time Display
Debug LED usually displays the current system status in real time, even when the system is running normally, it can still be used to monitor system status.
Debug LED is an important diagnostic tool on the motherboard, helping users quickly identify and resolve hardware and system issues by displaying codes and error messages during the startup process. Correct use of Debug LED can improve troubleshooting efficiency and ensure stable system operation.
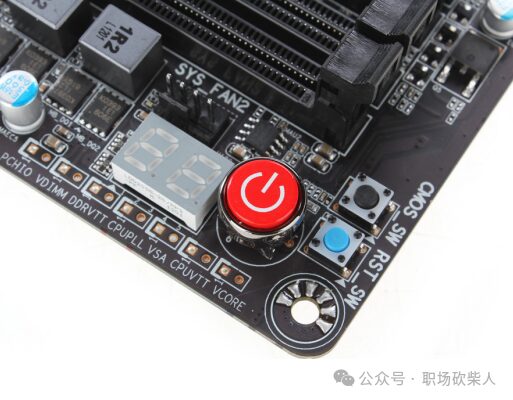
(3)MOMOK Switch
The MOMOK switch, or “Momentary-On Momentary-Off Key” switch, is usually referred to simply as a switch or button. This type of switch on computer motherboards is mainly used for specific functions, such as starting or restarting the system.
The MOMOK switch (power switch and reset switch) is a key control switch in the motherboard front panel jumpers. By correctly connecting and operating these switches, the system’s startup and reset functions can be realized. Refer to the motherboard manual for correct jumper connections, and pay attention to anti-static measures and regular checks to ensure normal operation and stability of the system. When encountering startup or reset issues, checking and adjusting these switch connections can effectively resolve related faults.
(4)TPM Interface
TPM interface (Trusted Platform Module interface) is an interface on the motherboard used to connect the Trusted Platform Module (TPM). TPM is a hardware security module used to provide security-related functions such as encryption key generation, device authentication, data encryption, and secure boot.
TPM interface and TPM module provide powerful hardware-level security functions for computer systems. Through correct installation and configuration, functions such as key management, device authentication, data encryption, and secure boot can be realized, enhancing the overall security of the system. Correctly connecting the TPM module, enabling and configuring the corresponding security functions can effectively protect data and system security, preventing unauthorized access and malware attacks.
(5)BIOS Auto-Override Switch/ Dual BIOS Switch
Two buttons, one for override and one for switch, are used to operate the BIOS, facilitating recovery operations in case of failure.Operation Method: When the auto-override function is enabled, the system will automatically save a backup of the current BIOS version when updating the BIOS. If there is a problem during the update process (such as power failure or update failure), the system can automatically restore to the previously backed-up BIOS version, avoiding the risk of system failure to boot due to update failure.
The BIOS auto-override switch and dual BIOS switch are advanced features on some modern motherboards, designed to enhance system stability and security. By enabling the auto-override function and configuring the dual BIOS switch, users can quickly recover and protect the system when updating the BIOS or when the system encounters problems, avoiding unnecessary risks and losses. When using these features, users should follow the operation guidelines to ensure safe and effective management of the system’s firmware updates and maintenance.
(6)Overclocking Button
The overclocking button is a feature designed to simplify and accelerate the overclocking process of the CPU or other hardware.
Functions and Roles of the Overclocking Button
① Simplify the Overclocking Process
The overclocking button is usually designed as a physical button or switch, aimed at simplifying the user’s operation process for overclocking the system. By pressing the button or flipping the switch, the system will automatically adjust related parameters to enhance the CPU or other hardware’s performance.
② Quick Setup
Users do not need to have an in-depth understanding of complex overclocking settings and parameters; they just need to press the button or flip the switch to quickly achieve system overclocking. This is particularly useful for users who are not familiar with overclocking details but wish to enhance system performance.
③ Safety Considerations
Most overclocking buttons preset safety parameters to ensure that the system does not experience stability issues or hardware damage due to overly high settings during overclocking. This design helps protect hardware and enhance user experience.
The overclocking button is a convenient design for users to quickly enhance system performance. By simplifying the overclocking operation process, even users unfamiliar with overclocking technology can enjoy the benefits of hardware performance enhancement. When using the overclocking button, users should pay attention to system compatibility, stability, and safety, following relevant operation guidelines and recommendations to achieve the best overclocking effects and long-term stable system operation.
Thank you all for reading this far! If you are interested in DIY computers, hardware performance optimization, and technology news, don’t forget to follow me! Here you can learn more practical computer knowledge and be the first to know the latest hardware dynamics and practical skills. Follow me to easily navigate the tech world, enhance your user experience, and make your devices more powerful and personalized! Looking forward to seeing you in the upcoming content!
—— “To My Dear Readers”
-
Unveiling! The Ultimate Guide to Buying Solid State Drives: Build Your Computer Performance Beast!
-
[Super Value Hot Sale] Build the King of Cost Performance! Top Configuration DIY Assembled Machine, Performance Monster Strikes, Gaming and Office Both!
-
[Comprehensive Analysis] Laptop Computers: Convenient and Efficient Advantages VS Unignorable Disadvantages, Is Your Choice Wise?
-
Complete Guide to Laptop PCs! From Thin and Portable to Gaming Monsters, There’s Always One That Makes You Heartbeat!
-
Brand Machines Unveiled! Stable Performance, Long-Lasting Companionship, Your Best Partner for Work and Study!