Click the blue text to follow us

Learning is endless, and recording is always with us!
—— Liuli Kangkang
As a network operation and maintenance engineer, ssh is one of the most commonly used Linux commands, especially now that cloud computing has become prevalent. Every day, I need to maintain a large number of servers and VMs, so I frequently ssh into various servers and VMs, requiring a username, IP, and password for each connection.
In today’s security-first environment, password settings need to be increasingly complex and changed regularly. Additionally, for certain business requirements, entering a password may not be feasible, which necessitates passwordless login.
So, what is passwordless login, and how do we set it up?
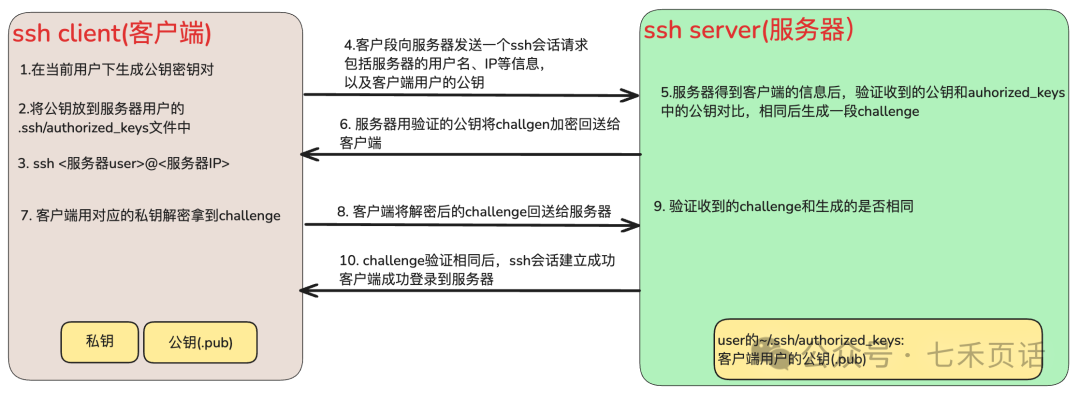
Before discussing passwordless login, we need to distinguish between the client and the server. As shown in the diagram below, the left side is the client, which is the device where the current user is located, wanting to log into the server on the right. In an ssh session, the client and server can interchange roles, with the only determining factor being that the current device is the client and the target device to log into is the server.
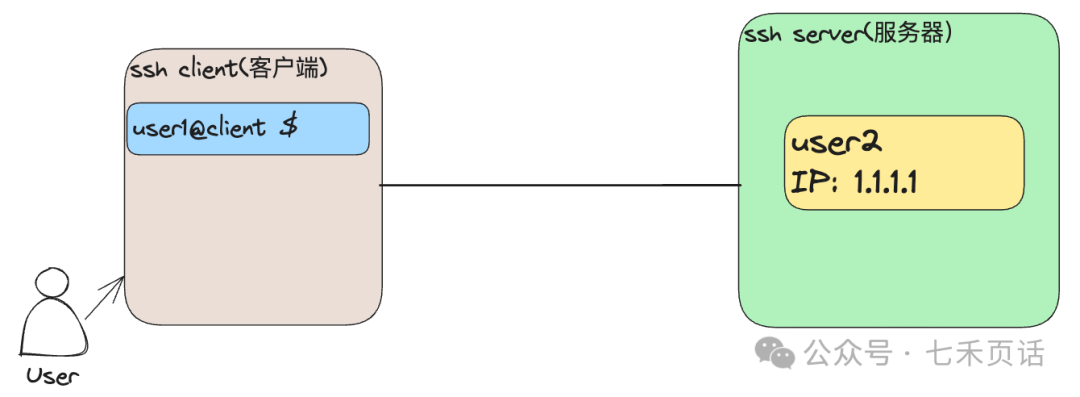
When logging into the server from the client, the following information is required from the server:
1. IP or URL (URL needs to be resolved to IP via DNS)
2. Port, default is 22, can be checked in /etc/ssh/sshd_config on the server
3. Username and password, which are defined usernames on the server.
It is important to note that the username is defined on the server and can be the same as or different from the client user.
For example, in the diagram below, the current device is called jumpserver, and I want to log into a device called instance-20250427-033831. Therefore, jumpserver is the client for the current ssh session, while instance-20250427-033831 is the server:
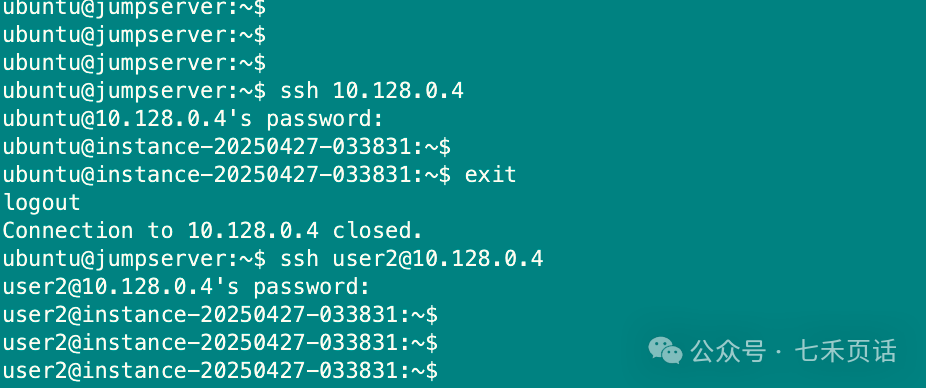
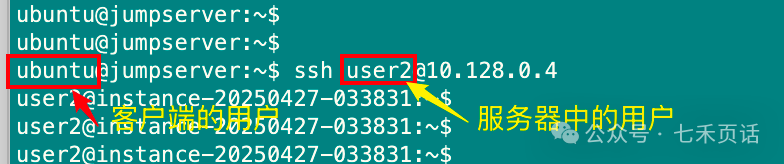
I performed ssh twice; the first time I directly ssh into the IP of instance-20250427-033831. After logging in, I saw the prompt as “ubuntu@instance-20250427-033831”, which means that if no username is specified in the ssh command, the current client user will be used as the server user. However, this user may not exist on the server.
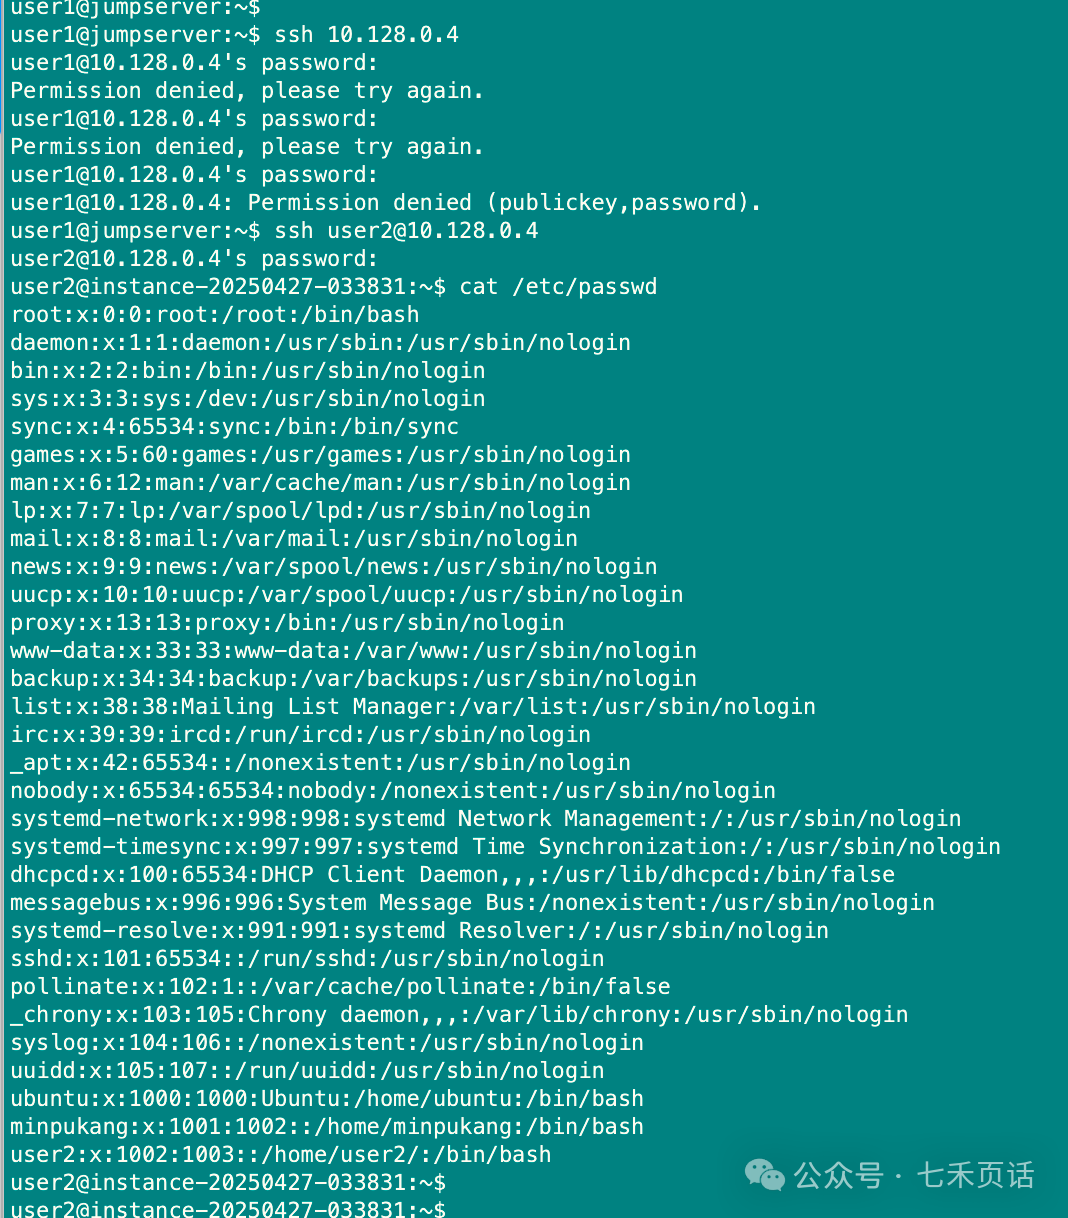
For instance, in the diagram below, the user on the jumpserver client is user1. When I directly <span>ssh 10.128.0.4</span>, it defaults to using user1 to log into the server, but it always fails. When we check the users on the server, we find that there is no user1 on the server, hence the failure.
Next, we will set up passwordless login from the client to the server.
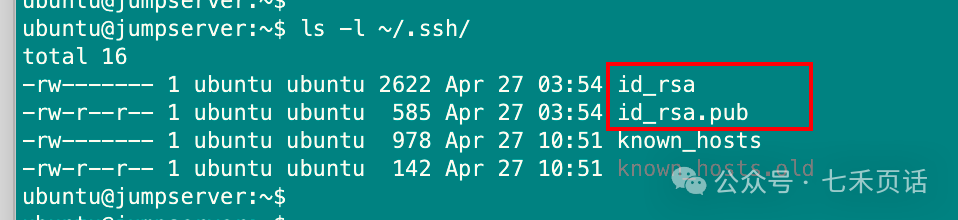
Check for SSH Key Pair on the Client
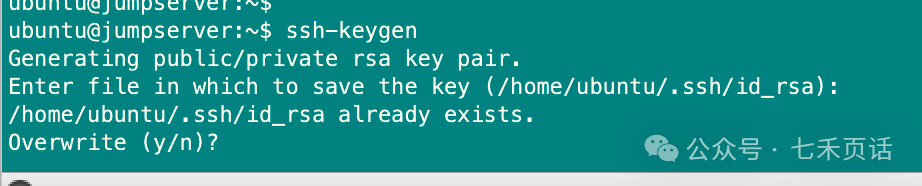
Why check if an SSH key pair already exists? Some people may habitually use <span>ssh-keygen</span> to generate an SSH key pair. Although it will prompt that a key pair already exists and ask if you want to overwrite it, some users may just keep pressing Enter until the generation is complete, ignoring the prompts in between.
However, if a key pair has already been generated, it may have other uses. If it gets overwritten, those uses may be disrupted, leading to unexpected issues that can easily be overlooked during troubleshooting.
Therefore, it is best to check for existing keys before generating anything. If they exist, you can use them directly. The command is very simple:
ls -l ~/.ssh/
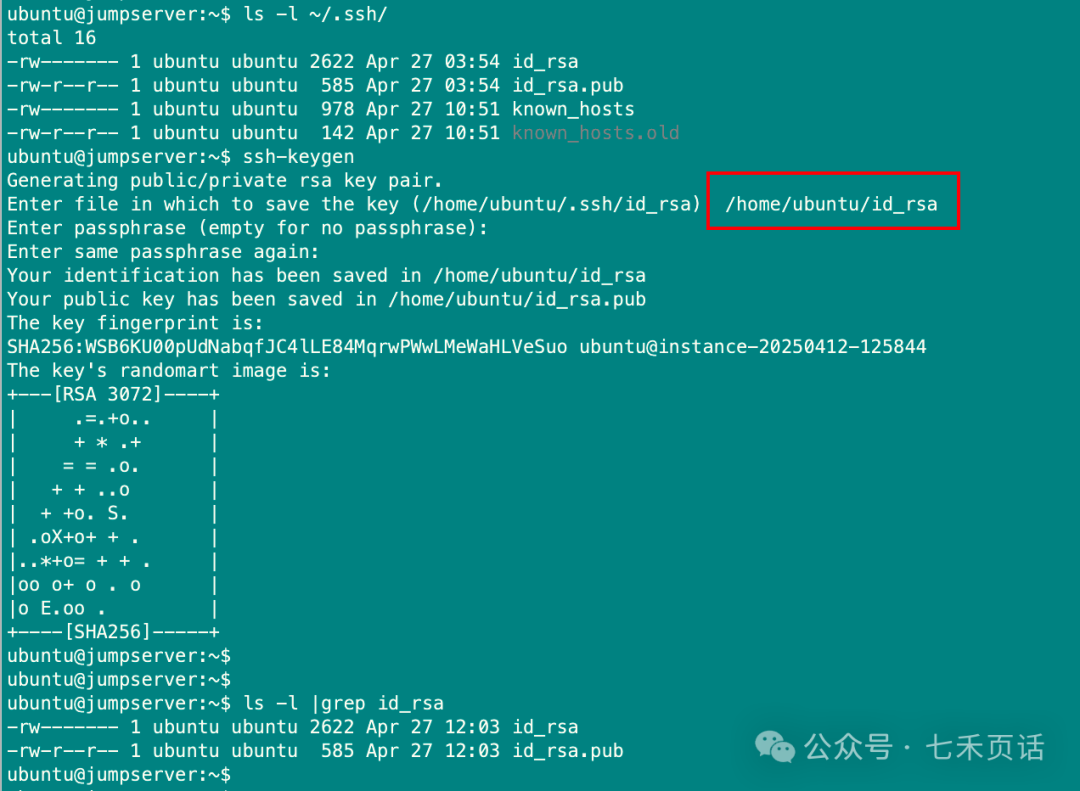
Generate SSH Key Pair
If an SSH key pair already exists, you can use it directly. If you do not want to use the existing one:
-
Backup the current key pair and then generate a new one.
-
When generating a key pair, set a custom path, or you can directly use the
<span>-f</span>parameter to specify it, but this will require using an additional<span>-i</span>parameter when using ssh later.

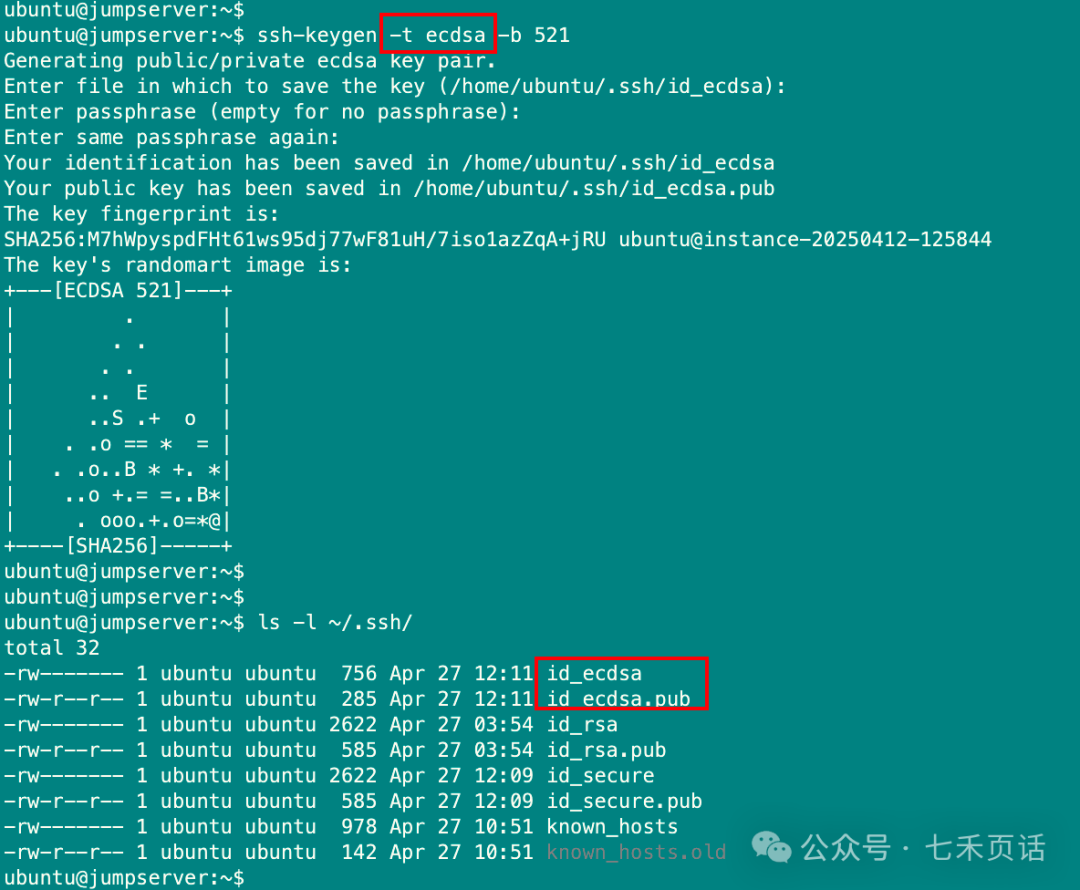
- Change the algorithm used to generate the key pair by specifying the
<span>-t</span>parameter. For example, in the diagram below, the elliptic curve encryption algorithm ECDSA (521 bits) is used to generate the key.
In SSH, common key types include the following:
- RSA: This is one of the earliest SSH key types, using the RSA encryption algorithm. RSA keys are widely used in SSH and are the default key type for many SSH tools and protocols.
- DSA: This is another early SSH key type, using the DSA encryption algorithm. DSA keys have been widely used but are no longer recommended.
- ECDSA: This is an SSH key type based on the elliptic curve encryption algorithm, which is generally more secure and efficient than RSA and DSA keys.
- ed25519: This is a public key encryption scheme based on elliptic curve cryptography, widely used for SSH key authentication. ed25519 keys offer higher security and better performance, making them the preferred choice in many cases.
- ECIES: This is an encryption scheme based on elliptic curve cryptography that can be used in SSH. ECIES keys are typically used for encrypting and decrypting sensitive data.
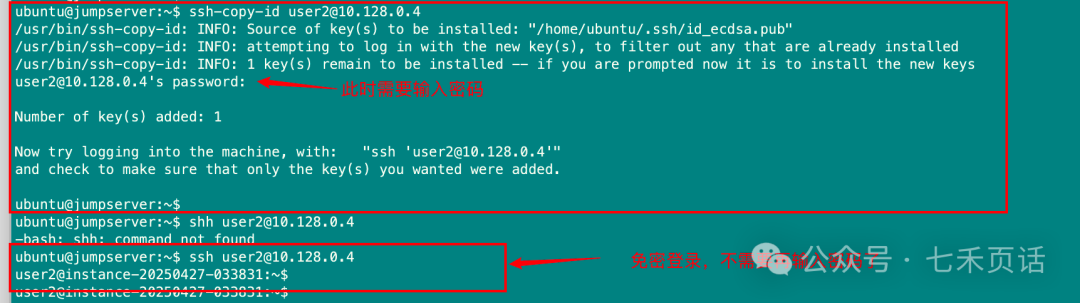
Place the Public Key on the Server
After generating the public-private key pair on the client, the public key needs to be placed in the server user’s account (by default, it should be placed in the user’s ~/.ssh/authorized_keys file) to complete the passwordless login.
There are two methods:
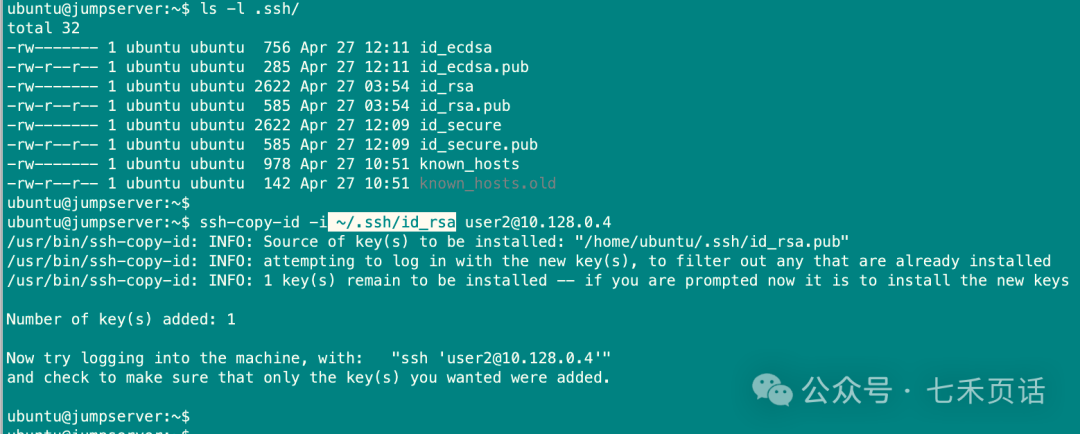
Directly use the <span>ssh-copy-id</span> command, as shown in the diagram below, to copy a public key from the <span>ubuntu</span> user on the client to the <span>user2</span> user’s authorized_keys on the server, allowing for passwordless login:
Note: In SSH protocol version 2, the ssh command will by default read the following key files: ~/.ssh/id_dsa, ~/.ssh/id_ecdsa, ~/.ssh/id_ed25519, and ~/.ssh/id_rsa.
If you need to specify a particular set of generated public keys, you can use the <span>-i</span> parameter to specify the private key, and the corresponding public key will be copied to the server:
Another method is to print the public key and copy it into the server user’s <span>~/.ssh/authorized_keys</span> file:
### Swipe left and right
### On the client:
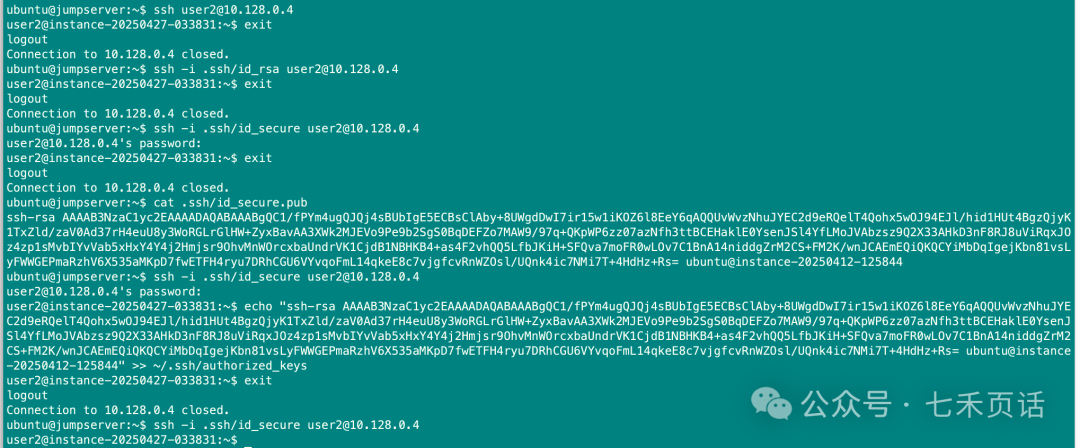
cat <public_key>, for example:
cat .ssh/id_secure.pub
### On the server, use vi to edit ~/.ssh/authorized_keys, or use echo + >>, be sure to use >> to append to the file:
echo "content of the public key" >> ~/.ssh/authorized_keys
The specific operation is shown in the diagram below:
At this point, the passwordless login from the client to the server is complete. It is important to note that the user on the client must be the one who generated the public-private key pair. For example, in the above case, I used the ubuntu user on the client, meaning that only when logged in as the ubuntu user can I log into the server without a password. Additionally, the server user must be the one who has the client’s public key, as in my example where the public key of the ubuntu user on the client was placed in the user2 user’s <span>authorized_keys</span> file. Therefore, only the following ssh command can be used for passwordless login:
Here is a summary of the requirements and process for passwordless login:
Finally, here are some additional issues to be aware of and troubleshooting suggestions for passwordless login:
- The permissions of the .ssh directory on the server must be 700.
- The permissions of the authorized_keys file on the server must be 600 or 644.
- The permissions of the user home directory on the server must be 700 (the user directory permissions can also be 755 or 750, but cannot be 77x). For example, if the username is user2, then the permissions of the /home/user2 directory must be 700. If any of the above three permissions are incorrect, you will see “bad ownership or modes for …” errors in the /var/log/secure file on the client.
- SELinux on the server should be disabled. You can modify it using the command
<span>setenforce 0</span>, and check the status with<span>getenforce</span>or by looking at the /etc/selinux/config file to see if it is set to disabled. - Failure of passwordless login may be due to the StrictModes issue. Edit /etc/ssh/sshd_config on the server and change #StrictModes yes to StrictModes no.
- It may also be a PubkeyAuthentication issue. Edit /etc/ssh/sshd_config on the server and change PubkeyAuthentication to yes.
That’s all. Feel free to leave comments to learn more about ICT-related knowledge together!

Follow our public account: 七禾页话 (qiheyehk)Let’s learn about cloud, cloud-native, networking, communication, IP, Linux, and other ICT knowledge together. 『Share』Your every 『like』 and 『view』 is appreciated!