GPIO (General Purpose Input/Output) is a pin on a microcontroller or microprocessor that can be programmed as an input or output for communication with external devices. In Linux systems, developers can easily read and set the state of GPIO through user space interfaces provided by the kernel, enabling control and monitoring of external devices.
This article explores the new interface based on character devices for accessing and managing GPIO lines in user space since Linux kernel version 4.8.

Linux Kernel GPIO Interface
Within the Linux system, the Linux kernel implements access to GPIO through a producer/consumer model. There are driver programs that produce GPIO lines (GPIO controller drivers) and driver programs that consume GPIO lines (keyboards, touch screens, sensors, etc.).
Links related to driver programs that produce GPIO lines: [GPIO Driver Interface — The Linux Kernel documentation]
1https://www.kernel.org/doc/html/latest/driver-api/gpio/driver.htmlLinks related to driver programs that consume GPIO lines: [GPIO Descriptor Consumer Interface — The Linux Kernel documentation]
1https://www.kernel.org/doc/html/latest/driver-api/gpio/consumer.htmlTo manage GPIO registration and allocation, there is a framework in the Linux kernel called gpiolib. This framework provides an API for device drivers running in kernel space and user space applications.
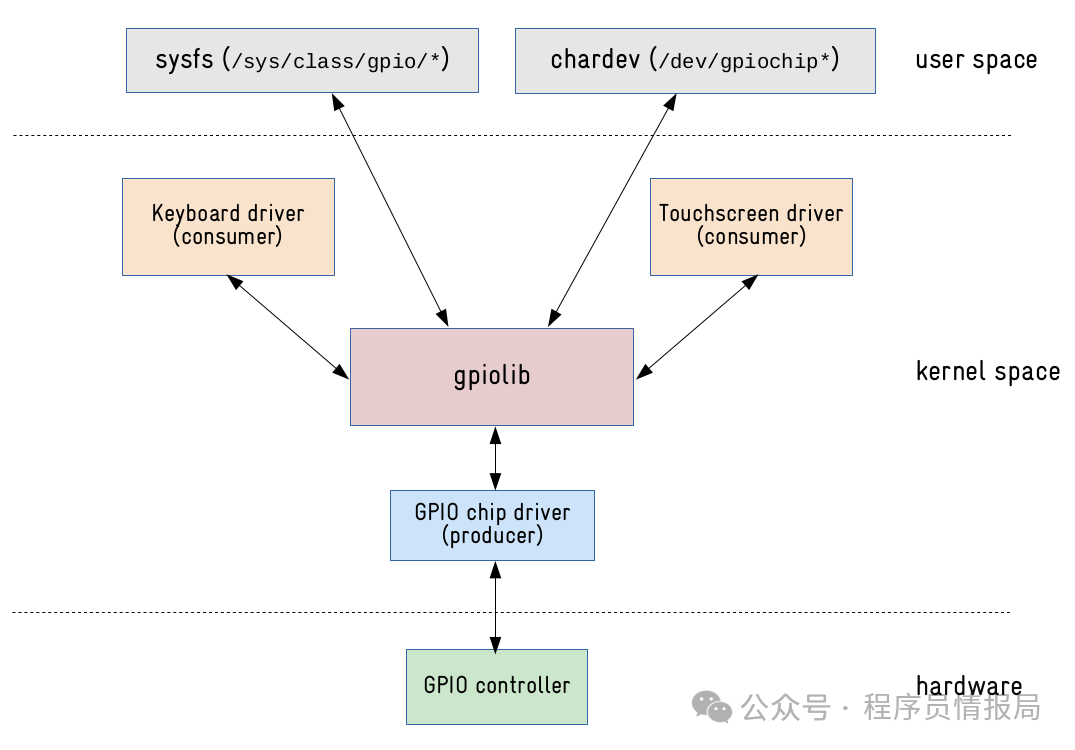
Old Version Method: sysfs Interface
Before Linux kernel version 4.7, the interface for managing GPIO lines in user space was through files exported in /sys/class/gpio in sysfs. Therefore, if you want to set a GPIO as output and make this GPIO input high, the overall steps are as follows:
-
Determine the GPIO line number;
-
Write the GPIO number to
/sys/class/gpio/export; -
Configure the GPIO line as output, corresponding to the file
/sys/class/gpio/gpioX/direction; -
Write 1 to
/sys/class/gpio/gpioX/valueto make the GPIO output high.
For example, to set GPIO 69 output high from user space on an Orangepi ZERO 2, execute the following commands (run as root user):
1echo 69 > /sys/class/gpio/export
2echo out > /sys/class/gpio/gpio69/direction
3echo 1 > /sys/class/gpio/gpio69/value
4
The effect before and after execution is shown in the following figure (the gpio readall command is used to check the status of physical pins):
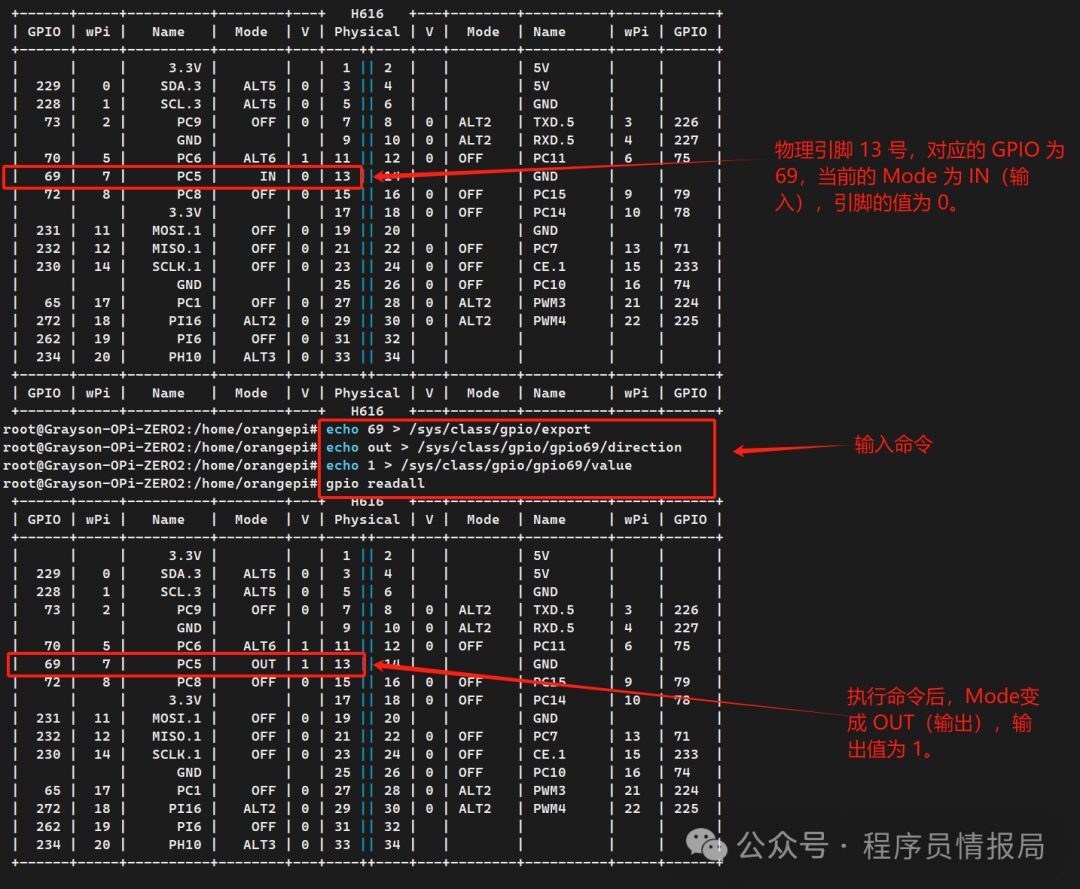
From the command execution interface, the effect is good, and the execution is simple, but there are still some drawbacks:
-
The allocation of GPIO is not bound to any process; if the process using the GPIO ends or crashes, the GPIO may continue to maintain its current state;
-
If multiple processes access the same GPIO line, concurrency may be an issue;
-
Writing to multiple pins requires operations such as
open,read,write, andcloseon a large number of files (export / direction / value, etc.); -
The polling process for capturing events (interrupts from GPIO lines) is unreliable;
-
There is no interface to configure GPIO lines (open drain, open source, etc.);
-
The numbering assigned to GPIO lines is uncertain.
New Version Method: chardev Interface
Starting from Linux kernel version 4.8, the GPIO sysfs interface has been deprecated, and a new API based on character devices is now available for accessing GPIO lines from user space.
Each GPIO controller (gpiochip) will have a character device in /dev, and GPIO lines can be managed and interacted with using file operations (open, read, write, ioctl, poll, close). By inputting ls /dev/gpiochip*, you can see all character devices for GPIO:

Although this new character device interface prevents the use of standard command-line operations like echo and cat on GPIO, it has several advantages over the sysfs interface:
-
The allocation of GPIO is associated with the process using it, improving control over which GPIO lines are used by user space processes;
-
Ability to read or write multiple GPIO lines at once;
-
Ability to find GPIO controllers and GPIO lines by name;
-
Ability to configure pin states (open source, open drain, etc.);
-
The polling process for capturing events (interrupts from GPIO lines) is reliable.
gpiod Library and Its Command Line
Using the chardev interface, you can install the libgpiod project
1https://git.kernel.org/pub/scm/libs/libgpiod/libgpiod.git/
This is a C library and tool for interacting with Linux GPIO character devices.
Taking the Orangepi ZERO 2 development board as an example, which runs Ubuntu 22.04 with kernel version 5.16, the commands to install the libgpiod library and tools are as follows (if not operating as root, prepend the command with sudo to elevate permissions):
1apt update
2apt install libgpiod-dev
3apt install gpiod
gpiod Library Command Line
After installing the library and tools, you can use some commands to confirm whether the installation was successful. For example, check the available GPIO chips:
1gpiodetect
The GPIO chips on the Orangepi ZERO 2 development board are shown in the following figure, with two gpiochip, GPIO lines numbered 288 and 32.

[300b000.pinctrl] and [7022000.pinctrl] are the names or labels of the GPIO chips, typically associated with the hardware address or device tree node name of the chip. These names are specified by the kernel device driver to identify and distinguish different GPIO chips.
Command to view information about the GPIO chip (taking gpiochip0 as an example):
1gpioinfo /dev/gpiochip0
This command displays a lot of information, where line is the GPIO line number (from 0 to 287), followed by the name of the GPIO line. Unnamed lines are displayed as unnamed, unused indicates that the GPIO line is currently not in use, input indicates that the GPIO line is configured as input mode, and output indicates that the GPIO line is configured as output mode, active-high indicates that the active level of the GPIO line is high.
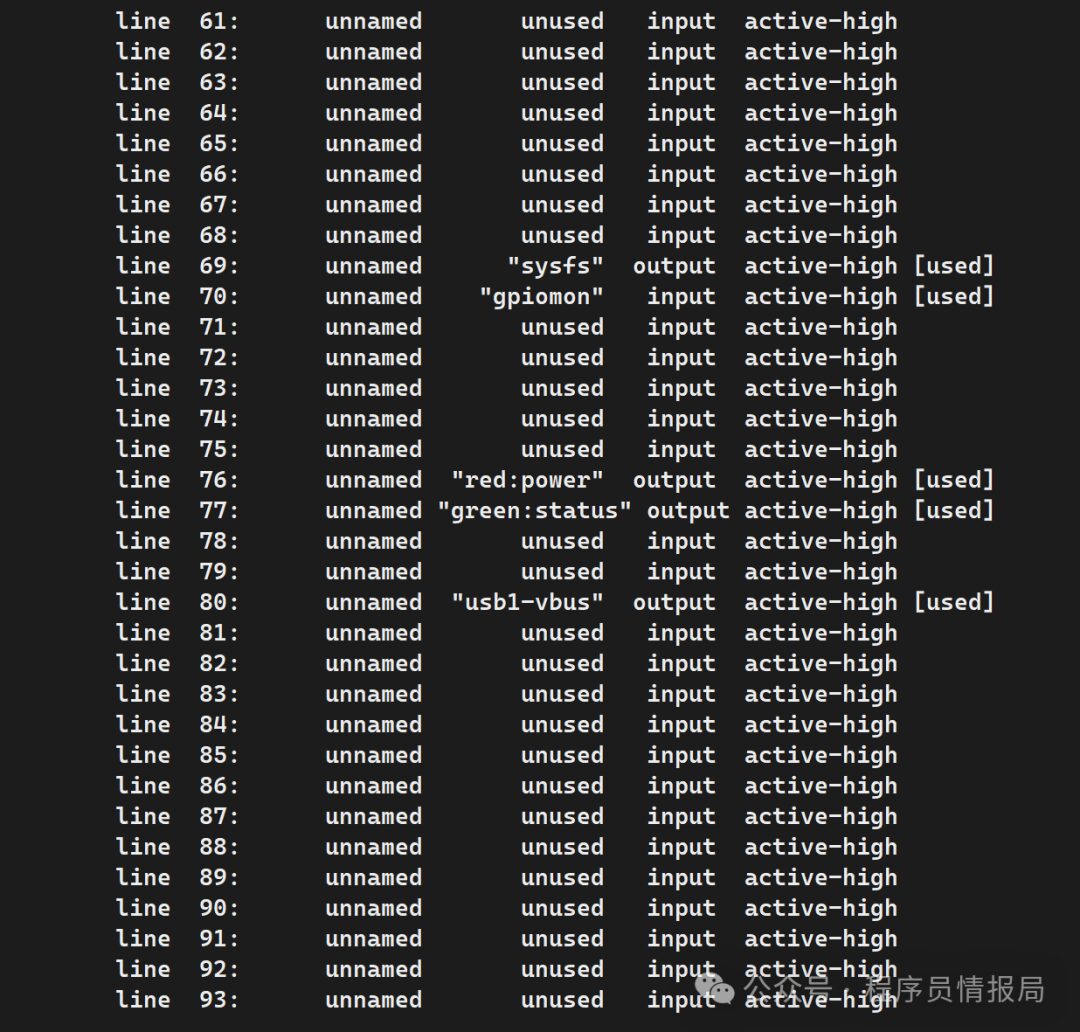
As shown in the figure above, several GPIO pins are in use, and the used GPIO will be named with other names, followed by the [used] notation.
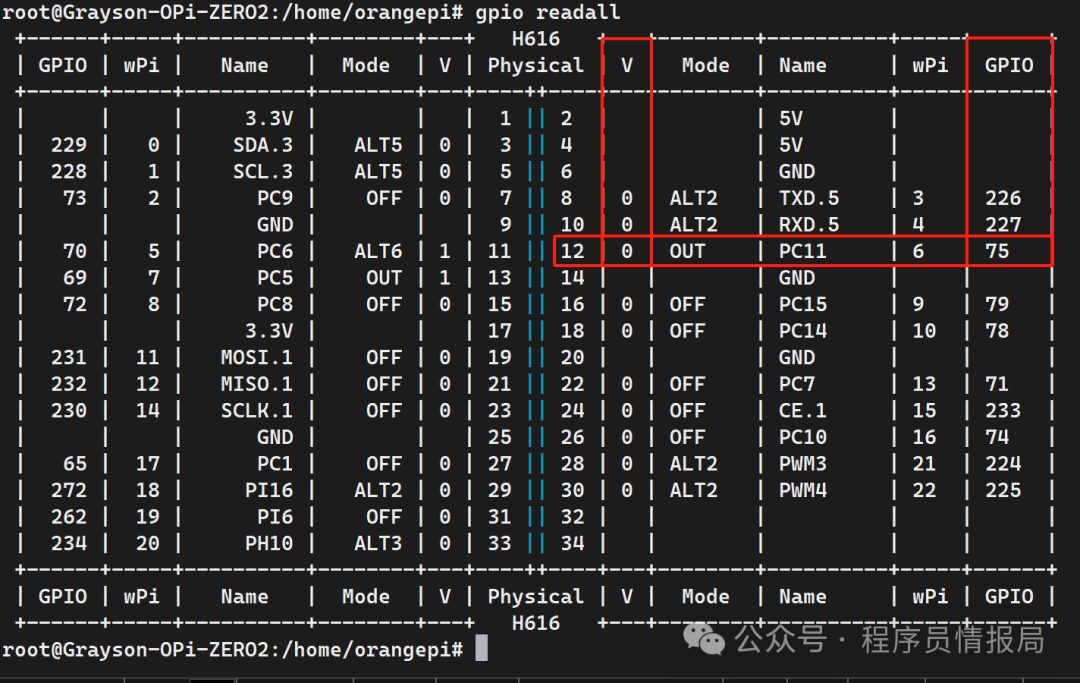
Use the previous wiringPi library command gpio readall to check the current status of physical pins. The physical pin number 12 corresponds to GPIO line number 75, and the current value is 0.
[!NOTE]
The wiringPi library is middleware for developing application layer programs for the Orangepi ZERO 2 development board, with installation tutorials mentioned in my previous blog post “Interface and wiringOP Library for OrangePi ZERO 2 Peripheral Application Development”.
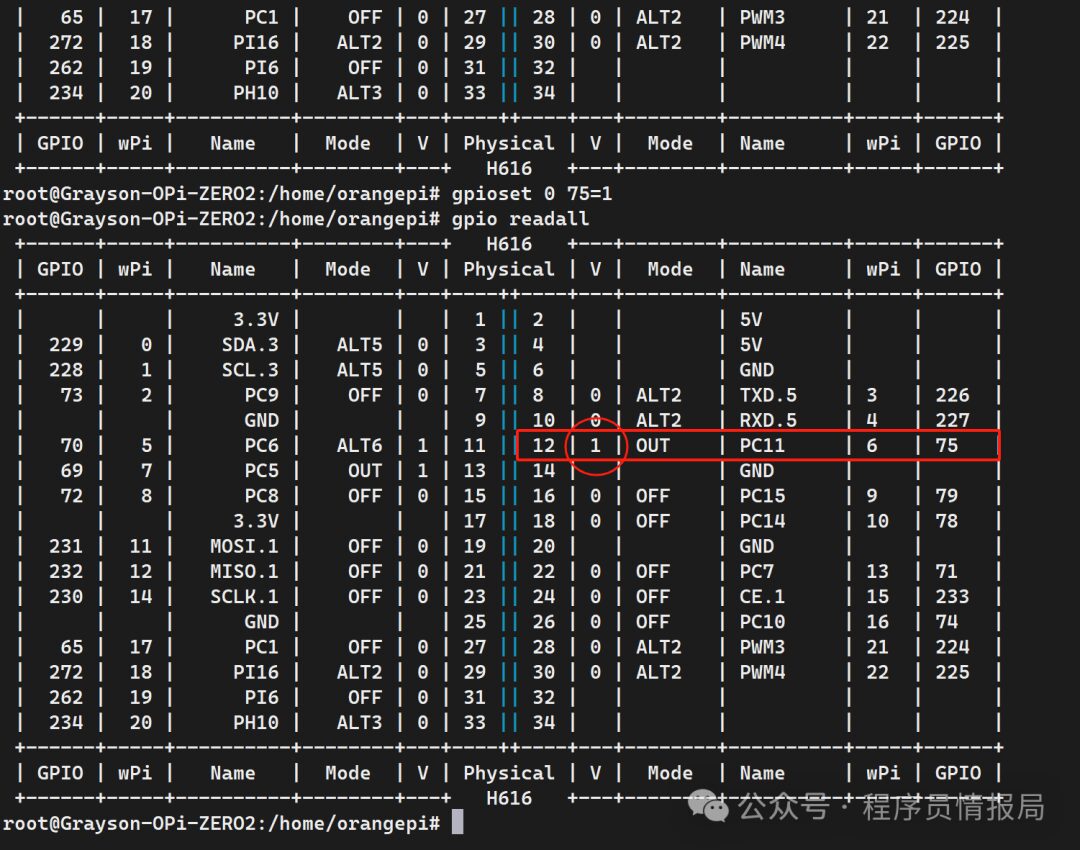
The gpioset command can be used to set the GPIO line. For example, to change the output state of GPIO 75 (set output to 1), the command is as follows:
1gpioset 0 75=1
In the command, 0 indicates gpiochip0, 75 is the GPIO line number, and 1 is the value to write.
After execution, the output value of GPIO 75 immediately changes to 1, which is much more convenient compared to the sysfs interface calls.
The gpioget command reads the value of the GPIO line. For example, to read the value of GPIO 65, the command is:
1gpioget 0 65
The execution result is shown in the following figure, indicating that the current value of GPIO pin 65 is 0.

All the source code for these commands can be found in the libgpiod repository.
Applications of gpiod Library Functions
The gpiod library provides many APIs for directly operating GPIO lines:
1struct gpiod_chip *gpiod_chip_open(const char *path);
2struct gpiod_line *gpiod_chip_get_line(struct gpiod_chip *chip, unsigned int offset);
3int gpiod_line_request_input(struct gpiod_line *line, const char *consumer);
4int gpiod_line_get_value(struct gpiod_line *line);
Below are explanations for several functions provided by libgpiod:
-
`gpiod_chip_open`
-
Function: Opens a GPIO chip.
-
Parameters:
-
const char *path– Path to the device file, e.g.,/dev/gpiochip0. -
Return Value:
-
Returns a pointer to the
gpiod_chipstructure on success. -
Returns
NULLon failure. -
Usage: This is the first step in using a GPIO chip, opening a GPIO chip by the specified path.
1struct gpiod_chip *chip;
2chip = gpiod_chip_open("/dev/gpiochip0");
3if (!chip) {
4   perror("gpiod_chip_open");
5   exit(1);
6}
-
`gpiod_chip_get_line`
-
Function: Gets a GPIO line from a GPIO chip.
-
Parameters:
-
struct gpiod_chip *chip– A pointer to the opened GPIO chip. -
unsigned int offset– The number of the GPIO line to get (starting from 0). -
Return Value:
-
Returns a pointer to the
gpiod_linestructure on success. -
Returns
NULLon failure. -
Usage: Retrieves a specific numbered GPIO line for operation.
1struct gpiod_line *line;
2line = gpiod_chip_get_line(chip, 4); // Get the 4th GPIO line
3if (!line) {
4   perror("gpiod_chip_get_line");
5   gpiod_chip_close(chip);
6   exit(1);
7}
-
`gpiod_line_request_input`
-
Function: Requests to configure a GPIO line as input mode.
-
Parameters:
-
struct gpiod_line *line– A pointer to the GPIO line to configure. -
const char *consumer– The name of the requester (usually the name of the application, for debugging and logging). -
Return Value:
-
Returns 0 on success.
-
Returns -1 on failure.
-
Usage: Configures the specified GPIO line as input mode to read its level value.
1int ret;
2ret = gpiod_line_request_input(line, "my_consumer");
3if (ret) {
4   perror("gpiod_line_request_input");
5   gpiod_line_release(line);
6   gpiod_chip_close(chip);
7   exit(1);
8}
-
`gpiod_line_get_value`
-
Function: Retrieves the level value of a GPIO line.
-
Parameters:
-
struct gpiod_line *line– A pointer to the GPIO line configured as input mode. -
Return Value:
-
Returns 0 or 1 on success, representing low and high levels, respectively.
-
Returns -1 on failure.
-
Usage: Reads the current level value of the GPIO line.
1int value;
2value = gpiod_line_get_value(line);
3if (value < 0) {
4   perror("gpiod_line_get_value");
5} else {
6   printf("GPIO line value: %d\n", value);
7}
In summary, the main purposes of these functions are to open a GPIO chip, get a GPIO line, configure the GPIO line as input mode, and read its level value. Through these steps, monitoring and responding to the state of GPIO lines can be achieved.
The following C program uses libgpiod to read GPIO 70:
 1// gpio_line.c
 2
 3#include <stdio.h>
 4#include <string.h>
 5#include <gpiod.h>
 6#include <errno.h>
 7
 8int main()
 9{
10    struct gpiod_chip *chip;
11    struct gpiod_line *line;
12    int req, value;
13
14    chip = gpiod_chip_open("/dev/gpiochip0");
15    if (!chip) {
16        perror("Failed to open GPIO chip");
17        return -1;
18    }
19
20    line = gpiod_chip_get_line(chip, 70);
21    if (!line) {
22        gpiod_chip_close(chip);
23        perror("Failed to get line");
24        return -1;
25    }
26
27    req = gpiod_line_request_input(line, "gpio_state");
28    if (req) {
29        gpiod_chip_close(chip);
30        fprintf(stderr, "Failed to request line as input: %s\n", strerror(errno));
31        return -1;
32    }
33
34    value = gpiod_line_get_value(line);
35    if (value < 0) {
36        gpiod_chip_close(chip);
37        fprintf(stderr, "Failed to get line value: %s\n", strerror(errno));
38        return -1;
39    }
40
41    printf("GPIO value is: %d\n", value);
42
43    gpiod_chip_close(chip);
44    return 0;
45}
Compile and run commands are as follows:
1gcc -o gpio_line gpio_line.c -lgpiod
2./gpio_line
The execution result is shown in the following figure:

The new Linux kernel GPIO user space interface is a very simple, elegant, and robust API that should be used in embedded Linux development from now on!