
About a year ago, I wrote an article on how to measure air quality using a Raspberry Pi and a cheap sensor. We have been using this project at school and privately for the past few years. However, it has a drawback: since it is based on a wireless/wired network, it is not portable. If your Raspberry Pi, smartphone, and computer are not on the same network, you cannot even access the sensor measurement data.
To compensate for this flaw, we added a small screen to the Raspberry Pi so we could read the data directly from the device. Here is how we set up and configured the screen for our mobile particulate matter sensor.
Setting Up the Screen for Raspberry Pi
There are many Raspberry Pi screens available for purchase from Amazon, Alibaba, and other sources, ranging from ePaper screens to touch-enabled LCDs. We chose a cheap 3.5-inch LCD with touch functionality and a resolution of 320×480 pixels that can be directly plugged into the Raspberry Pi’s GPIO pins. The 3.5-inch screen is almost the same size as the Raspberry Pi, which is nice.
When you first power on the screen with the Raspberry Pi, it will remain blank due to the lack of drivers. You need to install the appropriate drivers for the screen first. Log in via SSH and execute the following commands:
$ rm -rf LCD-show
$ git clone <https://github.com/goodtft/LCD-show.git>
$ chmod -R 755 LCD-show
$ cd LCD-show/
Execute the appropriate command for your screen to install the drivers. For example, here is the command for our MPI3501 screen:
$ sudo ./LCD35-show
This command will install the appropriate drivers and reboot the Raspberry Pi.
Installing the PIXEL Desktop and Setting Up Auto-login
Here is what we want our project to achieve: when the Raspberry Pi starts up, we want to display a website with our air quality measurement data.
First, install the PIXEL desktop environment on the Raspberry Pi:
$ sudo apt install raspberrypi-ui-mods
Then install the Chromium browser to display the website:
$ sudo apt install chromium-browser
We need to set up auto-login so that the measurement data is displayed directly after startup; otherwise, you will only see the login screen. However, Raspberry Pi users do not have auto-login set up by default. You can configure auto-login using the raspi-config tool:
$ sudo raspi-config
In the menu, select: “3 Boot Options → B1 Desktop / CLI → B4 Desktop Autologin”.
There is one step missing to open our website with Chromium after startup. Create the folder /home/pi/.config/lxsession/LXDE-pi/:
$ mkdir -p /home/pi/config/lxsession/LXDE-pi/
Then create an autostart file in that folder:
$ nano /home/pi/.config/lxsession/LXDE-pi/autostart
And paste the following code:
#@unclutter
@xset s off
@xset -dpms
@xset s noblank

# Open Chromium in Full Screen Mode
@chromium-browser --incognito --kiosk <http://localhost>
If you want to hide the mouse pointer, you need to install the unclutter package and remove the comment from the beginning of the autostart file.
$ sudo apt install unclutter
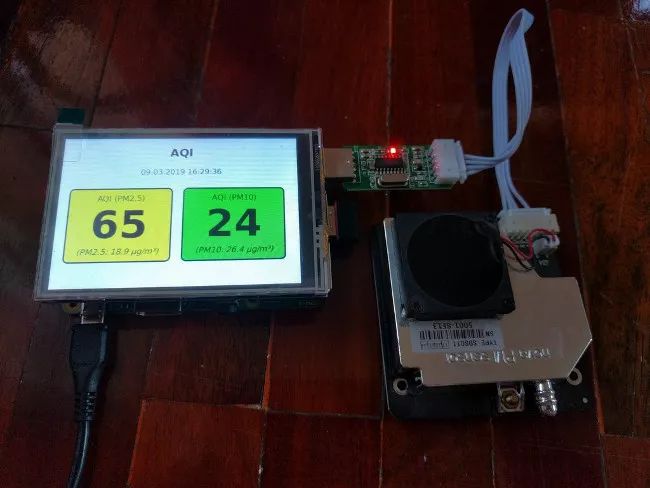
Mobile Particulate Matter Sensor
I made some minor modifications to last year’s code. So if you previously set up the air quality project, make sure to re-download the scripts and files for the AQI website using the instructions in the original article.
By adding a touchscreen, you now have a portable particulate matter sensor! We use it at school to check the air quality in classrooms or for comparative measurements. With this configuration, you no longer need to rely on a network connection or WLAN. You can use this small measuring station anywhere—you can even use a power bank to get away from the grid.
This article was originally published on Open School Solutions and is republished with permission.
via: https://opensource.com/article/19/3/mobile-particulate-matter-sensor
Author: Stephan Tetzel, Editor: lujun9972, Translator: tomjlw, Proofreader: wxy
This article is a LCTT original translation, proudly presented by Linux China.