Getting started with the ESP32 Wroom DevkitC V4 on Arduino IDE
Introduction to ESP32
ESP32 is a series of low-cost, low-power microcontroller units with integrated Wi-Fi and dual-mode Bluetooth. The ESP32 series uses the Tensilica Xtensa LX6 microprocessor, which includes both dual-core and single-core versions, with built-in antenna switches, RF converters, power amplifiers, low-noise receive amplifiers, filters, and power management modules.
ESP32 was created and developed by Espressif Systems, a local chip design company based in Shanghai, and is manufactured by Taiwan Semiconductor Manufacturing Company (TSMC) using 40-nanometer technology. It is the successor to the ESP8266 microcontroller.
After its debut in 2014, the ESP8266 quickly gained the attention of many foreign electronic makers. The original ESP8266 was introduced on a module called ESP-01, which had very little documentation in English, making its capabilities largely unknown at that time. Once the documentation was translated into English, many experimenters quickly realized the powerful features of the ESP8266, and it became very popular.
Other features of the ESP32 include:
-
Up to 18 12-bit Analog-to-Digital Converters
-
Two 8-bit Digital-to-Analog Converters
-
10 Capacitive Touch Sensor Inputs
-
Four SPI Channels
-
Two I2C Interfaces
-
Two I2S Interfaces (for digital audio)
-
Three UARTs for communication
-
Up to 8 channels of IR remote control
-
Up to 16 LED PWM (Pulse Width Modulation) channels
-
Integrated Hall Effect Sensor
-
Ultra-low-power Analog Front-end Amplifier
-
One Internal Low Dropout Regulator
ESP32 Modules
There are many types of ESP32 modules, most of which are suitable for the tutorials in this article.
Many development boards come with USB connectors, allowing programming via USB cable. Some boards do not have this feature and require an external FTDI adapter for programming.
These modules are mostly based on the ESP32-WROOM chip.
The ESP32 DEV KIT and ESP32 NODEMCU development boards are two popular choices.
The ESP32 WROOM DevKitC v4 development board features Espressif’s dual-core SoC module WROOM-32D or WROOM-32U. This board supports Wi-Fi connections with speeds of up to 150 Mb/s at a frequency of 2.4 GHz and BLE Bluetooth technology. The MCU on the ESP32 WROOM DevKitC v4 board operates at a frequency of up to 240MHz. The I/O pins of the board connect to 2.54mm headers on both sides. Users can connect peripherals via jumper wires or secure the development board to a breadboard to build applications.
Below is the layout of the ESP32 WROOM DevKitC v4 development board:
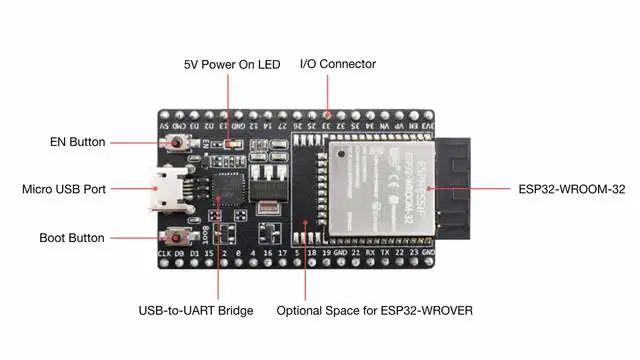
ESP32-DevKitC V4 (with ESP32-WROOM-32 onboard)
ESP32 Development Environment
The ESP32 can be developed in many different environments, including Visual Studio Code, Arduino, and the IDF released by Espressif itself.
For beginners, a simple way to start is by using the familiar Arduino IDE. While this may not be the best environment for using the ESP32, its advantage lies in the abundance of tutorials available online.
This article uses the Arduino IDE for experimentation.
Configuring Arduino IDE for ESP32 Development
To develop with the ESP32 in the Arduino IDE, you need to add an additional source to the Arduino IDE board manager and then install the ESP32 board.
Board Manager
To add the ESP32 development board in the board manager, we need to add the additional URL for the ESP32 development boards.
Open the menu -> File -> Preferences. Paste the following URL into the Additional Board Manager URLs field:
“https://raw.githubusercontent.com/espressif/arduino-esp32/gh-pages/package_esp32_index.json”
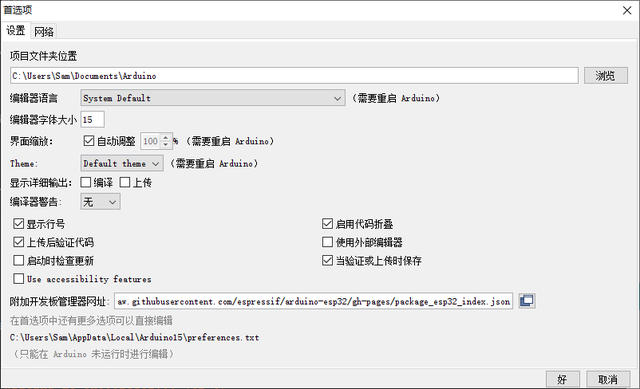
Adding Additional Board Manager URLs
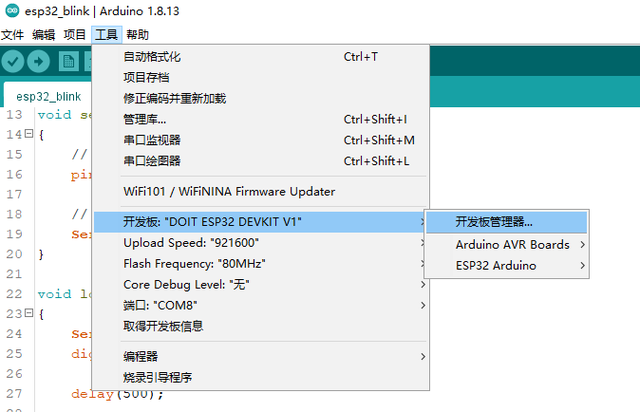
Next, install the ESP32 board. Open the menu -> Tools -> Board -> Board Manager:

Board Manager Entry
In the board manager, type esp32 to search for the ESP32 development board and then install it:
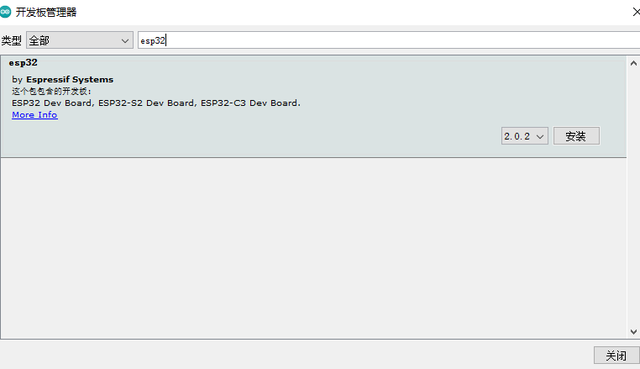
Installing ESP32 Development Board
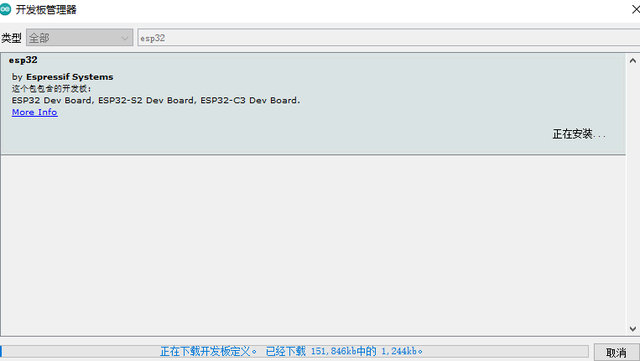
Downloading
Since downloading requires a connection to GitHub, if you have been waiting for a long time with no download, you may need to use a VPN.
Once the download is complete, don’t forget to select DOIT ESP32 DEVKIT V1 as the board in the Arduino IDE:
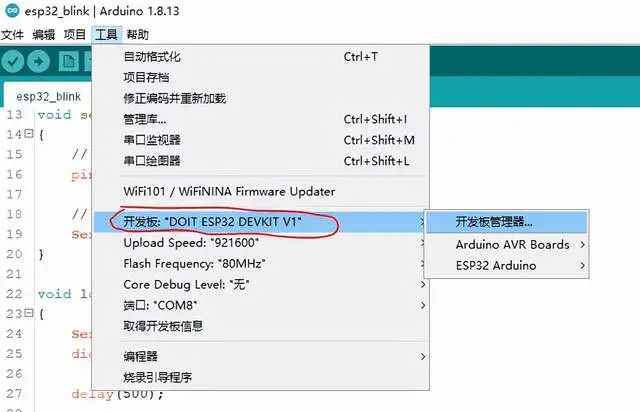
DOIT ESP32 DEVKIT V1
Experimental Circuit
As shown in the figure below, build the circuit. Note that the ESP32 pins are specified by their GPIO names rather than pin numbers, as different ESP32 boards will have different pin numbers.
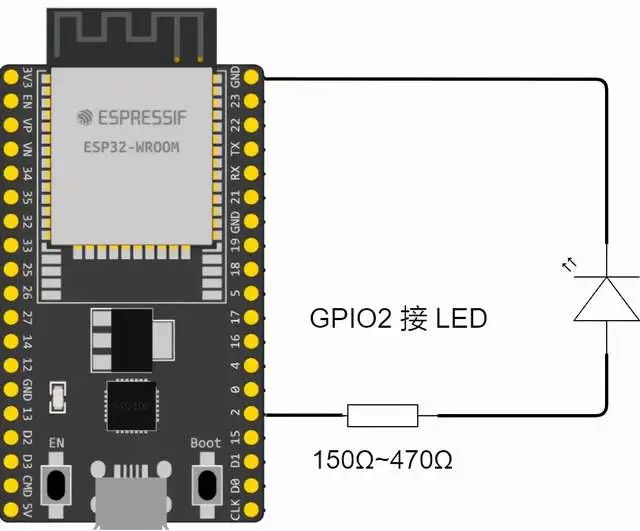
ESP32 Initial Experience Circuit Diagram
If using 5mm or 3mm diameter through-hole LEDs, any resistor value between 150 to 470 ohms will work fine.
Now that we are all connected, it’s time to try our first program.
ESP32 Blink Program
When learning a new programming language, the first program is typically to output “Hello World”.
The blink program is the “Hello World” of hardware. Generally, your first program when learning microcontrollers or MCUs is the blink program.
Below is a blink program in the Arduino programming environment:
/*
  ESP32 Blink
  esp32_blink.ino
  Rewrite of classic Blink sketch for ESP32
  Use LED on GPIO2

  WeChat Public Account: 【Fei Duo Xue Tang】
*/

// LED on GPIO2
int ledPin = 2;

void setup()
{
    // Set LED as output
    pinMode(ledPin, OUTPUT);

    // Serial monitor setup
    Serial.begin(115200);
}

void loop()
{
    Serial.print("Hello");
    digitalWrite(ledPin, HIGH);

    delay(500);

    Serial.println(" world!");
    digitalWrite(ledPin, LOW);

    delay(500);
}
Uploading the Program
First, do exactly what you would do with Arduino—click the upload button (the one with the right arrow). This will start the compiler. You may notice that compiling the ESP32 program takes longer than compiling an Arduino sketch.
Watch the status screen at the bottom of the Arduino IDE. After the compilation process is complete, it will print “Connecting”, followed by a series of dots:
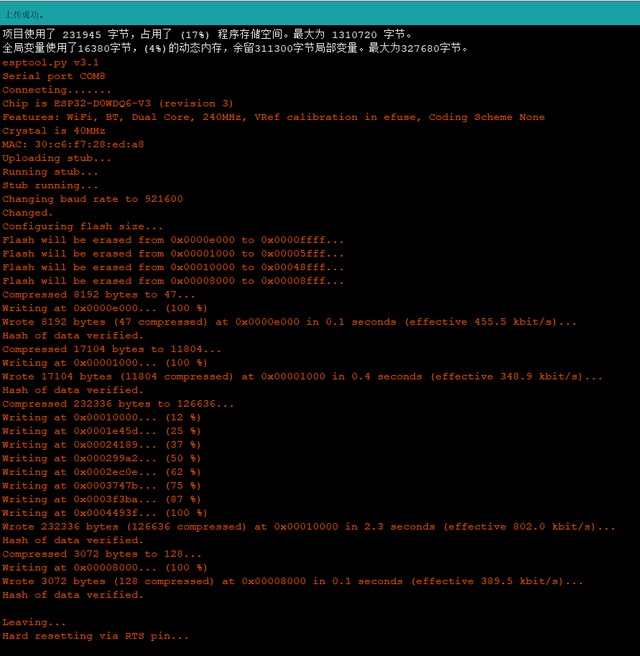
Upload Success Prompt
If you’re lucky, you’ll see the LED start to blink. There’s no need to press the BOOT or EN button on the development board during the entire process.
Some development boards require you to press the BOOT button (sometimes labeled as IO0) and hold it down until you see the upload progress after you see the “Connecting…” prompt.
After a successful upload, the program will start automatically. Some development boards require pressing the ENABLE or RESET button to start the program, but my board does not require this step.
Twinkle, twinkle, little star, how I wonder what you are
Conclusion
Today we learned how to develop ESP32 programs using the Arduino IDE, with the main difficulty being downloading the ESP32 development board in the Arduino IDE; the program itself is quite simple.
 Fei Duo’s Shop29.80