The Arduino-Pico project brings support for the Arduino programming environment to the Raspberry Pi Pico (and compatible RP2040 and RP2350 chips), greatly simplifying the development process and endowing this cost-effective microcontroller with powerful capabilities. This article will delve into the core features of Arduino-Pico, installation methods, usage instructions, and some advanced tips.
1. Core Features of Arduino-Pico
The Arduino-Pico project is not a mere port of Arduino; it is more like a tailor-made Arduino core for the RP2040. Its core advantages lie in fully utilizing the dual-core architecture and rich hardware resources of the RP2040, along with providing extensive libraries and functionality support. Specifically, it includes the following key features:
-
• Extensive Hardware Support: Arduino-Pico supports the vast majority of development boards based on RP2040 and RP2350 in the market, including products from well-known manufacturers such as Raspberry Pi Pico, Pico W, Pico 2, Adafruit series, SparkFun series, etc. This allows developers to choose the appropriate hardware platform based on their needs.
-
• Rich Library Support: The project provides driver support for numerous peripherals, including SPI, I2C, UART, PWM, ADC, etc., making it convenient for developers to perform various hardware operations. It also integrates the Adafruit TinyUSB library, supporting various USB device functionalities such as USB mouse, keyboard, USB drives, and HID.
-
• Multi-Core Support: Fully utilizes the dual-core features of the RP2040, allowing developers to run code on both cores separately, achieving parallel processing and improving efficiency. FreeRTOS SMP support also provides strong guarantees for multi-task processing.
-
• Network Connectivity: Supports network connections via WiFi (Pico W) and Ethernet (various network card chips), providing support for HTTP clients and servers, SSL/TLS/HTTPS, making it convenient for developers to perform network programming.
-
• File System Support: Supports LittleFS and SD card file systems, facilitating data storage and program upgrades.
-
• Advanced Features: Arduino-Pico also offers advanced features such as OTA upgrades, Bluetooth (classic Bluetooth and BLE), audio input/output, and low-jitter peripheral control using PIO state machines.
-
• Debugging Support: Supports debugging using Picoprobe, in conjunction with OpenOCD and GDB for code debugging, making it convenient for developers to troubleshoot and optimize programs.
2. Installation Methods for Arduino-Pico
There are two main installation methods for Arduino-Pico: installing via the Arduino Library Manager and installing via Git clone.
-
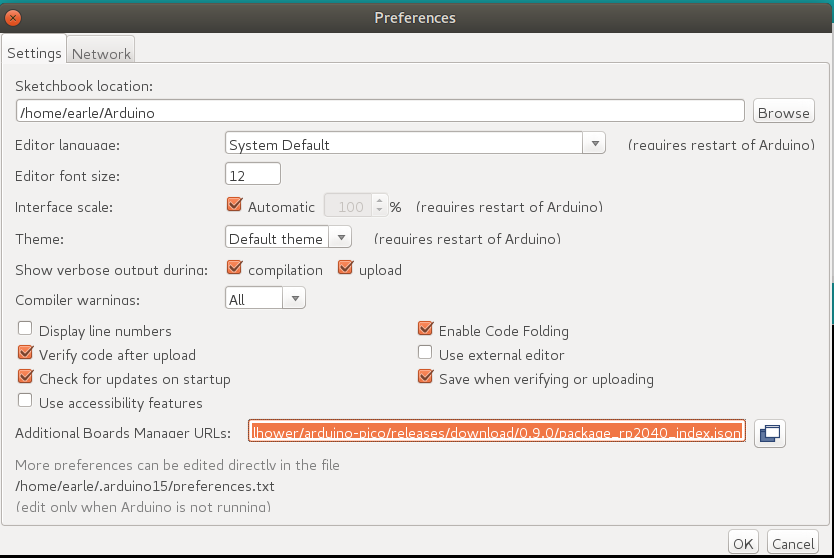
• Installation via Arduino Library Manager: This is the simplest installation method. Just add the Arduino-Pico index URL in the Arduino IDE, then search and install through the library manager. This method is easy to use and recommended for most users.
-
• Installation via Git Clone: This method allows you to obtain the latest version of the code and makes it easy for developers to modify and contribute to the code. However, it requires some experience with Git. The installation steps include cloning the repository, updating submodules, and installing necessary tools.
3. Usage Methods for Arduino-Pico
After installation, select the corresponding development board, and you can write and upload programs just like using a regular Arduino development board. Arduino-Pico provides a wealth of example programs to help developers learn and get started. It is important to note that when uploading a program for the first time, you need to hold down the BOOTSEL button, after which Arduino-Pico will automatically reset.
4. Advanced Applications and Tips
Arduino-Pico supports many advanced features, such as:
-
• Multi-Core Programming: Utilize
setup1()andloop1()functions to run code on the second core, achieving parallel processing. -
• File System Operations: Use LittleFS or SD card file systems for data storage and retrieval.
-
• Bluetooth Communication: Use Bluetooth for data transmission or controlling other devices.
-
• Network Programming: Perform network communication via WiFi or Ethernet.
-
• Using PIO State Machines: Achieve low-jitter servo control, tone generation, and I2S audio processing, etc.
5. Conclusion
The Arduino-Pico project provides a powerful Arduino programming environment for the Raspberry Pi Pico, significantly lowering the development threshold for RP2040. Its rich functionality, extensive hardware support, and active community make it an ideal development platform for IoT, embedded systems, and other fields. Whether you are a beginner or an experienced developer, you can find the right tools and resources in Arduino-Pico.
Project address: https://github.com/earlephilhower/arduino-pico