Getting Started with ARM Development for Beginners

Getting Started with ARM Development for Beginners
Currently, most consumer smart devices use ARM processors, such as smartphones, tablets, and TVs. However, many college students are still unfamiliar with ARM and are more accustomed to 8-bit microcontrollers. But don’t be discouraged; in fact, ARM’s M series processors are not much different from other microcontrollers. Students with a background in 51 or STM32 can get started quite easily.
Getting Started with ARM Development for Beginners
Of course, if you already have a foundation in microcontrollers and C language and want to learn ARM, it’s recommended to break it down into the following three steps.

1

Purchase a Development Board

Look for detailed resources and choose a board that can port an operating system; otherwise, you’ll have to buy another board to learn system porting and drivers, which isn’t cost-effective. It’s recommended to start with bare-metal programming for ARM, first understanding the structure of the ARM architecture (with a focus on the ARM instruction set). Since you have experience with bare-metal programming, it’s advisable to briefly review some knowledge of analog circuits and digital circuits to solidify your understanding of the driving circuits seen in the chip manuals and schematics.
Getting Started with ARM Development for Beginners

2

Write Programs Hands-On

Address issues. I suggest initially imitating code, then understanding it, and finally rewriting it yourself. This process primarily reinforces the theories you’ve previously encountered, such as: GPIO operations, GPIO interrupts, UART operations, IIC, SPI, CAN bus, etc.
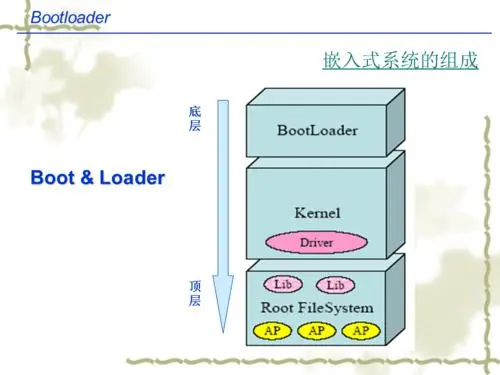
As for operating system porting, I believe it’s not easy for beginners. Only after becoming familiar with the various modules of ARM bare-metal can you proceed. Start by reading books related to the principles of the Linux operating system to understand its components, boot process, and what each step should accomplish. Then, begin learning how to compile and configure the BootLoader. First, get the BootLoader running, then move on to compiling and configuring the kernel. Only after mastering kernel configuration, drivers, and adding devices to the device tree can you delve into what a file system is and how to create one. At this stage, you should have a relatively comprehensive and in-depth understanding of operating systems.
Getting Started with ARM Development for Beginners

3

Write Character Device Drivers

Start with writing simple character device drivers, and then move on to platform device drivers, which will be much easier. If you don’t want to write drivers, just focus on mastering the content above in detail. Generally, it takes about 2 months to get started, and to do well, you need to accumulate knowledge and experience.
If you want to delve deeper into drivers, you’ll need to research concurrent programming, IO models, sensors, common character devices, network devices, block devices, and other related issues. Each module is quite complex, and only through actual practice will you gain experience. In short, to truly understand, you must independently engage in hands-on practice; otherwise, you will never get started.
I also hope that students can get their desired boards soon and begin their ARM learning journey, experiencing the joy of ARM bare-metal development, system porting, and driver development.
Getting Started with ARM Development for Beginners

End

Recommended

● What Level is Considered Proficient in Linux?

● A Trip Down Memory Lane: DIY Snake Game, What More Could You Want?

● Huawei’s HarmonyOS May Enter the European Market Next Year, Competing with iOS and Android

Getting Started with ARM Development for Beginners
→ Follow us for more surprises ←

Leave a Comment