1. STM32Cube Ecosystem
2. CubeMX
3. CubeIDE
4. CubeProg
5. Developing with CubeIDE
5.1 STM32CubeIDE Home
5.2 Generating Projects
5.3 Program Download
6. Conclusion
1. STM32Cube Ecosystem
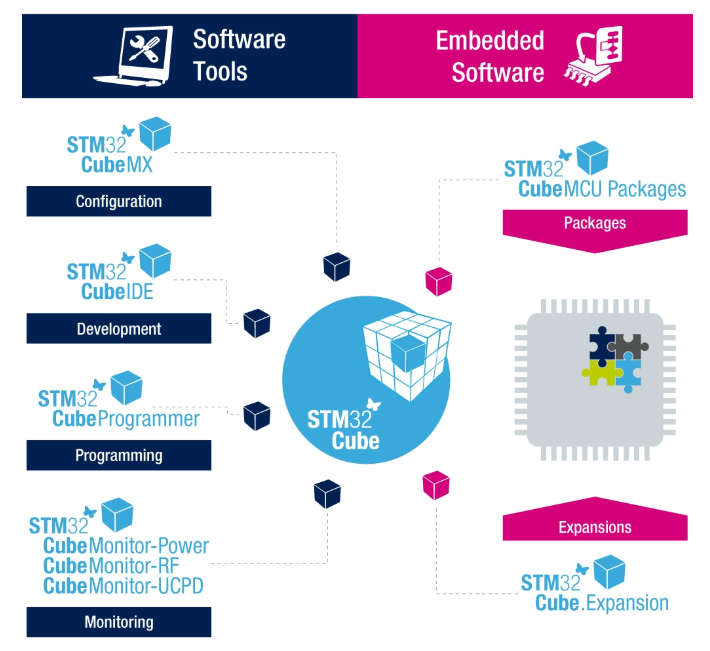
-
STM32 CubeMX Almost all STM32 devices can use this tool to initialize configuration code. This is a graphical configuration software developed based on Java, which can automatically generate the necessary configuration <span>Cortex-M</span>code and can also generate device trees for<span>Linux</span>systems supported by the<span>Cortex-A</span>core. -
STM32 CubeIDE This is a free integrated development environment launched by ST, based on Eclipse and GNU C/C++ and other open-source toolchains, which can compile and debug code. The official also integrated <span>STM32 CubeMX</span>into<span>IDE</span>, making the entire software configuration and development seamless and very convenient. -
STM32CubeProgrammer Software programming tool, supports reading and writing devices and external memory through (JTAG, SWD, UART, USB DFU, I2C, SPI, CAN) and other methods. -
STM32CubeMonitor series tools. Powerful monitoring tools help developers fine-tune the behavior and performance of their applications in real-time. I haven’t tried this yet, so I’ll trust the official self-promotion for now.

-
Step 1: Use <span>CubeMX</span>to initialize the corresponding chip peripheral functions, etc.; -
Step 2: Use <span>CubeIDE</span>for code editing and debugging. Of course, if you prefer, you can also use<span>IAR</span>,<span>Keil</span>, or<span>VSCode</span>, this is completely a matter of personal preference and habit. However, it is said that<span>CubeIDE</span>integrates<span>CubeMX</span>, which is quite appealing, right? Plus, if you want to use the<span>gcc</span>compiler, it saves a lot of configuration hassle; -
Step 3: Use <span>CubeProgrammer</span>for program burning, mainly because it supports many protocols, and it feels like it’s quite impressive; -
Step 4: More functional plugins may be released in the future, but currently, they don’t seem necessary.
2. CubeMX
<span>ST</span>, and the latest STM32F7 no longer supports the standard peripheral library.<span>IAR</span>, <span>Keil MDK</span>, and <span>GCC</span>, which is relatively convenient, so you don’t have to fiddle with registers according to the manual or migrate using the official standard peripheral library <span>demo</span>, it truly allows you to point where you don’t understand.3. CubeIDE
<span>CubeIDE</span> from the official website and install it. Assuming you have successfully installed and opened the software, you will see;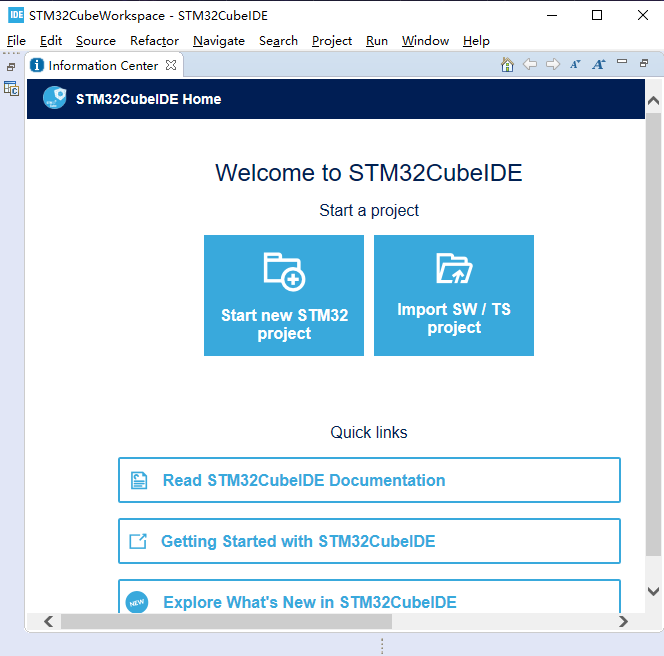
<span>CubeIDE</span> has integrated <span>CubeMX</span>, and creating a <span>STM32</span> project can be done step by step to get started quickly.4. CubeProg
<span>Java</span>, and it may have better support for <span>st-link</span>, but if you are using <span>jlink</span>, using <span>openocd</span> is also fine. However, since it’s a suite, here are some simple points;-
Supports erasing, reading, and writing <span>Flash</span>and other operations; -
Supports <span>Motorola S19</span>,<span>HEX</span>,<span>ELF</span>and binary formats; -
<span>ST-LINK</span>firmware upgrade; -
Multi-platform: <span>Windows</span>,<span>Linux</span>,<span>macOS</span>, this is actually a strong point;
5. Developing with CubeIDE
Quickly create STM32 HAL library projects using STM32CubeIDE.
5.1 STM32CubeIDE Home
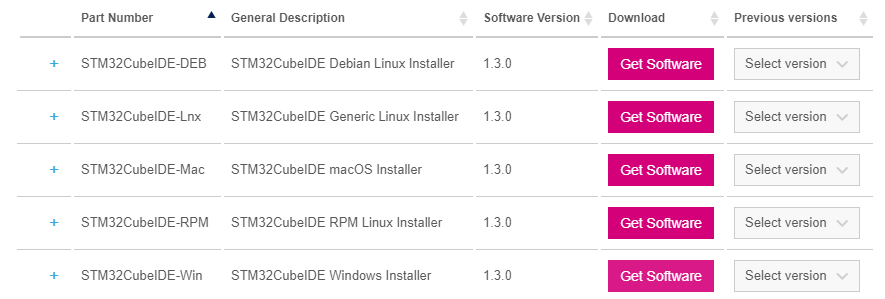

<span>Read STM32CubeIDE Documentation</span>has a wealth of official documentation; you can quickly get started, including;
Installation tutorial; User manual;
5.2 Generating Projects
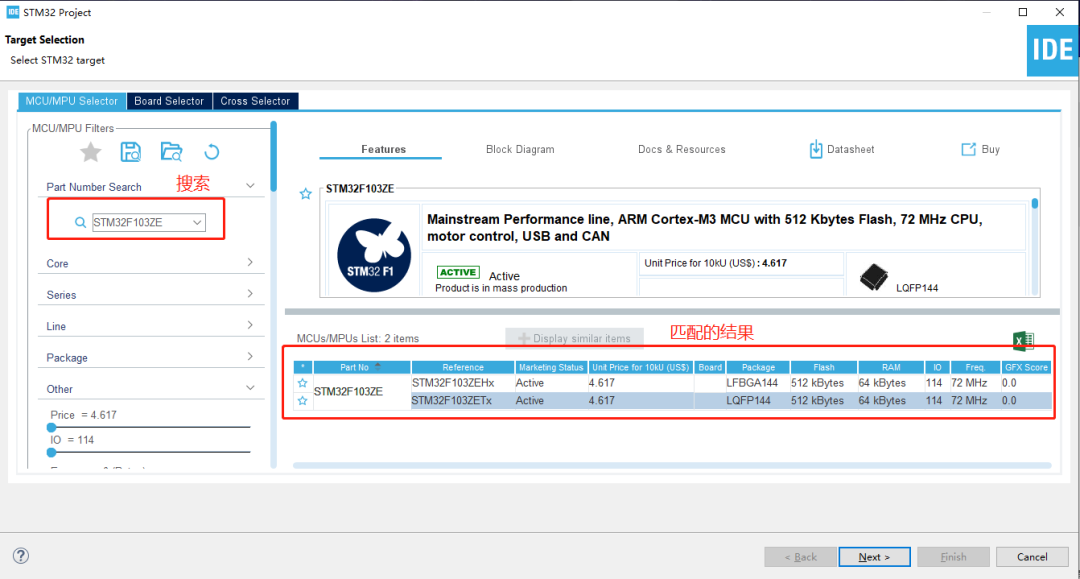
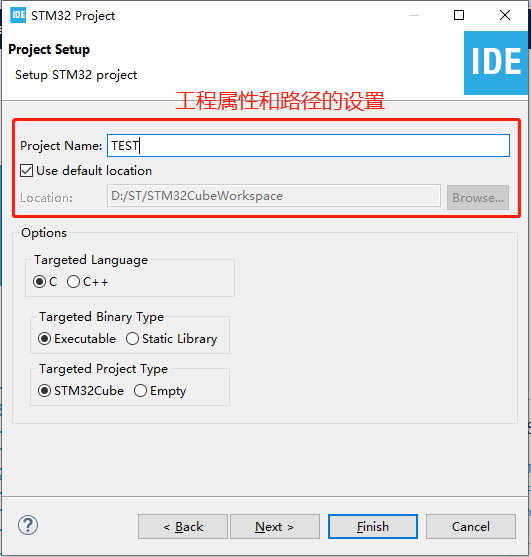
<span>MCU</span> peripheral files, so keep the network smooth and be patient;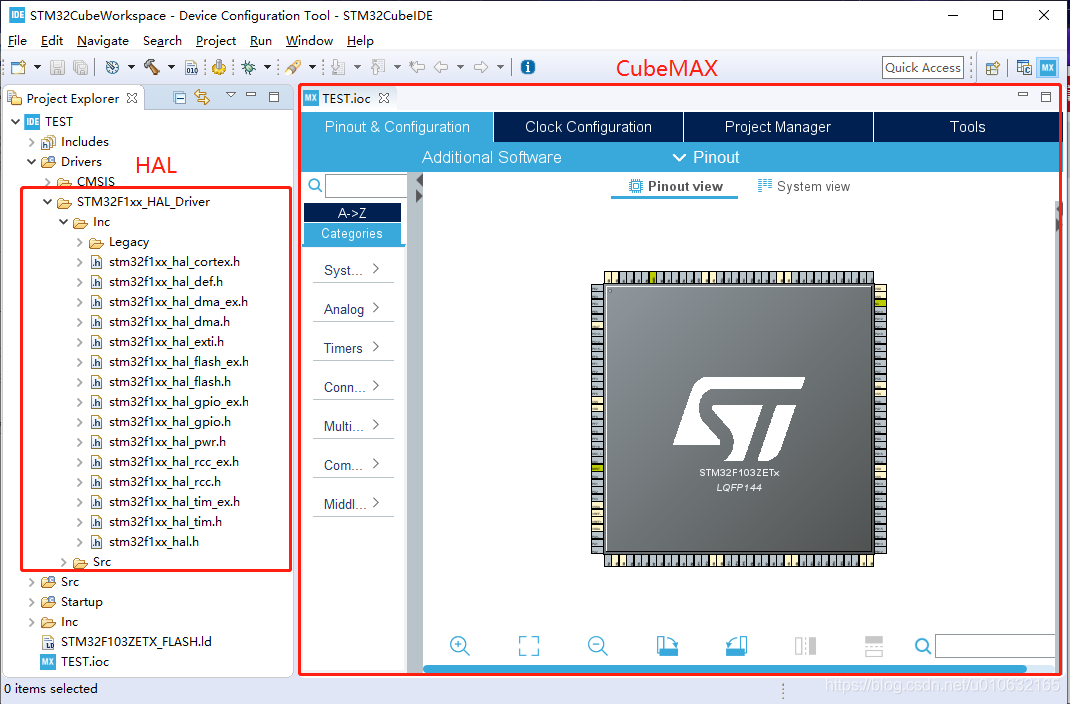
<span>HAL</span> library, and the right side is the <span>CubeMAX</span> configuration interface. Thus, the project generation is complete, and the next step is to compile and download.#MicroXplorer Configuration settings - do not modify
FREERTOS.IPParameters=Tasks01
FREERTOS.Tasks01=defaultTask,0,128,StartDefaultTask,Default,NULL
File.Version=6
KeepUserPlacement=false
Mcu.Family=STM32F1
Mcu.IP0=FREERTOS
Mcu.IP1=NVIC
Mcu.IP2=RCC
Mcu.IP3=SYS
Mcu.IPNb=4
Mcu.Name=STM32F103Z(C-D-E)Tx
Mcu.Package=LQFP144
Mcu.Pin0=VP_FREERTOS_VS_CMSIS_V1
Mcu.Pin1=VP_SYS_VS_ND
Mcu.Pin2=VP_SYS_VS_Systick
Mcu.PinsNb=3
Mcu.ThirdPartyNb=0
Mcu.UserConstants=
Mcu.UserName=STM32F103ZETx
MxCube.Version=5.3.0
MxDb.Version=DB.5.0.30
NVIC.BusFault_IRQn=true:0:0:false:false:true:false:false:false
NVIC.DebugMonitor_IRQn=true:0:0:false:false:true:false:false:false
NVIC.HardFault_IRQn=true:0:0:false:false:true:false:false:false
NVIC.MemoryManagement_IRQn=true:0:0:false:false:true:false:false:false
NVIC.NonMaskableInt_IRQn=true:0:0:false:false:true:false:false:false
NVIC.PendSV_IRQn=true:15:0:false:false:false:true:false:false
NVIC.PriorityGroup=NVIC_PRIORITYGROUP_4
NVIC.SVCall_IRQn=true:0:0:false:false:false:false:false:false
NVIC.SysTick_IRQn=true:15:0:false:false:true:true:false:true
NVIC.UsageFault_IRQn=true:0:0:false:false:true:false:false:false
PCC.Checker=false
PCC.Line=STM32F103
PCC.MCU=STM32F103Z(C-D-E)Tx
PCC.PartNumber=STM32F103ZETx
PCC.Seq0=0
PCC.Series=STM32F1
PCC.Temperature=25
PCC.Vdd=3.3
PinOutPanel.RotationAngle=0
ProjectManager.AskForMigrate=true
ProjectManager.BackupPrevious=false
ProjectManager.CompilerOptimize=6
ProjectManager.ComputerToolchain=false
ProjectManager.CoupleFile=false
ProjectManager.CustomerFirmwarePackage=
ProjectManager.DefaultFWLocation=true
ProjectManager.DeletePrevious=true
ProjectManager.DeviceId=STM32F103ZETx
ProjectManager.FirmwarePackage=STM32Cube FW_F1 V1.8.0
ProjectManager.FreePins=false
ProjectManager.HalAssertFull=false
ProjectManager.HeapSize=0x200
ProjectManager.KeepUserCode=true
ProjectManager.LastFirmware=true
ProjectManager.LibraryCopy=1
ProjectManager.MainLocation=Src
ProjectManager.NoMain=false
ProjectManager.PreviousToolchain=
ProjectManager.ProjectBuild=false
ProjectManager.ProjectFileName=TEST.ioc
ProjectManager.ProjectName=TEST
ProjectManager.StackSize=0x400
ProjectManager.TargetToolchain=STM32CubeIDE
ProjectManager.ToolChainLocation=
ProjectManager.UnderRoot=true
ProjectManager.functionlistsort=1-SystemClock_Config-RCC-false-HAL-false
RCC.APB1Freq_Value=8000000
RCC.APB2Freq_Value=8000000
RCC.FamilyName=M
RCC.IPParameters=APB1Freq_Value,APB2Freq_Value,FamilyName,PLLCLKFreq_Value,PLLMCOFreq_Value,TimSysFreq_Value
RCC.PLLCLKFreq_Value=8000000
RCC.PLLMCOFreq_Value=4000000
RCC.TimSysFreq_Value=8000000
VP_FREERTOS_VS_CMSIS_V1.Mode=CMSIS_V1
VP_FREERTOS_VS_CMSIS_V1.Signal=FREERTOS_VS_CMSIS_V1
VP_SYS_VS_ND.Mode=No_Debug
VP_SYS_VS_ND.Signal=SYS_VS_ND
VP_SYS_VS_Systick.Mode=SysTick
VP_SYS_VS_Systick.Signal=SYS_VS_Systick
board=custom
isbadioc=false
5.3 Program Download

<span>elf</span> file, which is the file that the emulator can burn; you can then directly view the <span>Build</span> information in the window, including any errors, as shown below;12:52:59 **** Incremental Build of configuration Debug for project TEST ****
make -j4 all
arm-none-eabi-gcc "../Drivers/STM32F1xx_HAL_Driver/Src/stm32f1xx_hal_cortex.c" -mcpu=cortex-m3 -std=gnu11 -g3 -DSTM32F103xE -DUSE_HAL_DRIVER -DDEBUG -c -I../Inc -I../Drivers/CMSIS/Device/ST/STM32F1xx/Include -I../Drivers/CMSIS/Include -I../Drivers/STM32F1xx_HAL_Driver/Inc/Legacy -I../Drivers/STM32F1xx_HAL_Driver/Inc -O0 -ffunction-sections -fdata-sections -Wall -fstack-usage -MMD -MP -MF"Drivers/STM32F1xx_HAL_Driver/Src/stm32f1xx_hal_cortex.d" -MT"Drivers/STM32F1xx_HAL_Driver/Src/stm32f1xx_hal_cortex.o" --specs=nano.specs -mfloat-abi=soft -mthumb -o "Drivers/STM32F1xx_HAL_Driver/Src/stm32f1xx_hal_cortex.o"
...
Finished building target: TEST.elf
arm-none-eabi-objdump -h -S TEST.elf > "TEST.list"
arm-none-eabi-size TEST.elf
text data bss dec hex filename
3860 20 8228 12108 2f4c TEST.elf
Finished building: default.size.stdout


<span>Run</span> option and select <span>Debug Configurations</span>, as shown in the figure below, configure the emulator and interface method for debugging, and finally click <span>Debug</span> to download <span>TEST.elf</span> to the target.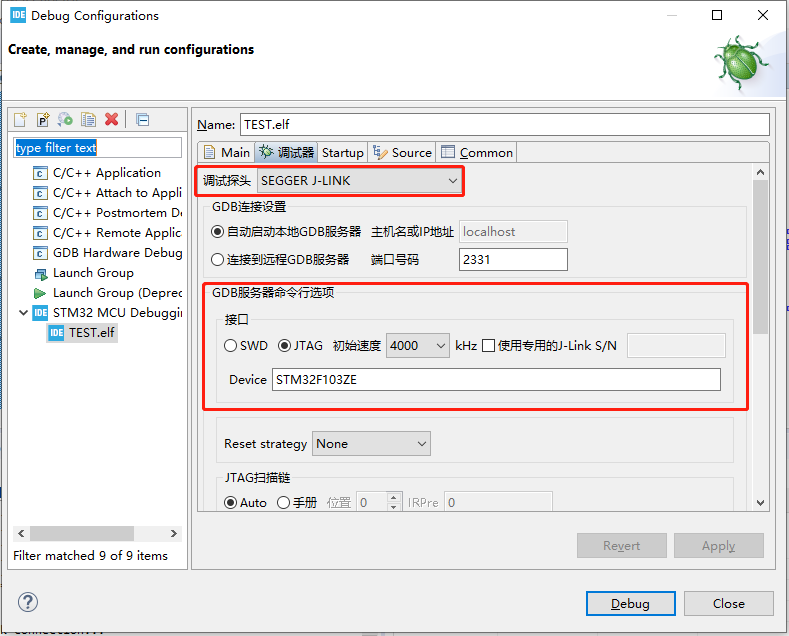
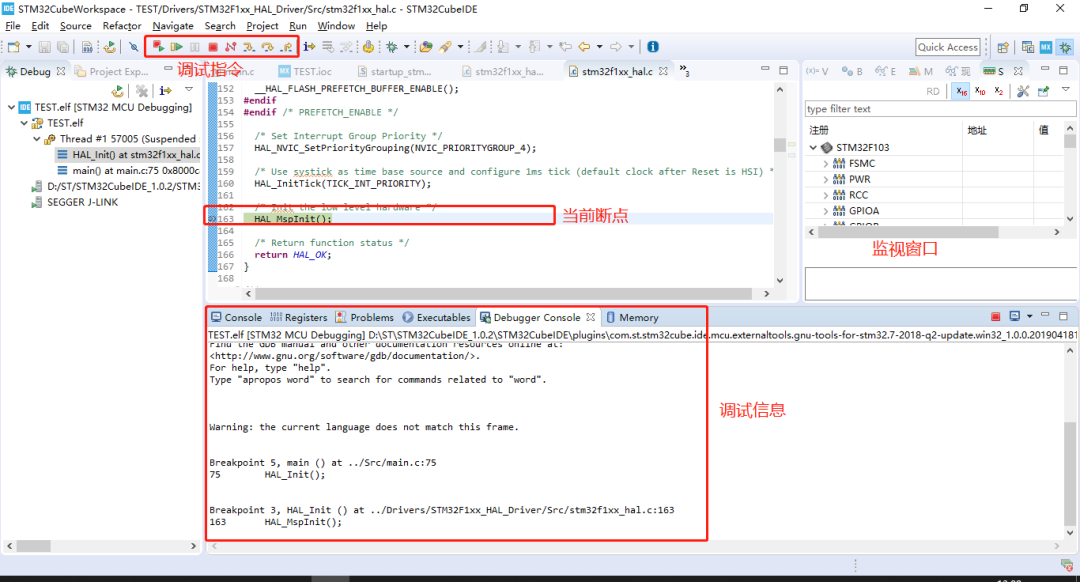
Conclusion
<span>HAL</span>, and if necessary, you can also look at <span>LL</span>, which basically conforms to the CMSIS standard.<span>CubeIDE</span> for development, it has integrated <span>CubeMAX</span>, so there is no need to download it separately, and you can complete everything in one-stop service. If you only need to generate initialization code, then it is still necessary to install <span>CubeMAX</span> separately.-END-
I am Zhang Qiaolong, a university teacher teaching electronics, welcome to follow!