01
Understanding the Monit Tool

The Monit tool is an open-source monitoring tool based on the Linux system, which can monitor overall system resource utilization, monitoring physical devices, virtual devices, file systems, network connections, users, processes, etc., and continuously track them.
Additionally, it can schedule custom scripts to implement user-defined checks. The Monit tool has a small CPU and memory footprint on the host Linux, and although it is essentially a monitoring tool, its open nature makes it particularly suitable for testing in embedded systems.
This article provides some application examples, taken from the integration testing process of the O-RAN wireless communication product.

02
How to Install the Monit Tool

Download the software package from the official website
https://mmonit.com/wiki/Monit/Installation,
It is recommended to install using Pre-built binaries.
The basic process is:
$ tar zxvf monit-x.y.z-linux-x64.tar.gz (x.y.z denotes version numbers) $ cd monit-x.y.z $ cp bin/monit /usr/local/bin/ $ cp conf/monitrc /etc/Installation Steps Example

1)Create ahome/monit directory in the system and upload the software package to that directory.
root@k8s-master-0:/home/monit# ll total 2252 drwxr-xr-x 2 root root 4096 Dec 5 10:29 ./ drwxr-xr-x 15 root root 4096 Dec 5 10:29 ../ -rw-r--r-- 1 root root 2293992 Dec 5 10:29 monit-5.34.0-linux-x64.tar.gz2)Unzip the software package in the/home/monit directory.
root@k8s-master-0:/home/monit# tar zxvf monit-5.34.0-linux-x64.tar.gz monit-5.34.0/monit-5.34.0/man/monit-5.34.0/man/man1/monit-5.34.0/man/man1/monit.1 monit-5.34.0/conf/monit-5.34.0/conf/monitrc monit-5.34.0/CHANGES monit-5.34.0/bin/monit-5.34.0/bin/monit monit-5.34.0/COPYING root@k8s-master-0:/home/monit# cd monit-5.34.0/3)Set environment variables.
root@k8s-master-0:/home/monit/monit-5.34.0# cp bin/monit /usr/local/bin/ root@k8s-master-0:/home/monit/monit-5.34.0# cp conf/monitrc /etc/4)RunMonit to verify the installation.
root@k8s-master-0:/home/monit/monit-5.34.0# monit New Monit id: 07b1ed309a9a41cab9df8e7a2e387dad Stored in '/root/.monit.id' Starting Monit 5.34.0 daemon with http interface at [localhost]:2812Or execute monit -h if the help information displays correctly, it indicates the installation was successful.
root@k8s-master-0:/home/monit/monit-5.34.0# monit -h Usage: monit [options]+ [command] Options are as follows: -c file Use this control file -d n Run as a daemon once per n seconds -g name Set group name for monit commands -l logfile Print log information to this file -p pidfile Use this lock file in daemon mode -s statefile Set the file monit should write state information to -I Do not run in background (needed when run from init) --id Print Monit's unique ID --resetid Reset Monit's unique ID. Use with caution -B Batch command line mode (do not output tables or colors) -t Run syntax check for the control file -v Verbose mode, work noisy (diagnostic output) -vv Very verbose mode, same as -v plus log stacktrace on error -H [filename] Print SHA1 and MD5 hashes of the file or of stdin if the filename is omitted; monit will exit afterwards -V Print version number and patchlevel -h Print this text Optional commands are as follows: start all - Start all services start <name> - Only start the named service stop all - Stop all services stop <name> - Stop the named service restart all - Stop and start all services restart <name> - Only restart the named service monitor all - Enable monitoring of all services monitor <name> - Only enable monitoring of the named service unmonitor all - Disable monitoring of all services unmonitor <name> - Only disable monitoring of the named service reload - Reinitialize monit status [name] - Print full status information for service(s) summary [name] - Print short status information for service(s) report [up|down|..] - Report state of services. See manual for options quit - Kill the monit daemon process validate - Check all services and start if not running procmatch <pattern> - Test process matching pattern root@k8s-master-0:/home/monit/monit-5.34.0#
03
Basic Configuration of the Monit Tool

In step 4 of the installation example in the previous section, we can see that after the monit process runs, it will open port 2812 on localhost. We can modify the tool’s configuration file to allow users to remotely access the tool’s page.
root@k8s-master-0:/home/monit/monit-5.34.0# vi /etc/monitrcModify the paragraph included in the default configuration
set httpd port 2812 and use address localhost # only accept connection from localhost (drop if you use M/Monit) allow localhost # allow localhost to connect to the server and allow admin:monit # require user 'admin' with password 'monit'to
set httpd port 2812 and use address localhost # only accept connection from localhost (drop if you use M/Monit) use address 192.168.1.172# allow localhost # allow localhost to connect to the server and allow admin:monit # require user 'admin' with password 'monit'Restart monit.
root@k8s-master-0:/home/monit/monit-5.34.0# monit quit Monit daemon with pid [2757148] killed root@k8s-master-0:/home/monit/monit-5.34.0# monit Starting Monit 5.34.0 daemon with http interface at [192.168.1.72]:2812Then enter 192.168.1.72:2812 in the browser on the testing PC to see the check results under the default configuration, as shown in the following image.
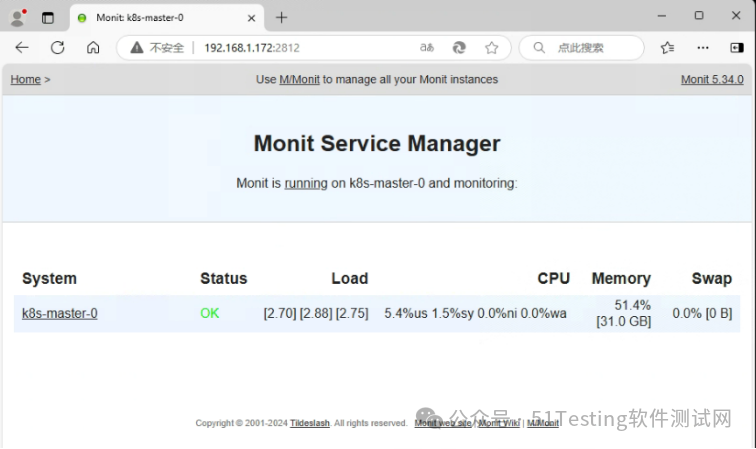
You can see that the tool will display the system’s CPU, memory, and other load conditions by default.

04
Using the Tool’s Syntax
Writing Check Sections for Testing

You can write check sections in the /etc/monitrc file to design checks.
vi /etc/monitrcAdd to the file
### Monitor System check system $HOST if loadavg (5min) per core > 15 for 10 cycles then alert if cpu usage > 70% for 10 cycles then alert if memory usage > 70% for 10 cycles then alert if swap usage > 25% then alert ## Monitor 5G Process check process gnbCuMcuNode matching "gnbCuMcuNode" if changed pid then alert if totalmem > 150.0 MB for 5 cycles then alert mode passive ## Monitor Network Interface check network br_gnbOamNode with interface br_gnbOamNode if link down then alert ## Monitor Disk check filesystem os with path /var/log if space usage > 95% for 5 cycles then alertThe check system section is used to check the system. In this example, the checks for loadavg, cpu usage, memory usage, swap usage are “and” relationships; if any one of them fails, such as memory usage exceeding 70% of the maximum system memory, the status is deemed failed. (Note: Customizing this section will override the default checks in the previous section.)
The phrase For xx cycles means checking multiple rounds to avoid sudden data anomalies affecting the result judgment.
You can see the execution results through the tool’s web page, showing the System, Process, Filesystem, and Net sections as shown in the following image.
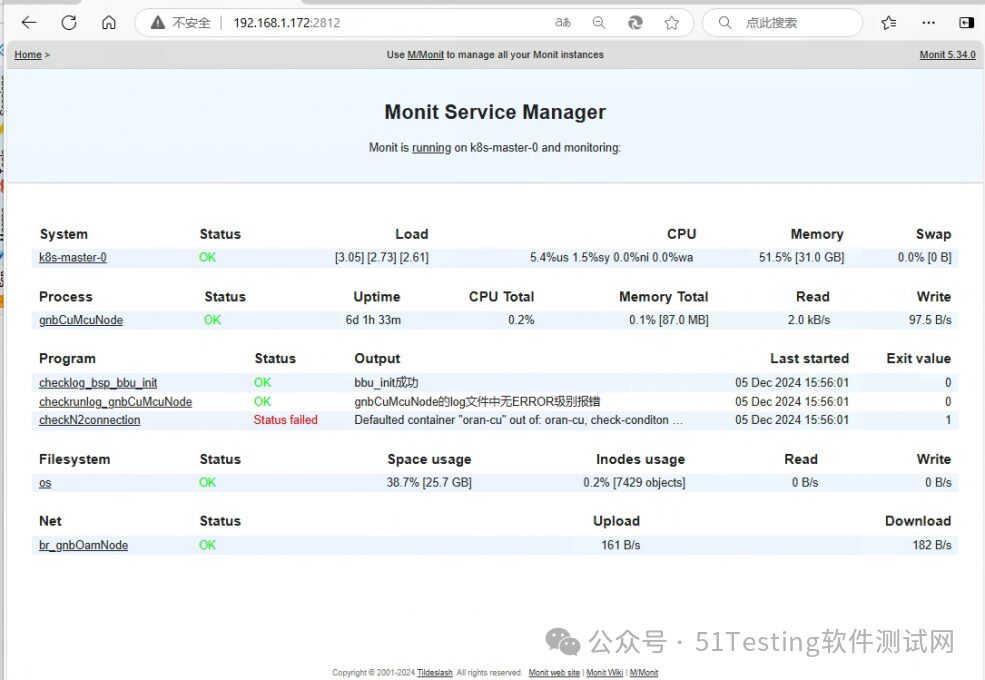
The check process section is used to check the processes running in the system. This example checks whether the process ID has changed and whether the memory usage of the process exceeds the design standard. Mode passive indicates that there will be no post-processing for fail states (some monitoring tasks require post-processing, while testing tasks should not).
The check network section is used to check the status of network devices running in the system.
The check filesystem section is used to check the file system in the system, with this example checking the capacity of the frequently cached path /var/log.
In addition to the checks mentioned above, you can design checks for many other resources, such as single file checksums, file permissions, or CPU utilization and memory usage of a single process, service port connectivity, disk I/O rates, as well as ping rates between the local system and remote hosts, success rates of application layer accesses such as http/dns/mysql, and TCP/UDP download rates, etc. More comprehensive methods can be found in the wiki on their official website.
However, the manual is complicated, so it is recommended to initially follow the examples in the monitrc configuration file to grasp the basic methods.
In ORAN wireless communication products, the number of processes and network devices can often reach dozens or even hundreds. Testers design hundreds of test cases based on their understanding of all system resources or the system design, and it has been verified that these test designs can be well mapped to the Monit tool’s check sections, effectively improving testing efficiency and saving manpower.
To be continued, the follow-up article will explainMonit tool writing custom scripts for testing, more explanations, and related content, stay tuned.


Don’t go away, 

 Daily interaction “Leave a message, like, look, share, follow” will have a chance to receive a custom “mouse pad”! (Every weekInteraction rewards, based on the above 5 aspects, select the 2 partners with the most interactions to each receive a mouse pad)
PS: Every Monday, the interaction situation of the previous week (Monday to Sunday) will be counted, and the winners’ list and collection methods will be announced at 17:30 on the same day.
Image: Custom mouse pad
Today’s Interaction Topic:
What challenges have you encountered while using the Monit tool, and how did you overcome them?