Elmo Controller Tutorial: How to Get Started

Hello everyone! I am Robert Xiang. I am honored to be invited by the great Gu Yue to become a contracted author at Gu Yue Home, sharing my technical growth experiences with you all.
I believe many of you have had the experience of purchasing motion controllers while developing robots or automation devices, only to find yourself unsure of where to start. The technical manuals can be confusing, and consulting technical support sometimes leads to vague responses. To help you avoid the pitfalls I once faced, I decided to share my experiences with using motion controllers.
Today, I will share with you a tutorial on using the Elmo Maestro controller, specifically the Platinum Maestro controller as an example, detailing its usage.

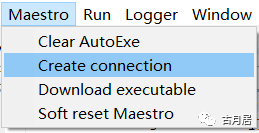
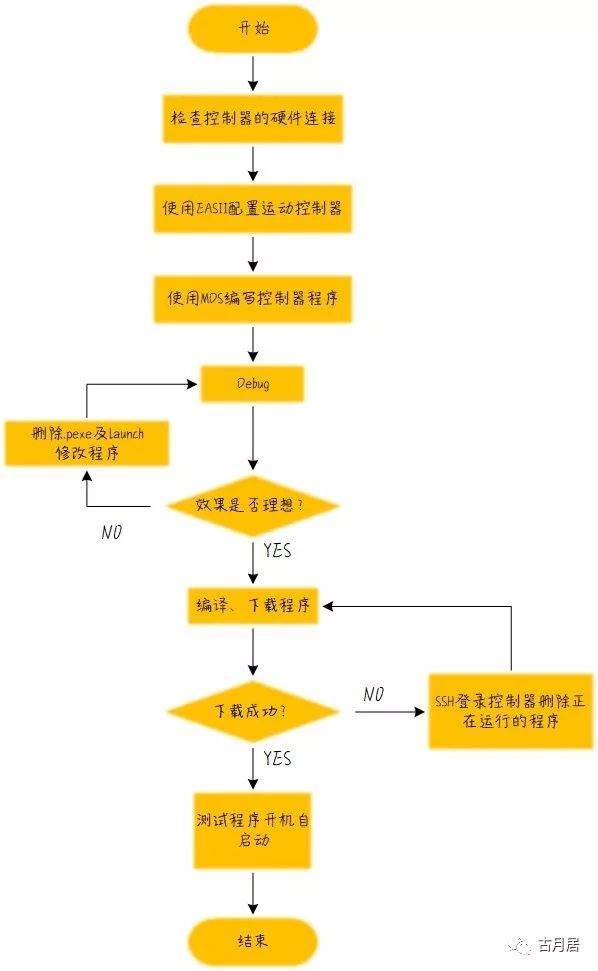
Controller Hardware Connection

Using EtherCAT as an example, we first establish a connection between the controller and the PC using an RJ45 twisted pair cable. Connect it to the controller’s HOST ETH port. The EtherCAT port on its right corresponds to our EtherCAT bus device. Insert the prepared EtherCAT bus crystal head into Master1, and finally connect the 24V DC power line. The CAN bus interface is located on the left side of the controller, with the connection method as described above.
Important: Do not reverse the positive and negative terminals! Do not reverse the positive and negative terminals! Do not reverse the positive and negative terminals!

Elmo Controller Tutorial: How to Get Started

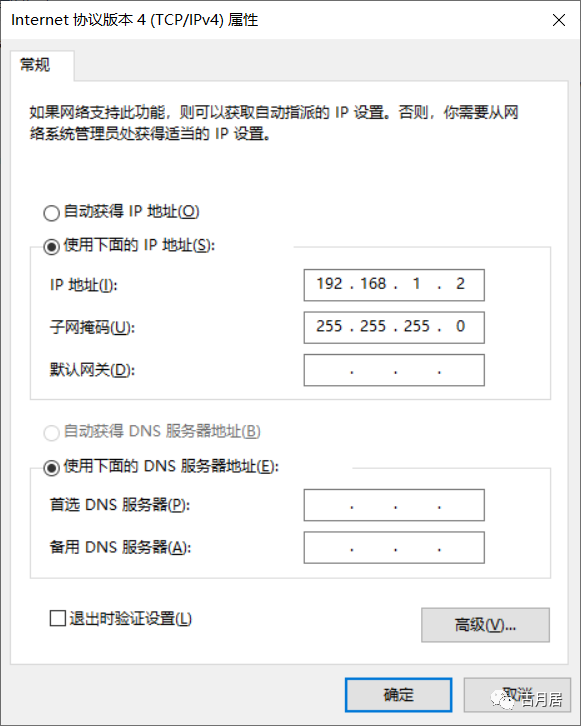
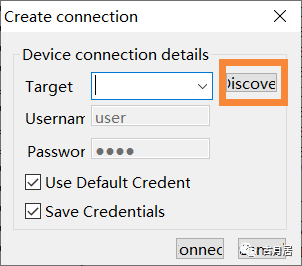
Communication Between Controller and PC

The motion controller is essentially a PC as well, and to establish communication between two PCs, they must be on the same subnet. Therefore, we need to modify the IP of the host PC device first.
The default IP of the Platinum Maestro controller is: 192.168.1.3, and the default port is 502. The device IP of the bus devices mounted on the motion controller will be recognized sequentially as 192.168.1.4, 192.168.1.5, etc.
In the system settings, find [Change Adapter Options] → [Network Card of Connected Device], right-click and select [Properties] → [Internet Protocol Version 4 (TCP/IPv4)] → [Properties]. To avoid IP conflicts between the PC and the device, it is recommended to set the PC network card IP to: 192.168.1.2.
Elmo Controller Tutorial: How to Get Started
At this point, we have completed the physical layer connection.
Next, open EASII (Elmo Application Studio II). In the workspace options, right-click to select the type of controller to add. Here we choose [Add Platinum Maestro EtherCAT].
Elmo Controller Tutorial: How to Get Started
Select the added device and fill in the project configuration information on the right. In the [Target Connection] section, select Maestro TCP/IP for ConnectionType, and for IP Address, select the configured 192.168.1.2; check the two sub-options in [Gateway], and in the [Host Interface] section, click the drop-down arrow to select the PMAS IP (192.168.1.3). After configuration, click [Connect] in the upper left corner to establish the connection.
Next, the device will start automatically scanning the bus devices. The default PDO mapping should be sufficient for our use. After scanning the devices, click [To System Configuration] to automatically download the relevant configuration information to the motion controller.

Tip

Elmo Controller Tutorial: How to Get Started

If unable to connect, check the IP settings and turn off the firewall.

Elmo Controller Tutorial: How to Get Started

If fewer devices are scanned than the actual hardware, it indicates a break in the bus loop; check the hardware connection.

Programming and Management
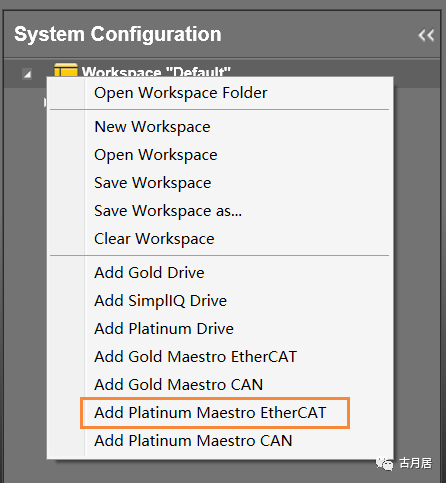
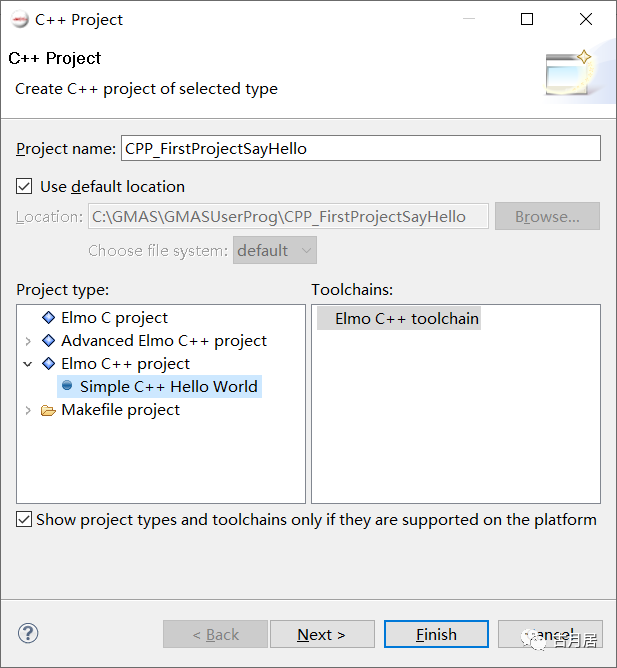
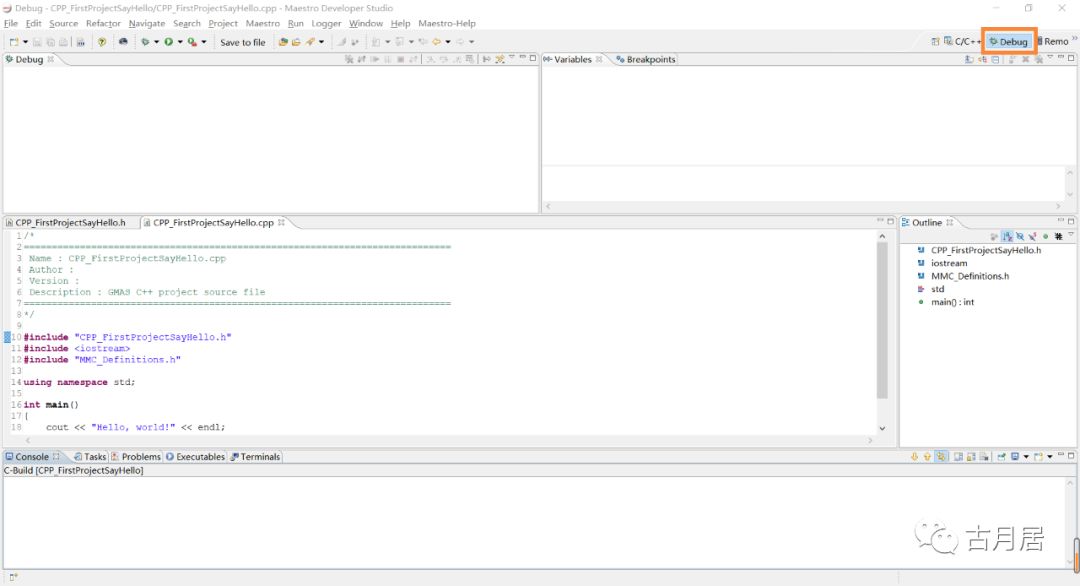
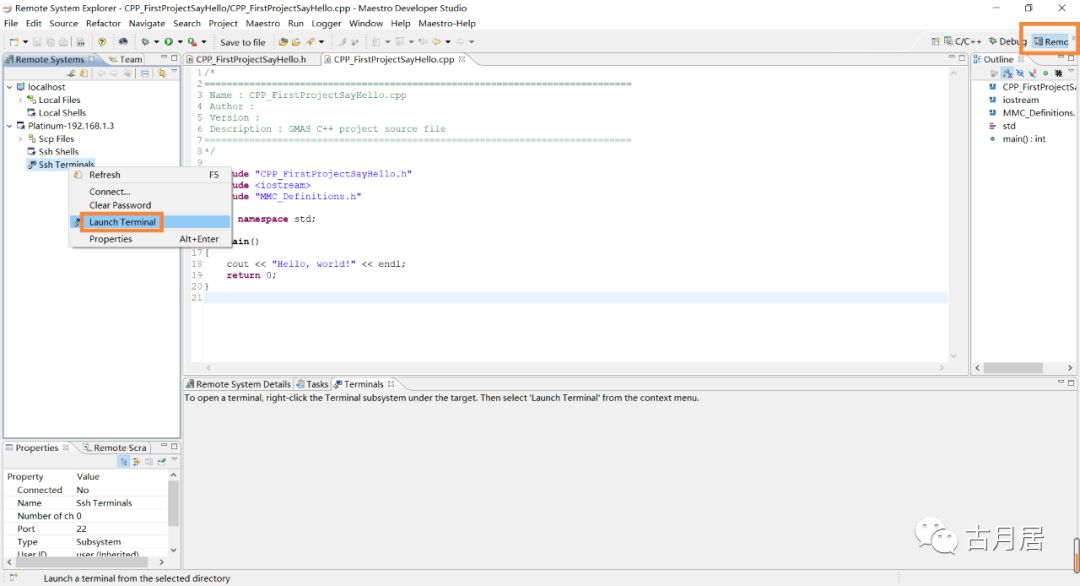
For programming the controller, we need to use the official MDS IDE (Maestro Developer Studio), which is an IDE developed based on Eclipse specifically for programming the Maestro controller, integrating program compilation, downloading, and management functions.

Elmo Controller Tutorial: How to Get Started

Tip: It is recommended to install MDS with administrator privileges and use its default installation location to avoid confusing issues caused by the environment.

Creating a Project

First, we will create a controller C++ project named [CPP_FirstProjectSayHello]. The official documentation provides some motion control program templates in [Advanced Elmo C++ project]. We will select the [Simple C++ Hello World] example under the Elmo C++ project as an example to introduce the program development and management process.

Elmo Controller Tutorial: How to Get Started

To facilitate management, the official documentation provides a set of naming suggestions for project names, variable names, and function names. For example, C++ project names should be named CPP_ProjectName, constants should be named NAME_TYPE, short variables should be named sVarName, function names should be named FunctionName, etc. Specific naming conventions can be referenced in the “Maestro Software Programming Practice Guide”.
The IDE will automatically generate a project named CPP_FirstProjectSayHello, which includes an Includes folder (which automatically loads the controller’s library files), CPP_FirstProjectSayHello.cpp, and CPP_FirstProjectSayHello.h files, as shown in the image:

Elmo Controller Tutorial: How to Get Started

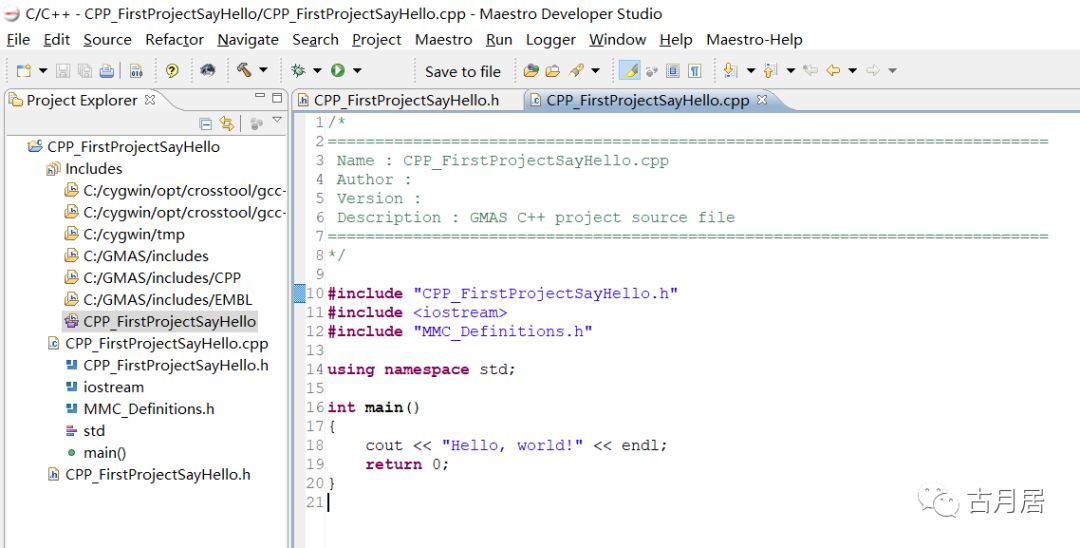
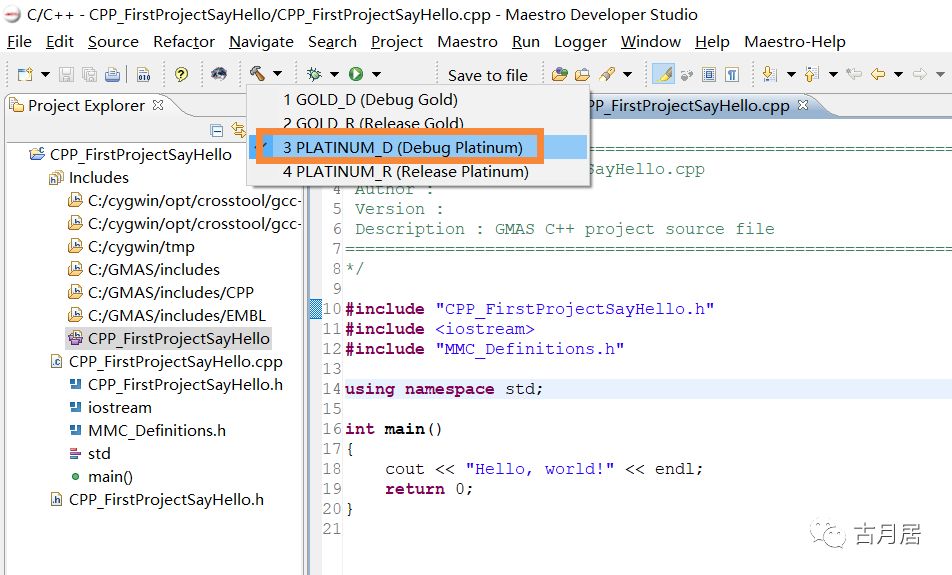
Debugging and Compiling the Program

Clicking the [Debug] button in the upper right corner will enter the program debugging interface, during which the IDE will automatically download the program to the motion controller.

Elmo Controller Tutorial: How to Get Started

After debugging, switch back to [C/C++] editing mode, click the toolbar and select [PLATINUM_D(Debug Platinum)] for compilation, and for the final version of the program, select the Release version for compilation.

Elmo Controller Tutorial: How to Get Started

After compilation, a [PLATINUM_D] folder and a *.launch file will be generated. The [CPP_FirstProjectSayHello.pexe] file in the folder is the program we need to download to the controller, and the launch file automatically generates the configuration for the program to start on boot.

Elmo Controller Tutorial: How to Get Started

Tip: When modifying the program after compilation, it is recommended to delete the generated PLATINUM_D folder and launch file first.

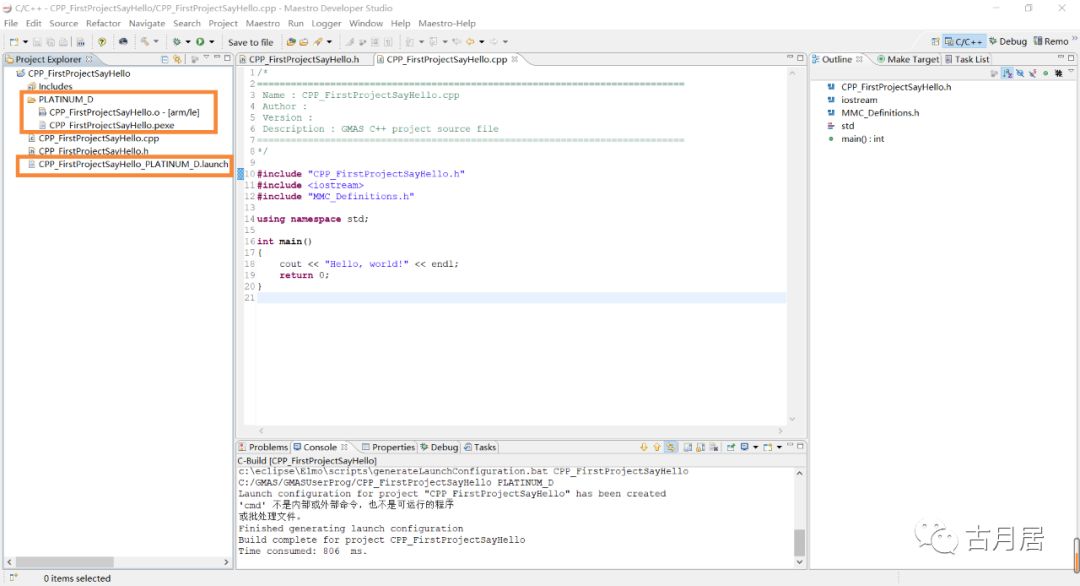
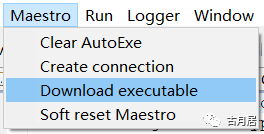
Downloading the Program

Before downloading the program, you need to connect to the controller. Click the [Maestro] option in the toolbar and select [Create connection]. Click [Discover] and the system will automatically scan the connected devices. Finally, click [connect] to complete the connection.

Elmo Controller Tutorial: How to Get Started

Elmo Controller Tutorial: How to Get Started

The program download options are also located under the [Maestro] tab. Select [Download executable], choose the controller to download in the Target section, and select the compiled *.pexe file in the Select File section. This file is located in C:\GMAS\GMASUserProg\CPP_FirstProjectSayHello\PLATINUM_D directory. If the selected version is the Release compilation, the *.pexe will be located in the same directory as the PLATINUM_D folder in the PLATINUM_R directory.
A well-developed program usually needs to run immediately upon powering on. To achieve this, we need to check the [Run at Maestro startup] option when downloading and click the [Download] button to complete the download. Then, power cycle the controller to test whether the auto-start is functioning properly.

Elmo Controller Tutorial: How to Get Started

Elmo Controller Tutorial: How to Get Started

Tip

Elmo Controller Tutorial: How to Get Started

It is not recommended to use the “auto-start on power-up” feature for testing programs to avoid unexpected incidents caused by bugs.

Elmo Controller Tutorial: How to Get Started

Downloading a program while it is running is not possible; you must first delete the running program.

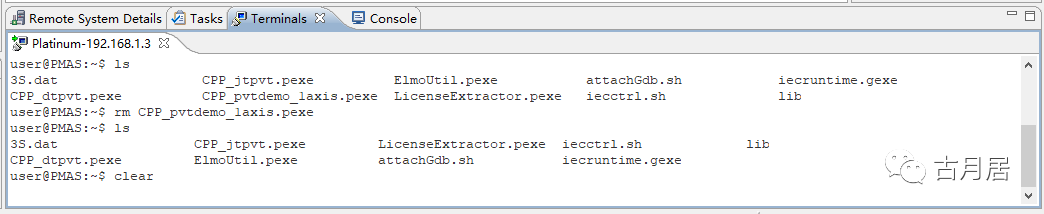
Managing Programs on the Controller

Clicking the [Remote System Explorer] button in the upper right corner will take you to the remote connection interface, where you can log into the motion controller via SSH.

Elmo Controller Tutorial: How to Get Started

In the controller’s [Ssh Terminals] option, right-click and select [Launch Terminal] to perform remote operations on the controller. Since PMAS runs on a real-time Linux system, Linux operation commands also apply to the controller.
Common operations include:
  • ls # List files in the current directory
  • clear # Clear screen
  • rm ***.pexe # Delete a specific executable program

Elmo Controller Tutorial: How to Get Started

Tip: It is advisable not to manipulate other files, escalate privileges, or change passwords beyond common operations to avoid system failures of the controller.
Programs that are currently running cannot be deleted; to do so, you need to power cycle the controller and delete the program while it is not running.

Conclusion

In this article, we introduced the physical connection method of the PMAS motion controller, the download of controller configurations, and the development and management of PMAS programs. The process is as follows:

Elmo Controller Tutorial: How to Get Started

Things to keep in mind throughout the development process:
  1. Check if the power cable is connected correctly when powering on the controller.
  2. Use MDS software with administrator privileges and its default installation location.
  3. Check firewall settings if communication fails.
  4. When modifying the program after compilation, it is advisable to delete the generated PLATINUM_D folder and launch file first.
  5. It is not recommended to use the “auto-start on power-up” feature for testing programs to avoid unexpected incidents caused by bugs.
  6. Downloading a program while it is running is not possible; you must first delete the running program.
  7. Avoid operations beyond common operations, such as modifying other files, escalating privileges, and changing passwords to prevent system failures of the controller.
My skills are limited, so please bear with me if there are shortcomings! I welcome everyone to communicate in the comment section of this article~
Reading a thousand books is not as good as traveling a thousand miles! I am Robert Xiang, see you next time!

The Gu Yue Home original author signing plan has been launched, and the website (guyuehome.com) has launched the [Submission] feature. We welcome everyone to submit actively; authors of high-quality original articles will have the chance to become contracted authors at Gu Yue Home.

Elmo Controller Tutorial: How to Get Started

Leave a Comment