Hello everyone! I am Lao Kou! Let’s learn how to debug gateway devices together.
For those who have worked with the Internet of Things (IoT), you are very familiar with gateway devices. From a beginner’s perspective, I will guide you step by step on how to debug these devices!
In my work, I use the <span>Ubuntu</span> operating system, so this article is also based on devices running <span>Ubuntu</span>! How do we connect and debug the new gateway on a <span>Windows</span> system?
Steps
1. Power On

Find the <span>power socket</span>, <span>insert the power cable</span>, and then <span>turn on the power</span>!
2. Connect the Ethernet Cable
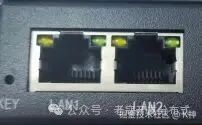
Not all devices have <span>two Ethernet ports</span>; some devices only have <span>one Ethernet port</span>. The <span>LAN1</span> and <span>LAN2</span> correspond to the network configurations <span>eth0</span> and <span>eth1</span>, which are specifically named as <span>Ethernet</span>.
Insert one end of the Ethernet cable into <span>LAN1</span> and the other end into the <span>computer's Ethernet port</span>. If your laptop does not have an Ethernet port, please use an <span>Ethernet adapter</span>.
3. Modify Computer IP Configuration
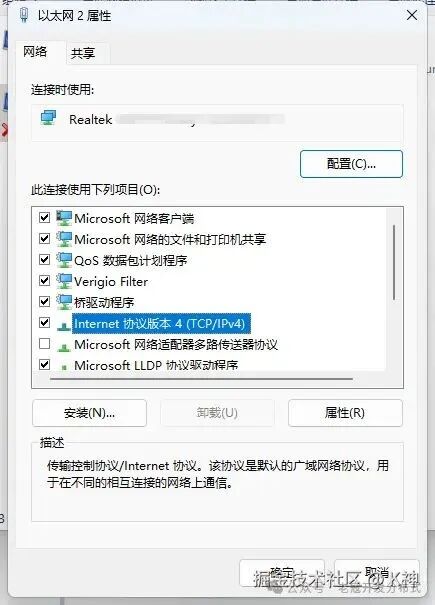
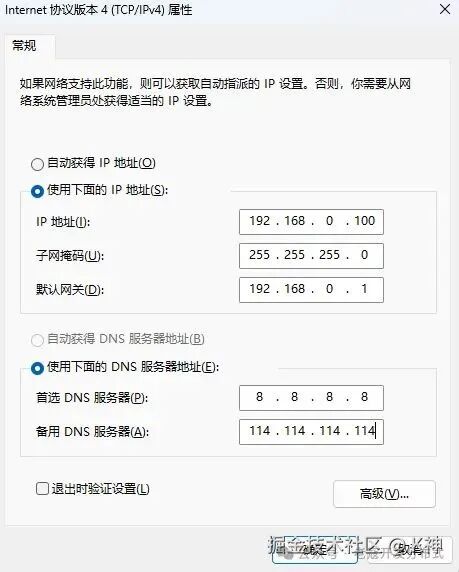
Press the <span>Win + R</span> key combination to open the Run window, type <span>control</span> and hit Enter to launch the Control Panel! Click on <span>Network and Internet</span>, find <span>Network Connections</span>, and modify the <span>Ethernet 2</span> network configuration. Click on <span>Internet Protocol Version 4 (TCP/IPv4)</span>. The gateway device’s IP address is <span>192.168.0.88</span>, and since it is not in the same subnet, we need to manually set the IP.

4. SSH Connection
Use <span>finalshell</span> or <span>xshell</span> to connect.
5. Manually Configure Device Static IP
<span>Ubuntu</span>‘s network configuration is generally located in the <span>/etc/netplan</span> directory. We manually set the IP to <span>192.168.1.33</span>, so that it is in the <span>same subnet</span> as our computer IP, making debugging easier!
vi /etc/netplan/01-network-manager-all.yaml
network:
    renderer: NetworkManager
    ethernets:
        eth0:
            dhcp4: false
            addresses:
                - 192.168.1.33/24
            gateway4: 192.168.1.1
            nameservers:
                addresses:
                    - 8.8.8.8
                    - 114.114.114.114
        eth1:
            dhcp4: false
            addresses:
                - 100.100.1.15/24
            gateway4: 100.100.1.1
            nameservers:
                addresses:
                    - 223.5.5.5
                    - 114.114.114.114
# Apply configuration
sudo netplan apply
# Restart network
sudo systemctl restart networking
6. Network Switch
Disconnect your computer’s network, and plug the Ethernet cable into the <span>switch</span>. We can then connect via SSH~
Common Issues Encountered
Insufficient Disk Space on Gateway Device
After purchasing the gateway and installing <span>docker</span>, restarting it several times caused the <span>disk to fill up</span>, making it impossible to <span>upload files</span>.
# Check disk usage to see if it is really full or if it is a network issue that needs to be ruled out step by step
df -lh
# Search directories by full path to find the highest disk usage directory, one by one until you find it. Usually, system logs occupy a lot of disk space -> /var/log/syslog
sudo du -hsx /* | sort -rh | head -10
# Clear logs. This command should not be executed lightly, as it is very dangerous!
sudo rm -r /var/log/syslog
Network Device Set to Automatically Obtain IP, Unable to Connect to Device
In this case, directly check the <span>network management page</span> to view all devices’ IPs and find the device’s <span>dynamic IP</span>!
I am Lao Kou, see you next time!