The priority queue in C++ is a derived container in the STL that only considers elements with the highest priority. The queue follows a FIFO (First In, First Out) strategy, while the priority queue pops elements based on priority, meaning the element with the highest priority is popped first.
The priority queue is similar to a regular queue in some aspects, but differs in the following ways:
-
In a priority queue, each element in the queue is associated with a certain priority, which is absent in the regular queue data structure.
-
The element with the highest priority in the priority queue will be deleted first, while the regular queue follows the FIFO strategy, meaning the element that was inserted first will be deleted first.
-
If there are multiple elements with the same priority, the order of the elements in the queue will be considered.
Note: The priority queue is an extended version of the regular queue, with the difference being that the priority queue will delete the element with the highest priority first.
Syntax of Priority Queue
priority_queue<int> variable_name;Let’s understand the priority queue with a simple example.
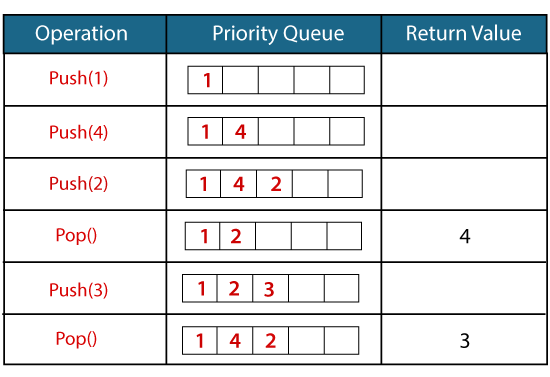
In the above example, we use the push() function to insert elements, and the insertion operation is the same as in a regular queue. However, when using the pop() function to delete elements from the queue, the element with the highest priority will be deleted first.
👇 Click to Claim 👇
👉 C Language Knowledge Resource Collection
Member Functions of Priority Queue
| Function | Description |
|---|---|
| push() | Inserts a new element into the priority queue. |
| pop() | Removes the top element with the highest priority from the queue. |
| top() | Accesses the top element of the priority queue. |
| size() | Determines the size of the priority queue. |
| empty() | Checks if the queue is empty. Returns the status based on the check. |
| swap() | Swaps the elements of one priority queue with another queue of the same type and size. |
| emplace() | Inserts a new element at the top of the priority queue. |
Let’s create a simple priority queue program.
#include <iostream>
#include <queue>
using namespace std;
int main(){
  priority_queue<int> p; // Variable declaration.
  p.push(10); // Insert 10 into the queue, top=10
  p.push(30); // Insert 30 into the queue, top=30
  p.push(20); // Insert 20 into the queue, top=20
  cout << "Number of elements available in 'p': " << p.size() << endl;
  while (!p.empty())
  {
      std::cout << p.top() << std::endl;
      p.pop();
  }
  return 0;
}
In the above code, we created a priority queue and inserted three elements: 10, 30, and 20. After inserting the elements, we use a while loop to display all elements of the priority queue.
Output
Number of elements available in 'p': 3
30
20
10
Let’s look at another example of a priority queue.
#include <iostream>
#include <queue>
using namespace std;
int main(){
  priority_queue<int> p; // Priority queue declaration
  priority_queue<int> q; // Priority queue declaration
  p.push(1); // Insert element '1' into p.
  p.push(2); // Insert element '2' into p.
  p.push(3); // Insert element '3' into p.
  p.push(4); // Insert element '4' into p.
  q.push(5); // Insert element '5' into q.
  q.push(6); // Insert element '6' into q.
  q.push(7); // Insert element '7' into q.
  q.push(8); // Insert element '8' into q.
  p.swap(q);
  std::cout << "Elements of p are: " << std::endl;
  while (!p.empty())
  {
      std::cout << p.top() << std::endl;
      p.pop();
  }
  std::cout << "Elements of q are:" << std::endl;
  while (!q.empty())
  {
      std::cout << q.top() << std::endl;
      q.pop();
  }
  return 0;
}
In the above code, we declared two priority queues p and q. We inserted four elements into the ‘p’ priority queue and four elements into the ‘q’ priority queue. After inserting the elements, we used the swap() function to exchange the elements of the ‘p’ queue with those of the ‘q’ queue.
Output
Elements of p are: 8
7
6
5
Elements of q are: 4
3
2
1
Recommended Hot
-
Frontend is dead, and I am dying too~
-
CLion Tutorial – Creating Live Templates in CLion
-
C Language Algorithm – “Best Time to Buy and Sell Stock III” Algorithm Problem