Build A DIY License Plate Recognition System With Raspberry Pi

Click the “Machine Vision” above, then click the top right corner… select “Pin/StarPublic Account to receive the latest articles!

Source: Translated by Machine Heart

Original article link: https://towardsdatascience.com/i-built-a-diy-license-plate-reader-with-a-raspberry-pi-and-machine-learning-7e428d3c7401

Build A DIY License Plate Recognition System With Raspberry Pi

Author:Robert Lucian Chiriac Translated by Machine Heart

Out of boredom, we equipped our beloved car with a Raspberry Pi, paired it with a camera, designed a client, and completed a real-time license plate detection and recognition system.

How to create a smart car system without changing the car? For some time, the author Robert Lucian Chiriac has been thinking about giving the car the ability to detect and recognize objects. This idea is very interesting, as we have seen the capabilities of Tesla, and although we cannot buy a Tesla right away (it must be mentioned that the Model 3 looks increasingly attractive now), he had an idea to work towards realizing this dream.

So, the author achieved this with a Raspberry Pi, which can detect license plates in real-time when placed in the car.

Build A DIY License Plate Recognition System With Raspberry Pi

In the following content, we will introduce each step of the project and provide the GitHub project address, where the project address is just the client tool, and other datasets and pre-trained models can be found at the end of the original blog.
Project address:
https://github.com/RobertLucian/cortex-license-plate-reader-client
Build A DIY License Plate Recognition System With Raspberry Pi
Next, let’s see how the author Robert Lucian Chiriac built a useful vehicle detection and recognition system step by step.

Build A DIY License Plate Recognition System With Raspberry Pi

Here’s a picture of the finished product.
Step 1:Define the Project Scope
Before starting, the first question that came to my mind was what this system should be able to do. If there’s one thing I’ve learned in my life, it’s to take things step by step—starting small is always the best strategy. So, besides the basic visual tasks, I only needed to clearly identify license plates while driving. This recognition process includes two steps:
  1. Detect the license plate.

  2. Recognize the text within each license plate boundary box.

I thought that if I could accomplish these tasks, it would be much easier to do other similar tasks (such as determining collision risks, distances, etc.). I might even create a vector space to represent the surrounding environment—sounds cool to think about.
Before determining these details, I knew I had to achieve:
  • A machine learning model that detects license plates using unlabelled images as input;

  • Some hardware. Simply put, I needed a computer system connected to one or more cameras to call my model.

Let’s start with the first task—building the object detection model.
Step 2:Select the Right Model
After careful research, I decided to use these machine learning models:
  1. YOLOv3 – This is one of the fastest models available, and its mAP is comparable to other SOTA models. We use this model to detect objects;

  2. CRAFT Text Detector – We use it to detect text in images;

  3. CRNN – Simply put, it’s a recurrent convolutional neural network model. To arrange the detected characters into words in the correct order, it must be sequential data;

How do these three models work together? Here’s the operational flow:
  1. First, the YOLOv3 model receives frames from the camera and finds the boundary boxes for the license plates in each frame. It’s not advisable to use very precise predicted boundary boxes—the boxes should be slightly larger than the actual detected object. If they are too tight, it may affect the performance of subsequent processes;

  2. The text detector receives the cropped license plates from YOLOv3. At this point, if the boundary box is too small, it’s likely that part of the license plate text will be cropped out, leading to poor prediction results. However, when the boundary box is enlarged, we can let the CRAFT model detect the positions of the letters, allowing for very precise positioning of each letter;

  3. Finally, we can pass the boundary boxes of each word from CRAFT to the CRNN model to predict the actual words.

With my basic model architecture sketch in place, I can start shifting to hardware.
Step 3:Design Hardware
When I realized I needed low-power hardware, I thought of my old love: the Raspberry Pi. It has a dedicated camera, the Pi Camera, and enough computational power to preprocess each frame at a decent frame rate. The Pi Camera is the physical camera for the Raspberry Pi and has a mature and complete library.
To connect to the internet, I can use the EC25-E’s 4G connection, which I used in a previous project with one of its GPS modules, details can be found here:
Blog link: https://www.robertlucian.com/2018/08/29/mobile-network-access-rpi/
Build A DIY License Plate Recognition System With Raspberry Pi
Next, I need to start designing the casing—I should be able to mount it on the car’s rearview mirror, so I ultimately designed a two-part support structure:
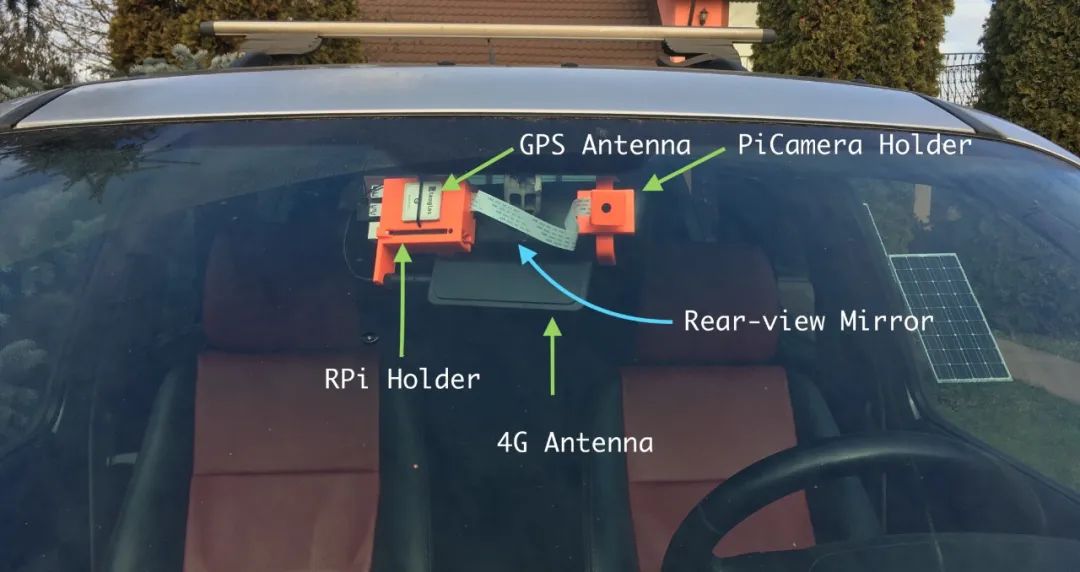
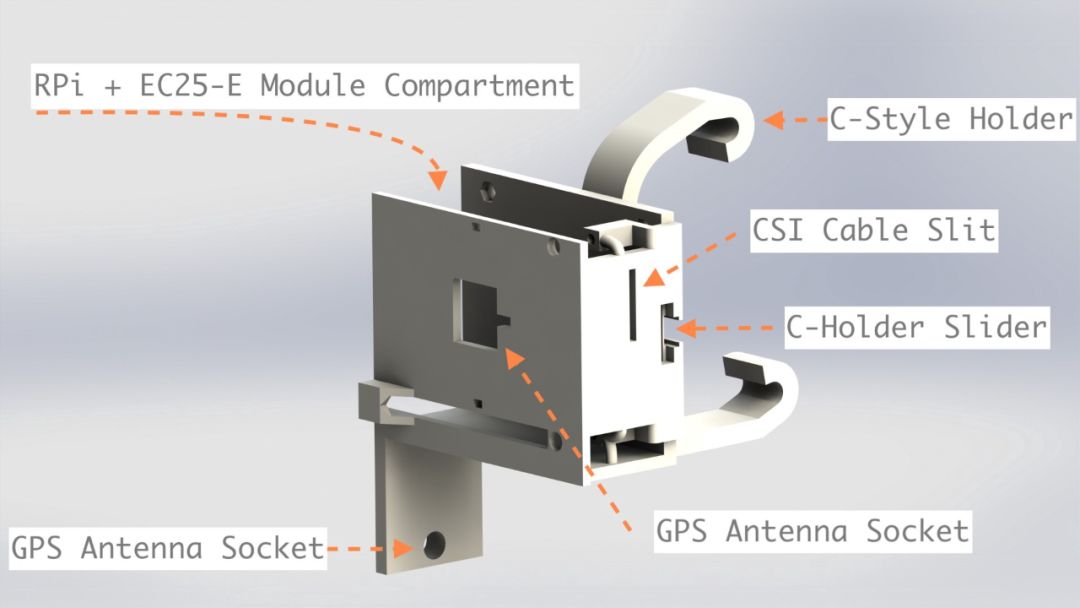
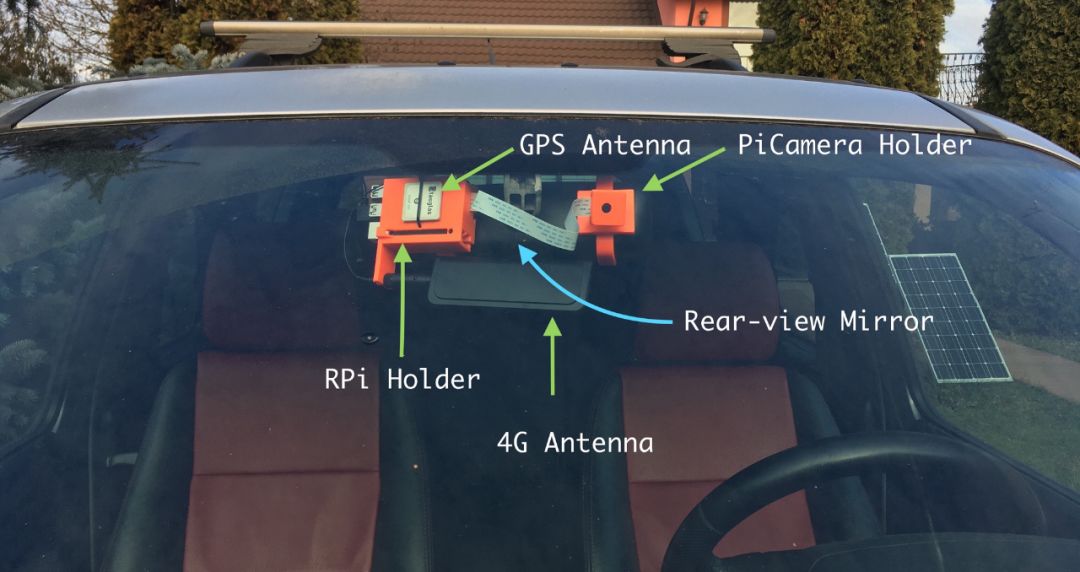
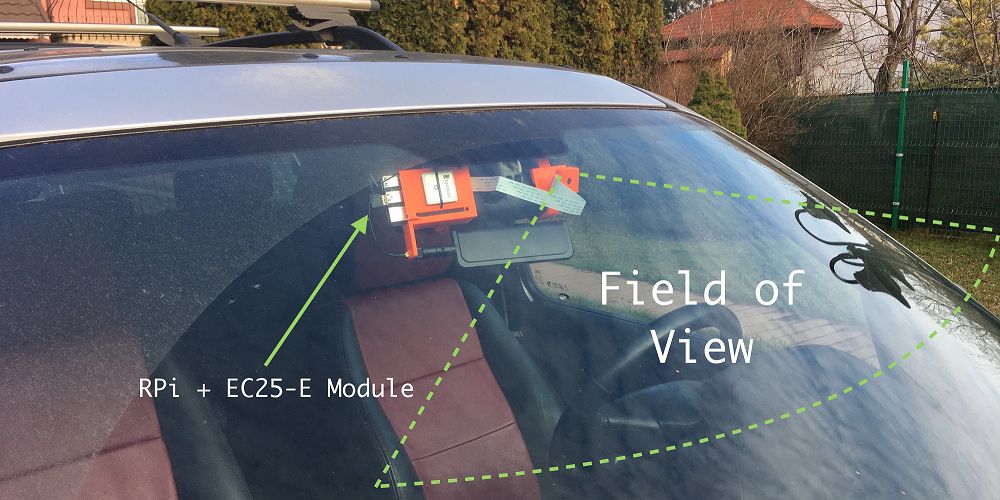
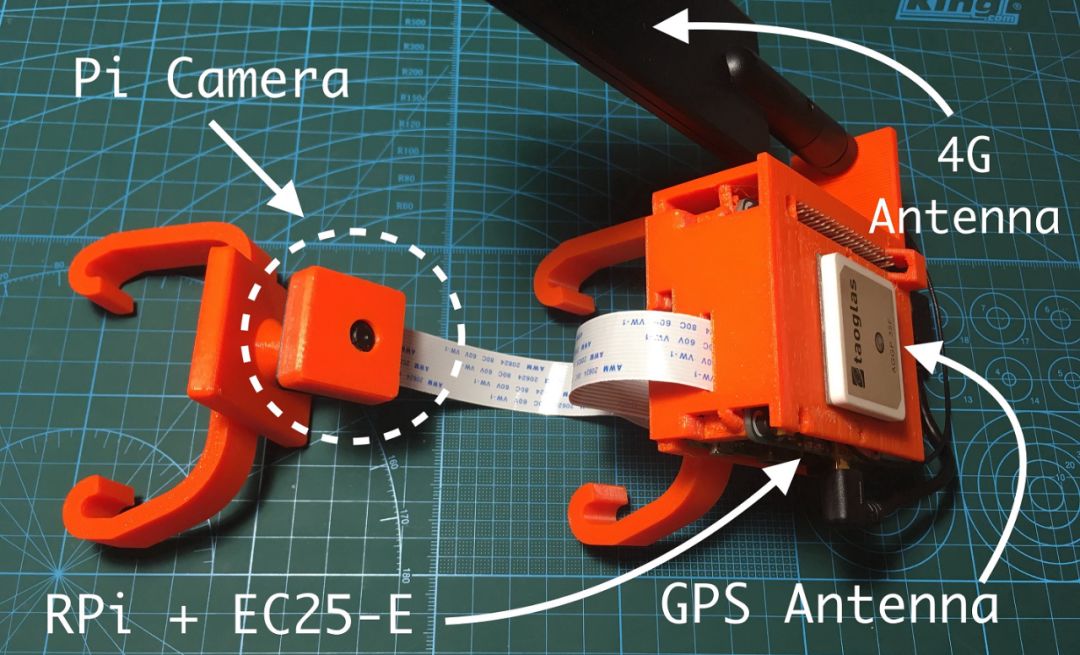
  1. On the rearview mirror side, the Raspberry Pi + GPS module + 4G module will be retained. You can check my article about the EC25-E module for the GPS and 4G antennas I used;

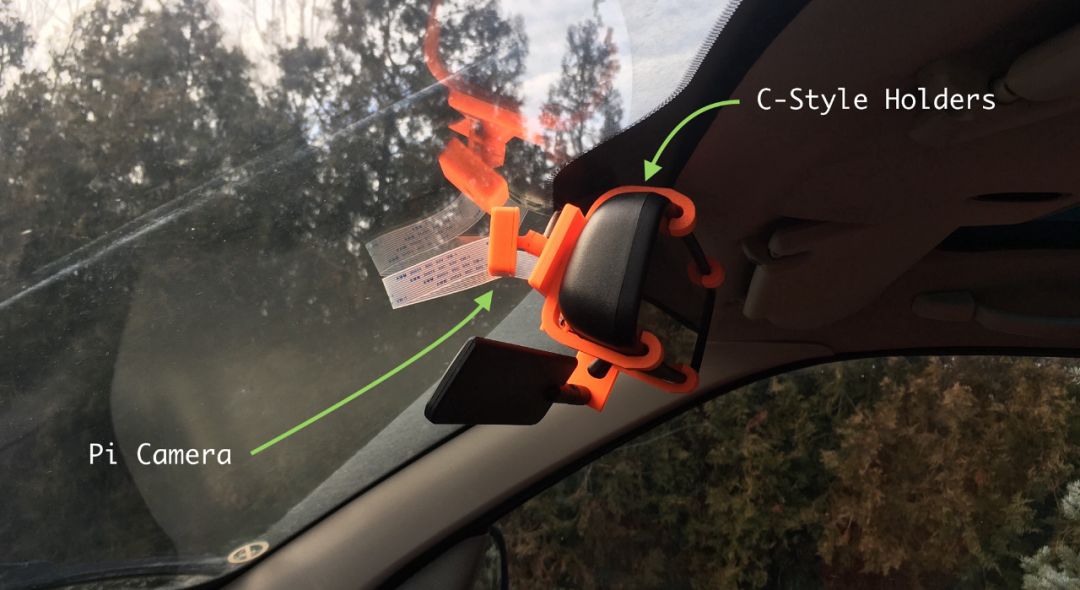
  2. On the other side, I used an arm that utilizes a ball joint to support the Pi Camera.

I will use my reliable Prusa i3 MK3S 3D printer to print these parts, and I will provide the 3D printing parameters at the end of the original text.

Build A DIY License Plate Recognition System With Raspberry Pi

Figure 1: The shape of the Raspberry Pi + 4G/GPS case

Build A DIY License Plate Recognition System With Raspberry Pi

Figure 2:Using a ball joint arm to support the Pi Camera
Figures 1 and 2 show how they look when rendered. Note that the c-shaped bracket here is detachable, so the Raspberry Pi’s accessories and the Pi Camera’s supports are not printed together with the bracket. They share a socket, with the bracket plugged into it. If any readers want to replicate this project, this is very useful. They only need to adjust the bracket on the rearview mirror. Currently, this base works very well on my car (Land Rover Freelander).

Build A DIY License Plate Recognition System With Raspberry Pi

Figure 3:Side view of the Pi Camera support structure

Build A DIY License Plate Recognition System With Raspberry Pi

Figure 4:Front view of the Pi Camera support structure and RPi base

Build A DIY License Plate Recognition System With Raspberry Pi

Figure 5:Expected camera field of view

Build A DIY License Plate Recognition System With Raspberry Pi

Figure 6:Close-up of the embedded system with built-in 4G/GPS module and Pi Camera
Clearly, these items take some time to model, and I need to do several iterations to achieve a sturdy structure. The PETG material I used has a layer height of 200 microns. PETG works well at 80-90 degrees Celsius and has good resistance to UV radiation—although not as good as ASA, it is still strong.
This was designed in SolidWorks, so all my SLDPRT/SLDASM files, as well as all the STLs and gcode, can be found at the end of the original text. You can also use these to print your own version.
Step 4:Train the Model
Now that the hardware is sorted, it’s time to start training the model. Everyone should know that working from the shoulders of giants is the best approach. This is the essence of transfer learning—first learning with a very large dataset, and then leveraging the knowledge gained from it.
YOLOv3
I found many pre-trained license plate models online, but not as many as I initially expected. However, I found one trained on 3600 images of license plates. This training set is not large, but it’s better than nothing. Moreover, it was trained on top of Darknet’s pre-trained model, so I could use it directly.
Model link: https://github.com/ThorPham/License-plate-detection
Since I already had a hardware system that could record, I decided to drive around town for a few hours to collect new video frame data to fine-tune the previous model.
I used VOTT to annotate the frames containing license plates, ultimately creating a small dataset of 534 images, all with labeled bounding boxes for the license plates.
Dataset link: https://github.com/RobertLucian/license-plate-dataset
Then, I found the code that implements YOLOv3 using Keras and used it to train my dataset, then submitted my model to this repo so others could use it. I ultimately achieved a mAP of 90% on the test set, which is great considering my dataset is very small.
  • Keras implementation: https://github.com/experiencor/keras-yolo3Build A DIY License Plate Recognition System With Raspberry Pi

  • Submit merge request: https://github.com/experiencor/keras-yolo3/pull/244

Build A DIY License Plate Recognition System With Raspberry Pi
CRAFT & CRNN
To find a suitable network for recognizing text, I went through countless trials. Eventually, I stumbled upon keras-ocr, which packages CRAFT and CRNN, is very flexible, and has pre-trained models, which is fantastic. I decided not to fine-tune the models and kept them as they are.
keras-ocr link: https://github.com/faustomorales/keras-ocr
Build A DIY License Plate Recognition System With Raspberry Pi
Most importantly, predicting text with keras-ocr is very simple. Basically, it just takes a few lines of code. You can check out the project’s homepage to see how this is done.
Step 5:Deploy My License Plate Detection Model
Model deployment mainly has two methods:
  1. Perform all inference locally;

  2. Perform inference in the cloud.

Both methods have their challenges. The first means having a central “brain” computer system, which is complex and expensive. The second faces challenges related to latency and infrastructure, especially when using GPUs for inference.
During my research, I stumbled upon an open-source project called cortex. It’s a newcomer in the AI field, but as the next evolutionary step in AI development tools, it certainly makes sense.
Cortex project link: https://github.com/cortexlabs/cortex
Build A DIY License Plate Recognition System With Raspberry Pi
Essentially, cortex is a platform that deploys machine learning models as production network services. This means I can focus on my application while leaving the rest to cortex to handle. It does all the preparation work on AWS, and all I need to do is write a predictor using template models. Even better, I only need to write a few dozen lines of code for each model.
Below is a terminal output from the cortex runtime fetched from the GitHub repo. If this isn’t elegant and concise, I don’t know what to call it:

Build A DIY License Plate Recognition System With Raspberry Pi

Since this computer vision system is not designed for autonomous driving, latency is less of a concern for me, and I can use cortex to address this issue. If it were part of an autonomous driving system, using services provided by cloud vendors wouldn’t be a good idea, at least not right now.
Deploying ML models with cortex involves:
  1. Defining the cortex.yaml file, which is the configuration file for our API. Each API will handle one type of task. I assigned the task for the yolov3 API to detect the license plate bounding boxes on the given frame, while the crnn API predicts the license plate number with the help of CRAFT text detector and crnn;

  2. Defining the predictor for each API. Basically, what you need to do is define a predict method for a specific class in cortex to receive a payload (all the servy parts are already handled by the platform), this payload can be used to predict results and then return the prediction results. It’s that simple!

Here’s an example of a predictor for the classic iris dataset, but due to the length of the article, I won’t go into details here. You can find how to use these two APIs in the project link—the rest of the resources for this project are at the end of this article.
<span># predictor.pyimport boto3</span>import picklelabels = [<span>"setosa"</span>, <span>"versicolor"</span>, <span>"virginica"</span>]<span><span>class</span> <span>PythonPredictor</span>:</span> <span><span>def</span> <span>__init__(<span>self</span>, config)</span></span>: s3 = boto3.client(<span>"s3"</span>) s3.download_file(config[<span>"bucket"</span>], config[<span>"key"</span>], <span>"model.pkl"</span>) <span>self</span>.model = pickle.load(open(<span>"model.pkl"</span>, <span>"rb"</span>)) <span><span>def</span> <span>predict(<span>self</span>, payload)</span></span>: measurements = [ payload[<span>"sepal_length"</span>], payload[<span>"sepal_width"</span>], payload[<span>"petal_length"</span>], payload[<span>"petal_width"</span>], ] label_id = <span>self</span>.model.predict([measurements])[<span>0</span>] <span>return</span> labels[label_id]
To make predictions, you just need to use curl like this:
curl http://***.amazonaws.com/iris-classifier \ -X POST -H <span>"Content-Type: application/json"</span> \ -d '{<span>"sepal_length"</span>: 5.2, <span>"sepal_width"</span>: 3.6, <span>"petal_length"</span>: 1.4, <span>"petal_width"</span>: 0.3}'
Then you will receive feedback like setosa, very simple!
Step 6:Develop the Client
With cortex helping me with deployment, I can start designing the client—this is arguably the trickiest part.
I thought of the following architecture:
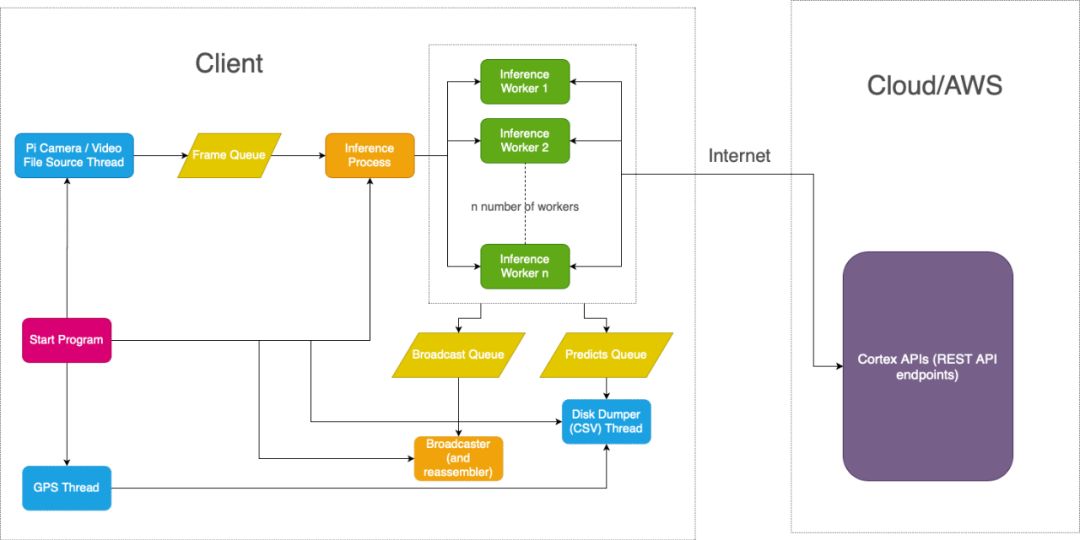
  1. Collect frames from the Pi Camera at an acceptable resolution (800×450 or 480×270) at a frame rate of 30 FPS and push each frame into a public queue;

  2. In a separate process, I will take frames from the queue and distribute them to multiple workstations on different threads;

  3. Each worker thread (or what I call an inference thread) will make API requests to my cortex API. First, a request to my yolov3 API, and then, if any license plate is detected, another request will send a batch of cropped license plates to my crnn API. The predicted license plate numbers will be returned in text format;

  4. Each detected license plate (with or without recognized text) will be pushed to another queue, which will ultimately broadcast to the browser page. Additionally, the predicted license plate numbers will be pushed to another queue to be saved to disk in CSV format later;

  5. The broadcast queue will receive a set of unordered frames. The consumer’s task is to first place them into a very small buffer (the size of a few frames) and broadcast a new frame to the client for reordering. This consumer runs separately in another process, and it must also try to keep the queue size fixed at a specified value to display frames at a consistent frame rate. Obviously, if the queue size decreases, the frame rate drops proportionally, and vice versa;

  6. Meanwhile, another thread will run in the main process to get predictions and GPS data from another queue. When the client receives a termination signal, the predictions, GPS data, and time will also be stored to a CSV file.

The following diagram illustrates the relationship flow between the client and the cloud API provided by AWS via cortex.

Build A DIY License Plate Recognition System With Raspberry Pi

Figure 7:Flowchart of the cloud API provided by cortex and the client
In our case, the client is the Raspberry Pi, and the cloud API to which inference requests are sent is provided by cortex on AWS.
The source code for the client can also be found on its GitHub: https://github.com/robertlucian/cortex-licens-plate-reader-client
One challenge I had to overcome was the bandwidth of 4G. It’s best to minimize the bandwidth required for this application to reduce possible hang-ups or excessive use of available data. I decided to let the Pi Camera use a very low resolution: 480×270 (we can use a small resolution here because the Pi Camera has a very narrow field of view, so we can still easily identify the license plates).
However, even at this resolution, the JPEG size of each frame is about 100KB (0.8MBits). Multiplied by 30 frames per second gives 3000KB, which is 24mb/s, and this is without HTTP overhead, which is a lot.
Thus, I used some tricks:
  • Reduce the width to 416 pixels, which is the size required by the YOLOv3 model, and the scale is obviously intact;

  • Convert the image to grayscale;

  • Remove the top 45% of the image. The idea here is that license plates won’t appear at the top of the car frame because cars don’t fly, right? As far as I know, removing 45% of the image does not affect the performance of the predictor;

  • Convert the image to JPEG again, but this time with much lower quality.

The final size of the resulting frames is about 7-10KB, which is excellent. That translates to 2.8Mb/s. However, considering all overheads like response, it’s about 3.5Mb/s. For the crnn API, the cropped license plates don’t require much space, even without compression, their size is around 2-3KB each.
In summary, to operate at 30FPS, the bandwidth required for the inference API is about 6Mb/s, which is an acceptable number for me.
Results
It worked!
The above is an example of real-time inference through cortex. I need about 20 GPU-equipped instances to run it smoothly. Depending on the latency of this set of GPUs, you might need more GPUs or fewer instances. The average latency from capturing frames to broadcasting frames to the browser window is about 0.9 seconds, which is amazing considering the inference happens far away—I’m still amazed at this.
The text recognition part may not be the best, but it at least proves one point—it can be made more precise by increasing the resolution of the video or by reducing the camera’s field of view or by fine-tuning.
As for the issue of needing too many GPUs, this can be solved through optimization. For instance, using mixed precision/full half precision (FP16/BFP16) in the model. Generally speaking, using mixed precision in the model has little impact on accuracy, so we don’t have to make too many trade-offs.
In summary, if all optimizations are in place, it is feasible to reduce the number of GPUs from 20 to one. With proper optimization, it might not even use up one GPU’s resources.

Recommended Articles:

001: Research resources and journals in the field of computer vision

002:German Kuka robots vs. world champion table tennis players

003:120 images outline the complete map of the global AI industry!

004:Facebook open-source computer vision system, understanding images at pixel level (with paper and code)

005:If you want to become a machine learning engineer, this self-learning guide is worth collecting

006:Eleven common filtering algorithms

007:Basics of image processing and computer vision, classic and recent developments

008:In-depth report on the robotics industry (full version)

009:From a laundry girl to Google’s chief scientist, she changed the AI world with loneliness!

010:Industrial-grade machine vision industry research report

011:Brief introduction to the principle of dual telecentric industrial lenses

012:How to equip an academic iPad?

013:Overview of machine vision systems

014:German craftsmen: We don’t have anything that’s “cheap and good”

015:Why the best robotic arms have 7 degrees of freedom instead of 6?

016:The most powerful technology video ever!

017:Comparison of the top 10 popular programming languages for robots, which one do you know?

018:Novel and complex mechanical principle diagrams!

019:A collection of knowledge related to robot control systems

020:The working principles of robots, the most detailed analysis ever!

021:Knowledge points on light source selection

022:This is a mechanical hand, this is automation, what you have is nothing!

023:Basic knowledge of cameras and lenses

024:Panorama of the IoT industry chain (with another 13 panoramic charts of the electronics industry, must collect)

025:How powerful is Japan? It’s breathtaking! I couldn’t sleep the night after watching it

026:Germany’s machinery has amazed the world: invincibility is so lonely

All phenomena that arise from actions are like dreams, illusions, bubbles, and shadows; they are like dew and lightning. One should view them this way!

Leave a Comment