Copyright belongs to the author. If you wish to share, please indicate the source of the article: https://cyrus-studio.github.io/blog/
Introduction
This guide will take you through the process of downloading the source code, configuring the environment, compiling, and exporting a complete emulator image to run LineageOS in the Android Studio emulator.
Compared to the official system images, self-compiled LineageOS images are easier to customize and modify, making them suitable for in-depth exploration of the Android system’s underlying architecture.
Source Code Download
- • LineageOS Official Website: https://lineageos.org/
- • LineageOS Source Code GitHub Repository: https://github.com/LineageOS/android
- • LineageOS Source Code Domestic Mirror: https://mirrors.tuna.tsinghua.edu.cn/help/lineageOS/
The source code requires approximately 150GB of disk space, and the compiled output will be around 300GB.
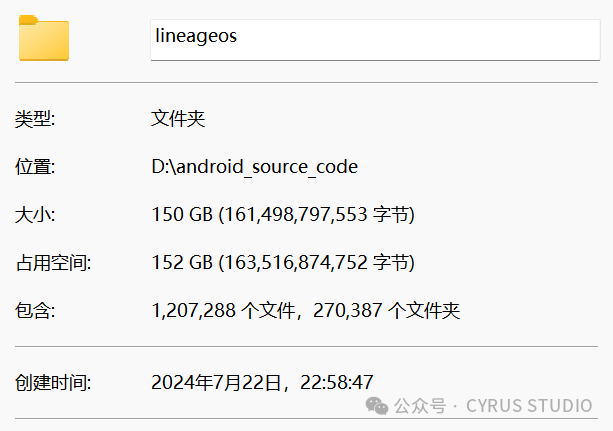
1. Configure Git
git config --global user.email "[email protected]"
git config --global user.name "Your Name"
2. Install Repo
mkdir ~/bin
PATH=~/bin:$PATH
curl https://storage.googleapis.com/git-repo-downloads/repo > ~/bin/repo
chmod a+x ~/bin/repo
3. Install Git LFS
sudo apt install git-lfs
git lfs install
4. Set REPO_URL
Find the path where repo is located.
which repoEdit the repo file.
nano /home/cyrus/bin/repo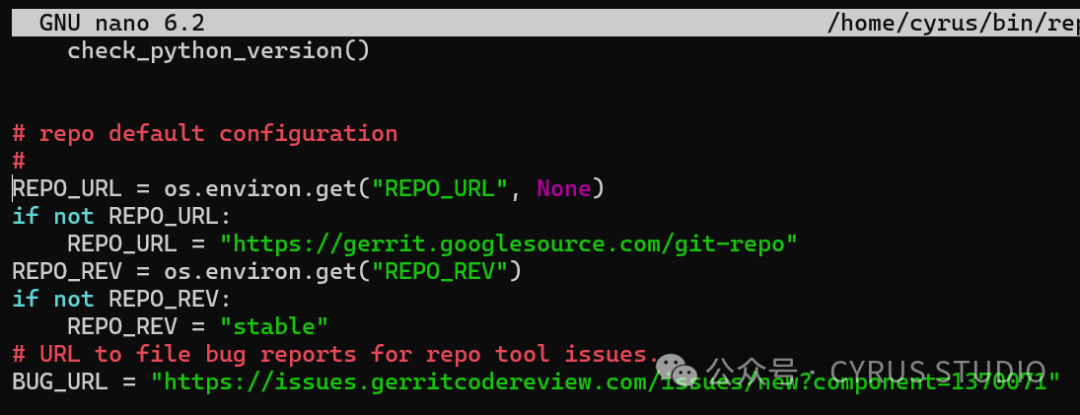
As you can see, repo will prioritize the REPO_URL environment variable; otherwise, it defaults to googlesource.
Press Ctrl + X to exit nano.
Set the REPO_URL environment variable to the Tsinghua University mirror to resolve access issues with googlesource in China.
export REPO_URL=https://mirrors.tuna.tsinghua.edu.cn/git/git-repo/5. Download the Source Code
Create a directory.
mkdir lineageosNavigate into the lineageos directory.
cd lineageosIf you can access GitHub normally, use the following command to initialize the repo.
repo init -u https://github.com/LineageOS/android.git -b lineage-21.0 --git-lfsOtherwise, use the Tsinghua University mirror to initialize the repo and modify default.xml.
repo init -u https://mirrors.tuna.tsinghua.edu.cn/git/lineageOS/LineageOS/android.git -b lineage-21.0 --git-lfsOpen .repo/manifests/default.xml and change:
  <remote  name="github"
           fetch=".."
           review="review.lineageos.org" />
To:
<remote  name="github"
           fetch="https://github.com/" />

<remote  name="lineage"
           fetch="https://mirrors.tuna.tsinghua.edu.cn/git/lineageOS/"
           review="review.lineageos.org" />
Change:
<remote  name="aosp"
           fetch="https://android.googlesource.com" >
To:
<remote  name="aosp"
           fetch="https://mirrors.tuna.tsinghua.edu.cn/git/AOSP">
Change remote=”github” to:
 <default revision="..."
           remote="github">
To remote=”lineage”.
<default revision="..."
           remote="lineage">
Alternatively, directly modify .gitconfig to replace the URL for accessing the LineageOS repository with the Tsinghua University mirror.
cat >> ~/.gitconfig <<EOF

[url "https://mirrors.tuna.tsinghua.edu.cn/git/git-repo"]
insteadof = https://gerrit.googlesource.com/git-repo
[url "https://mirrors.tuna.tsinghua.edu.cn/git/lineageOS/"]
insteadof = https://review.lineageos.org/
[url "https://mirrors.tuna.tsinghua.edu.cn/git/AOSP/"]
insteadof = https://android.googlesource.com/
[url "https://mirrors.tuna.tsinghua.edu.cn/git/lineageOS/LineageOS/"]
insteadof = https://github.com/LineageOS/
EOF
Finally, sync the source code.
repo sync6. Resolving Incomplete Sync Issues
error: Unable to fully sync the tree
error: Checking out local projects failed.
Failing repos:
android
device/generic/goldfish
device/generic/mini-emulator-x86
external/ImageMagick
build/blueprint
Try re-running with "-j1 --fail-fast" to exit at the first error.
================================================================================
Repo command failed due to the following `SyncError` errors:
Cannot initialize work tree for LineageOS/android
Cannot initialize work tree for device/generic/goldfish
Cannot initialize work tree for device/generic/mini-emulator-x86
Cannot initialize work tree for LineageOS/android_external_ImageMagick
Cannot initialize work tree for platform/build/blueprint
Try syncing with a single thread to reduce conflicts during the sync process.
repo sync -j1 --fail-fastThis will terminate the sync at the first error, making it easier to locate and resolve issues.
Alternatively, clean the work tree by manually deleting problematic projects and resyncing.
rm -rf .repo/projects/device/generic/goldfish.git
rm -rf .repo/projects/device/generic/mini-emulator-x86.git
rm -rf .repo/projects/external/ImageMagick.git
rm -rf .repo/projects/build/blueprint.git
repo sync
Setting Up Cache
Create a cache directory.
mkdir -p /mnt/case_sensitive/ccacheAdd cache configuration to the end of the environment variable configuration file .bashrc.
cat >> ~/.bashrc <<EOF
# Use cache
export USE_CCACHE=1
# ccache file path
export CCACHE_EXEC=/usr/bin/ccache
# Set cache directory
export CCACHE_DIR=/mnt/case_sensitive/ccache
EOF
Run the following command to make the configuration effective.
source ~/.bashrcSet the maximum cache size to 50GB.
ccache -M 50GEnable ccache’s compression feature to reduce the disk space occupied by cache files.
ccache -o compression=trueStart Compilation
# Initialize the build environment
source build/envsetup.sh

# Set the build target
breakfast sdk_phone_x86_64 eng

# Start compilation
mka
breakfast is a command in the LineageOS build system used to set up the build environment. It downloads and configures device-specific source code and dependencies.
sdk_phone_x86_64 refers to the code name of the target device. In this example, it represents a virtual phone device for the x86_64 architecture used in the Android emulator.
For more details, refer to: https://wiki.lineageos.org/emulator
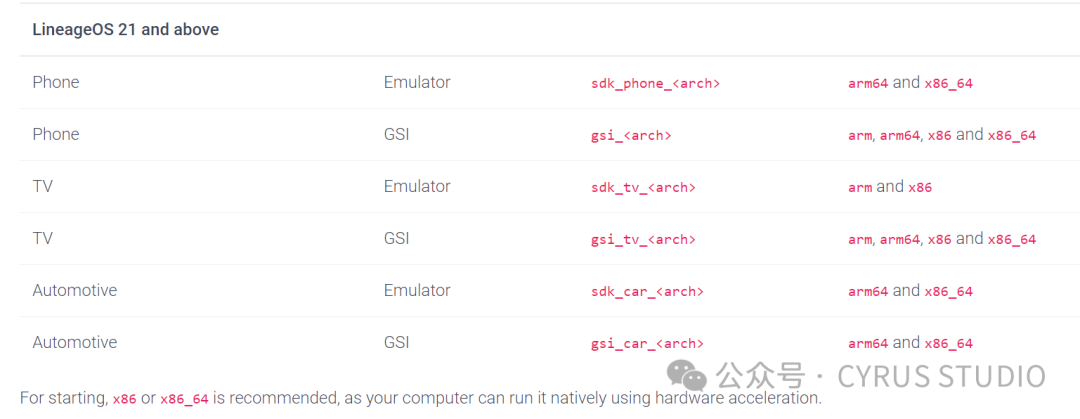
When building LineageOS, eng and userdebug are two different build types that mainly differ in debugging features and security.
eng:
- • Suitable for developer debugging.
- • Contains fully unoptimized debugging features, allowing extensive logging, debugger connections, and various tests.
- • Lower security, as certain security measures in production environments are not enabled.
userdebug:
- • Suitable for debugging builds close to production environments.
- • Contains all features of user builds but retains some debugging tools, with higher security than eng builds.
- • Closer to the environment used by end users while still allowing debugging.
In summary, eng is more suitable for in-depth development debugging, while userdebug is better for debugging under conditions close to production environments.
Resolving Compilation Errors
1. exit status 137
[ 55% 50817/91235] //packages/apps/HTMLViewer:HTMLViewer r8
Warning: The rule `-checkdiscard interface kotlin.coroutines.jvm.internal.DebugMetadata` matches a class not in the program.
18:03:04 ninja may be stuck, check /mnt/case_sensitive/lineageos/out/soong.log for list of running processes.
18:03:04 ninja may be stuck, check /mnt/case_sensitive/lineageos/out/soong.log for list of running processes.
18:03:04 ninja failed with: exit status 137
#### failed to build some targets (02:14:44 (hh:mm:ss)) ####
exit status 137 usually indicates that the process was killed by the system due to insufficient memory. You can check memory usage with htop or free -h commands.
If memory is insufficient, try increasing the memory of the virtual machine or adding a swap partition on the local machine.
# Create a new 16G swap file
sudo fallocate -l 16G /mnt/case_sensitive/swapfile

# Set the swap file permissions to 600 to ensure only the root user can read and write to the file.
sudo chmod 600 /mnt/case_sensitive/swapfile

# Format the swap file to swap format
sudo mkswap /mnt/case_sensitive/swapfile

# Enable the new swap file
sudo swapon /mnt/case_sensitive/swapfile

# Verify that the new swap file has been correctly enabled using swapon --show or free -h commands.
swapon --show
# or
free -h
To ensure /mnt/case_sensitive/swapfile remains effective after reboot, add it to the /etc/fstab file.
echo '/mnt/case_sensitive/swapfile swap swap sw 0 0
' | sudo tee -a /etc/fstab
2. Read-only file system: ‘/home/*/.repo_.gitconfig.json’
This error indicates an attempt to write to a read-only file during compilation, with the following error message:
OSError: [Errno 30] Read-only file system: '/home/cyrus/.repo_.gitconfig.json'

Write to a read-only file system detected. Possible fixes include
1. Generate file directly to out/ which is ReadWrite, #recommend solution
2. BUILD_BROKEN_SRC_DIR_RW_ALLOWLIST := <my/path/1> <my/path/2> #discouraged, subset of source tree will be RW
3. BUILD_BROKEN_SRC_DIR_IS_WRITABLE := true #highly discouraged, entire source tree will be RW
19:26:39 ninja failed with: exit status 1
Add write permissions to the .repo_.gitconfig.json file and recompile.
cyrus@cyrus-studio:/mnt/case_sensitive/lineageos$ chmod a+w ~/.repo_.gitconfig.json
cyrus@cyrus-studio:/mnt/case_sensitive/lineageos$ ls -alh /home/cyrus/.repo_.gitconfig.json
-rw-rw-rw- 1 cyrus cyrus 442 Aug 30 21:41 /home/cyrus/.repo_.gitconfig.json
If it still doesn’t work, use the nano command to edit .repo_.gitconfig.json, make any change, save it, then edit it back, and recompile. This should resolve the issue.
nano /home/cyrus/.repo_.gitconfig.jsonCompilation Complete
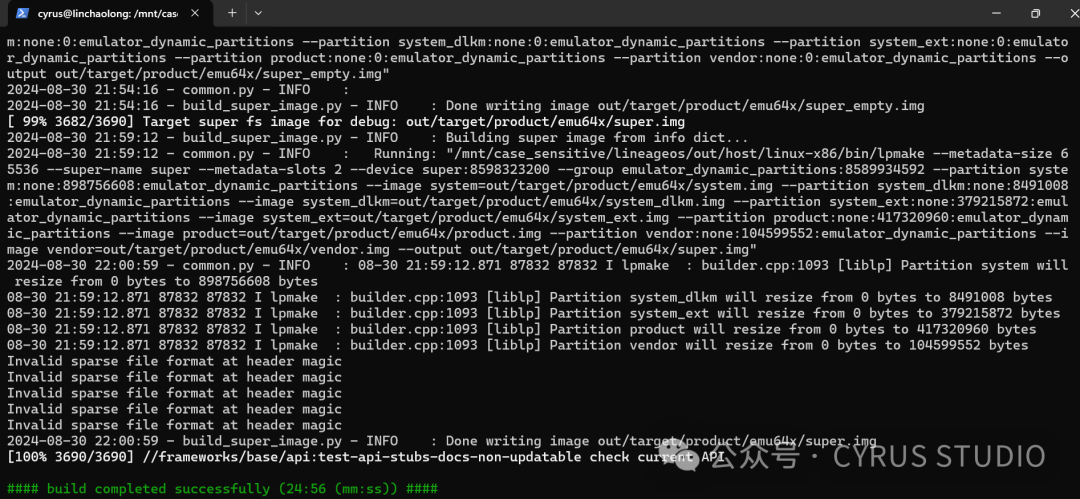
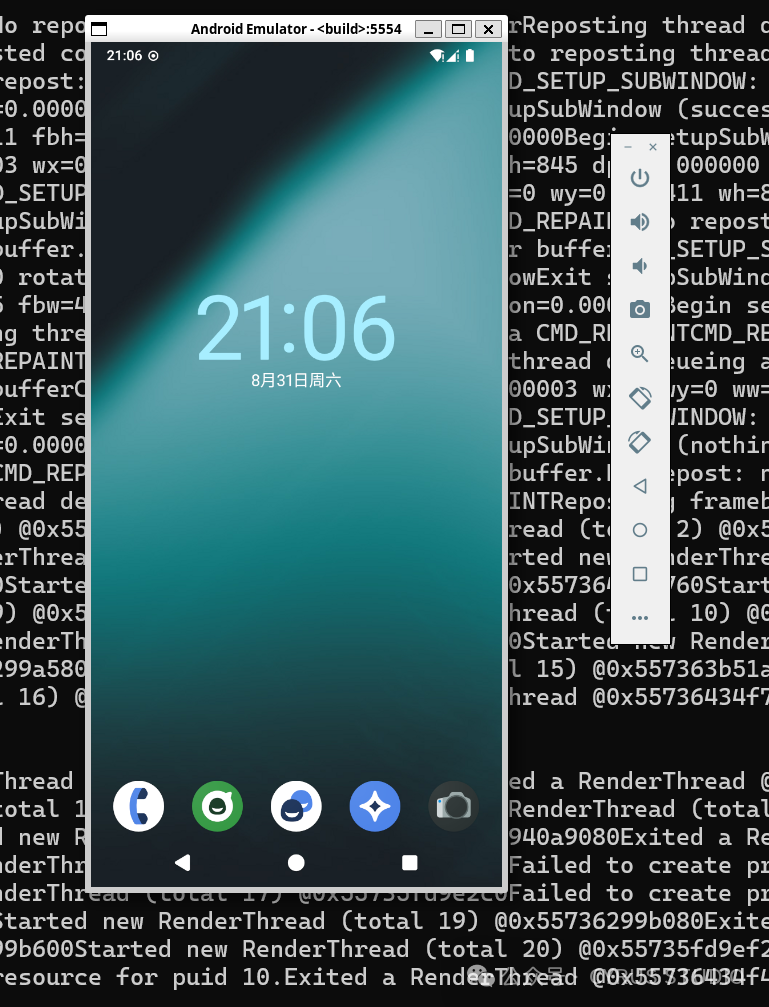
Launching the Emulator
Execute the emulator command to start the emulator.
If it fails to start, the following error may occur:
INFO    | Storing crashdata in: /tmp/android-cyrus/emu-crash-34.2.7.db, detection is enabled for process: 1799459
INFO    | Android emulator version 34.2.7.0 (build_id 11381971) (CL:N/A)
INFO    | Storing crashdata in: /tmp/android-cyrus/emu-crash-34.2.7.db, detection is enabled for process: 1799459
INFO    | Duplicate loglines will be removed, if you wish to see each individual line launch with the -log-nofilter flag.
INFO    | Changing default hw.initialOrientation to portrait
ProbeKVM: This user doesn't have permissions to use KVM (/dev/kvm).
The KVM line in /etc/group is: [kvm:x:109:]

If the current user has KVM permissions,
the KVM line in /etc/group should end with ":" followed by your username.

If we see LINE_NOT_FOUND, the kvm group may need to be created along with permissions:
    sudo groupadd -r kvm
    # Then ensure /lib/udev/rules.d/50-udev-default.rules contains something like:
    # KERNEL=="kvm", GROUP="kvm", MODE="0660"
    # and then run:
    sudo gpasswd -a $USER kvm

If we see kvm:... but no username at the end, running the following command may allow KVM access:
    sudo gpasswd -a $USER kvm

You may need to log out and back in for changes to take effect.

ERROR   | x86_64 emulation currently requires hardware acceleration!
CPU acceleration status: This user doesn't have permissions to use KVM (/dev/kvm).
The KVM line in /etc/group is: [kvm:x:109:]

If the current user has KVM permissions,
the KVM line in /etc/group should end with ":" followed by your username.

If we see LINE_NOT_FOUND, the kvm group may need to be created along with permissions:
    sudo groupadd -r kvm
    # Then ensure /lib/udev/rules.d/50-udev-default.rules contains something like:
    # KERNEL=="kvm", GROUP="kvm", MODE="0660"
    # and then run:
    sudo gpasswd -a $USER kvm

If we see kvm:... but no username at the end, running the following command may allow KVM access:
    sudo gpasswd -a $USER kvm

You may need to log out and back in for changes to take effect.

More info on configuring VM acceleration on Linux:
https://developer.android.com/studio/run/emulator-acceleration#vm-linux
General information on acceleration: https://developer.android.com/studio/run/emulator-acceleration.
This error occurs because QEMU failed to enable hardware acceleration (KVM).
Check if the permissions for /dev/kvm are correct. You can check with the following command:
$ ls -l /dev/kvm
crw-rw---- 1 cyrus kvm 10, 232 Aug 31 21:01 /dev/kvm
The output should be similar to crw-rw—- 1 YourUserName kvm 10, 232 date /dev/kvm, where
kvm is the group for this device.
If the permissions are not set correctly, you can try the following commands to fix it:
sudo apt install qemu-kvm
sudo adduser $USER kvm
sudo chown $USER:kvm /dev/kvm
sudo chmod 660 /dev/kvm
Finally, re-execute the emulator command to start the emulator.
Exporting for Android Studio/AVD
Export the built image in a format usable by Android Studio/AVD with the following commands:
For LineageOS 20 and below:
mka sdk_addonAfter the build is complete, a ZIP file (ending with -img.zip) will be generated in the out/host/linux-x86/sdk_addon directory, containing all the files needed to run the emulator image externally.
For LineageOS 21 and above:
mka emu_img_zipAfter the build is complete, a ZIP file named sdk-repo-linux-system-images.zip will be generated in the out/target/product/<arch> directory, containing all the files needed to run the emulator image externally.
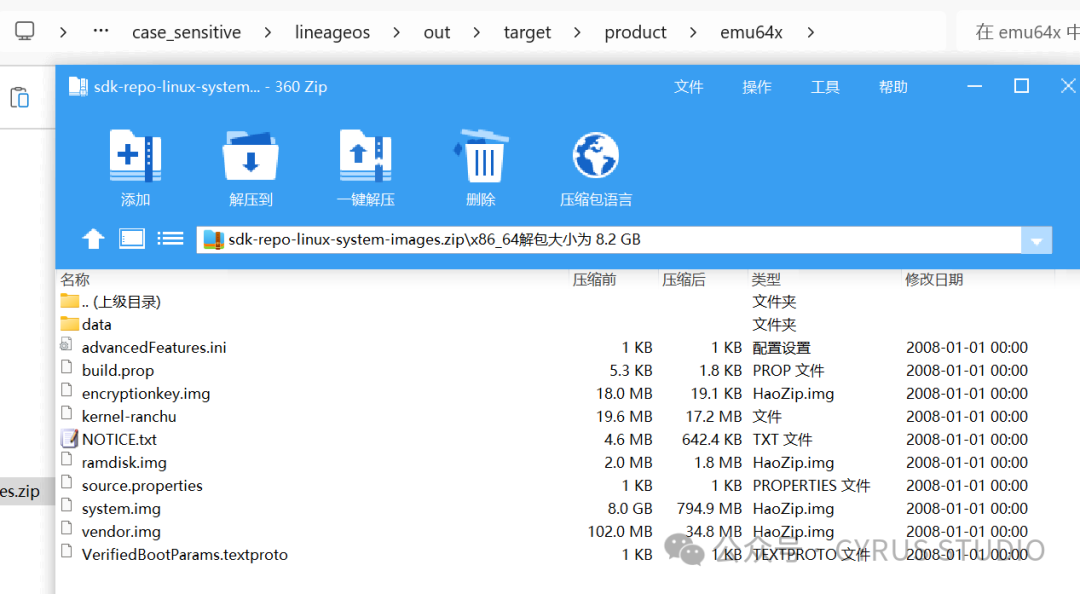
Unzip the ZIP file into the system-images directory of the Android SDK, with the following path:
system-images/android-<sdk version>/<tag>/<arch> (where <tag> is one of default/google_apis/google_apis_playstore)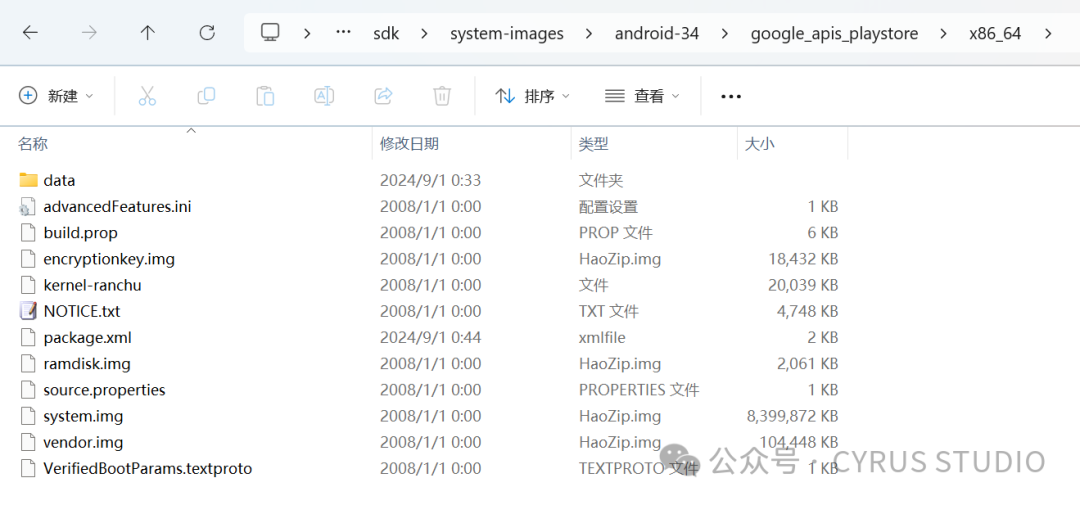
In Android Studio, go to 【Device Manager】【Create Virtual Device】 and create a virtual device, selecting the LineageOS image.
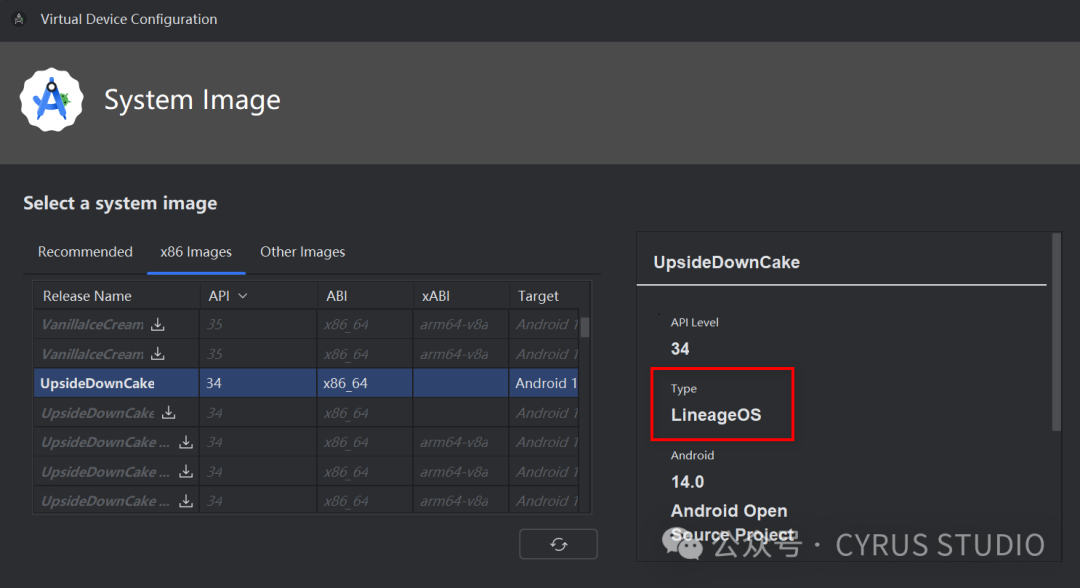
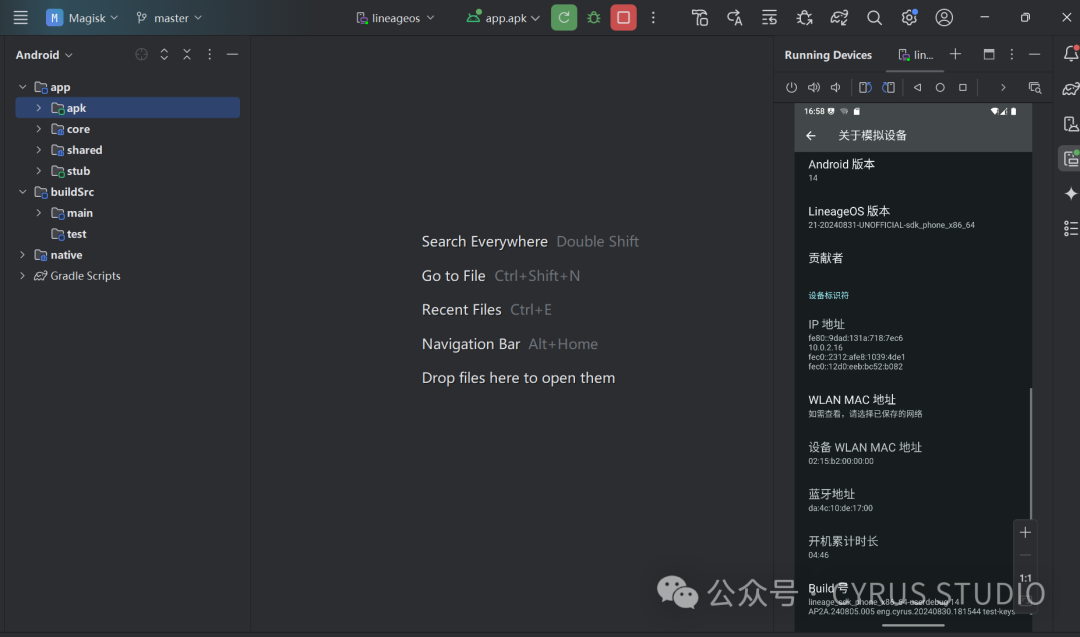
Finally, the result running in Android Studio is as follows:
Related link: https://wiki.lineageos.org/emulator