0x00 What is ESP_NOW?

Characteristics of ESP_NOW Communication Protocol
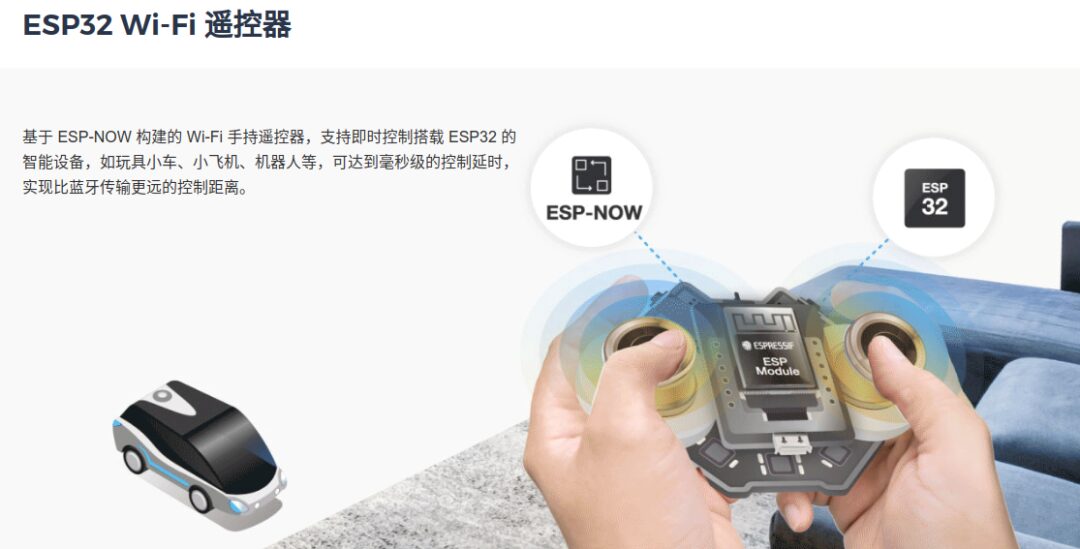
Application Scenarios of ESP_NOW
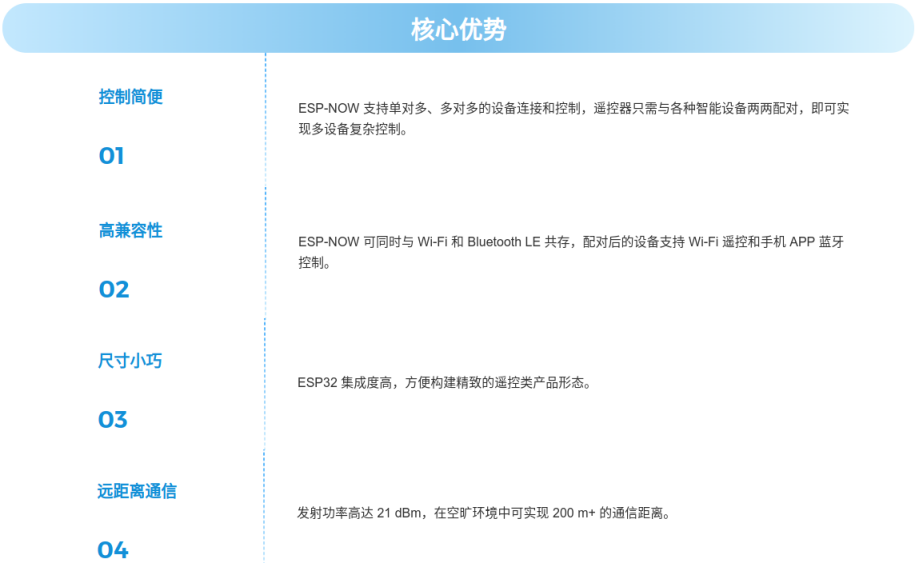
Core Advantages of ESP_NOW
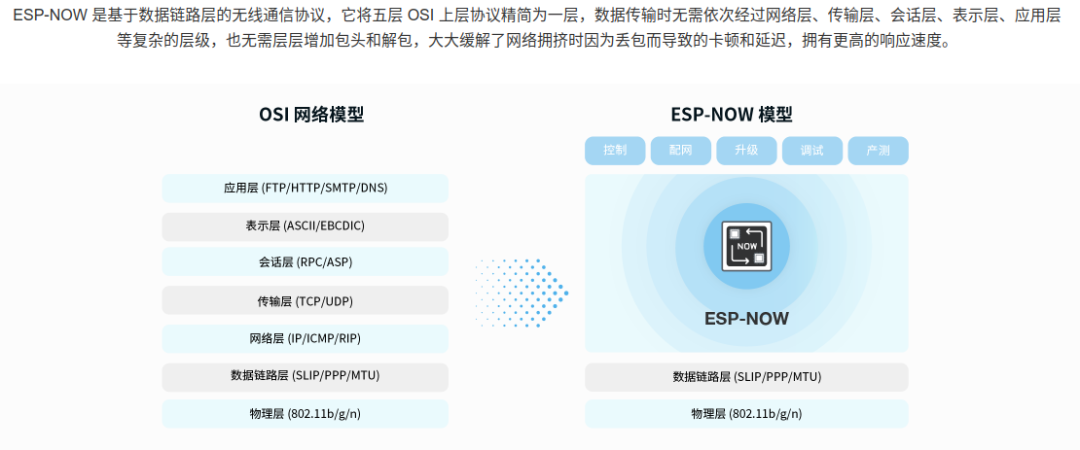
ESP_NOW Network Model
0x01 ESP_NOW Communication Data Frame Format
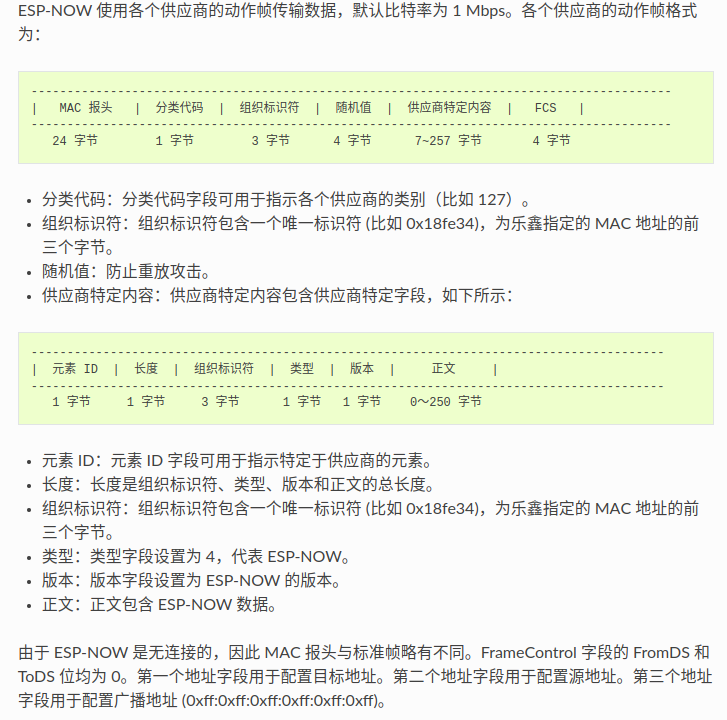
ESP_NOW Frame Format Definition
From the above figure, it can be seen that a complete frame can send a maximum of 250 bytes of effective data. If the data to be sent exceeds this byte count, it needs to be divided into multiple frames.
ESP-NOW uses the CCMP method to secure vendor-specific action frames, which can be referenced in IEEE Std. 802.11-2012. Wi-Fi devices maintain an initial master key (PMK) and several local master keys (LMK), each 16 bytes long.
-
PMK can encrypt LMK using the AES-128 algorithm. Please call esp_now_set_pmk() to set PMK. If PMK is not set, the default PMK will be used.
-
LMK can encrypt vendor-specific action frames using the CCMP method, with a maximum of 6 different LMKs. If the LMK of the paired device is not set, the action frame will not be encrypted.
0x02 Common ESP_NOW APIs
Call esp_now_init() to initialize ESP-NOW communication, and esp_now_deinit() to de-initialize ESP-NOW.
ESP-NOW data must be transmitted after Wi-Fi is started, so it is recommended to start Wi-Fi before initializing ESP-NOW and stop Wi-Fi after de-initializing ESP-NOW. When esp_now_deinit() is called, all information of paired devices will be deleted.
(2) Add/Remove Paired Devices
Before sending data to other devices, please call esp_now_add_peer() to add them to the paired device list.
If encryption is enabled, LMK must be set. ESP-NOW data can be sent from Station or SoftAP interfaces. Ensure that the interface is enabled before sending ESP-NOW data.
If it is necessary to remove a paired device from the list, call esp_now_del_peer(). Note that both esp_now_add_peer() and esp_now_del_peer() functions require the MAC address parameter of the ESP32 S3 device to be executed properly.
A device with a broadcast MAC address must be added before sending broadcast data. The channel range for paired devices is from 0 to 14. If the channel is set to 0, data will be sent on the current channel. Otherwise, it must use the channel where the local device is located.
(3) Sending ESP-NOW Data
Call esp_now_send() to send ESP-NOW data, and esp_now_register_send_cb() to register the send callback function.
If the MAC layer successfully receives the data, this function will return the ESP_NOW_SEND_SUCCESS event. Otherwise, it will return ESP_NOW_SEND_FAIL.
There may be several reasons for ESP-NOW data transmission failures, such as the target device not existing, differing device channels, or action frames being lost during transmission. The application layer may not always receive the data.
If necessary, the application layer can send back an acknowledgment (ACK) data when receiving ESP-NOW data. If the ACK data times out, the ESP-NOW data will be retransmitted. A sequence number can be set for ESP-NOW data to eliminate duplicate data.
If there is a large amount of ESP-NOW data to send, note that the data sent at one time cannot exceed 250 bytes when calling esp_now_send(). Be aware that sending intervals that are too short may cause the callback function to return confusion.
Therefore, it is recommended to wait until the last callback function returns ACK before sending the next ESP-NOW data. The send callback function runs from a high-priority Wi-Fi task. Therefore, do not perform lengthy operations in the callback function. Instead, publish necessary data to a queue and let a lower-priority task handle it.
Call esp_now_register_recv_cb() to register the receive callback function. When receiving ESP-NOW data, the receive callback function needs to be called. The receive callback function also runs in the Wi-Fi task.
Therefore, do not perform lengthy operations in the callback function; instead, cache the necessary data for processing by a lower-priority task.
0x03 Getting the MAC Address of ESP32 S3
 1#include <WiFi.h>
 2void setup() {
 3  Serial.begin(115200);
 4}
 5void loop() {
 6  uint8_t macAddr[6];  // Array of type uint8_t to store MAC address
 7  Serial.print("Get ESP32-S3 Mac Addr: ");
 8  WiFi.macAddress(macAddr);  // MAC address stored in macAddr array
 9  for (int i = 0; i < sizeof(macAddr); i++) {
10    Serial.printf("0x%02x", macAddr[i]);
11    if (i < (sizeof(macAddr) - 1))
12      Serial.print(":");
13  }
14  Serial.println("");
15  delay(3000);
16}
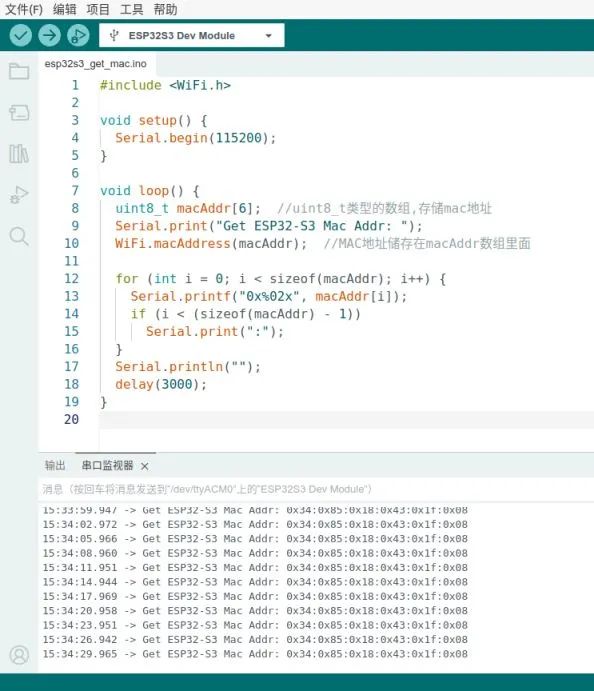
After obtaining the MAC address of the ESP32 S3, it needs to be recorded. If you have multiple ESP32 S3 devices, you will need to upload this code separately to obtain each device’s MAC address, as these MAC addresses will be needed later when using ESP_NOW communication.
0x04 ESP_NOW Bidirectional Communication Test
Here, we use two ESP32 S3 development boards for testing. Each board can send and receive data. I have already obtained their MAC addresses in advance, as shown in the following figure:
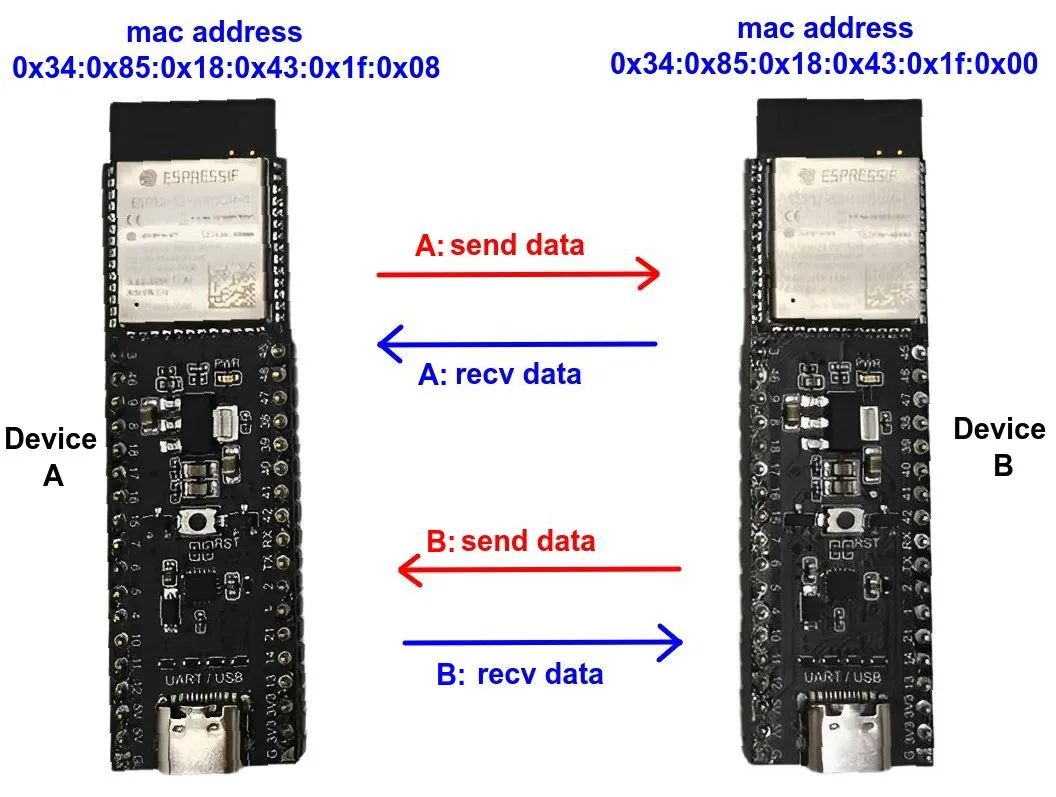
If we name the left ESP32 S3 as board A, its corresponding MAC address is 0x34:0x85:0x18:0x43:0x1f:0x08. The right ESP32 S3 is named board B, with its MAC address being 0x34:0x85:0x18:0x43:0x1f:0x00.
It is also important to know that the ESP32 S3’s data sending function is actively called for execution, meaning it can actively send data to paired devices as needed, while the data receiving function is executed through a callback function. When paired devices send data, the callback function is automatically invoked to handle it. If no data is sent from the paired device, the callback function will wait and not execute.
In fact, A’s send data will be automatically processed by B’s recv data function, and similarly, when B sends data to A, A’s recv data function will automatically handle it.
Now we can write the code. The structure of the code for both is the same; we only need to modify the MAC address of the paired device in the code and the message to be sent for testing. Let’s look at the code for A:
  1#include <esp_now.h>
  2#include <WiFi.h>
  3esp_now_peer_info_t peerDevice;
  4#define CHANNEL 0
  5int g_test_data = 0;
  6// Data structure to send to paired devices
  7typedef struct struct_msg {
  8  char device_name[50];
  9  int data;
 10} struct_msg;
  11struct_msg test_send_msg;
  12struct_msg test_recv_msg;
  13// MAC address of paired device ESP32 S3
  14uint8_t macAddr[6] = { 0x34, 0x85, 0x18, 0x43, 0x1F, 0x00 };
  15void InitESPNow() {
  16  if (esp_now_init() == ESP_OK) {
  17    Serial.println("ESPNow Init Success");
  18  } else {
  19    Serial.println("ESPNow Init Failed,Retry...");
  20    ESP.restart();
  21  }
  22}
  23void sendData() {
  24  const uint8_t *peer_addr = peerDevice.peer_addr;
  25  esp_err_t result = esp_now_send(peer_addr, (uint8_t *)&test_send_msg, sizeof(test_send_msg));
  26  if (result == ESP_OK) {
  27  } else if (result == ESP_ERR_ESPNOW_NOT_INIT) {
  28    Serial.println("ESPNOW not Init.");
  29  } else if (result == ESP_ERR_ESPNOW_ARG) {
  30    Serial.println("Invalid Argument");
  31  } else if (result == ESP_ERR_ESPNOW_INTERNAL) {
  32    Serial.println("Internal Error");
  33  } else if (result == ESP_ERR_ESPNOW_NO_MEM) {
  34    Serial.println("ESP_ERR_ESPNOW_NO_MEM");
  35  } else if (result == ESP_ERR_ESPNOW_NOT_FOUND) {
  36    Serial.println("Peer not found.");
  37  } else {
  38    Serial.println("Unknown Error!");
  39  }
  40}
  41void OnDataSent(const uint8_t *mac_addr, esp_now_send_status_t status) {
  42  Serial.println(status == ESP_NOW_SEND_SUCCESS ? "Delivery Success" : "Delivery Fail");
  43}
  44void OnDataRecv(const uint8_t *mac_addr, const uint8_t *data, int data_len) {
  45  memcpy(&test_recv_msg, data, sizeof(test_recv_msg));
  46  Serial.print("Device A Recv Data: ");
  47  Serial.print(test_recv_msg.device_name);
  48  Serial.print(" ");
  49  Serial.print(test_recv_msg.data);
  50  Serial.println();
  51}
  52bool connect() {
  53  bool exists = esp_now_is_peer_exist(peerDevice.peer_addr);
  54  if (exists) {
  55    return true;
  56  } else {
  57    esp_err_t addStatus = esp_now_add_peer(&peerDevice);
  58    if (addStatus == ESP_OK) {
  59      Serial.println("Pair success");
  60      return true;
  61    } else if (addStatus == ESP_ERR_ESPNOW_NOT_INIT) {
  62      Serial.println("ESPNOW Not Init");
  63      return false;
  64    } else if (addStatus == ESP_ERR_ESPNOW_ARG) {
  65      Serial.println("Invalid Argument");
  66      return false;
  67    } else if (addStatus == ESP_ERR_ESPNOW_FULL) {
  68      Serial.println("Peer list full");
  69      return false;
  70    } else if (addStatus == ESP_ERR_ESPNOW_NO_MEM) {
  71      Serial.println("Out of memory");
  72      return false;
  73    } else if (addStatus == ESP_ERR_ESPNOW_EXIST) {
  74      Serial.println("Peer Exists");
  75      return true;
  76    } else {
  77      Serial.println("Unknown Error!");
  78      return false;
  79    }
  80  }
  81}
  82void setup() {
  83  Serial.begin(115200);
  84  WiFi.mode(WIFI_MODE_STA);  // Set device in STA mode
  85  InitESPNow();
  86  esp_now_register_send_cb(OnDataSent);
  87  esp_now_register_recv_cb(OnDataRecv);
  88  memset(&peerDevice, 0, sizeof(peerDevice));
  89  memcpy(peerDevice.peer_addr, macAddr, sizeof(macAddr));
  90  peerDevice.channel = CHANNEL;
  91  peerDevice.encrypt = false;
  92  strcpy(test_send_msg.device_name, "I'm device A");
  93  memset(&test_recv_msg, 0, sizeof(test_recv_msg));
  94}
  95void loop() {
  96  if (connect()) {
  97    test_send_msg.data = g_test_data;
  98    sendData();
  99    g_test_data++;
100  }
101  delay(3000);
102}
For B’s code, we only need to modify lines 19, 55, and 106 of the above code; line 19 is to fill in the MAC address of the paired device, and the other two are just to modify the string for B.
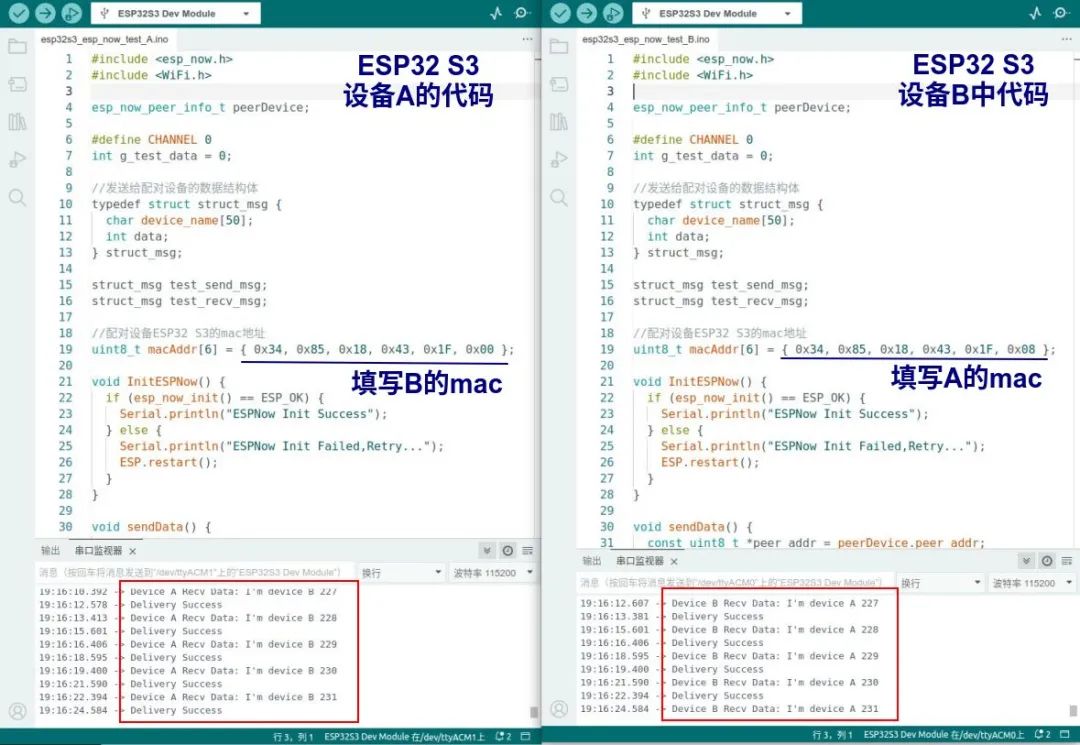
Upload the two codes to their respective ESP32 S3 development boards. Note that in A’s code, line 19 needs to fill in B’s MAC address, and then compile and upload it to board A. In B’s code, line 19 should fill in A’s MAC address, and also compile and upload it to board B. The effect after running the program is as follows:
0x05 Code Analysis
Here we analyze the code, starting with the setup() function, as shown in the following figure:
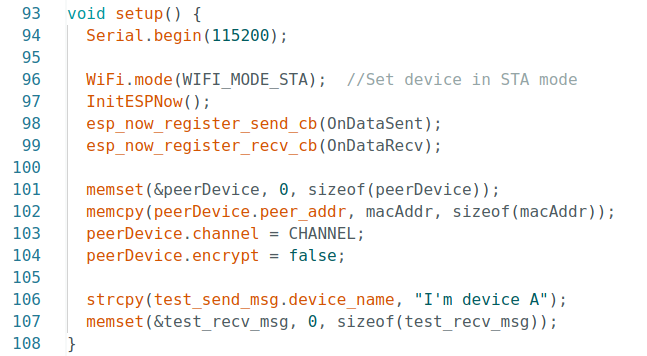
setup() function
In line 96, we first configure the Wi-Fi module of the ESP32 S3 to work in station mode. The Wi-Fi modes that the ESP32 S3 can be configured to can be found in esp_wifi_types.h, as shown in the following figure:
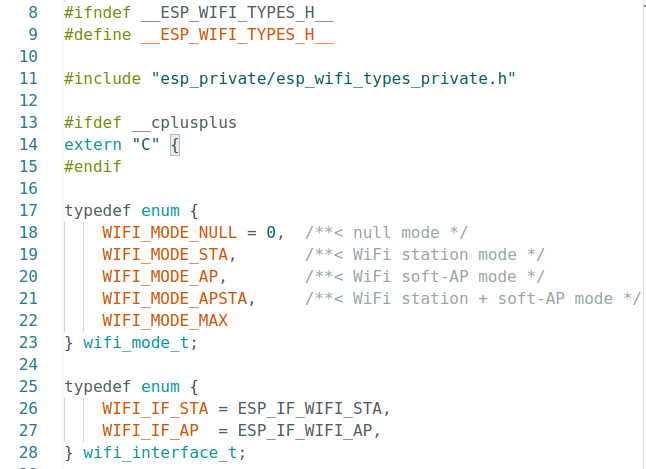
wifi_mode_t defines different Wi-Fi modes
In lines 98 and 99, two callback functions are configured. Line 98 configures the callback function to check if data has been successfully sent to the paired device. In this callback function, we can know the status of sending data to the paired device, and if data transmission fails, we can perform some exception handling, such as data retransmission. Line 99 configures the callback function for receiving data sent by paired devices; when data is received, the callback function is automatically called.
Lines 101 to 104 configure the MAC address of the paired device, the Wi-Fi communication channel, whether to encrypt the transmission, and other parameters. For all parameters that can be configured in the esp_now_peer_info_t structure, we can find them in the esp_now.h header file, as shown in the following figure:
View esp_now_peer_info_t structure definition
Next, in the loop() function, data sending is executed in a continuous loop, but it can also be sent as needed; it is not necessary to send data continuously, depending on the functional requirements.
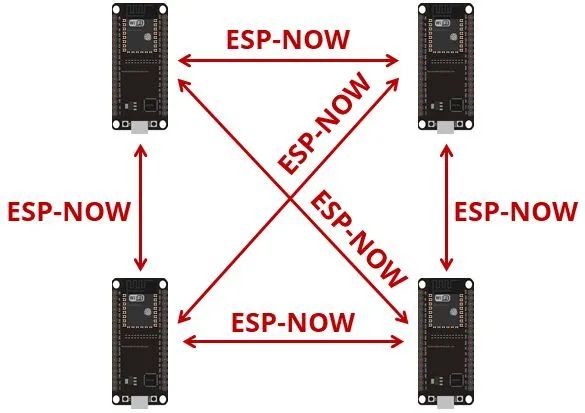
First, we pair with other devices by adding their MAC addresses to our paired device list. Note that the maximum number of devices that can be added to the list is 20, meaning we can use up to 20 ESP32 S3 devices to form a mesh communication network, as shown in the following figure:
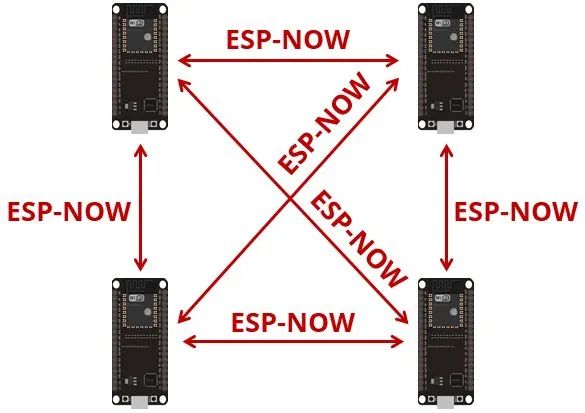
ESP_NOW Multi-device Mutual Communication Mode
0x06 Broadcast Mode
ESP_NOW supports broadcast mode, where one device can communicate data to all nearby ESP_NOW devices, allowing for one-to-many control. If each device uses broadcast mode, it feels somewhat like a virus propagation model; once broadcasted, surrounding ESP_NOW devices will receive the data. This communication method is still very valuable in certain scenarios.
Next, we will conduct such a test. The only point to note here is that when using the esp_now_send() function to send data, the first parameter is originally the MAC address of the specified device. Here, we create a broadcast message by sending the special MAC address FF:FF:FF:FF:FF:FF, so that every ESP_NOW device will reply with its MAC address. After obtaining these addresses, we can sequentially send data to these MAC address devices.
 1#include <WiFi.h>
 2#include <esp_now.h>
 3int g_test_data = 0;
 4// Function declaration
 5void formatMacAddress(const uint8_t *macAddr, char *buffer, int maxLength);
 6void receiveCallback(const uint8_t *macAddr, const uint8_t *data, int dataLen);
 7void sentCallback(const uint8_t *macAddr, esp_now_send_status_t status);
 8void broadcast(const String &message);
 9// Format MAC address
10void formatMacAddress(const uint8_t *macAddr, char *buffer, int maxLength) {
11  snprintf(buffer, maxLength, "%02x:%02x:%02x:%02x:%02x:%02x", macAddr[0], macAddr[1], macAddr[2], macAddr[3], macAddr[4], macAddr[5]);
12}
13// Callback function when data is received
14void receiveCallback(const uint8_t *macAddr, const uint8_t *data, int dataLen) {
15  // Format MAC address
16  char macStr[18];
17  formatMacAddress(macAddr, macStr, 18);
18  Serial.printf("Received message from: %s - %d\n", macStr, *data);
19}
20// Callback function after message is sent, used to determine if the other party successfully received the message, etc.
21void sentCallback(const uint8_t *macAddr, esp_now_send_status_t status) {
22  char macStr[18];
23  formatMacAddress(macAddr, macStr, 18);
24  Serial.print("Last Packet Sent to: ");
25  Serial.println(macStr);
26  Serial.print("Last Packet Send Status: ");
27  Serial.println(status == ESP_NOW_SEND_SUCCESS ? "Delivery Success" : "Delivery Fail");
28}
29// Broadcast message to all ESP_NOW devices in range
30void broadcast(int data) {
31  uint8_t broadcastAddress[] = { 0xFF, 0xFF, 0xFF, 0xFF, 0xFF, 0xFF };
32  esp_now_peer_info_t peerInfo = {};
33  memcpy(&peerInfo.peer_addr, broadcastAddress, sizeof(broadcastAddress));
34  if (!esp_now_is_peer_exist(broadcastAddress)) {
35    esp_now_add_peer(&peerInfo);
36  }
37  // Send message to all devices in range
38  esp_err_t result = esp_now_send(broadcastAddress, (const uint8_t *)&data, sizeof(int));
39  // Print the sending result to the serial port
40  if (result != ESP_OK) {
41    Serial.println("broadcast data error !");
42  }
43}
44void setup() {
45  Serial.begin(115200);
46  WiFi.mode(WIFI_MODE_STA);
47  // Initialize esp_now; if it fails, print error message and restart
48  if (esp_now_init() == ESP_OK) {
49    Serial.println("ESP-NOW Init Success");
50    esp_now_register_recv_cb(receiveCallback);  // Register the callback function for receiving messages
51    esp_now_register_send_cb(sentCallback);     // Register the callback function for sending messages
52  } else {
53    Serial.println("ESP-NOW Init Failed");
54    delay(3000);
55    ESP.restart();  // Restart esp device
56  }
57}
58void loop() {
59  broadcast(g_test_data);
60  g_test_data++;
61  delay(3000);
62}
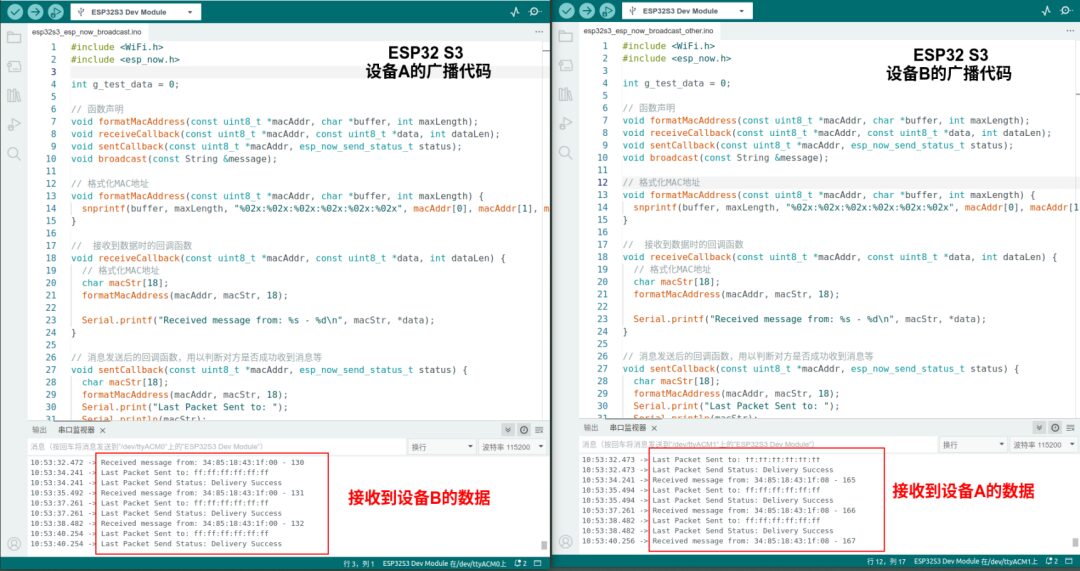
We can upload the above code to the ESP32 S3 development boards that need testing. The code achieves the effect of continuously sending an incrementing int type test data to other ESP_NOW devices every 3 seconds.
In fact, the code structure is quite similar to our bidirectional communication code, just changing the MAC address from a specified device MAC address to the broadcast address FF:FF:FF:FF:FF:FF. As long as an ESP_NOW device receives the broadcast data, it will reply with its MAC address. This way, we can obtain the MAC address and send data back. The running effect is as follows:
0x07 Reference Materials
[0]. Espressif’s official website ESP_NOW introduction.
[1]. ESP_NOW API reference manual.
[2]. ESP32 Beginner’s Note 07: ESP-NOW (ESP32 for Arduino).
[3]. Introduction to ESP NOW.
https://www.cnblogs.com/dapenson/p/esp-now.html