
Want to use ZigBee, want to set up a network, but don’t want to read complex networking protocols? This article is all you need!
ZigBee originated from the “Homer flite” technology initiated by industry giants like INTEL and IBM in 1998. As China’s Internet of Things rapidly develops, ZigBee is gradually being accepted by more and more users domestically. However, there are still many challenges in its development, such as how to maximize the advantages of ZigBee networking?
The main features of ZigBee technology are its strong self-organizing capabilities and self-recovery abilities, making it very attractive for applications such as underground positioning, parking space location, outdoor temperature and humidity collection, and pollution collection.
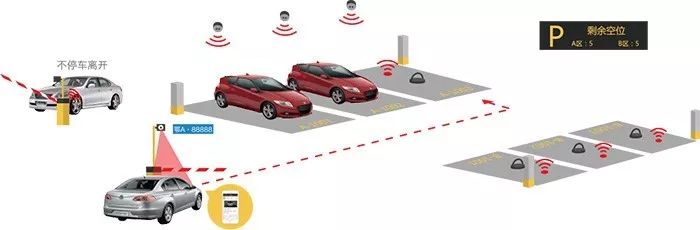
Figure 1 ZigBee in Smart Parking Applications
Building a complete ZigBee network involves two steps: network initialization and node joining.Node joining includes two steps: connecting to the network via the coordinator and joining the network through an existing parent node.
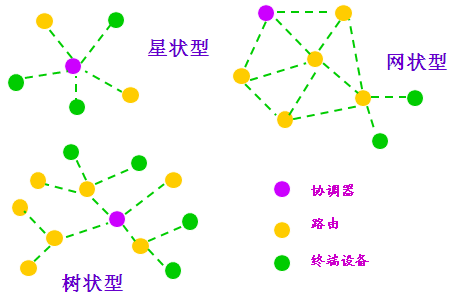
Figure 2 ZigBee Network Topology
1. Network Initialization Process:
-
Identify the network coordinator;
-
Conduct channel scanning;
-
Set the network ID.
2. Nodes Joining the Network via the Coordinator:
-
Locate the network coordinator;
-
Send association request command;
-
Wait for the coordinator to process;
-
Send data request command;
-
Confirm network joining.
3. Nodes Joining the Network through Existing Nodes
ZLG Zhiyuan Electronics has designed the ZM32 series ZigBee module based on the Silicon Lab EFR32MG chip, fully leveraging the advantages of the ZigBee protocol and combining ZLG Zhiyuan Electronics’ innovation in the wireless industry to offer customers three different networking methods.
 Manual Networking
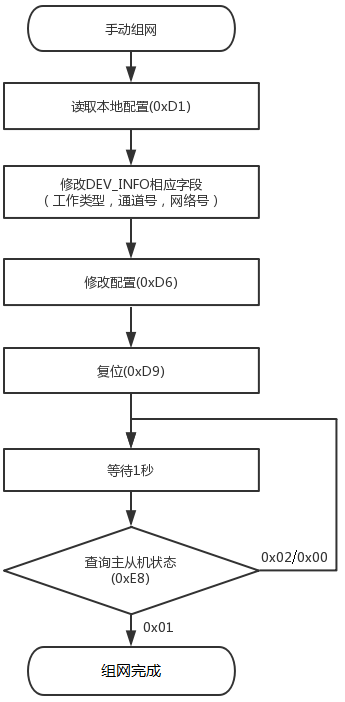
Figure 3 Manual Networking Flowchart
Configure Network Parameters:
-
Select working type: The coordinator must save the configuration parameters first to become the first physical device in the network;
-
Configure channel number;
-
Configure network number (PAN ID);
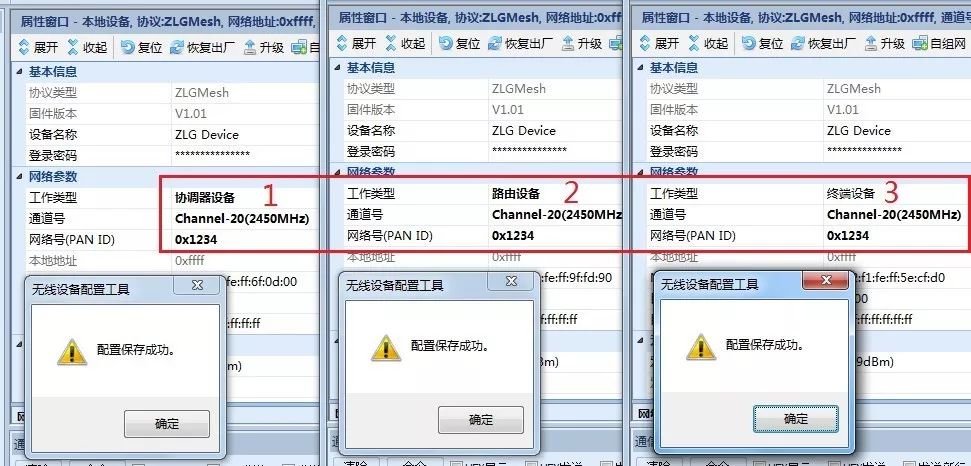
Figure 4 Setting Module Configuration Submission
When the device’s local address changes from 0xFFFF, the device has successfully joined the network.
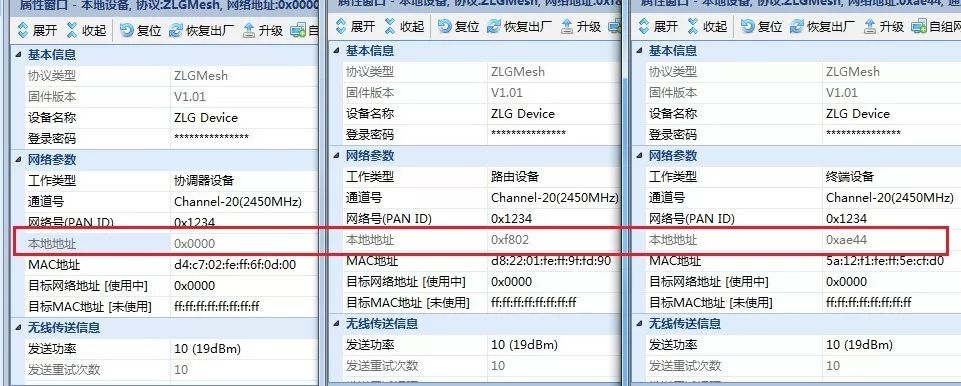
Figure 5 Routing and Terminal Devices Successfully Joined the Network
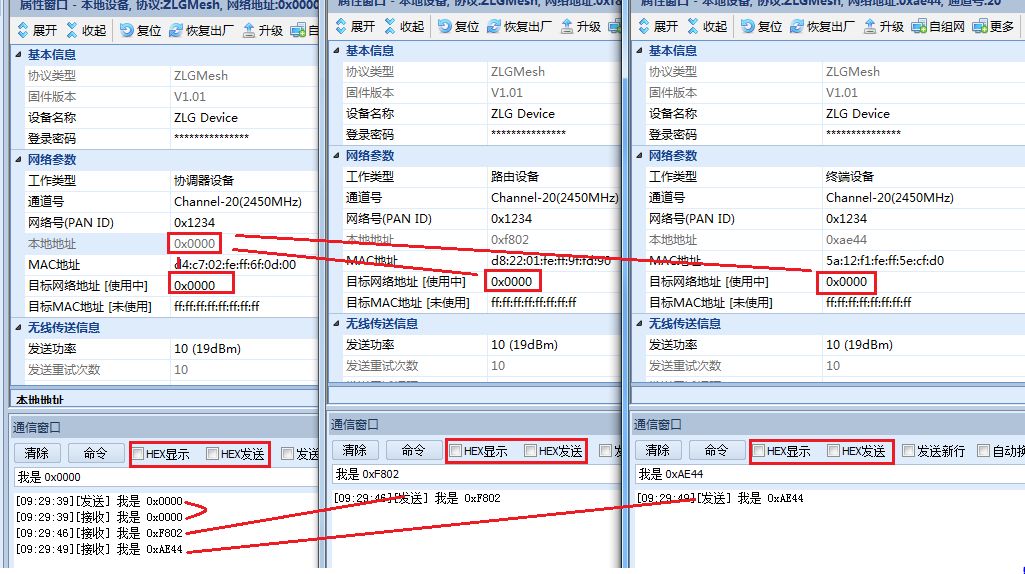
Figure 6 Test Example
 Ordinary Self-Organizing Network
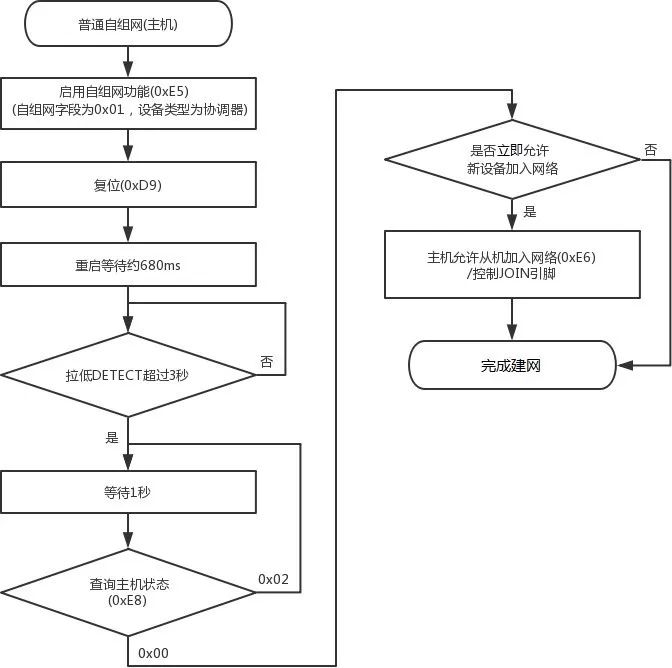
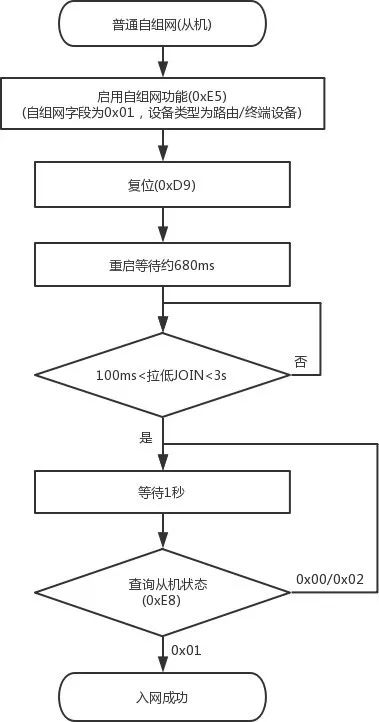
Figure 7 Master and Slave Module Ordinary Self-Organizing Network Flowchart
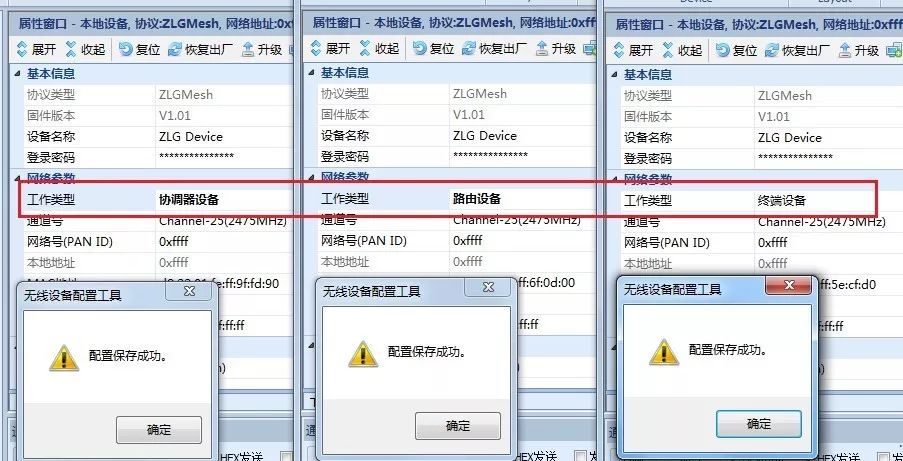
Figure 8 Configuring Module Working Type
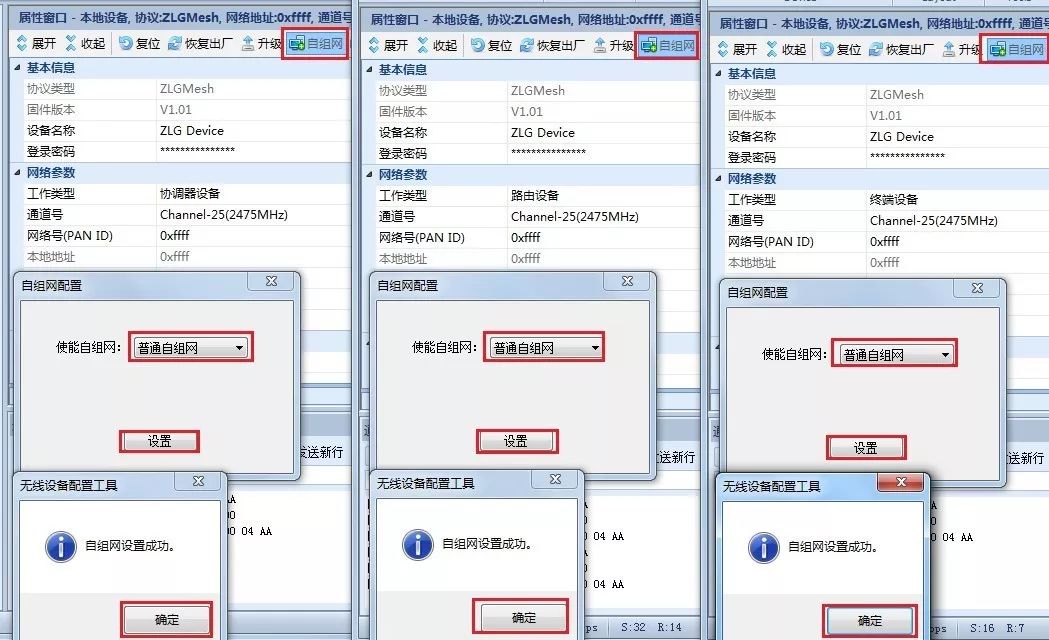
Figure 9 Enabling Self-Organizing Network Function
Control the Coordinator for Networking
-
On the DEMO Board where the coordinator is located, find button S2, press it for at least 3 seconds, then release, and observe whether the STATE LED on the DEMO Board changes from blinking 4 times to blinking 2 times;(If it still blinks 4 times, please press S2 again for 3 seconds);
-
On the DEMO Board where the coordinator is located, find button S3, keep pressing it without releasing, and the STATE LED will change from blinking 2 times to blinking 1 time;At this point, the coordinator allows new devices to join the network;
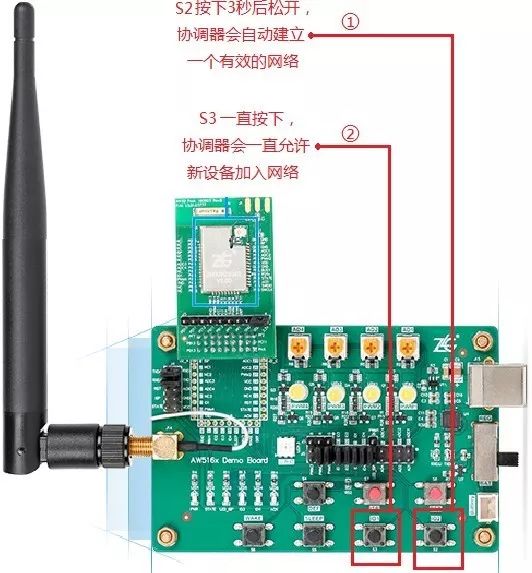
Figure 10 Control Coordinator Allowing Joining
Use the configuration tool to obtain device information; the coordinator has automatically set a unique network number;
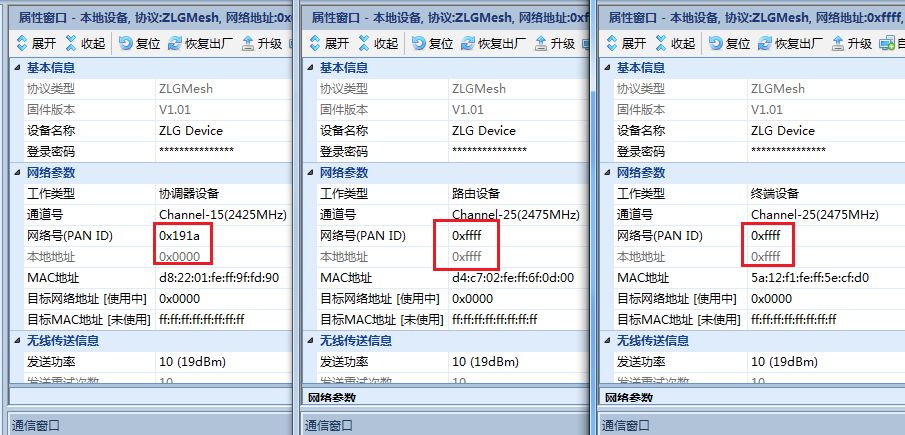
Figure 11 Coordinator Setting Network PAN ID
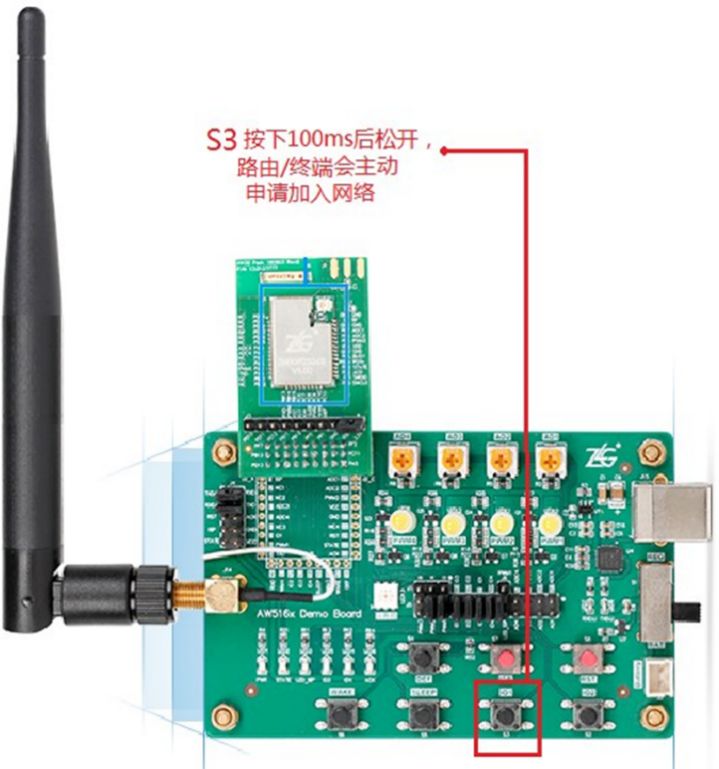
Figure 12 Control Routing/Terminal Device Networking
-
On the DEMO Board where the routing/terminal device is located, find button S3, press it for at least 100ms, then release;
-
Observe whether the STATE LED on the DEMO Board changes from blinking 4 times to blinking 3 times, and finally to blinking 2 times;
-
If it still blinks 4 times, check whether the coordinator is still pressing button S3;
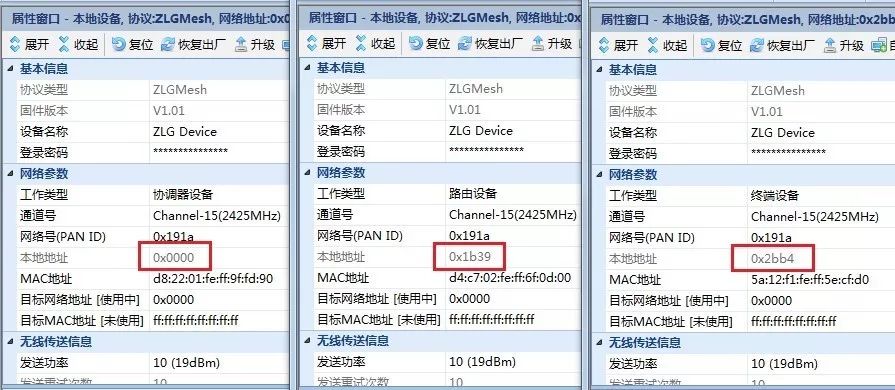
Figure 13 Network Established Successfully Module Information
At this point, use the configuration tool to obtain device information; the local address is automatically set, indicating that the network has been successfully established.
The user only needs to modify the target network address as needed, and the data will be sent to the device corresponding to that address.

Figure 14 Ordinary Self-Help Network Test Example
 Quick Self-Organizing Network
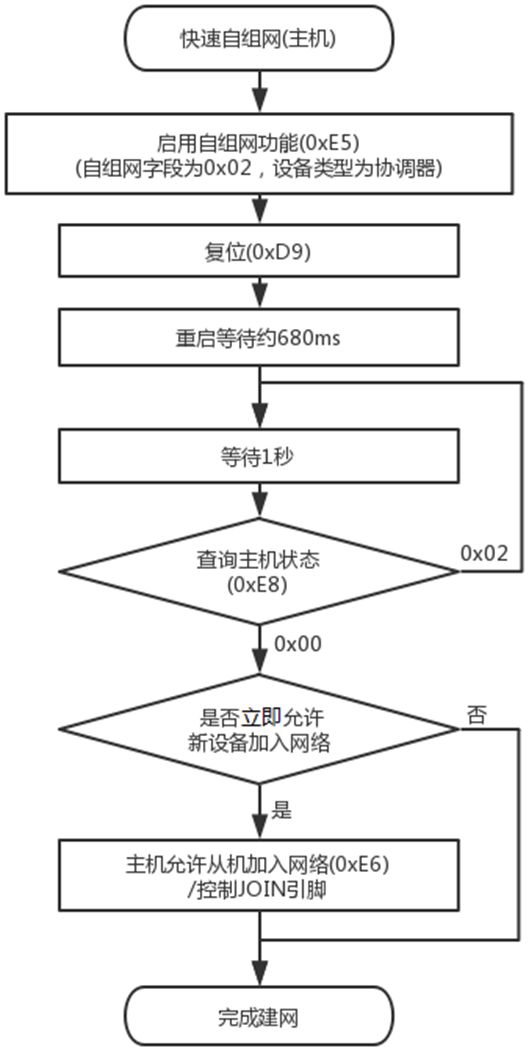
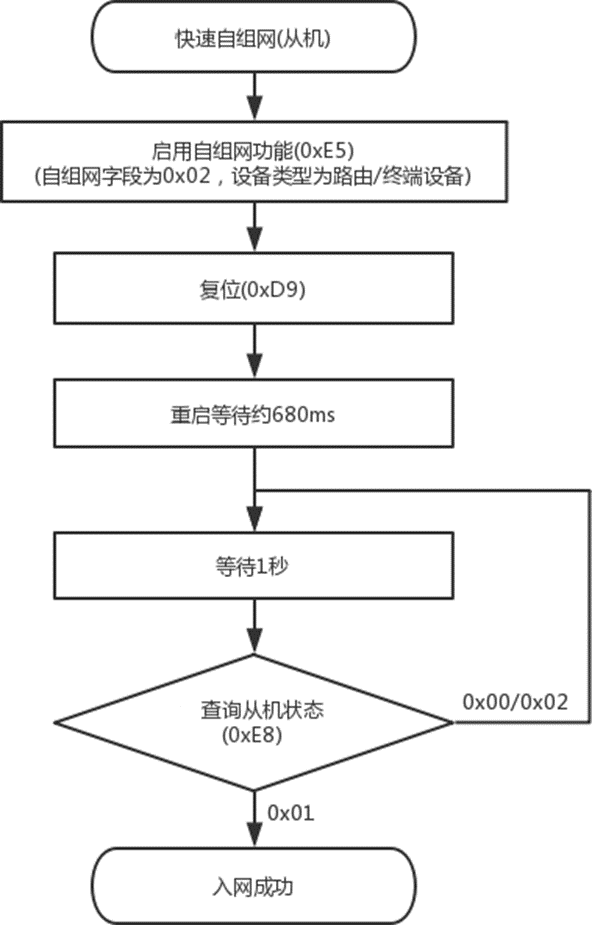
Figure 15 Master and Slave Module Quick Self-Organizing Network Flowchart
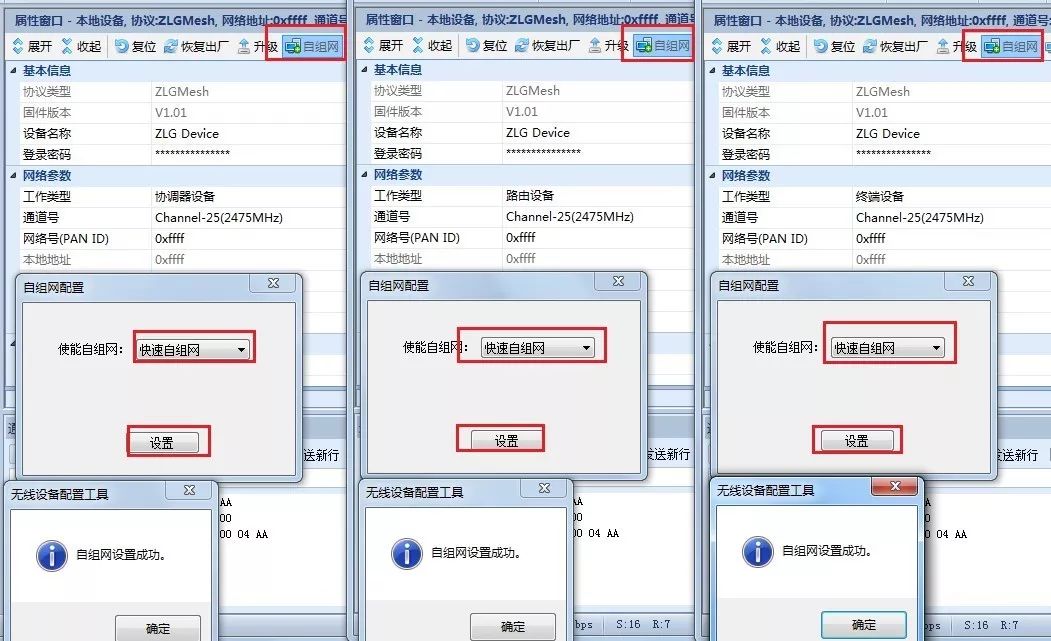
Figure 16 Configuring Module Working Type and Enabling Quick Self-Organizing Network
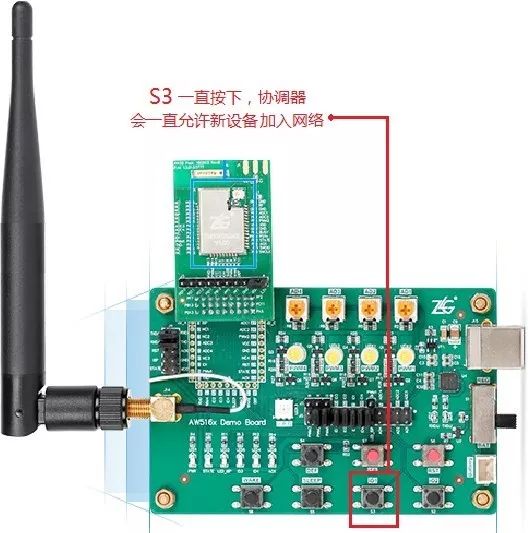
Figure 17 Coordinator Allows New Devices to Join the Network
-
At this point, the coordinator needs to find button S3 on the Demo Board;
-
If the button S3 on the coordinator is pressed continuously, new devices can keep joining the network. Releasing the button will prevent routing and terminal devices from joining the network;
-
When the coordinator allows joining, both routing and terminal devices can join the network. When the local address changes from 0xFFFF, it indicates that the device has successfully joined the network;
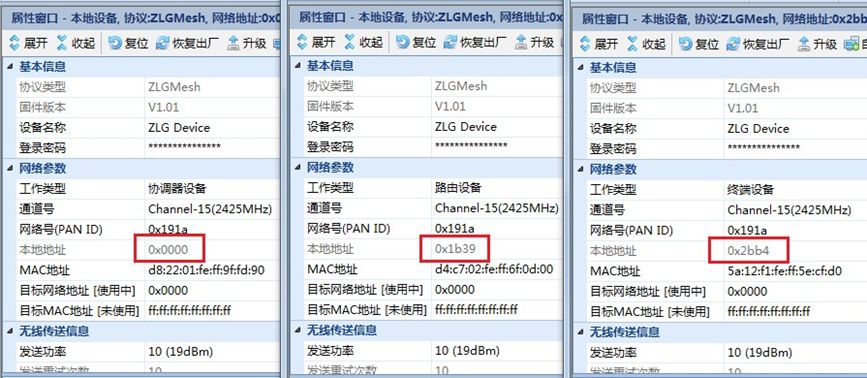
Figure 18 Network Information Generated, Network Established
By reading the information, it is found that the coordinator has assigned a network number to the routing and terminal modules, enabling the modules to generate a unique local address, completing the quick self-organizing network.

Figure 19 Test Example
Different networking methods have their own advantages and disadvantages, and different networking operations may vary. With the interface configuration software provided by ZLG Zhiyuan Electronics, users can quickly achieve networking operations.
ZM32 also has various communication methods, data encryption, and many other advantages. Currently, supporting evaluation kits are fully stocked, allowing for quick implementation of data transmission tests, networking tests, distance tests, and other customer concerns, helping customers quickly evaluate and select solutions.

 If you have any questions, you can:
 Add WeChat: zlgmcu-888
 Call ZLG Zhiyuan Electronics Official Technical Hotline: 400-888-4005.
