Part 2
Virtualization
OpenStack is a cloud operating system. To learn OpenStack, one must first grasp some knowledge related to virtualization and cloud computing.
Virtualization
Virtualization is the foundation of cloud computing. Simply put, virtualization allows multiple virtual machines to run on a single physical server, where the virtual machines share the physical machine’s CPU, memory, and I/O hardware resources, but logically, the virtual machines are isolated from each other.
The physical machine is generally referred to as the Host, and the virtual machines running on the Host are called Guests.
So how does the Host virtualize its hardware resources and provide them for the Guests? This is primarily achieved through a program called a Hypervisor.
Depending on the implementation method and location of the Hypervisor, virtualization is divided into two types: Type 1 virtualization and Type 2 virtualization.
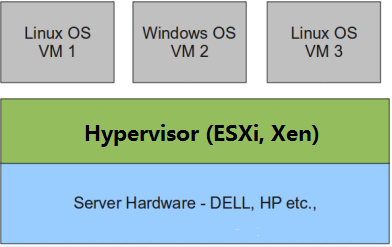
Type 1 Virtualization
The Hypervisor is installed directly on the physical machine, and multiple virtual machines run on the Hypervisor. The implementation of the Hypervisor is generally a specially customized Linux system. Xen and VMware’s ESXi belong to this type.
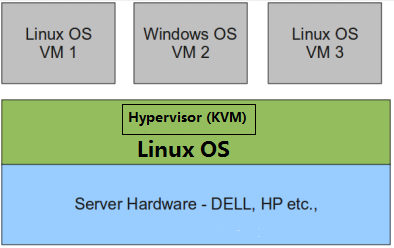
Type 2 Virtualization
A conventional operating system, such as Redhat, Ubuntu, or Windows, is first installed on the physical machine. The Hypervisor runs as a program module on the OS and manages the virtual machines. KVM, VirtualBox, and VMware Workstation belong to this type.
Theoretically speaking:
Type 1 virtualization is generally specially optimized for hardware virtualization features, resulting in better performance compared to Type 2;
Type 2 virtualization, being based on a regular operating system, is more flexible, for example, it supports nested virtual machines. Nesting means that you can run KVM within a KVM virtual machine.
KVM
Next, we will focus on KVM, a Type 2 virtualization technology.
Basic Concepts
The most popular and widely used virtualization solution on the x86 platform is KVM. OpenStack also provides the best support for KVM, and our tutorial naturally chooses KVM as the Hypervisor for the experimental environment.
KVM stands for Kernel-Based Virtual Machine. This means that KVM is implemented based on the Linux kernel. KVM has a kernel module called kvm.ko, which is solely responsible for managing virtual CPUs and memory.
So who is responsible for I/O virtualization, such as storage and network devices? This is handled by the Linux kernel and Qemu.
In short, as a Hypervisor, KVM focuses only on virtual machine scheduling and memory management. The tasks of I/O peripherals are delegated to the Linux kernel and Qemu.
Libvirt
When reading articles about KVM online, you will often come across Libvirt.
What is Libvirt? Simply put, it is a management tool for KVM.
In fact, Libvirt can manage not only KVM but also Xen, VirtualBox, and others. OpenStack also uses Libvirt at its core, so it is essential to learn about it.
Libvirt consists of three components: the background daemon program libvirtd, the API library, and the command-line tool virsh.
-
libvirtd is the service program that receives and processes API requests;
-
The API library allows others to develop advanced tools based on Libvirt, such as virt-manager, which is a graphical KVM management tool that we will introduce later;
-
virsh is the command-line tool for KVM that we will frequently use, and examples of its usage will follow.
As implementers of KVM and OpenStack, it is essential to be proficient in using virsh and virt-manager.
That’s about it for today. Next time, we will play with KVM.