

Product Introduction
The U Point Home Server is a new digital home product developed, designed, and produced by Guangdong Broadcasting Network for users. By combining the U Point Home Server with extension devices, it can serve as a family network center, family media center, family smart center, and social center.
-
Family Network Center:
The U Point Home Server supports high-speed broadband and other network services, achieving gigabit access and home wireless coverage to build a super broadband home network.
-
Family Media Center:
The U Point Home Server supports 4K live TV, HD video on demand, true 4K ultra HD video, multi-screen interaction, and other video services. It can also provide data storage and access services through cloud drives, managing family storage of images, music, videos, and other media resources for family multimedia sharing.
-
Family Smart Center:
The U Point Home Server provides control capabilities for smart home devices, enabling smart control of home appliances, home environment control, and security monitoring services.
-
Family Communication Center:
The U Point Home Server provides basic communication capabilities for family smart devices, enabling social television, video calls, instant messaging, and other functions.
Installation and Usage Instructions
1 Product Panel Description
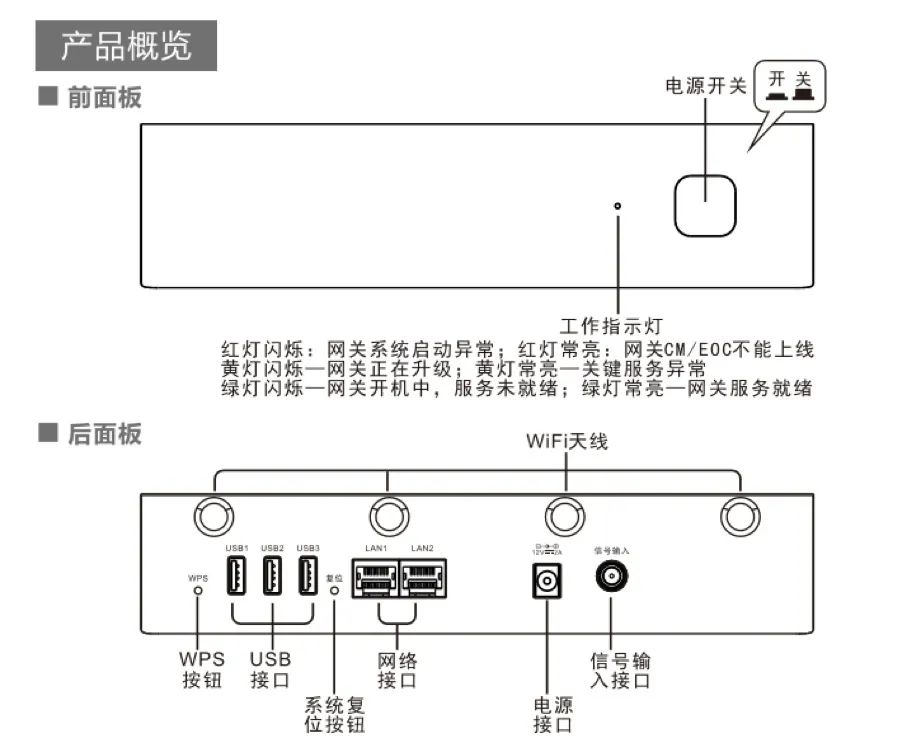
Note: If there is no need for home networking services, a filter is not required; connect directly using coaxial cable.
2 Connection Diagram
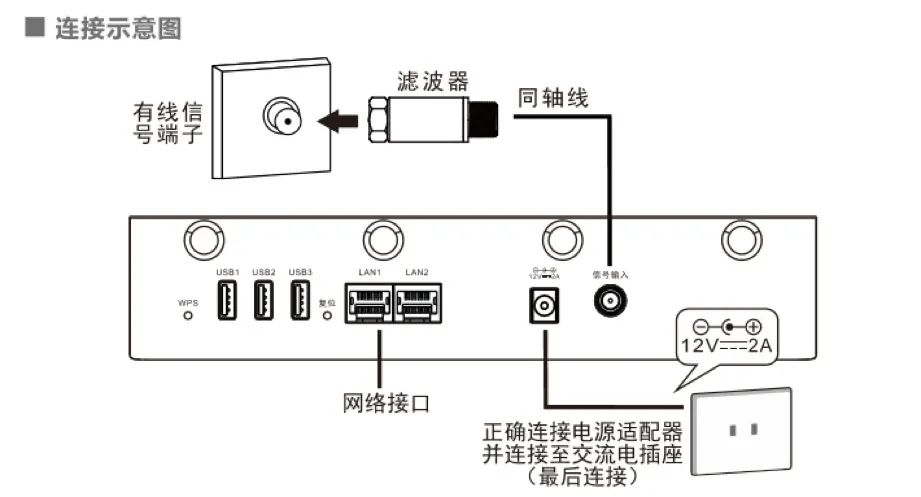
Note: If there is no need for home networking services, a filter is not required; connect directly using coaxial cable.
3 Installation Instructions
U Point Home Server + U Point Box + TV Installation
-
Step 1: Connect one end of the coaxial cable to the “Signal Input” port on the back panel of the U Point Home Server and the other end to the cable TV interface in the home.
-
Step 2: Use an Ethernet cable to connect the network port (LAN1/LAN2) of the U Point Home Server to the network port of the U Point Box; or connect the U Point Box to the wireless broadband of the U Point Home Server by setting the Wi-Fi of the U Point Box, allowing the U Point Box to access the internet through the U Point Home Server.
-
Step 3: Take an HDMI cable, connect one end to the HDMI port on the U Point Box, and the other end to the HDMI port on the TV.
-
Step 4: Plug the power adapter into the power port on the back panel of the U Point Home Server and connect the power adapter to a power socket.
U Point Home Server + Customized TV Installation
-
Step 1: Connect one end of the coaxial cable to the “Signal Input” port on the back panel of the U Point Home Server and the other end to the cable TV interface in the home.
-
Step 2: Use an Ethernet cable to connect the network port (LAN1/LAN2) of the U Point Home Server to the network port of the customized TV; or connect the customized TV to the wireless broadband of the U Point Home Server by setting the Wi-Fi of the customized TV, allowing the customized TV to access the internet through the U Point Home Server.
-
Step 3: Plug the power adapter into the power port on the back panel of the U Point Home Server and connect the power adapter to a power socket.
4 U Point Home Server Power On/Off Instructions
-
1. After installation is complete, press the power button on the front panel of the U Point Home Server; when the button is pressed, the U Point Home Server starts.
-
2. Check the indicator light; when the indicator light is solid green, the U Point Home Server is working normally, and you can start using it.
-
3. Press the power button on the front panel of the U Point Home Server; when the button is released, the indicator light goes off, and the U Point Home Server is powered off.
5 Indicator Light Instructions
The indicator light on the front panel of the U Point Home Server has the following situations:
-
1. Red light flashing: Gateway system failure.
-
2. Red light solid: Gateway is offline and cannot come back online.
-
3. Yellow light flashing: Gateway is triggered for upgrade or reset, or there is a clear authorization error.
-
4. Yellow light solid: Service exception or individual network card cannot obtain IP.
-
5. Green light flashing: Server is powering on, services not ready.
-
6. Green light solid: Server services are ready and working normally.
-
7. Light off: Powered off state.
Special Note: The U Point Home Server serves as the family network connection center, family media entertainment center, and family smart control center. During daily use, it does not need to be powered off. If the TV function is not needed, simply turn off the TV and the box.
How to Watch Programs
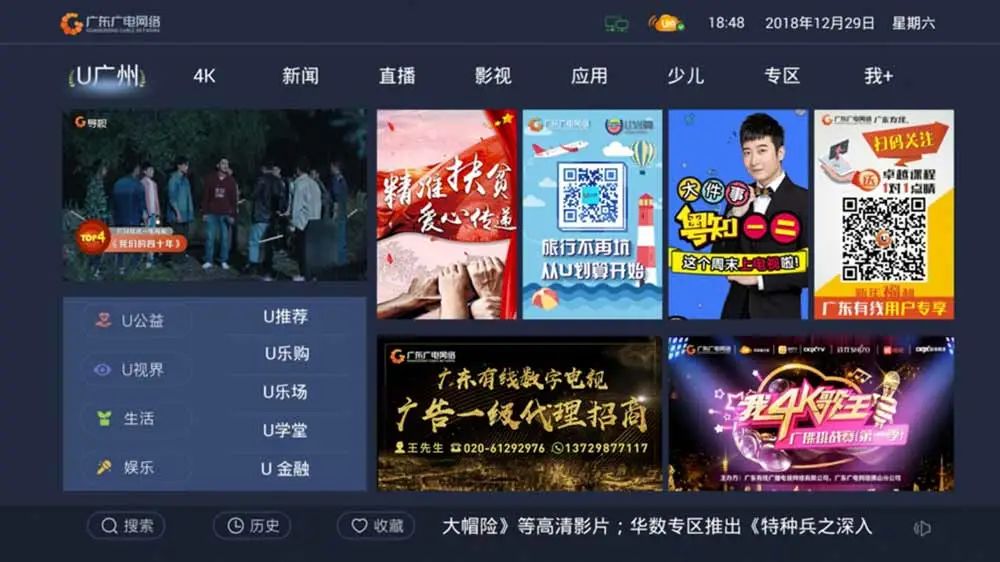
Page Structure Introduction

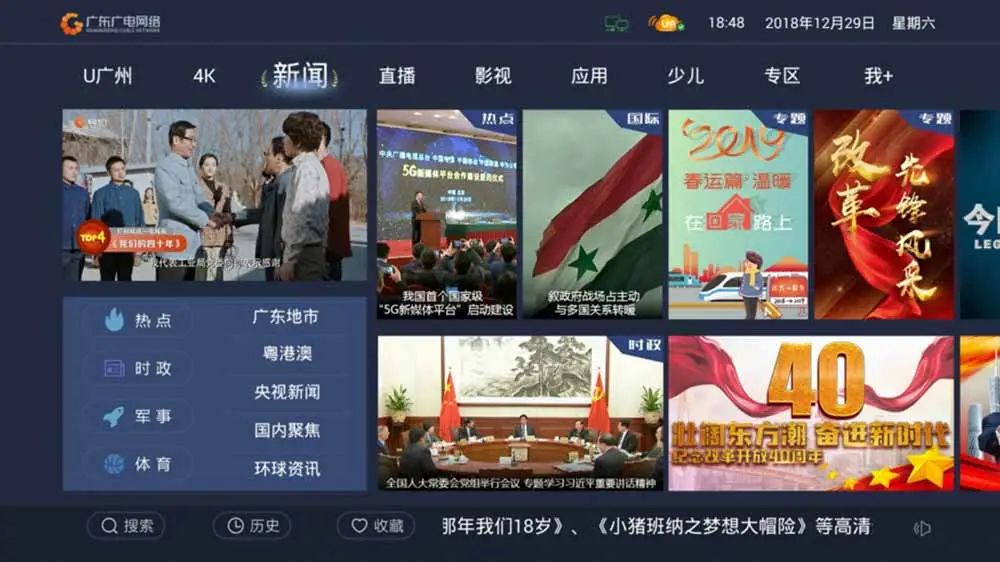
Turn on the TV and directly enter the “Home” application interface. As shown in the image above, this example illustrates the page structure, divided into primary menu, information notification bar, main video frame, 4+5 entry bar, and 4+2 recommendation position.
-
1. Primary Menu Bar
The menu bar includes nine items: Local, “4K”, News, Live, Movies, Applications, Children, Special Area, and “Me+”.
-
2. Information Notification Bar
The information notification bar includes search, history, favorites, and other function bars, as well as TV messages, scrolling notifications, weather, date, and other information.
-
3. Main Video Frame
Displays live video programs.
-
4. 4+5 Entry Bar
The 4+5 entry bar uses small icons and text, including 4 selected services and 5 or more category menus. The 4+2 recommendation position uses images to display 6 or 12 images showcasing specific services.
General Interface Operation Introduction
Turn on the TV and directly enter the “Home” application interface. Use the directional buttons on the remote control to move the focus between specific function items; press the “Confirm” button to enter the corresponding function item, press the “Back” button to return to the previous operation interface, and press the “Exit” button to exit to the previous menu interface.
During time-shifting, replaying, or on-demand viewing, clicking the “Left” button once will rewind at 12x speed; double-clicking the “Left” button will rewind at 32x speed; pressing the “Confirm” button will stop rewinding and start playing the current program. During time-shifting, replaying, or on-demand viewing, clicking the “Right” button once will fast-forward at 12x speed; double-clicking the “Right” button will fast-forward at 32x speed; pressing the “Confirm” button will stop fast-forwarding and start playing the current program.
“Live” Introduction
1. Live Function Introduction
Enter full-screen live TV through the “Main Video Frame” or the “Live” section in the primary menu; press the “Up” and “Down” keys to switch channels. Press the “Confirm” button to bring up the channel list, use the directional keys to move the focus, and select the channel you want to watch.


2. Time-Shift Function Introduction
Time-shifting allows users to directly rewind, pause, and perform operations on the currently playing live TV channel content and programs. After rewinding or pausing, users can fast-forward until they catch up with the current playback progress (live programs cannot be fast-forwarded). Currently, users are provided with a 4-hour real-time time-shift function. While playing live TV programs in full-screen mode, if the current program supports time-shifting, pressing the “Left” button enters time-shift playback, allowing users to rewind and watch the current live program.


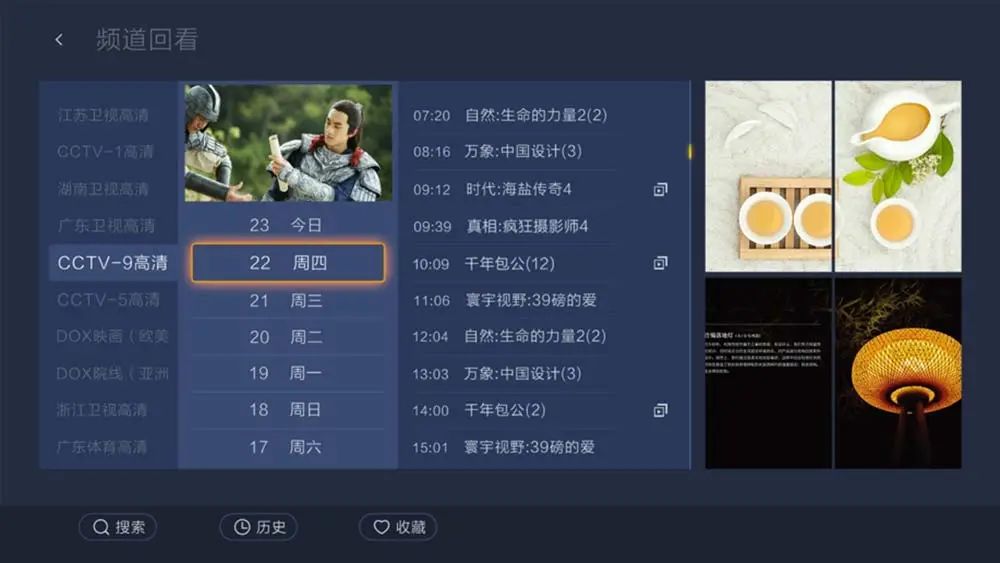
3. Replay Function Introduction
Replay allows users to select programs played within the last 7*24 hours. While watching live channels in full-screen mode, there are two methods to replay. Method 1: While playing full-screen, click the “Confirm” button on the remote control to bring up the channel classification list; then click the “Right” button to bring up the list and select “Replay” to enter. Method 2: In the primary menu under “Live”, select and click “Replay” to enter.

News, Movies, Applications, Children, and Special Area Introduction
Clicking on the primary menu “News” allows users to select from popular news segments from CCTV, news from the Greater Bay Area, well-known provincial news segments, and 21 city-specific news, as well as short video news reports on current affairs, domestic, international, finance, military, sports, entertainment, etc.
Clicking on the primary menu “Movies” allows users to choose from new films, movies, TV series, cartoons, variety shows, documentaries, and a wealth of film and television content.

Clicking on the primary menu “Applications” allows users to choose from a rich variety of application services such as music, games, education, and life.

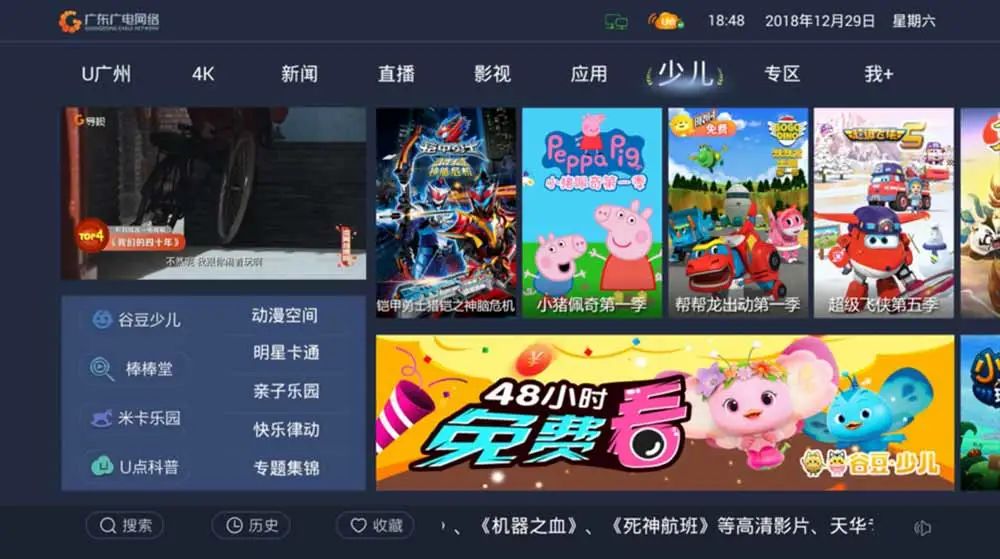
Clicking on the primary menu “Children” allows users to select from the Gu Dou Children’s Zone, Mika Paradise, and U Point Science Popularization Zone, covering popular children’s on-demand services such as anime space, star cartoons, happy rhythms, parent-child paradise, and Bang Bang Hall, meeting the viewing needs of children aged 0-12 for watching animations, singing nursery rhymes, and learning knowledge.
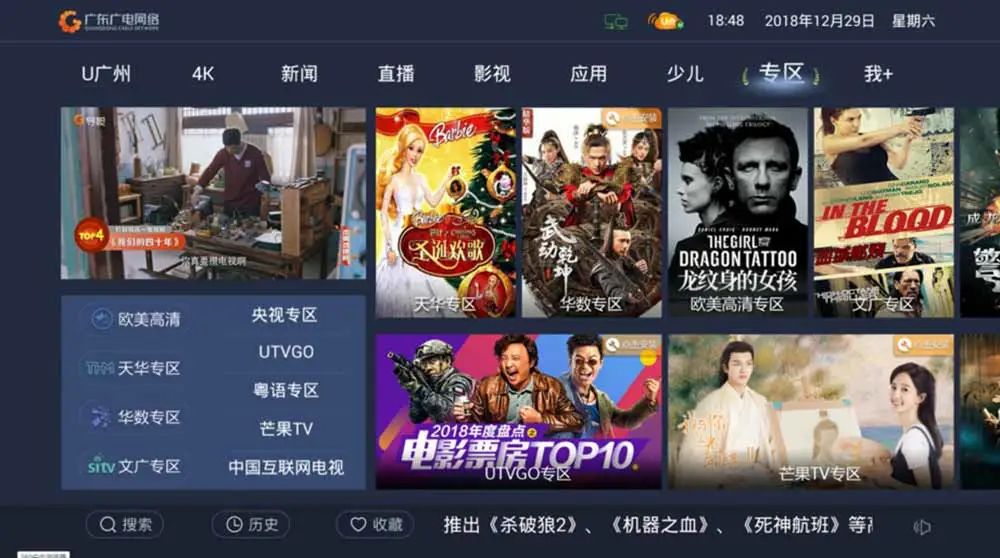
Clicking on the primary menu “Special Area” allows users to select from rich on-demand services such as Tencent Video, iQIYI, European and American HD, Tianhua, Huashu, CCTV, UTVGO, Cantonese, and China Internet TV.
“Me+” Introduction
Clicking on the primary menu “Me+” allows users to enter the TV business hall, system settings, application management, and other sections.

Other Functional Operations
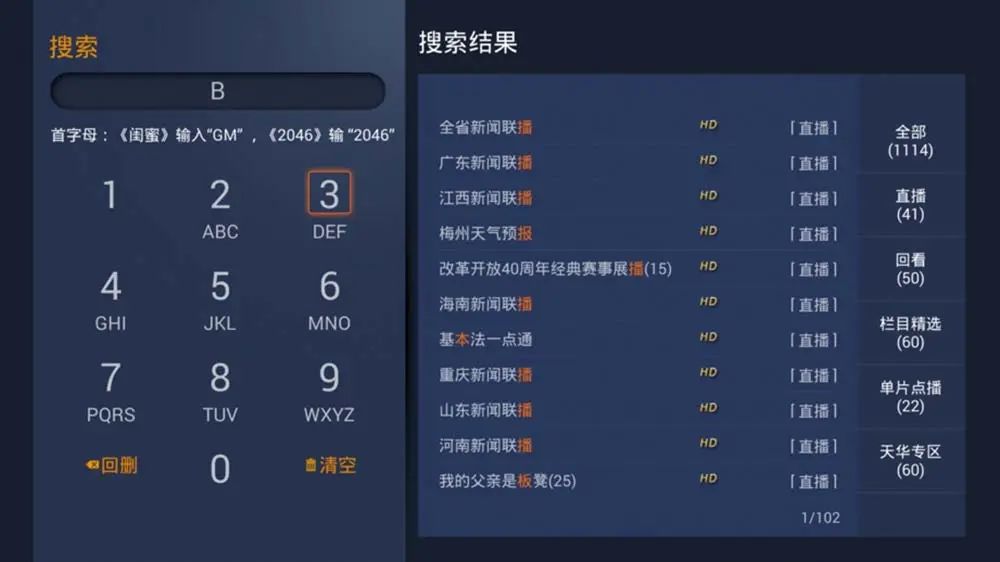
Search: Move the cursor to “Search” and click confirm to enter the search page. Enter the initials of the program name in the search box to search. For example, to search for “Three Lives, Three Worlds”, enter “SSSS” in the search box to find the corresponding program.

History: Move the cursor to “History” and click confirm to enter the playback history page. The playback history page will display the most recently played programs.

Favorites: Move the cursor to “Favorites” and click confirm to enter the favorites page. The favorites page shows the most recently favorited on-demand programs.

How to Use the Voice Remote Control
Appearance Description
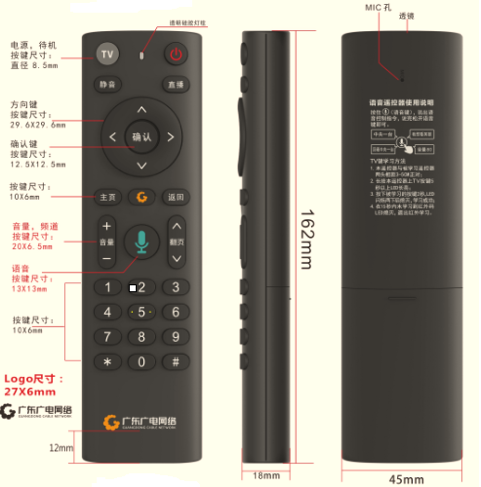

1. Key Description
[TV Power Key]: This key is an infrared learning key that can learn the power key of the TV remote control. After learning, it can control the TV’s power.
Learning Process:
Keep this remote control and the remote control to be learned facing each other at a distance of 3-5CM;
Long press the TV button on this remote control for more than 5 seconds until the LED lights up;
Press the button to be learned for 2 seconds, the LED will flash twice and then go off, indicating successful learning;
If the infrared code is not learned within 15 seconds, the LED will go off, exiting infrared learning.
[Set-top Box Power Key]: Controls the set-top box power
[Mute Key]: Sets the volume to 0
[Live Key]: Enters full-screen live
[Confirm Key]: Confirms the selected function
[Directional Keys]: Includes up, down, left, right movement; the left key enters time-shift during live viewing.
[Home Key]: Returns to the main interface from any interface
[Function Key]: Extension key, responds to specific functions on different pages
[Back Key]: Returns to the previous interface
[Volume Key]: Controls volume increase/decrease
[Voice Key]: Long press to input voice
[Page Key]: In live status, goes to the previous/next channel; in interface status, goes to the previous/next page
[Number Key]: In live status, jumps to a specific channel; in interface status, responds to specific functions.
2. Indicator Light Description
The indicator light supports blue and red dual colors, with different display states representing different information:
Infrared key state: LED light is on when pressed, indicating red; LED light is off when released;
Bluetooth key state: LED light is on when pressed, indicating blue; LED light is off when released;
Bluetooth pairing state: LED will flash blue quickly when entering pairing mode; after successful pairing, the LED will flash twice regularly; if not paired successfully within 10s, the LED will go off;
Infrared learning state: When entering infrared learning mode, the LED will light up red; after successful learning or if not learned within 10s, the LED will go off.
Usage Method
1. Remote Control Pairing
If the remote control buttons are unresponsive, bring the remote control close to the Bluetooth receiver, while pressing the [Confirm Key] and [Back Key] on the voice remote control. When the indicator light is flashing blue, you can release it; when the indicator light (blue) flashes twice regularly, it indicates successful pairing. If pairing is unsuccessful, the indicator light will flash blue at a medium speed for 10 seconds.
2. Remote Control Voice Operation
When the family smart gateway network is functioning normally, press the [Voice Key]; a voice interaction prompt box will appear on the TV screen. Then, say your voice control command, and release the [Voice Key] after finishing the command.

Prompt box example
Settings Page
Press the [Voice Key] to open settings and enter the TV voice assistant settings page (as shown below), where you can select the recognition language. Currently, there are three options: [Mandarin], [Cantonese], and [Sichuan dialect];
Entering [About] allows you to view the software information of the TV voice assistant.
Typical Usage Method Introduction
1. Directly Enter Full-Screen Live
Press the [Voice Key] and say “Open TV”, “TV Live”, “Enter TV Live”, etc.;
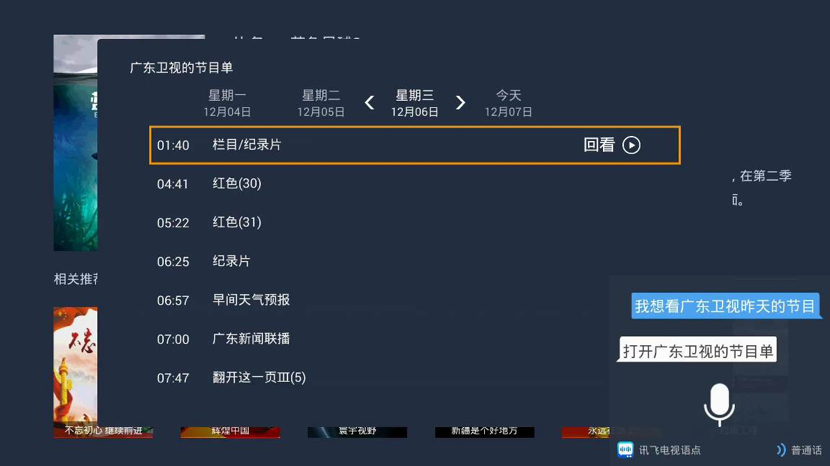
2. Replay Search
Press the [Voice Key], and directly say the channel you want to replay to jump directly to the corresponding channel’s replay program list. For example, say “I want to watch Guangdong TV’s program from yesterday”, as shown below:

3. Content Search
Press the [Voice Key] and say “I want to watch XXX” to directly enter the on-demand search program page.
4. Live Channel Switching
Live channel search can be done through channel number search, channel name search, alias search, and switching channels up and down.
For example, saying “Mango Channel” can switch to Hunan TV; saying “CCTV-1” can switch to CCTV-1; saying “Channel 1” can switch to CCTV-1, as shown below:
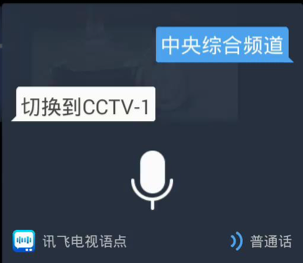
Live channel switching example
5. Volume Control
Press the [Voice Key] and say volume control commands such as: “Mute”, “Maximum Volume”, “Unmute”, “Louder”, “Volume 30”, etc.
How to Use WiFi to Connect to the Internet
WiFi Connection
At the bottom of the U Point Home Server device, you can see the WiFi network name and password. Use a PC, phone, or tablet to turn on the wireless connection, search for the U Point Home Server’s network name, and enter the password to go online.
WiFi Configuration Management
1. Connect to the U Point Home Server via LAN or WiFi, obtain the address assigned by the U Point Home Server, then open the browser and visit 192.168.1.1. The browser will redirect to the U Point Home Server settings homepage. Enter the username and password to log in, username: admin, password: admin.
2. Select “U Point Home Server Settings” under “WiFi Settings”. On this page, you can customize the SSID and password.
How to Use Other Terminals to Watch TV
Usage Method
If using a tablet, phone, or other small screen to watch TV, connect the terminal device to the U Point Home Server via WiFi. Download the “Gu Dou TV” APP through the network, and after installation, you can watch TV programs through this APP.